Yosemite in the summer on Pentax 6×7 medium format film camera
It’s been a while since my last post. I’m glad that I’m back on time for the summer. I was a big Lana Del Rey’s fan years ago. In her songs, I got the impression that summer is the most beautiful season of the year. All the summer vibes in her music are so goldenly youthful, vivid and full of lust for love. From her “Young and beautiful” lyrics, a perfect summer scene stuck in my head and I will forever looking for a summer moment in mid July, when the heat turns overwhelmed along with the humidity and the fruits are so ripe with all the juice about to burst out of their soft skin just before they turn rotten in the heat of summer. I just love how lively and vigorous but also nostalgic summer is in her mind, it’s the best suit for young and wild hearts that are full of love in the relentless summer heat.
My photos are quite different than what I posted here before, I don’t know why my “style” [if I had one] has changed but I’m glad with how it looks now. It’s a coincident when I wrote the intro for this post and realized how Lana Del Rey’s summer vibe was so similar with what I got here.
Here’s the slideshow for quick look at the series.
I like to begin the set with the photo of apples fell on the ground beneath an apple tree. The composition is not my best but I like how the apples lead our eyes from the bottom right of the frame to the top left. I like that the apple in the bottom right is out of focus giving a sense of depth in the photo.
apples on the ground
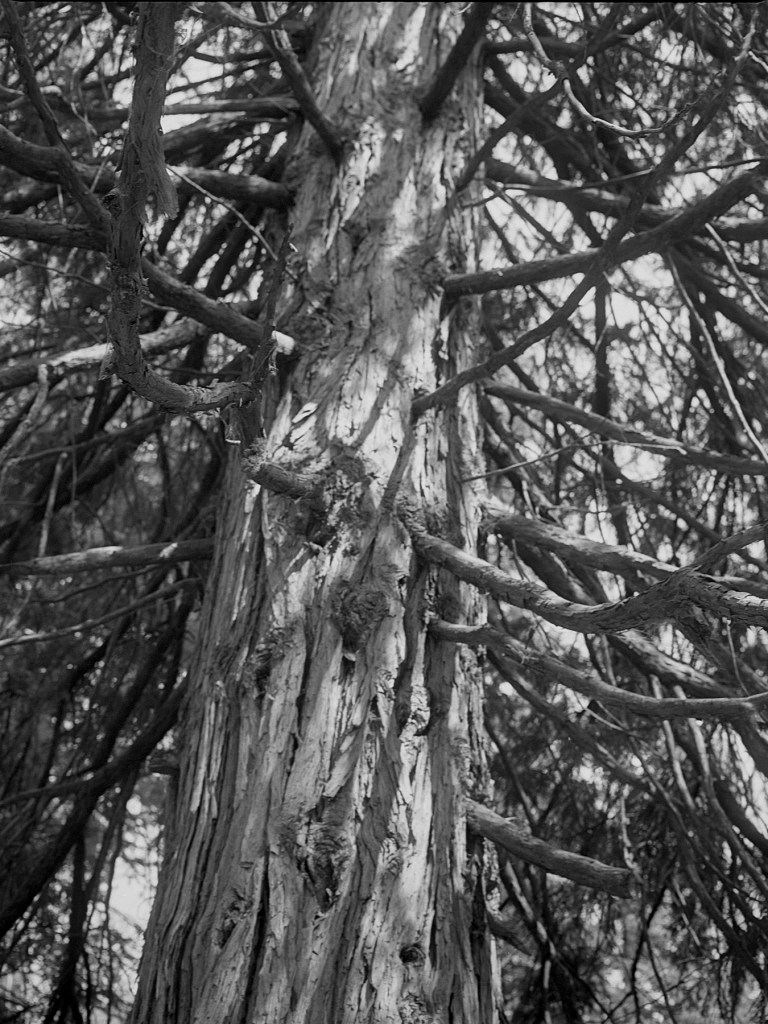
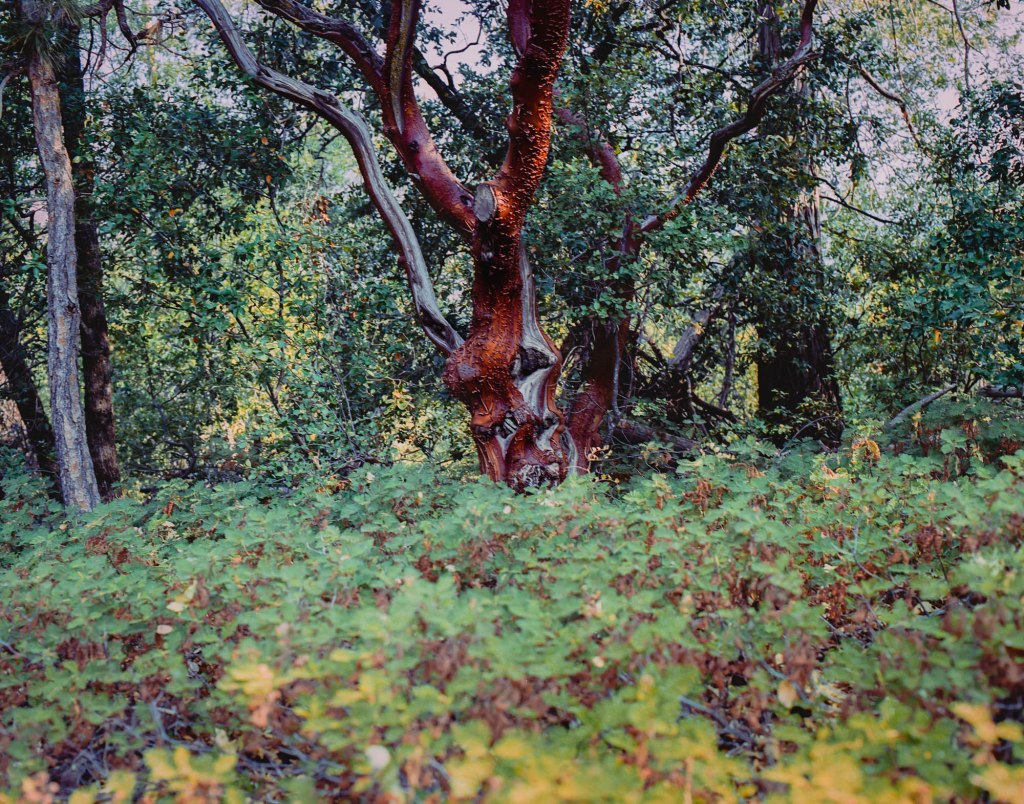
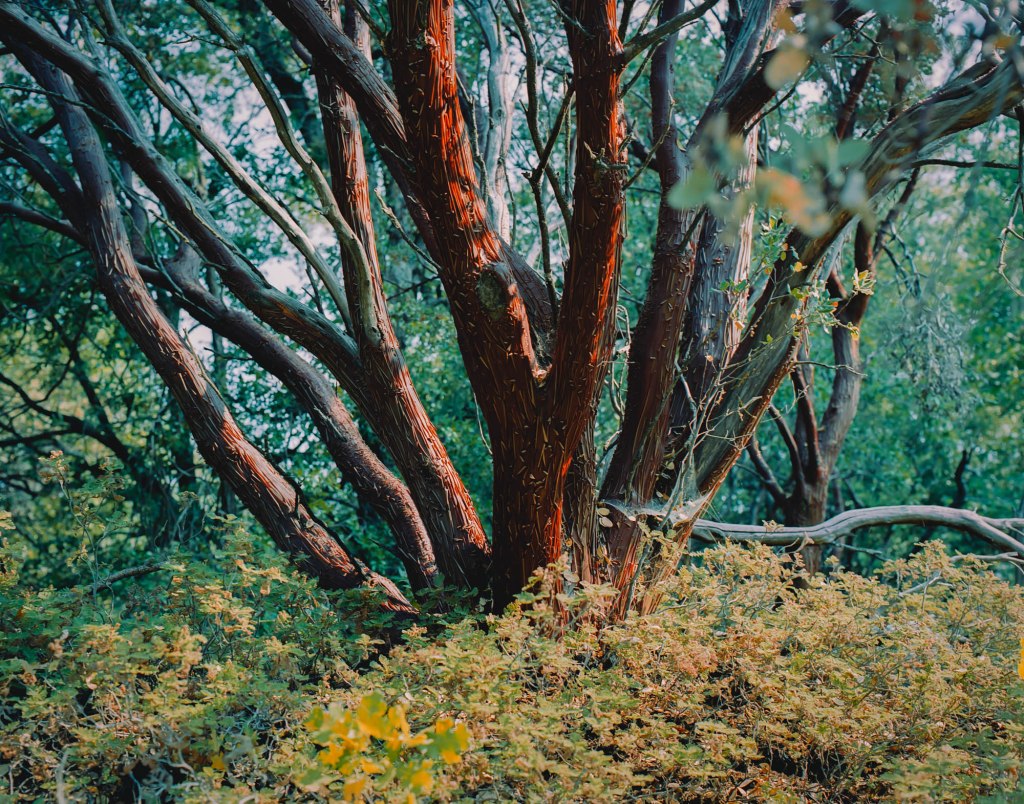
The next three photos are from an afternoon walking around my airbnb house. I was fascinated with the reddish tree trunks that look so vivid in the sun light. I like how the red and green contrast each other in these photos.
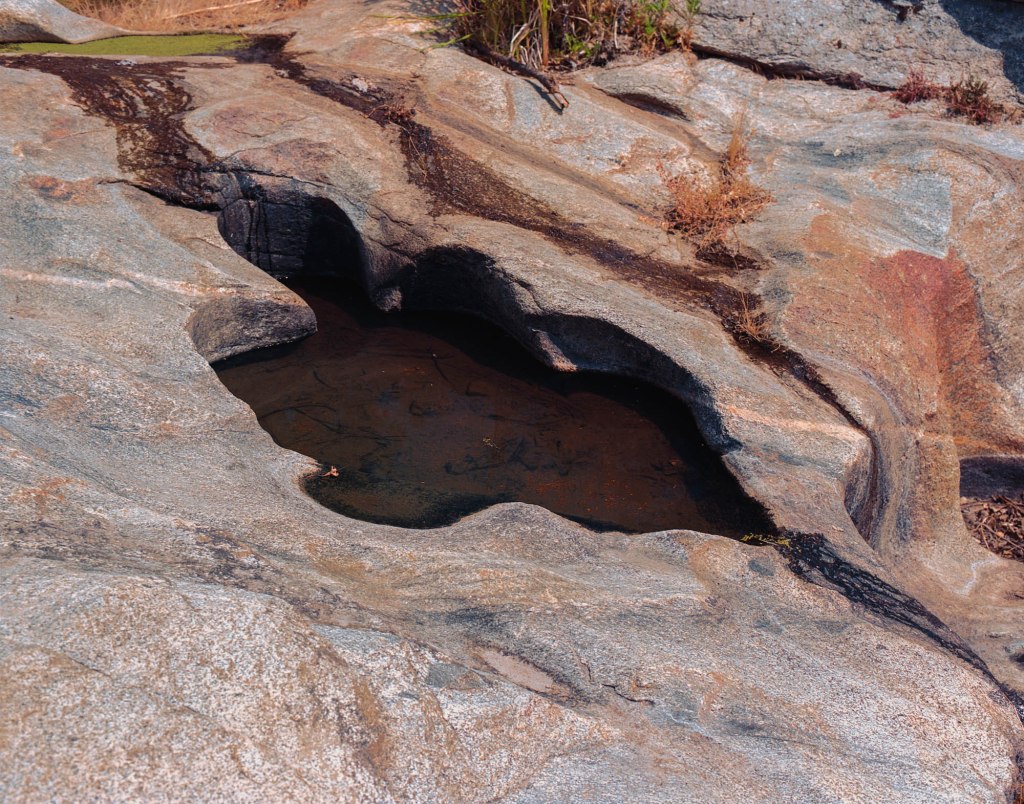
Next, I walked to a small waterfall near my airbnb house in the following morning to scout the waterfall and enjoy my time alone with my camera. The waterfall was nice but there weren’t a lot of water sine it’s summertime so I stepped on rocks that supposed to be under water to look around and go upper the stream.
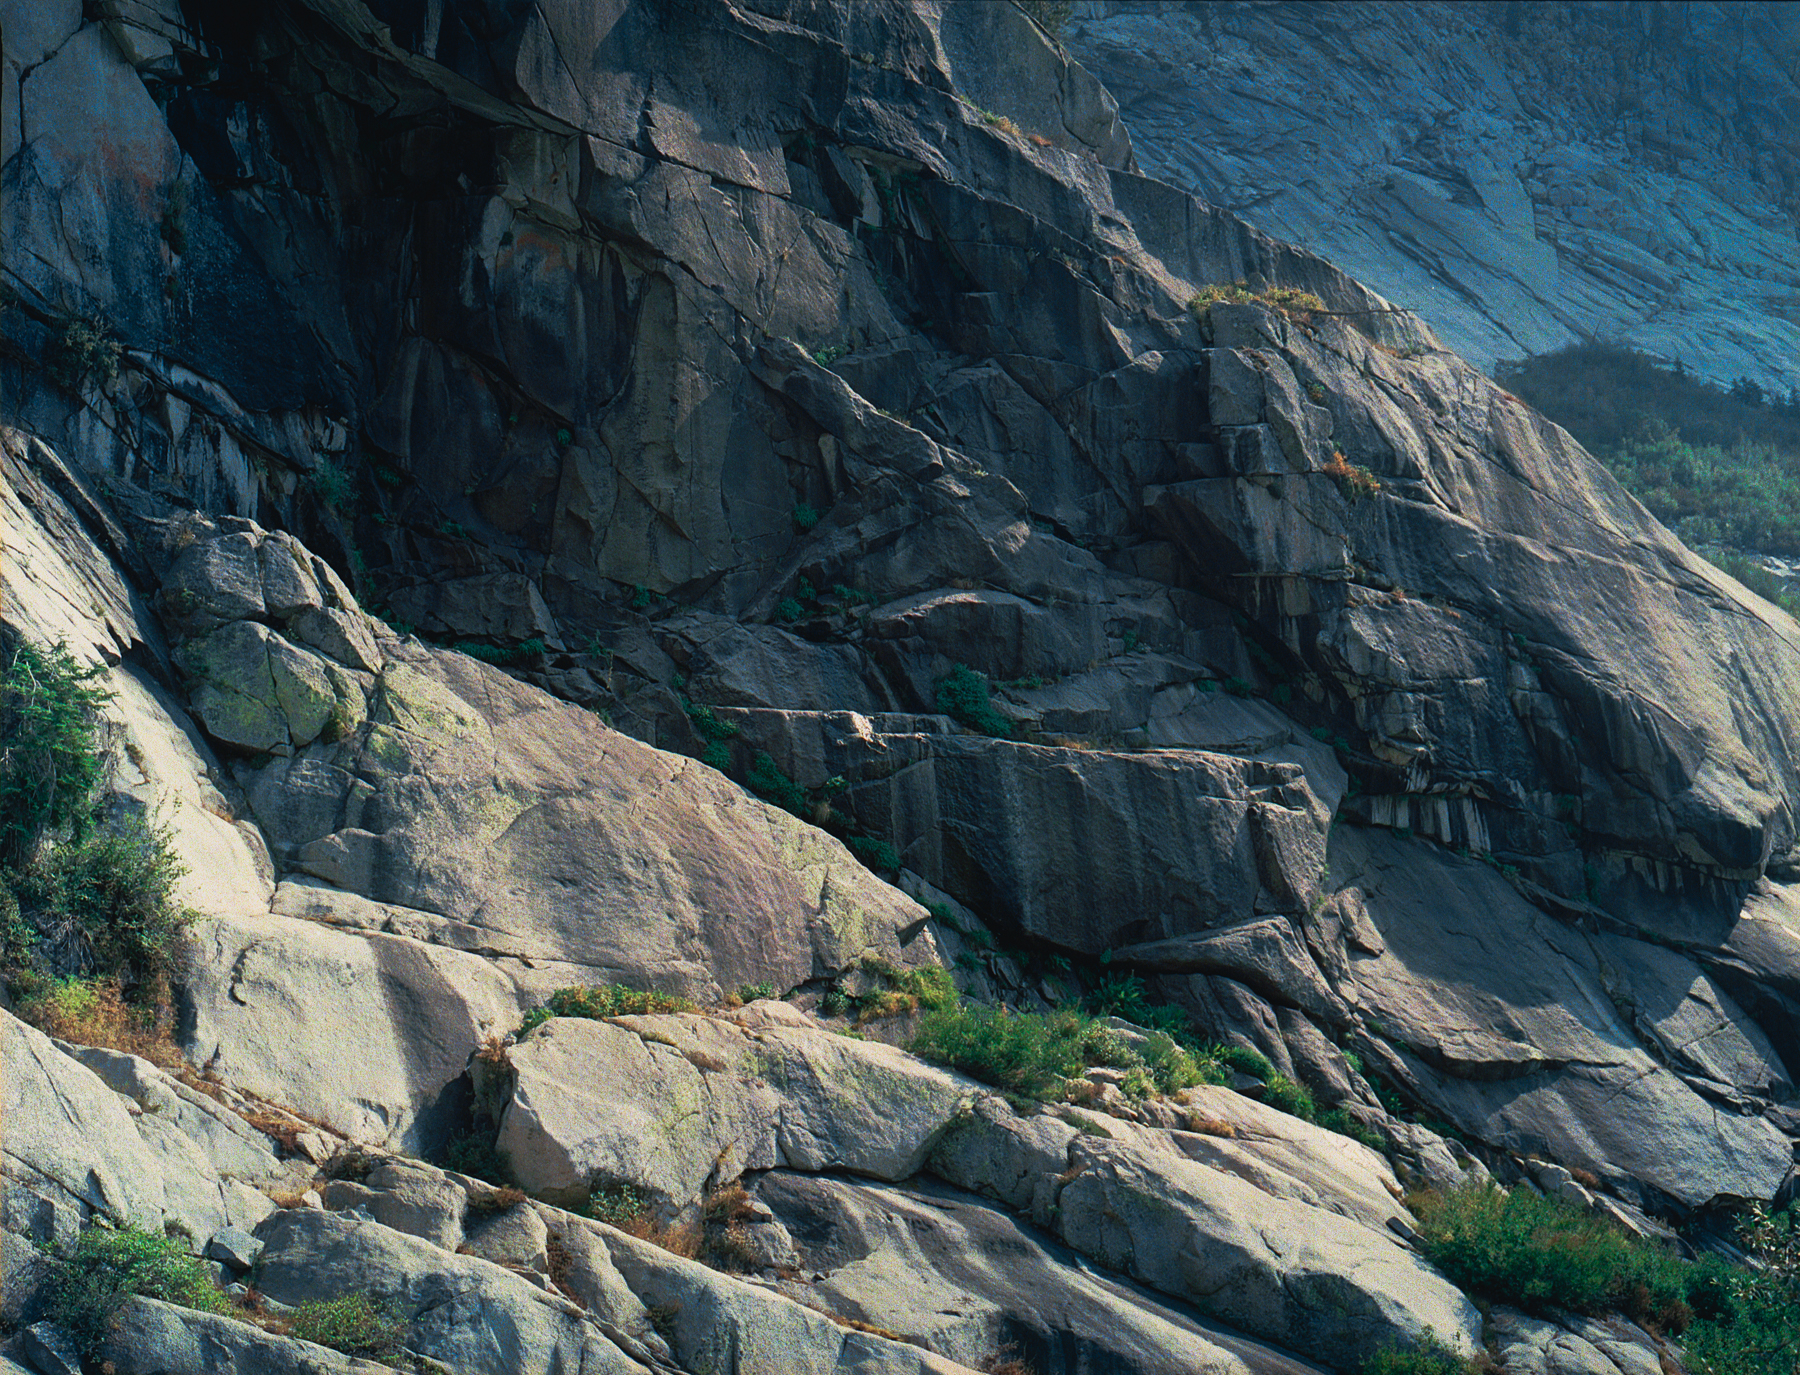
How the water carved the rock into those interesting shapes
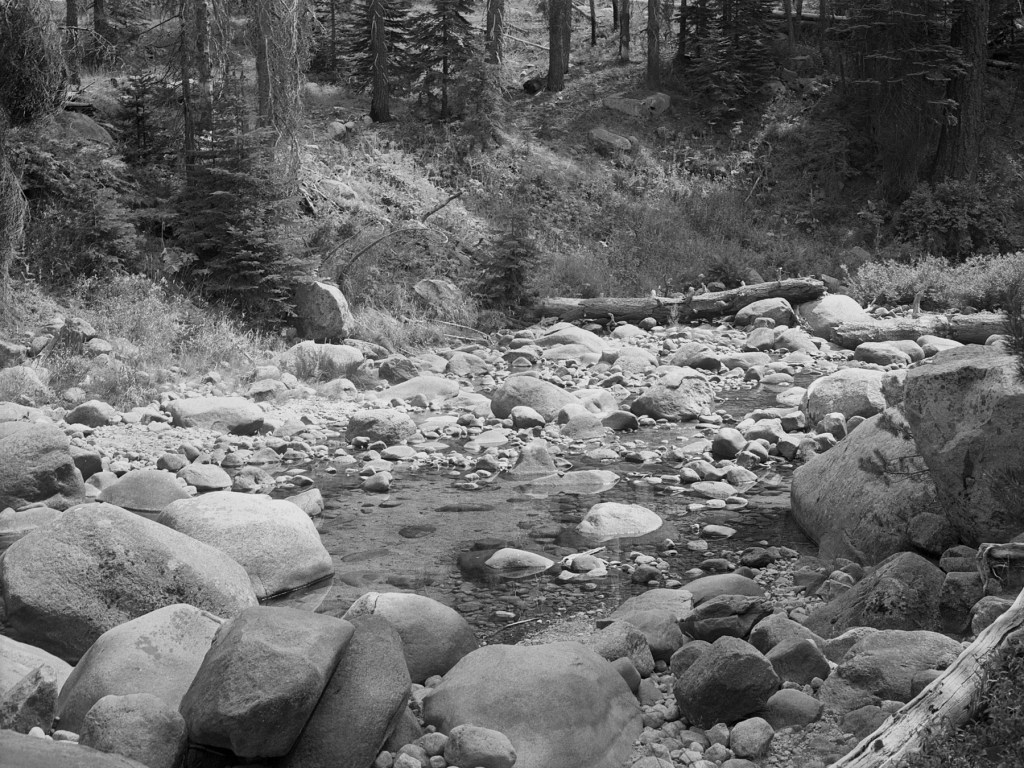
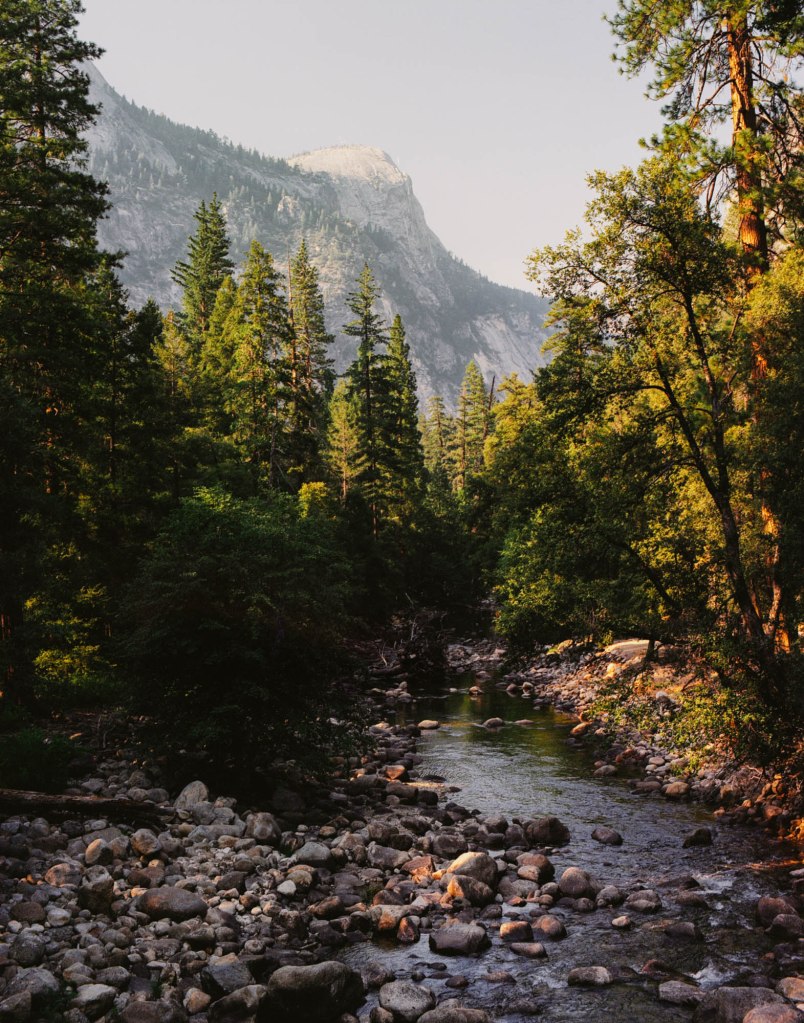
A scene from the upper stream. I like how green the bank was with many kin of grass and plant. Such a cute little eco system.
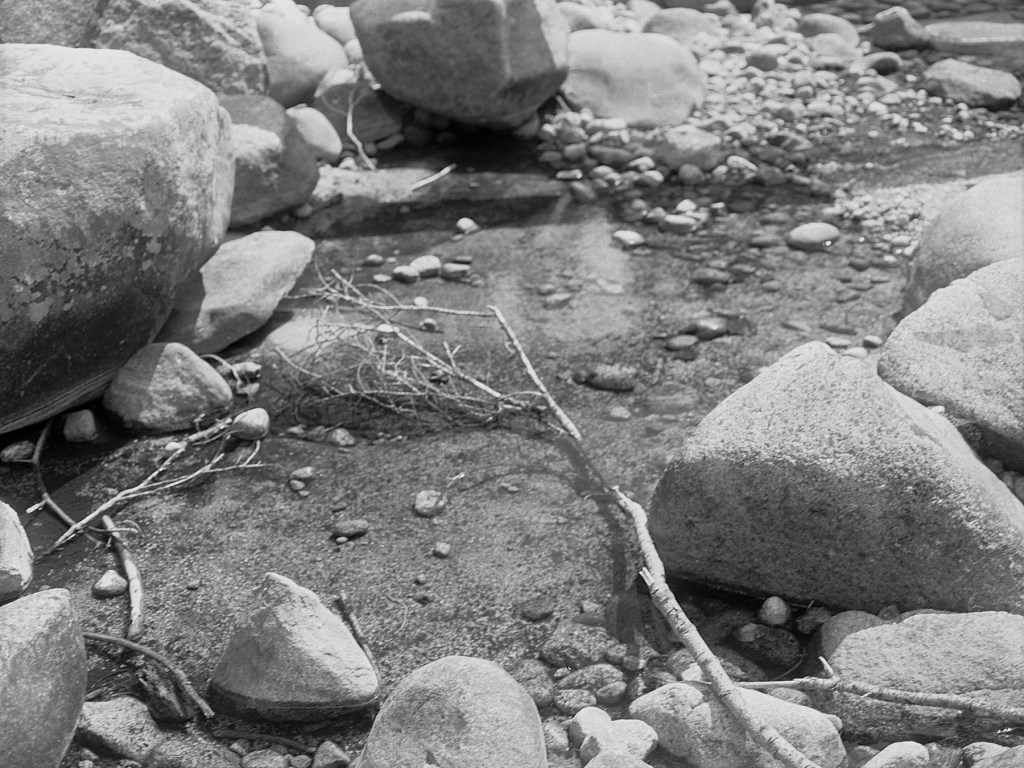
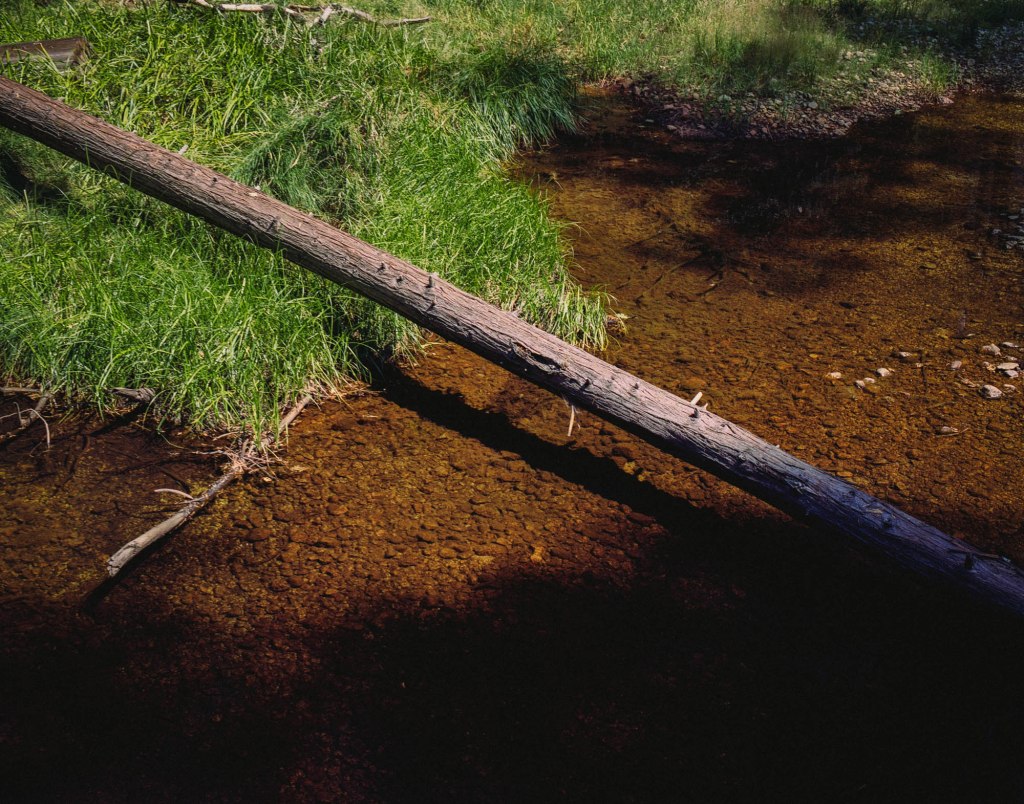
My favorite from the batch. I used the polarizer filter to cut out most of the reflection in the water. I love this photo because there’re so many things to look at, I like the fact that there’re many kind of plant around the stream and they brings so many shades of greens and yellow into the photos. I also love the texture beneath the water giving the nice pattern of purple and brown/yellow. I can remember the heat and moist atmosphere of the summer noon looking at this, and I love how peaceful and satisfied I felt when I was alone in this stream. I wish I tried with different variations of the polarizer filter to play with the reflection because I think there’re so much more in this scene that I can get out of.
On my second day in Yosemite, I went inside the National Park and visited some famous views. The first stop was Tunnel View. The view was beautiful but I wish the sky were clearer rather than misty and hazy as in the photos.
Tunnel View
A scene under the bridge
A view on the Vernal Fall hike
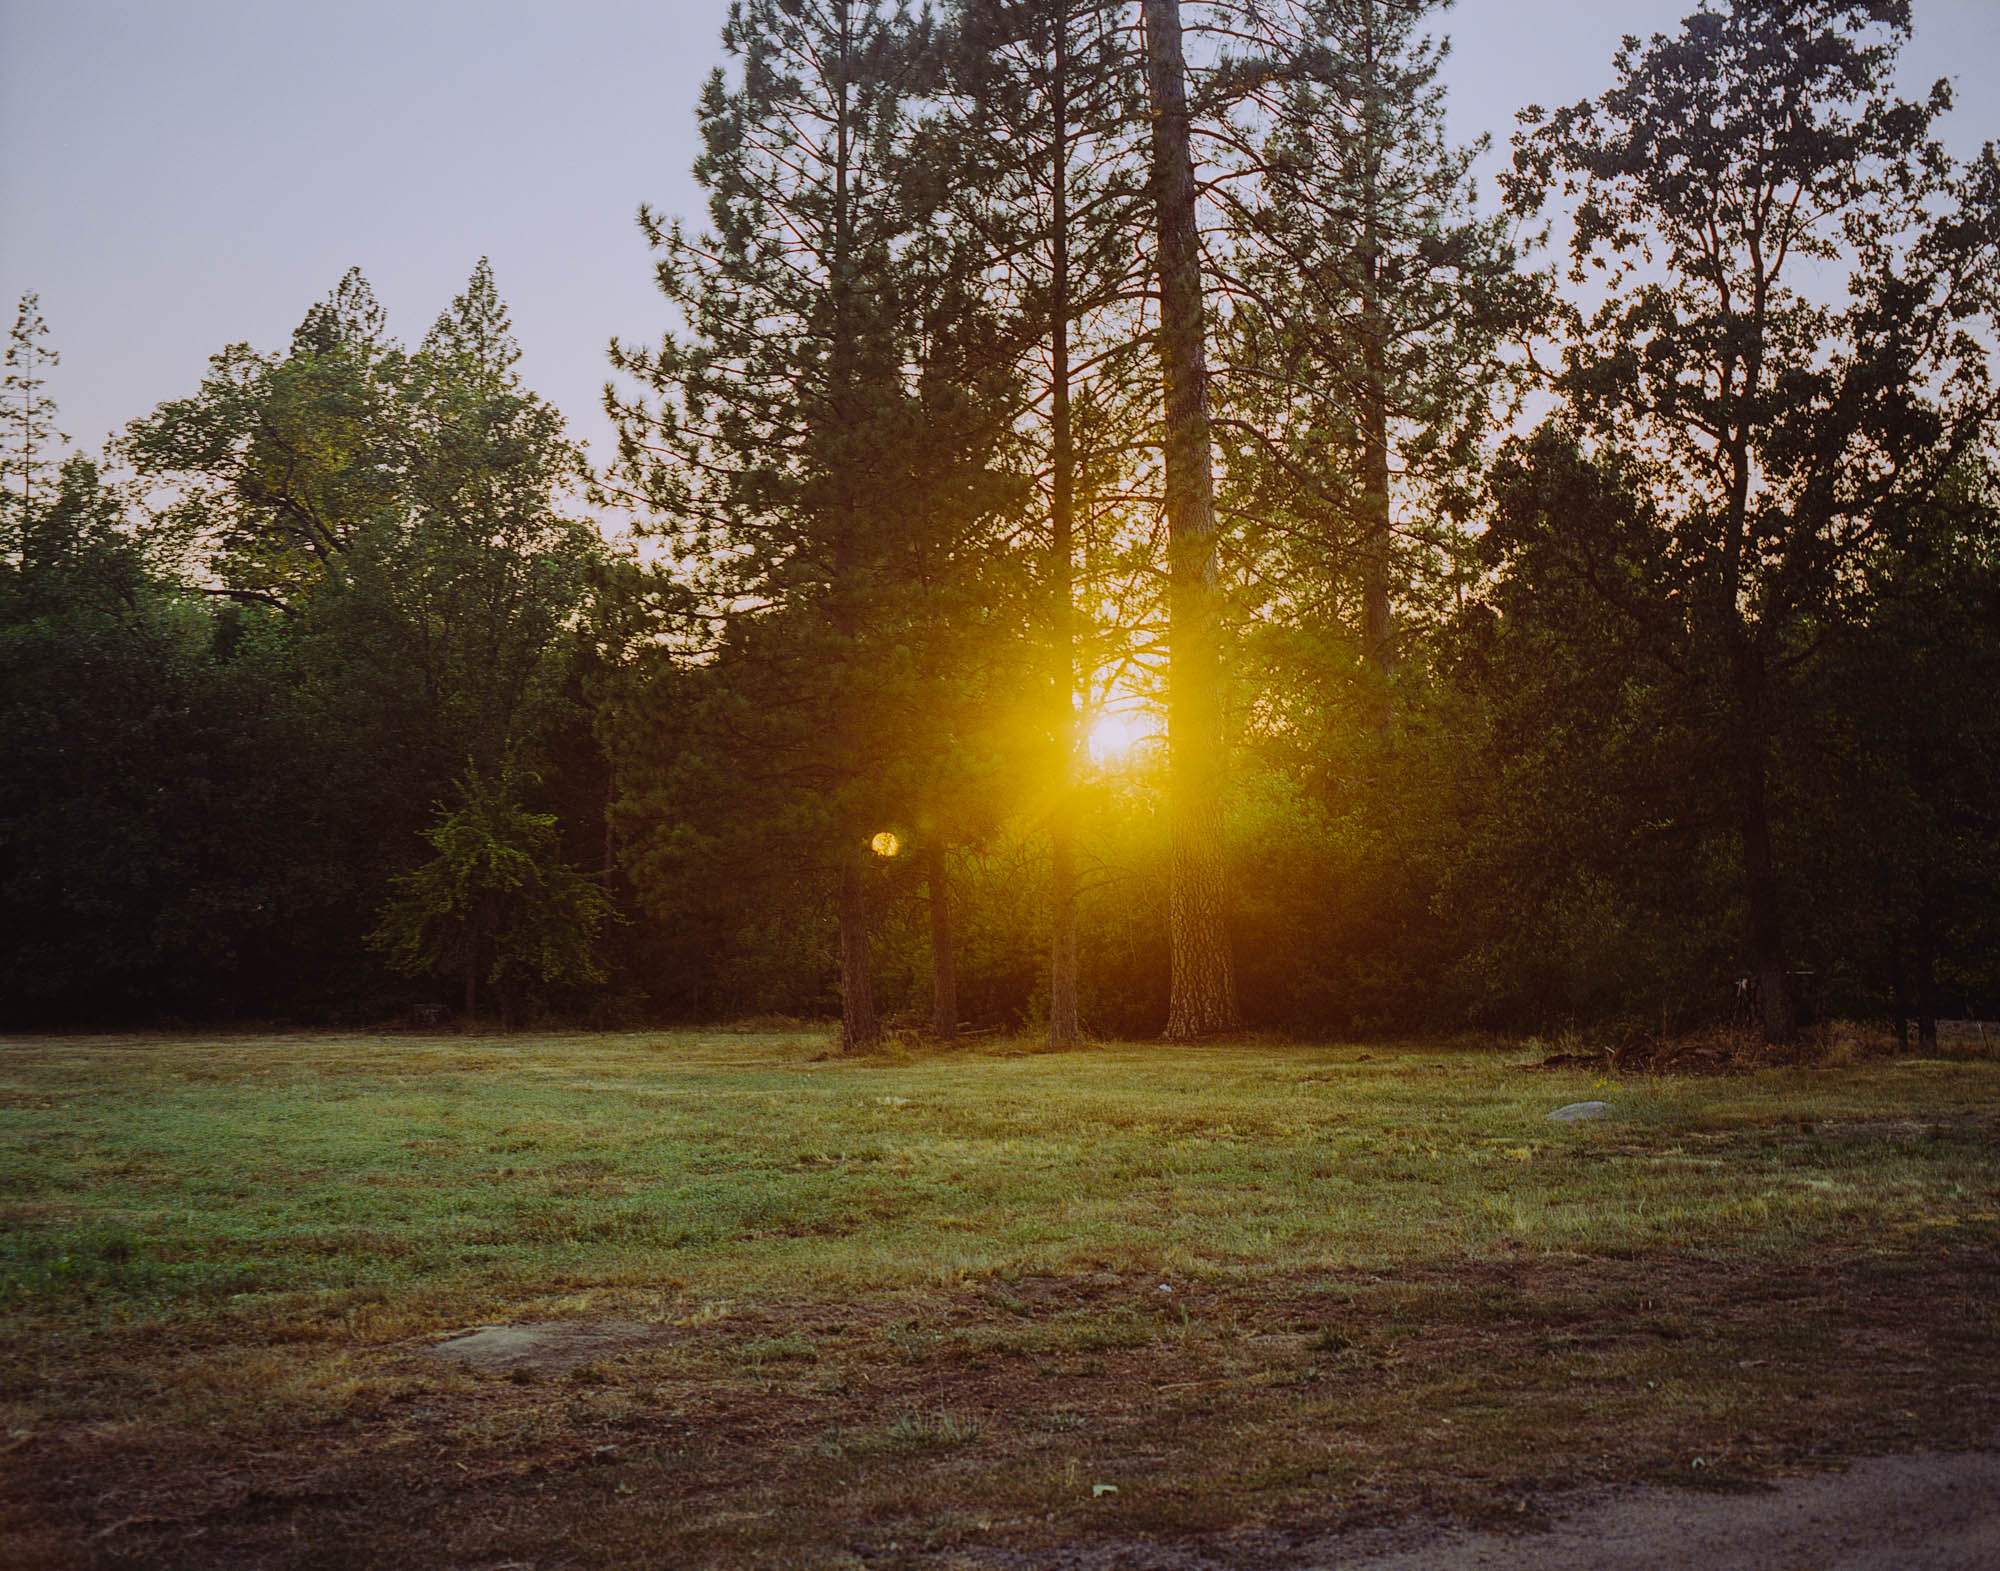
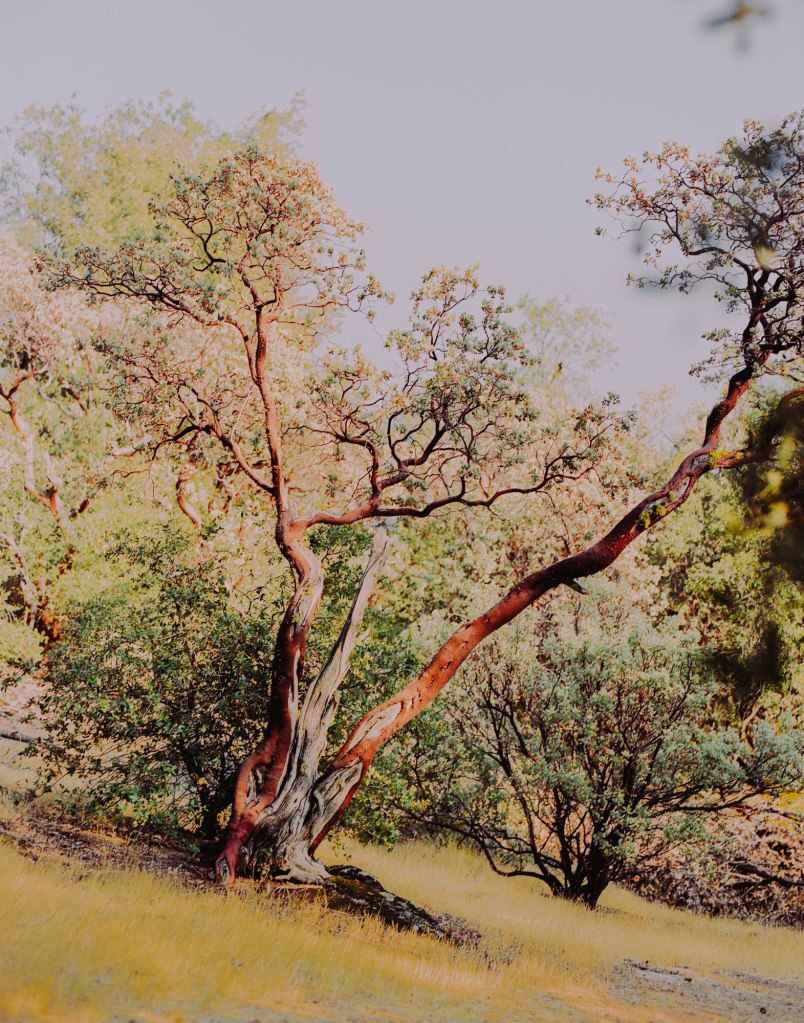
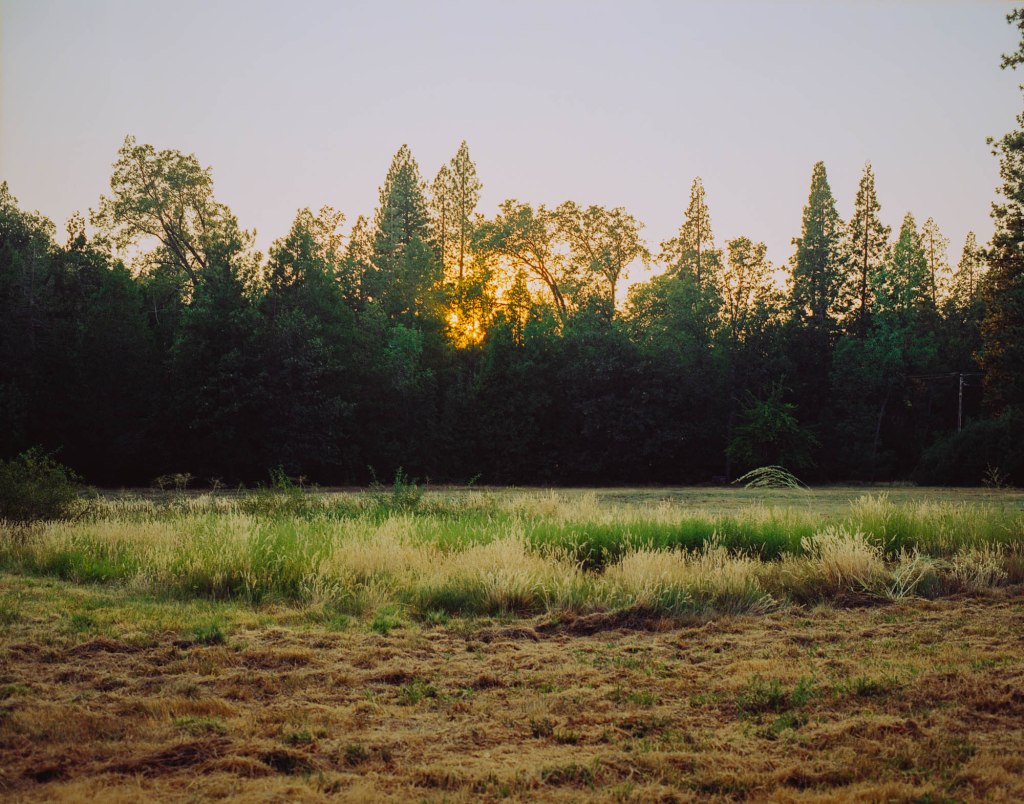
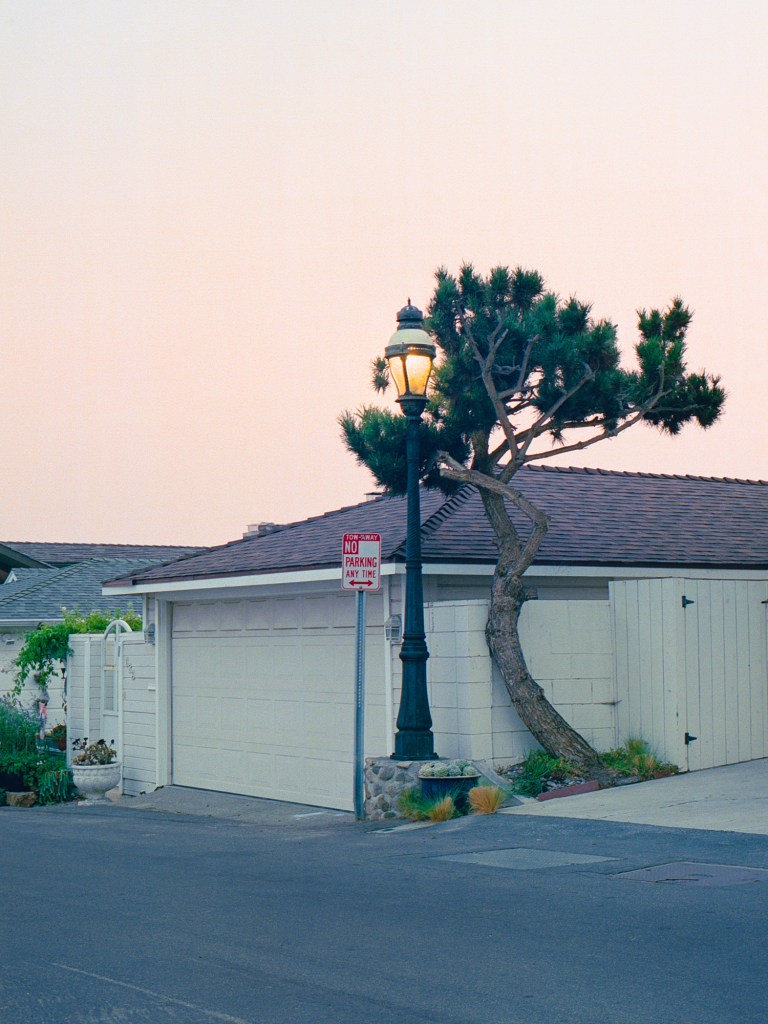
In the afternoon, I walked around the house again for some more discover. Here’re some photos that I like from the walk. I love the tree below because of its interesting gesture. I thought I need a wider lens to capture the whole tree but this frame still balance to me so I’m quite happy with it.
Sunset through the trees
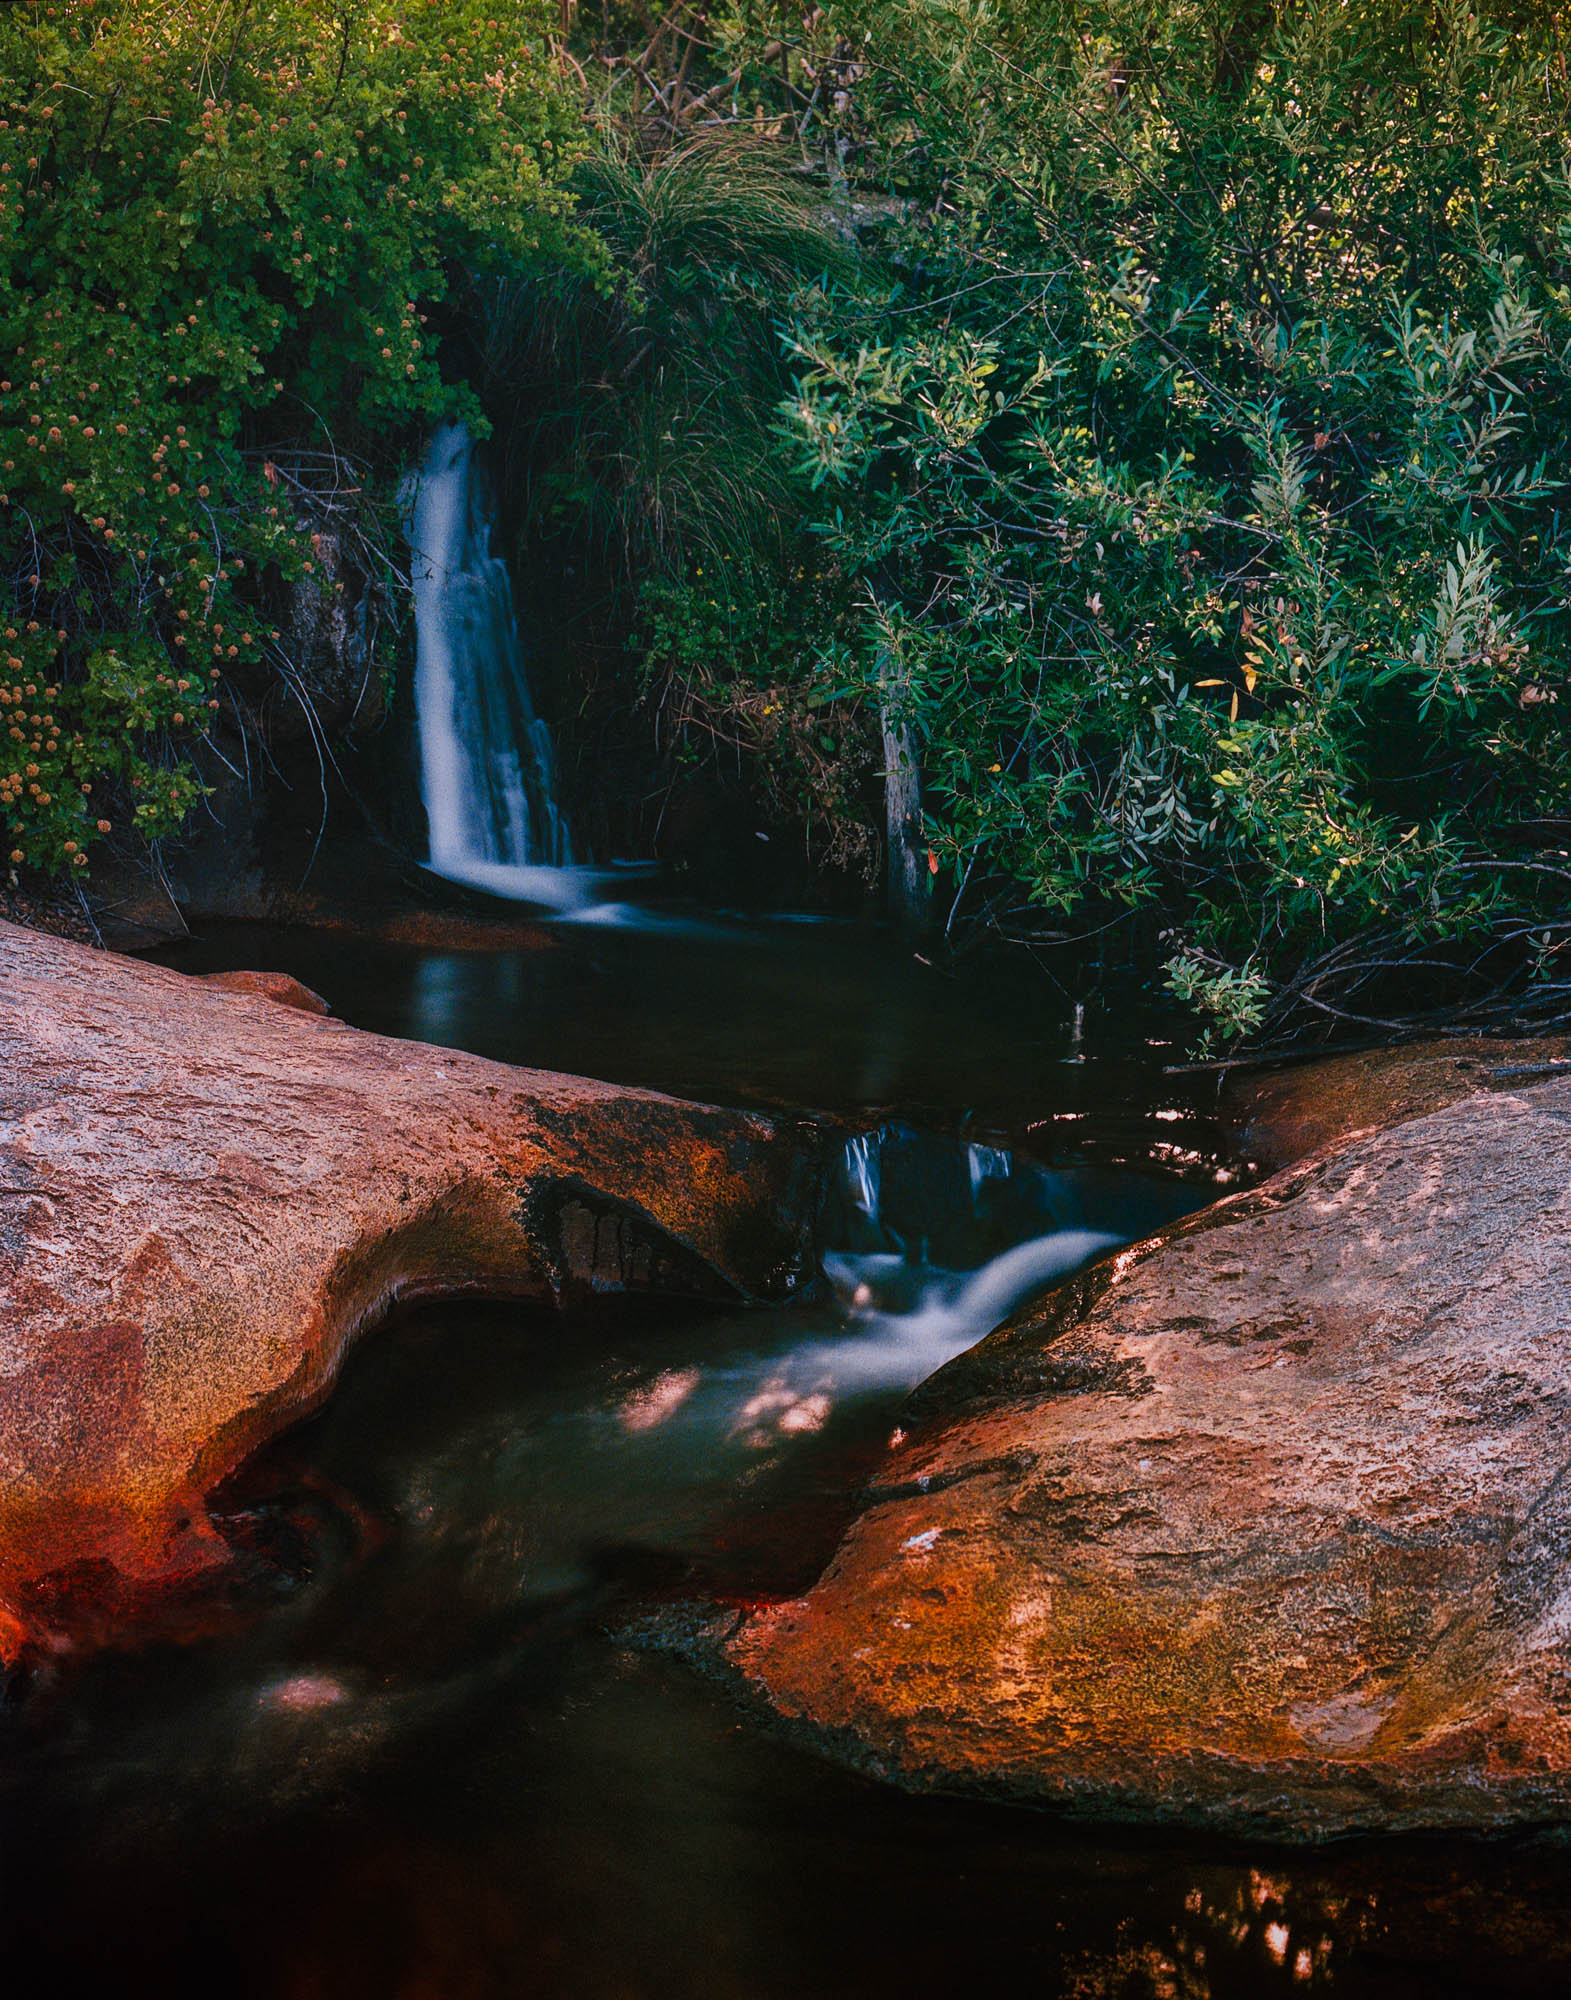
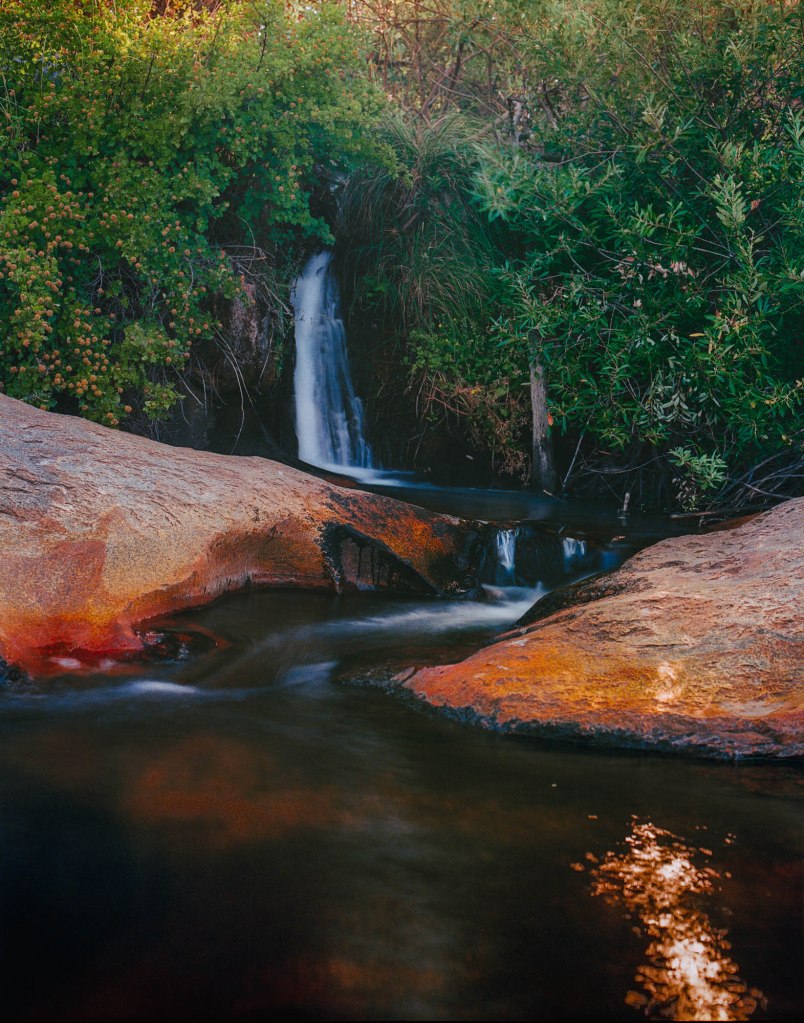
On the following day to Glacier Point I brought my digital camera instead of the Pentax 6×7, I end up didn’t take much photos because of the hazy sky but I still got some photos that I might like. But in the end, I just love the feeling of shooting film. Lastly, I walked to the near by waterfall in the last morning in Yosemite to make some long exposures. Here’re the results.
I took these photos backlit so the waterfall is quite dark, but I like how the waterfall is nicely placed against the dark background. I like the second shot better because the rocks at the bottom feel much stronger and dominant. The orange of the rocks contrast nicely with the greens in the photos. I also like there’re some patches of sunlight peak through the branches and appear on the stream. However in the first photo, I like the sunlight’s reflection on the water at the bottom right and the sunlight hitting the leaves at the very top left of the photo, I think they add more dynamic to the photo. But over all I like the contrast in the second one better.
After these shots, I fell into a pond while trying to get over a rock to compose my next shot. My Pentax get wet and stopped working. Although it means I have to send the camera to repairman now but I don’t feel regret or upset at all, that’s my choice, and to me all will be worth it if I got some photos that I’m proud of. So, cheers for a vivid beautiful summer.
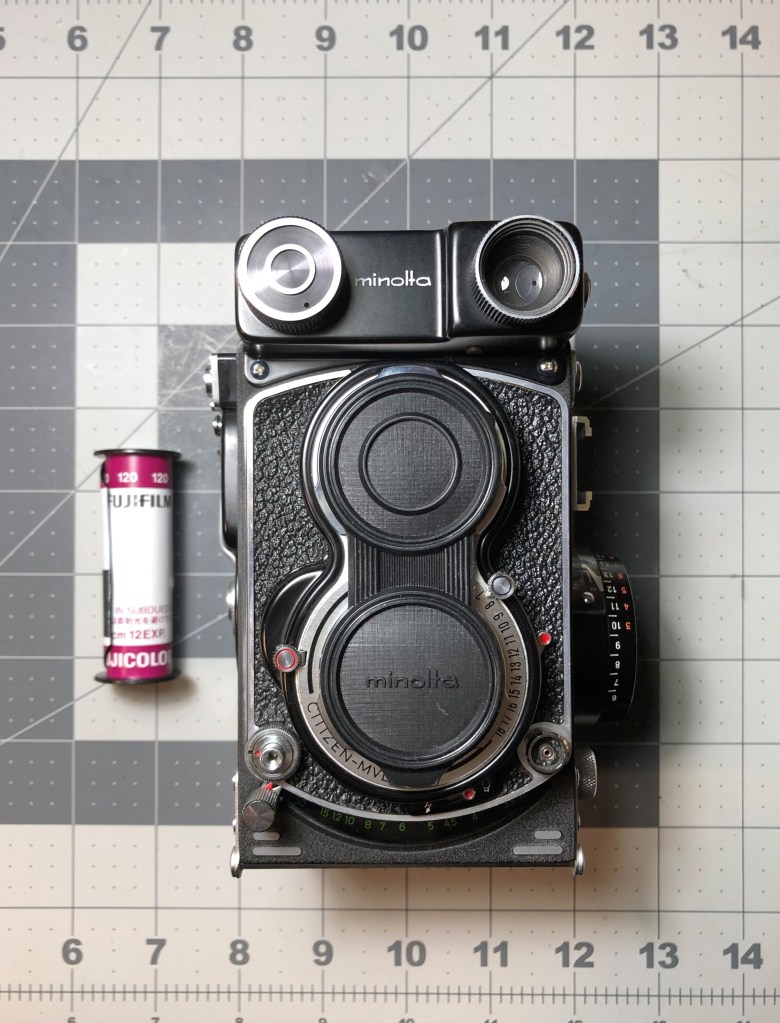
I got myself a twin lens reflect camera, the Minolta Autocord CdS, to start shooting square photos. I’ve been curious about square format since I learned about the famous Hasselblad V series and the amazing experience of shooting from the waist level. Shooting from the waist level is truly enjoyable. The feeling of seeing the photos from the ground glass is so satisfied.
One note I may add to using the waist level finder is don’t stuff your eye into the magnifier glass for “fine focus” (as you see so many Youtube photographers do), but rather put the camera down at your waist level and flip out the magnifier glass, at this distance, the circle “focusing spot” (in the middle of your ground glass) will fill up the entire magnifier glass, makes it super easy and fast to fine focus. Then, you can flip down the magnifier glass and re-compose, this way is much faster than you stuff your eye in the magnifier glass and bend your back up and down for the shots. Thanks to Rick Olesen for this focus tip.
Rick Oleson is a man who sale focusing screens for waist level camera and he’s been using waist level for about 30 years now. His tip is super helpful to me since I was stuff my eye to the magnifier glass as I saw others did.
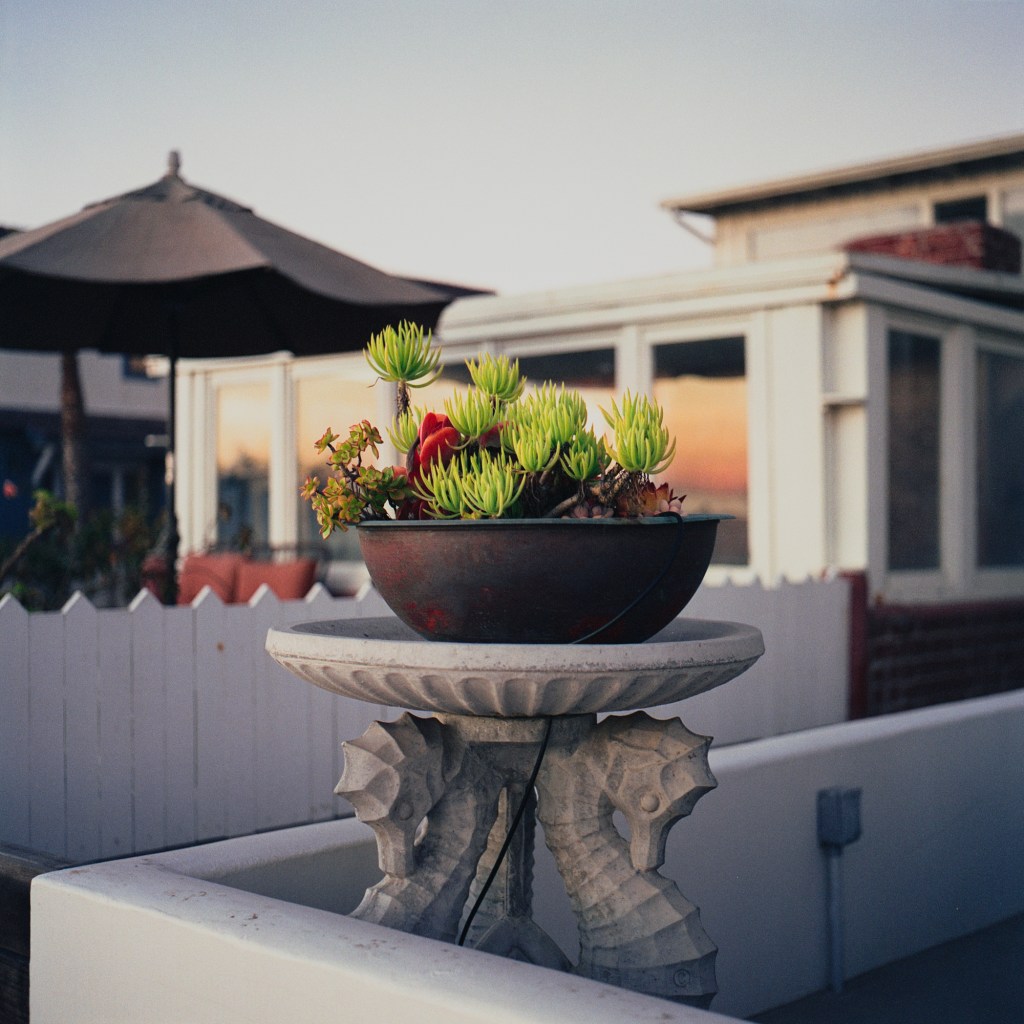
This is my favorite shot in all the square photos I’ve taken. Test out the bokeh of the lens at f/3.5
Next is some shots from my newest camera, the Rolleiflex SL66E, my dream camera and the most expensive one I have. So far I really enjoy using the camera. I’m planning to test out the tilt feature soon.
The last photo is my favorite from the roll. I like how similar the 2 trunks divide into 2 branches and their “gesture” creates a nice composition. The thing I wish I could do better is make sure the trunk behind is in focus entirely, I should shoot at f/5.6 or something like that to achieve that desire depth of field. But it’s hard to know exactly how much depth of field in these cases. Hope I will learn more about controlling depth of field for the next time.
Thank you for reading to the end. More photos next time!
Panoramic photos weren’t interesting to me from the beginning but since Nick Carver shows how wonderful panoramic photos can be, and other Youtubers’ talked about the Xpan and panoramic photos, I slowly get curious of this format. After awhile, I think I enjoy looking at panoramic photos because of the wide scenes and so much elements we can include in one frame. The feeling of looking at a photo from left to right slowly to appreciate the details and how the elements interact with each other in the shot is very enjoyable to me. So I tried panoramic photos for the first time, with my Pentax 6×7.
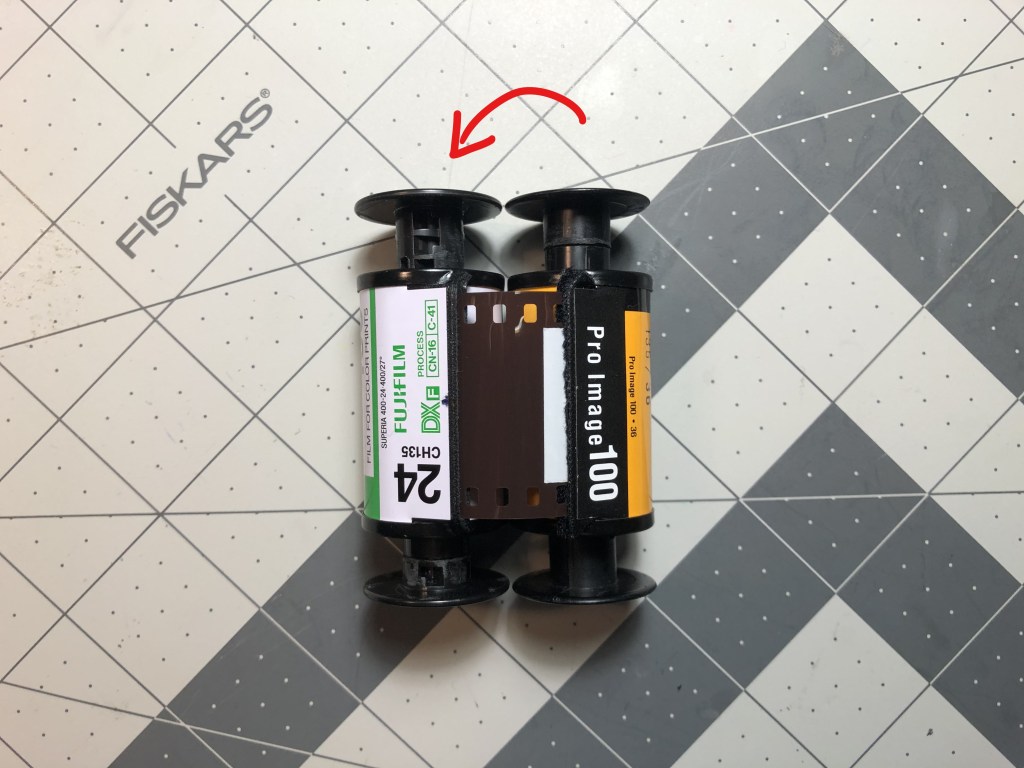
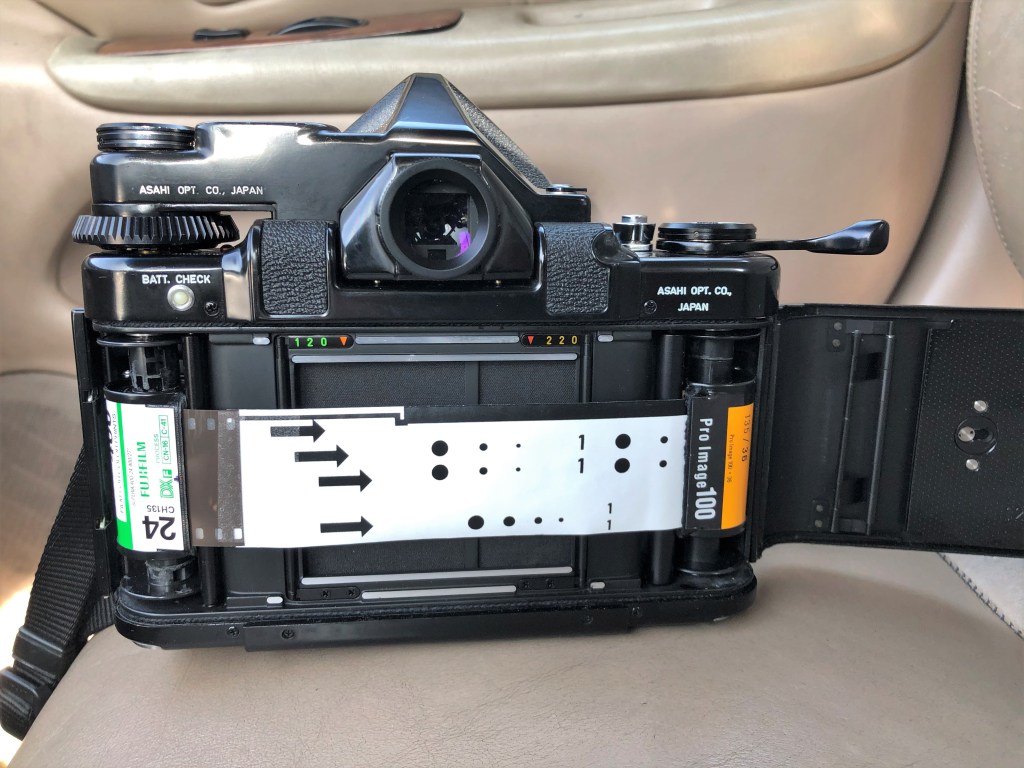
In other methods I saw on Youtube, most people use the adapter for the 35mm film canister and load the film into the camera with an extension paper at the beginning of the film roll so they don’t waste the film while winding the camera for the first shot. The down side of this method is you have to unload the film in the dark when you finish the roll, because you cannot rewind the film back into the canister when you finish so you have to go into a dark room or put your camera in a dark bag to take the film out of the film back and rewind it into the canister. This will limit your shooting experience in the field, if you can’t have a access to a dark room or dark bag, you cannot take the film out and load the new roll in. So I came up with this method, including 2 film canisters/cassettes, one is your brand new canister and one to take the film in, this one acts like the pick up spoon in normal scenario, but it can protect your film from the light.
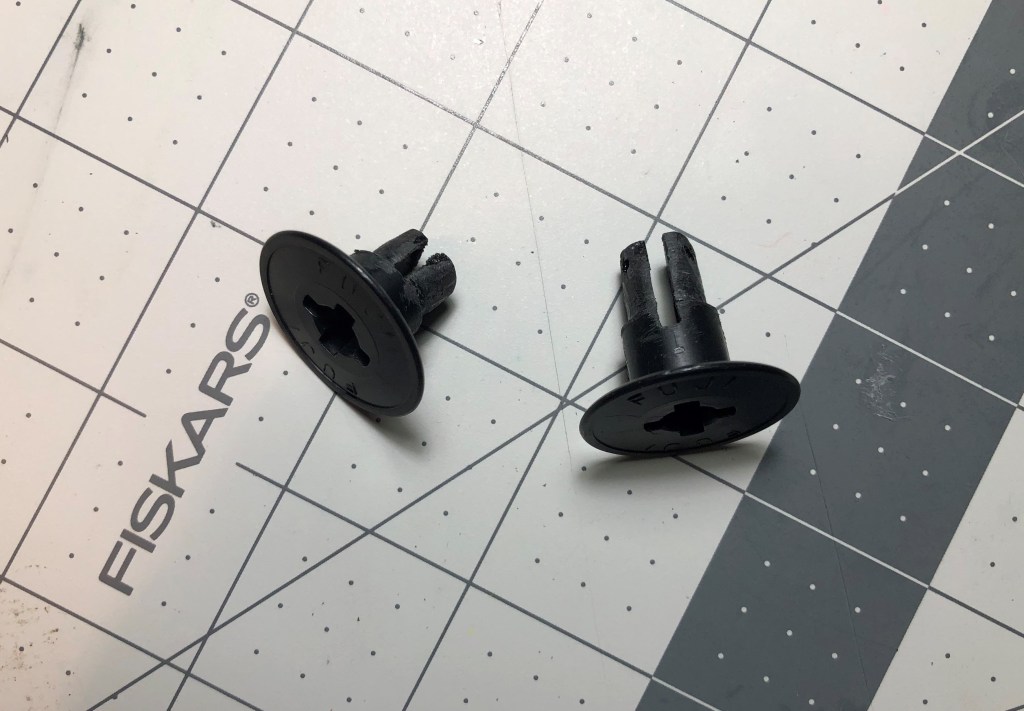
First, I made 2 pairs of 35mm film cannister adapters from old empty 120 film spoons. You can buy them dirt cheap online but on the day I wasn’t be patient enough to wait for the delivery so I made my own. It’s not beautiful at all but it works well. If you do it yourself like I did, one thing you should make sure is checking the length of the adapters carefully, so when you put it on the 35mm film canister, it will have the same height as a regular 120 film spoon. If it’s too high, it won’t fit in your film back, if it’s too short, it won’t stay straight and neat in your film back, this may cause damage to your film back.
One pair of adapter
Left to right: regular 120 film spoon, 35mm empty cannister and 35mm new film cannister. Make sure they have the same height.
So, how to prepare your pick up canister? We’re going to step 2.
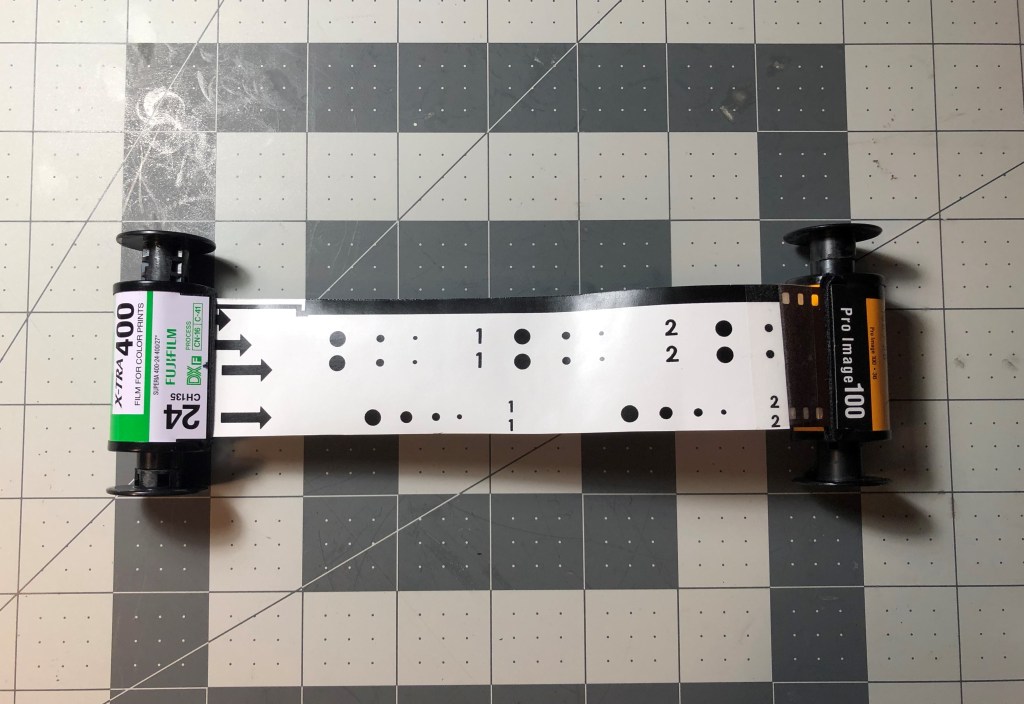
Step 2: Made the pick up canister/cassette from a old empty film canister/cassette, which still has a short amount of film left so you can tape a piece of paper on the actual film left. This piece of paper I cut from a backing paper of a 120 film roll, measured the wide is 35mm (same as the wide of the actual 35mm film) and the length is 18 cm. I taped one end of the paper strip to the film left on the old cannister and then taped the film lead from the new film roll to the other side of the paper strip, as photos below (step 2b).
Step 2a: Tape the paper strip to the piece of film left inside the empty cassette
Step 2b: Then tape the other side of the paper to the film lead from the new film roll
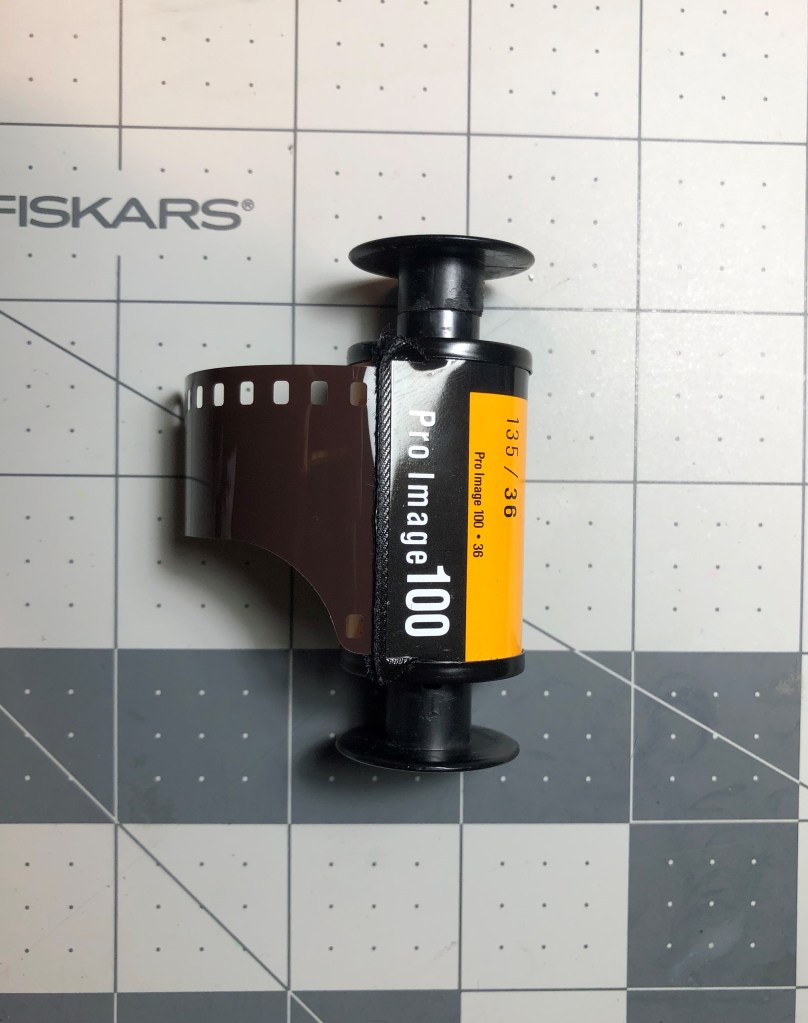
Step 3: Transfer the film from the original cassette into the empty cassette in the dark bag. So now you have 2 cassettes connected, and the film will be transferred from the new cassette into the empty cassette. Of course the transfer process is done in the dark bag. Why you must transfer the film from new cassette to the empty one? Because the point of this method is to let you unload the film in day light. So when you finish the roll and wind all the film to its original cassette, you open the camera back to take the film out, the backing paper strip that you taped earlier will be there at the end of the roll, and you don’t loose any last photo.
All the film was winded to the empty cassette, as you can see the white tape at the very end of the film roll is on the original cassette’s side.
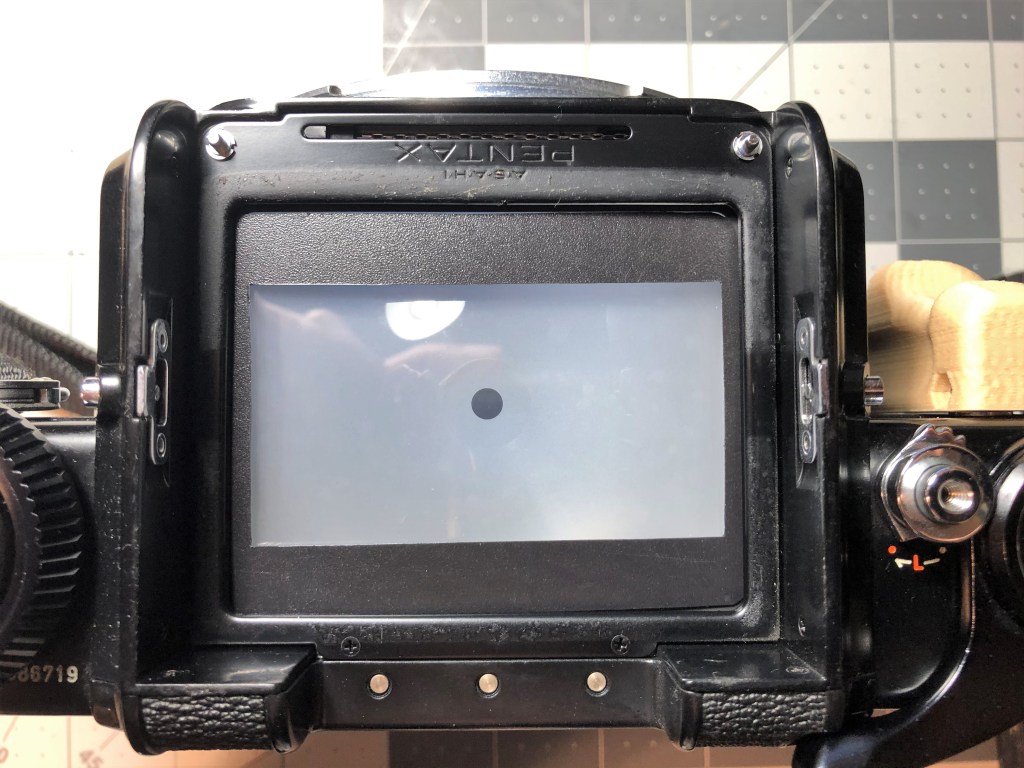
Step 4: Cut out a rectangle in a piece of black paper, the dimension of the rectangle is 35x70mm. (This includes the area of the sprocket holes, if you don’t want to include the sprocket holes, cut out the rectangle 25x70mm). Then put this piece of paper on top of your ground glass. This is a guideline for your composition.
A cut out 35x70mm paper for composing in the viewfinder
How you will see the aspect ratio looking through the viewfinder
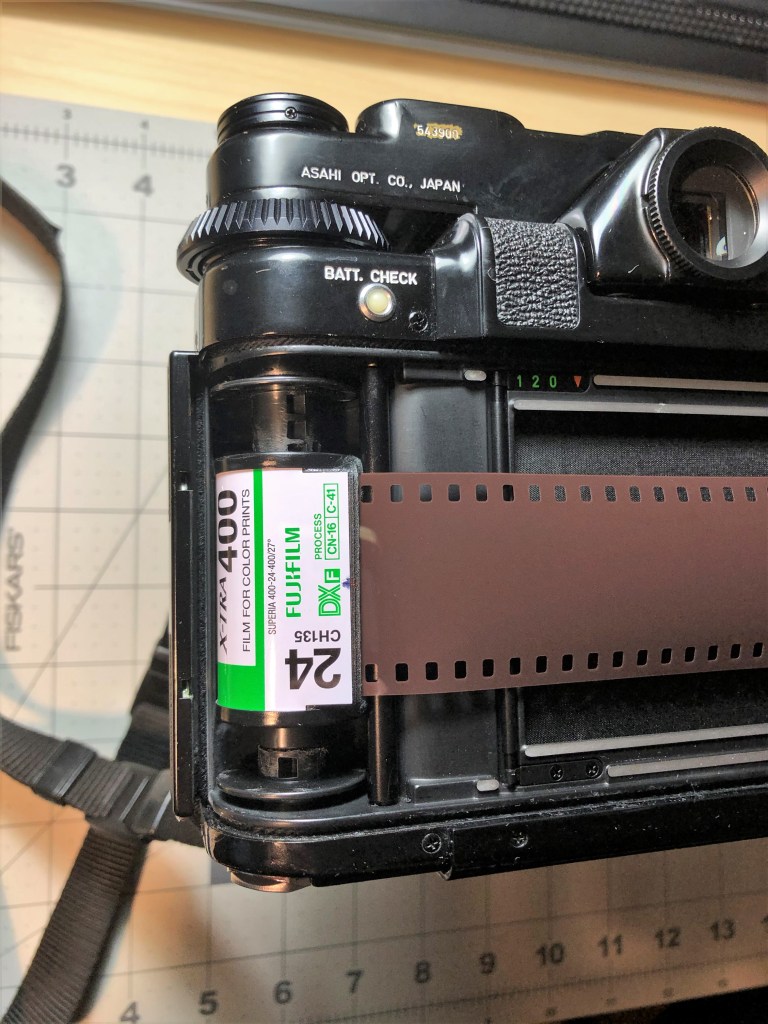
Step 5: Load the film into the camera. Remember to put the old film cassette (which now contains the film inside) on the left side and the pick up cassette (which is the original cassette) on the right side. So now when you take the photos and advance the film, you are actually wind the film back to its original cassette.
Film contained cassette on left side
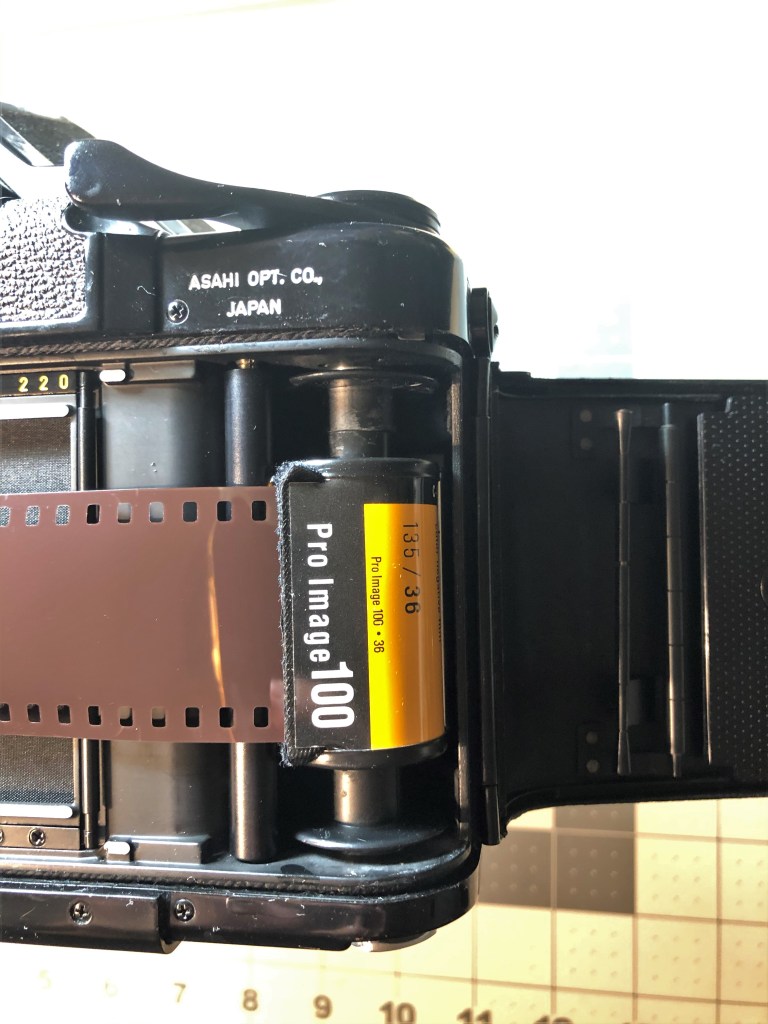
Pick up cassette on the right side
Film will be transferred from the old cassette to the original one
Step 6: Finish the roll and unload the film. After you finish the roll, you can open the back and remove the cassettes out of the camera safely. You will see that the film in winded into the original cassette and the part exposes to the light when you open up the camera is the paper strip you taped in. You can just remove the film lead from the paper strip and reuse the old film cassette and the paper strip again.
Open the back to unload film when you finish the roll
So now you have it, a method to take panoramic shots on your Pentax 6×7 without requiring going to dark room to unload your film. All you need to do is preparing your film upfront as a set of film cassette and pick up cassette, and you can have more freedom shooting in the field. I was able to get 15 shot out of the 36 exposes roll but I was messing with the loading part, I think if you can load the film more careful than me, you can get 18 out of the roll. I will update the exact number of the shots you can get when I finish the second roll.
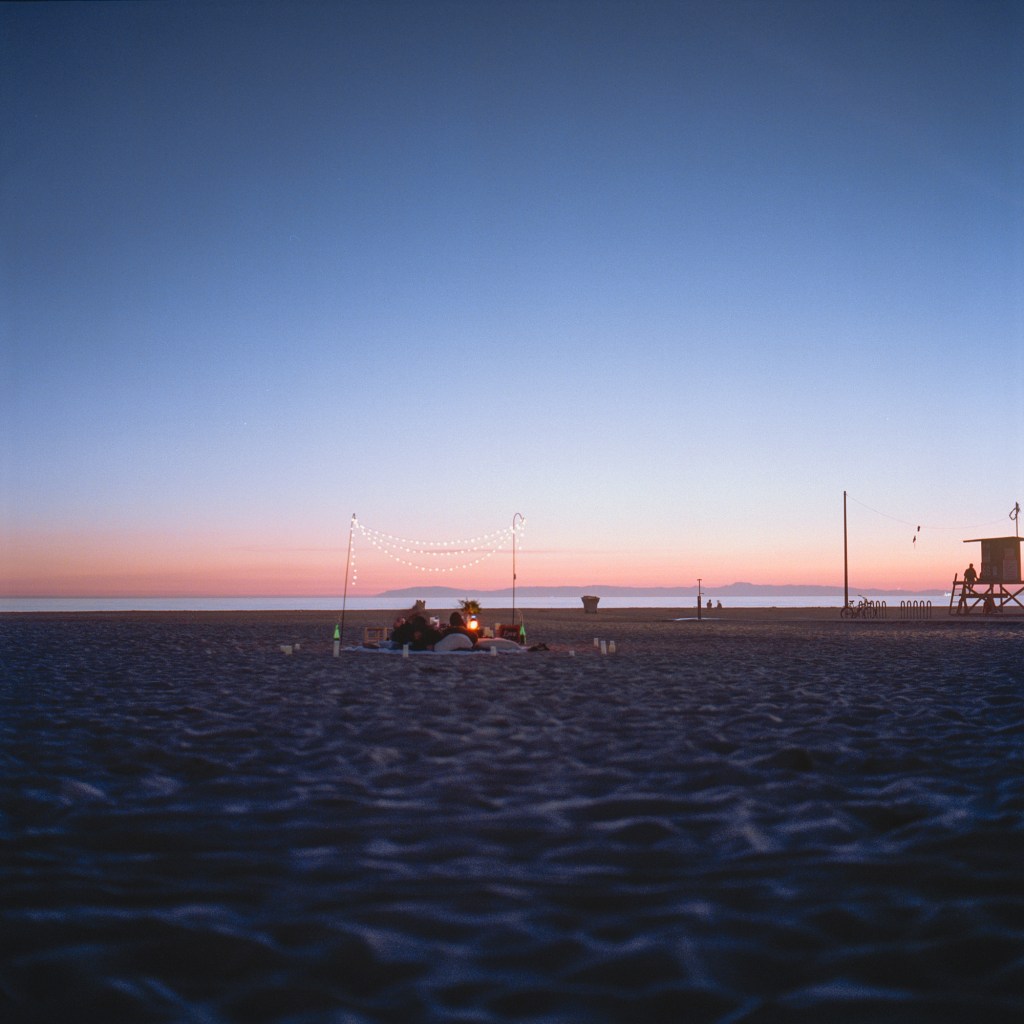
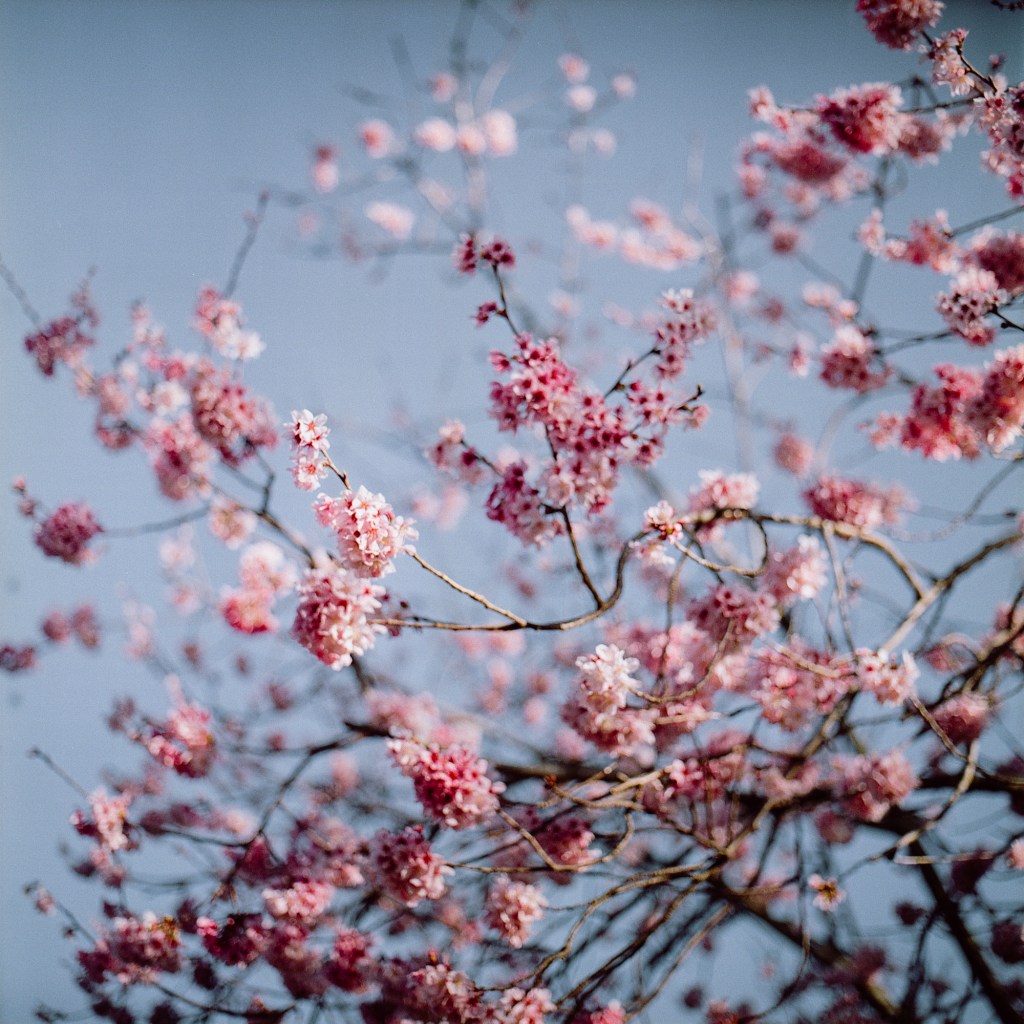
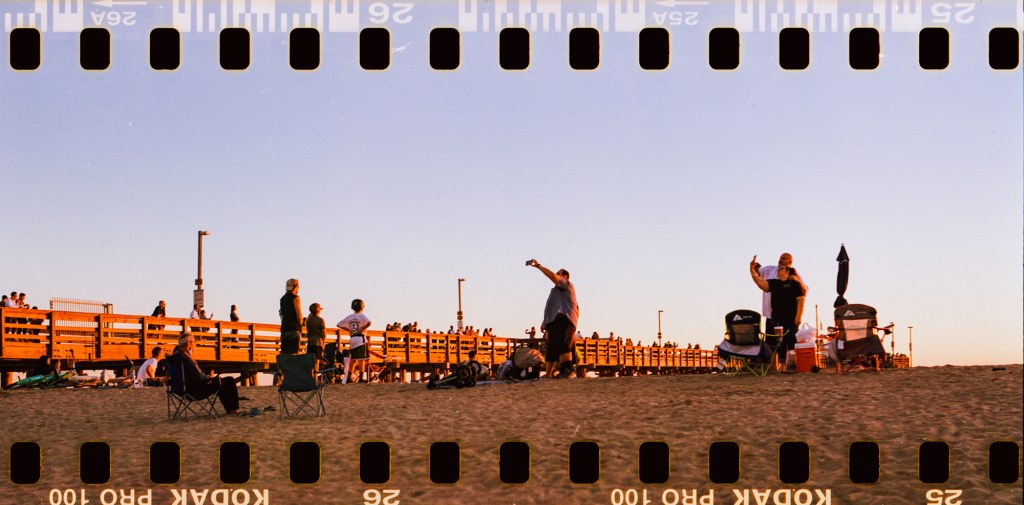
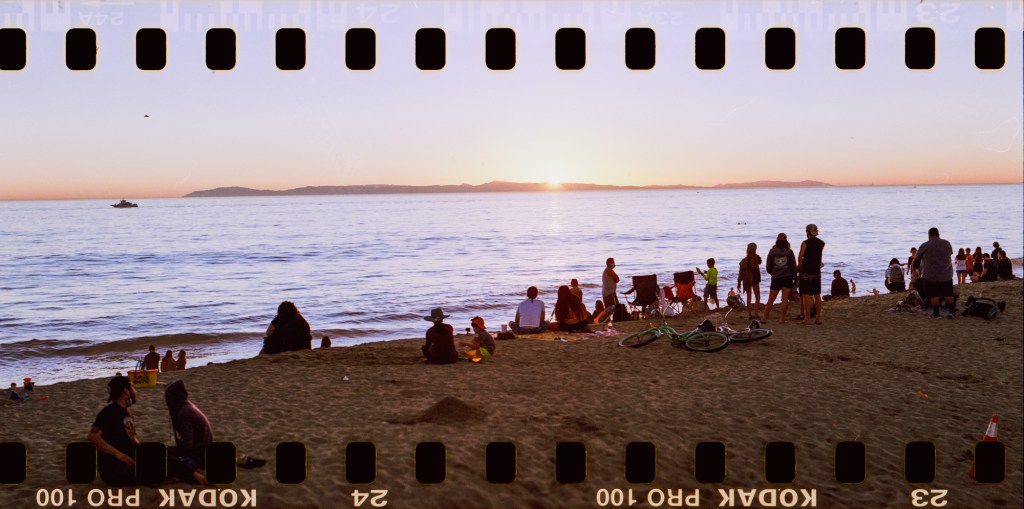
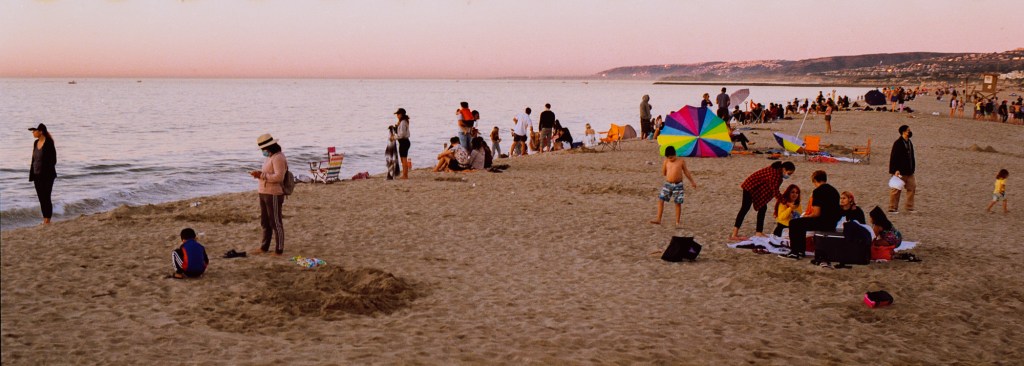
Here’re some photos I made with this first try. Taken with Kodak ProImage 100.
I love the photo of the man on the bike, it’s too bad that it’s underexposed but when I took the shot I knew this would work well on panoramic aspect ratio. You can also see that the ones with no sprocket holes are the ones I couldn’t get the horizon line straight 🙂
My favorites from the roll is this pair of photos, taking of the car in front of the house. I took the photo on the right side first and walked couple steps more to realize that the tail of the car and the scene was quite interesting and could make a good photo, so I took the second one. I think these 2 look very nice together because the continuation of the object, which is the car make the photos stand well next to each other. And I also like the idea of “the beginning is the end” cycle in the left photo, it’s not that literally but the photo starts with the head of the black car and ends with the tail of the silver car, like the end and the beginning come after each other. Or maybe I like series “Dark” a little too much 🙂
I love the last photo also. The frame feels a bit too much and messy but I like the overall feelings and colors of it.
Thank you for making it to the end. Hope you like these experimental photo ideas. Cheers!
This post does not have a specific theme but just shots from the Pentax 6×7, and some personal thoughts in life.
I got myself a Pentax 6×7 MLU body from Japan last September, along with a 90mm Leaf Shutter lens. I chose the LS lens in regard of the ability to shoot with flash, I don’t feel very comfortable with the flash sync 1/30s of the Pentax focal plane body. Since I got the system, I’ve shot with it through 4 rolls of film. Of course this is not a big amount of photos I’ve made with the camera but it’s very precious to me. The Pentax is my first 6×7 camera, I wanted a 6×7 camera for roughly a year back then, since the hype of 6×7 overrules Youtube and film community on Facebook groups. I never like the design of a replicate 35mm camera for a 6×7 system from Pentax, to me it’s just ugly and unergonomic. But after doing research, I end up getting the Pentax 6×7, because (1) the Bronica GS-1 is not as good as the Pentax or Mamiya, (2) the Mamiya RB is super heavy (not all people find it too much to handle but I’m a small Asian girl, it’s of course too big and heavy for me), and (3) the Mamiya RZ is so out of my budget. So the Pentax seems like a best option. When I received the camera, it’s not as bad as I thought, I actually did like to hold it. Gradually I find the Pentax 6×7 is not ugly anymore but kinda cool, because it’s black and huge and the sound is freaking amazing[?]. I set it up with a right hand 3D printed grip for more ergonomic to handle and of course a strap as an insurance for an expensive camera.
Since it’s 6×7 negative, means that I get 10 shots from a 120 roll, I choose my subjects and compose more carefully. Still I got some ugly and illegitimate shots, but I think my first 4 rolls are not disappointed. Not just because I got myself some favorite shots but also because the experience of shooting a “professional format” with a “professional camera”. Don’t get me wrong, I don’t mean those professional things make me a better photographer, but it gives me the spirit of intention and fidelity in my photography work. To this point, I haven’t done any paid photography job so the purpose of purchasing a Pentax 6×7 medium format camera has nothing to do with my professional or career but simply a dedicated inquisitive nature. My enthusiasm for photography is naive, I don’t know if I can become a photographer or have people admire my work, I am doing this because I want to create something that matters to someone, anyone. I’m always in the struggle of defining the purpose of my life and if I matter to anything or anyone. The only thing I can do to keep me from beating up myself with this query is keeping creating work and hope for one day, my work will give me an answer.
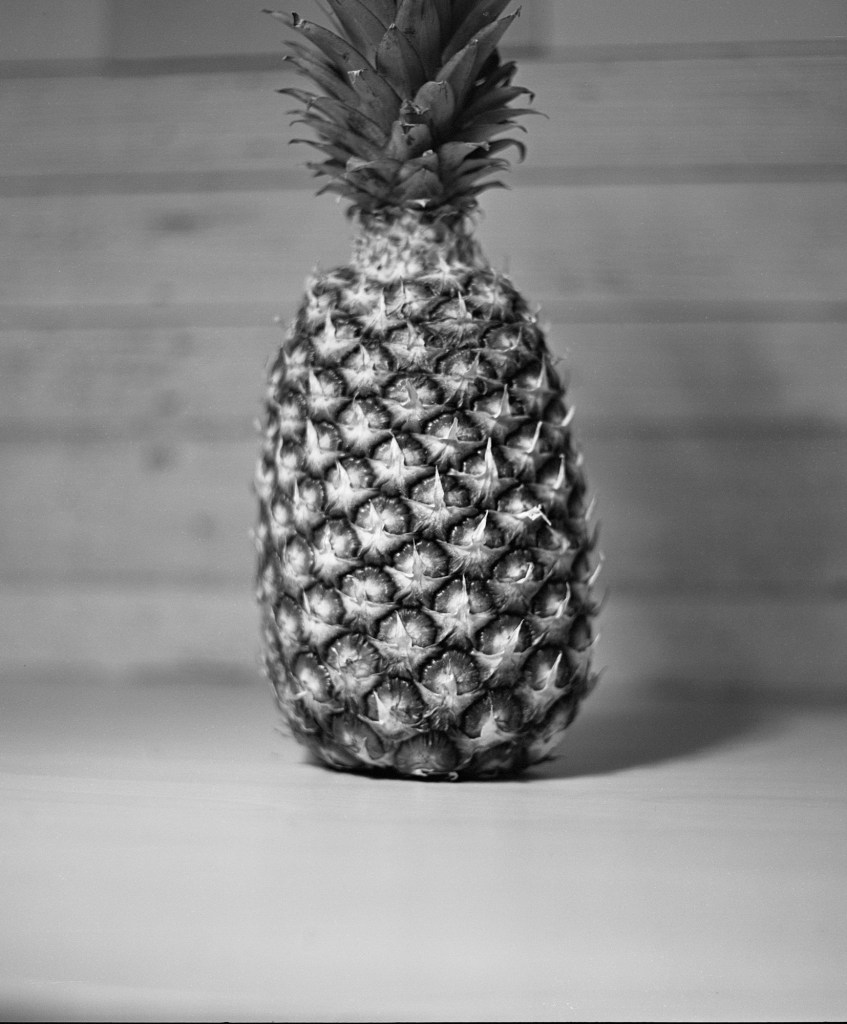
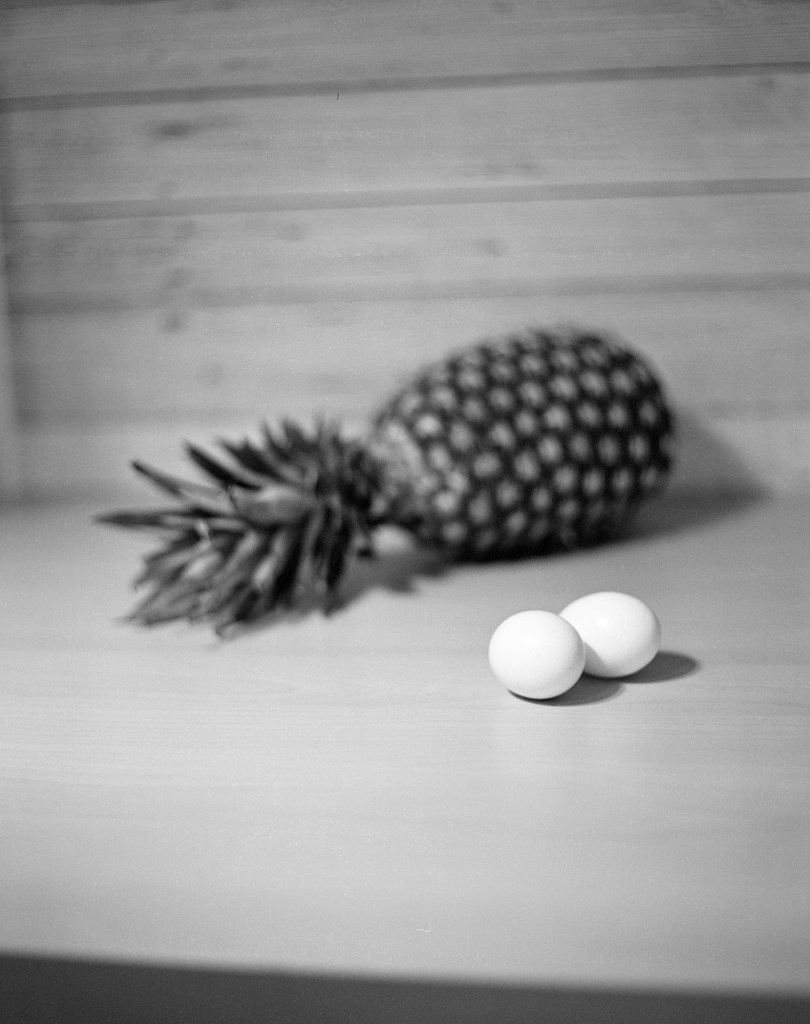
First shots I made with the Pentax 6×7 is still lives in my living room, shot with Ilford XP2. The main purpose of this is just testing out the camera to see if it works properly. The object I chose was a pineapple, because I like tropical fruits and the shape and texture of the pineapple is interesting to me. After a few shots with the pineapple, I decided to put more things in the frame, and I chose 2 eggs, because (1) 2 eggs and a pineapple makes it 3 objects in the frame, odd number of subjects is more pleasing to look at in general, (2) a pointy big pineapple is contrast with the round shape, smooth texture and small size of the eggs and (3) colorful contrast neutral (but you don’t see this in black and white photos, silly me). I like the contrast in life because things contrast each other doesn’t mean they are right and wrong, or against each other, they’re just simply different. It teaches me that everything may has its own way and we don’t necessary justify everything in order to accept it, we can just be opened and accept things or people for how they are.
The next 2 rolls I shot when riding a bicycle around my neighborhood. It’s fun to ride a bicycle just wander around and go to streets that you never go before. It reminds me of the time when I was 11~12, back then I was trying to ride bicycle and my friend was helping me and keep me company every afternoon that I went out and ride for an hour or so. Gradually, I didn’t ride bicycle every afternoon for practice anymore but because of it’s a pleasure time for me to hang out with my friend and passing by streets and scenes that elicited my curiosity and a strange urge to know/understand the stories behind visual things.
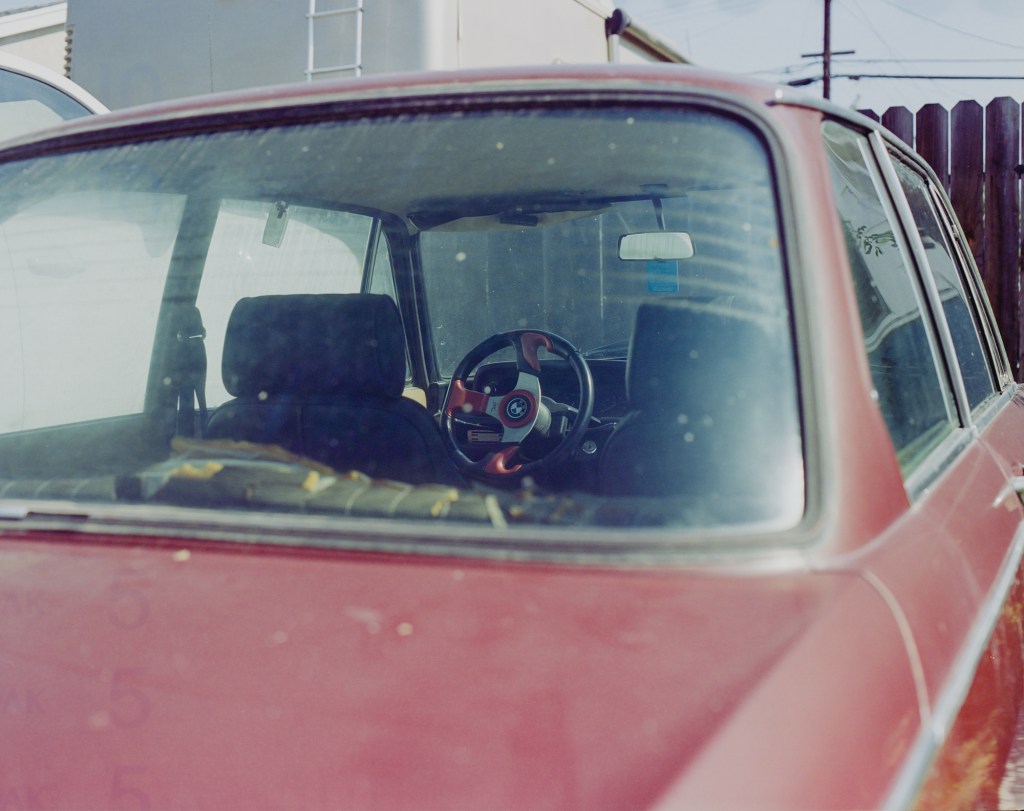
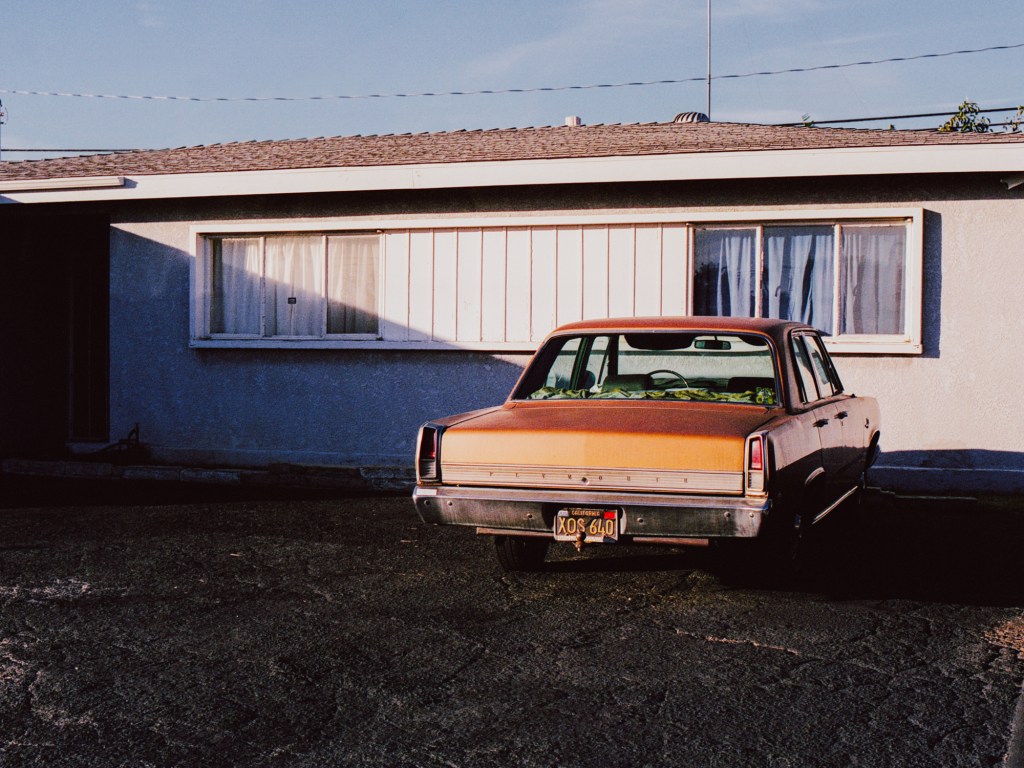
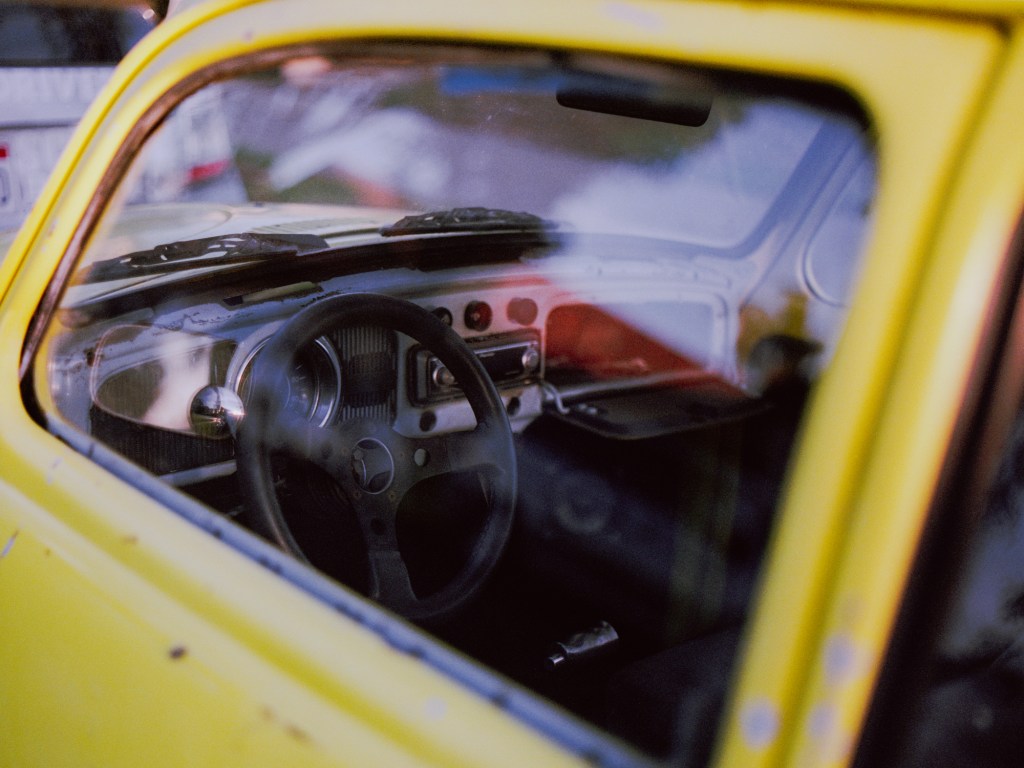
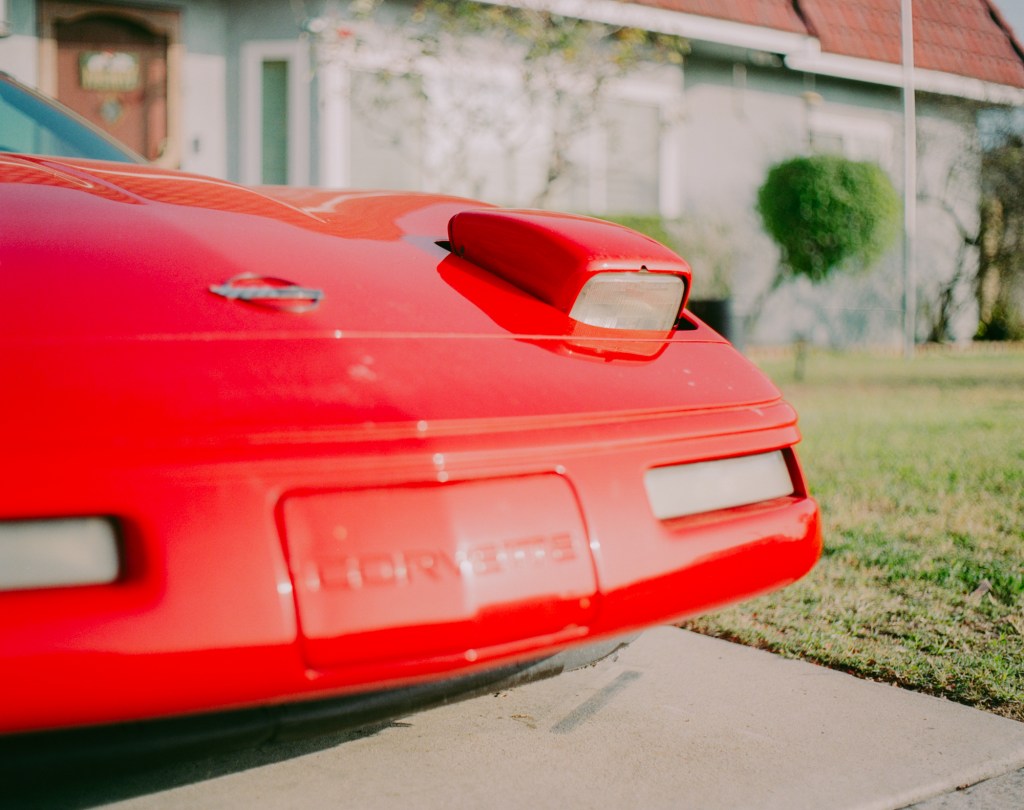
The first 2 photos I took to check out the shallow depth of field of the 90mm lens. I’m not sure why I shot a lots of cars with my Pentax but can’t denied they look quite cool on 6×7. My favorite photos are the one of the golden orange car packed in front of the windows with afternoon sunlight creating a clean line of light and shadow on the wall. I like the scene and the atmosphere here a lot. However the contrast between highlight and shadow is very high, it makes the shadows are too dark for my taste. The red car below is interesting to me because 1 of the head lights is half way up, makes the car has a sense of imperfection and uniqueness – something I’m always draw to.
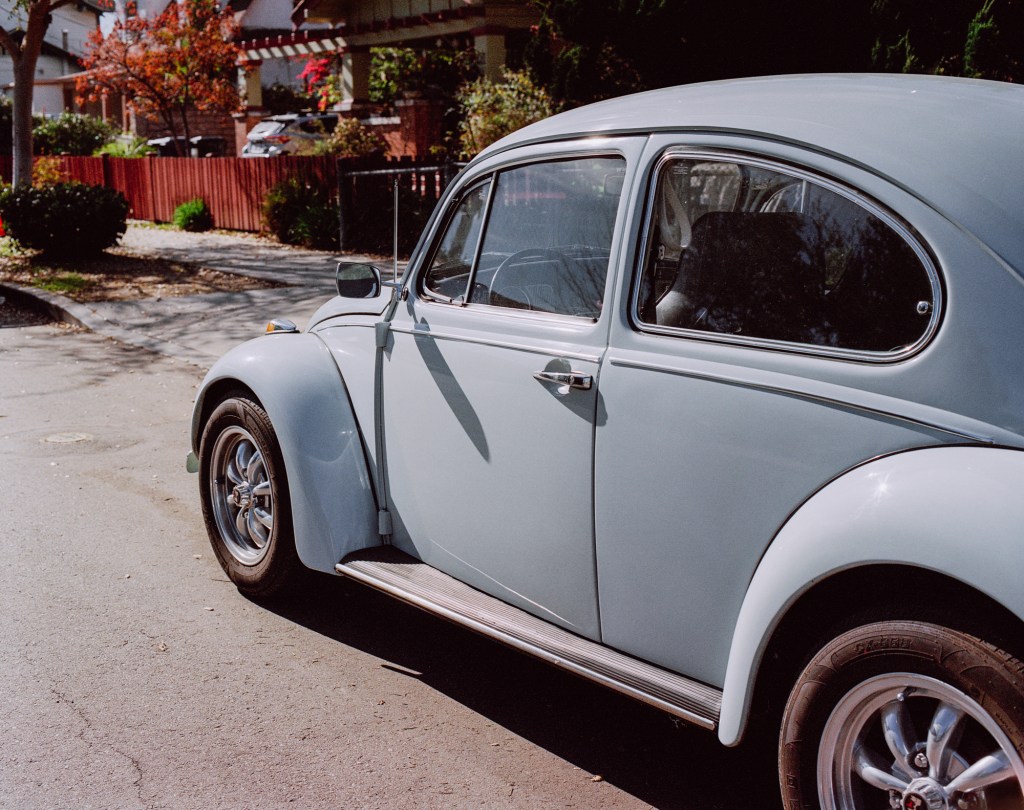
The baby blue car below is cute and classic to my eyes. I like the shot of the wheel from outside of the window the most. The red color from the steering wheel lock gives a attraction to the frame, also the subframe is quite nice.
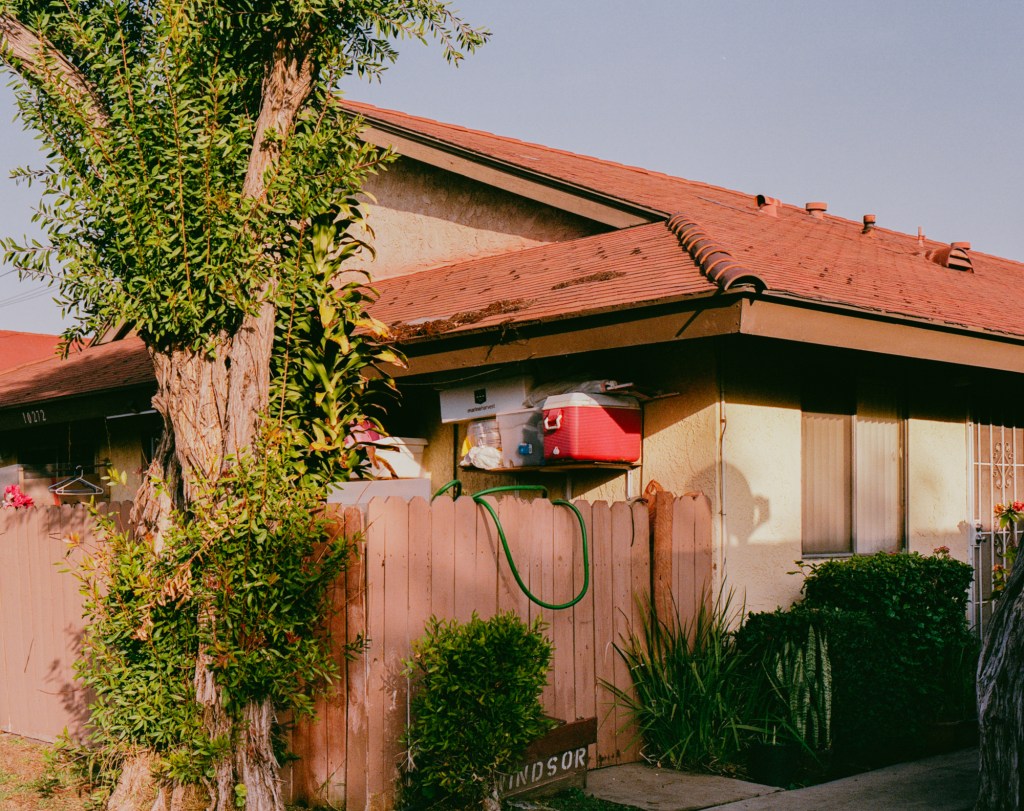
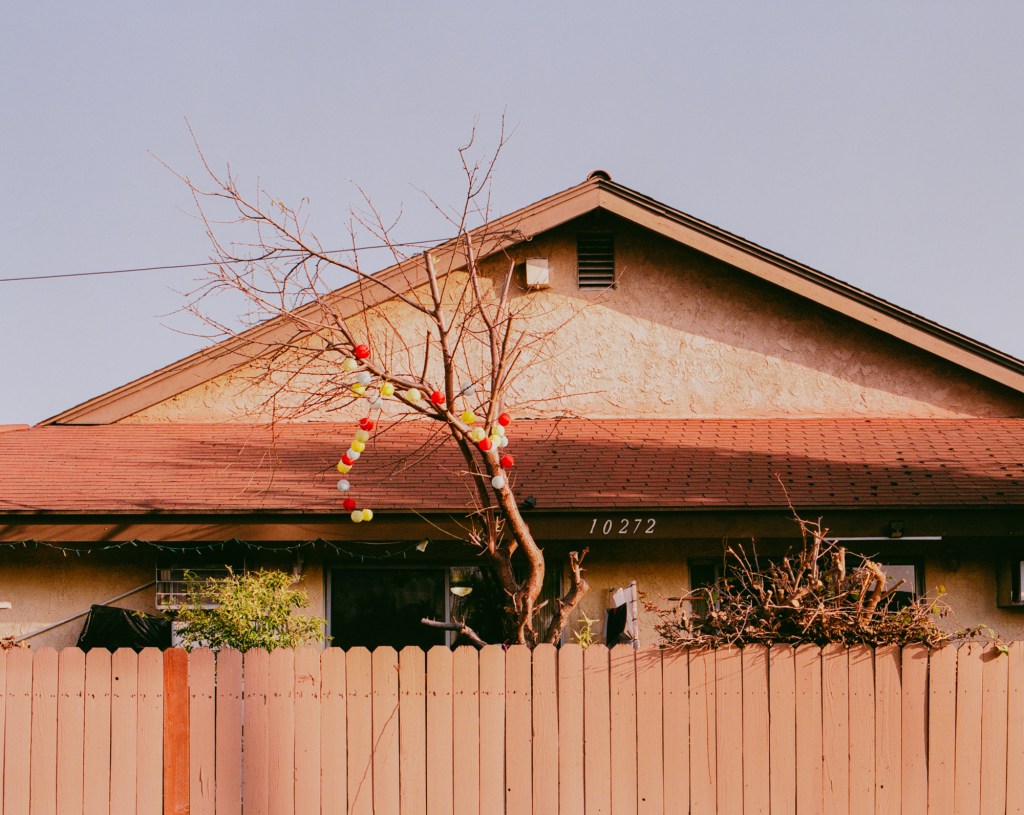
Next are some shots that feel very special to me. I’m from Vietnam, and I spent couple years in Saigon for my university study. There’s a area in Saigon that I usually went to with my friend for after school hang outs, called Thanh Đa. The places I went to with my friend back then were typical old, tight, a bit messy and mundane. Aside from all those adjectives, I still cannot find a proper word to define how was Thanh Đa exactly from my mind, but it feels very Vietnamese. And when I came across this street near my apartment here, I knew for sure it’s a Vietnamese community. The old houses and the tightness feeling and the way people hanging their stuff out on the walls, that all represent an old Vietnamese’s life style that I’m so familiar with. I don’t think these scenes are beautiful in other people’s eyes but to me they feel like a sad old poetic memory.
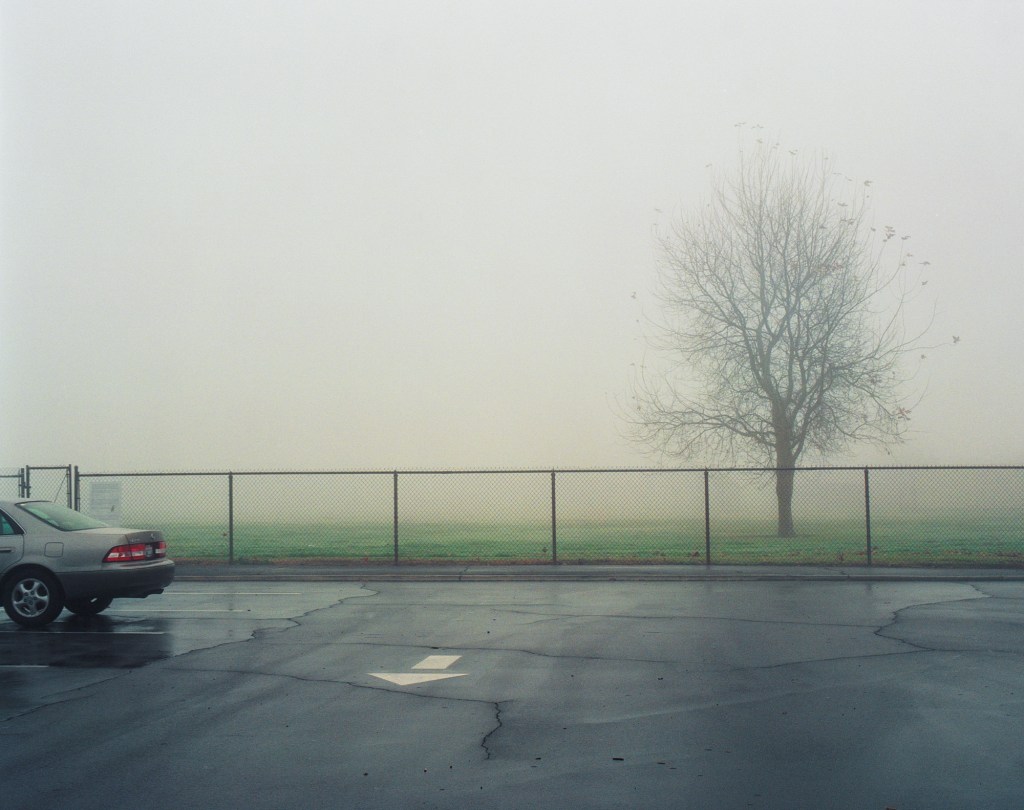
Final is some shots taken with Portra 800 in a rare foggy morning in my town. The tree standing there alone in the field feels very photogenic. I know that converting the photos to black and white will look more pleasing for these type of minimal shots but I personally don’t like minimalism style and “minimal shots + black and white” is too cliché for me. However, with these shots I was receiving a lots of helpful advices from fellows on Discord so I’m grateful for it.
Thank you for stopping by, hope my biography didn’t bore you to death. As always, leave a comment if you want to. Cheers!
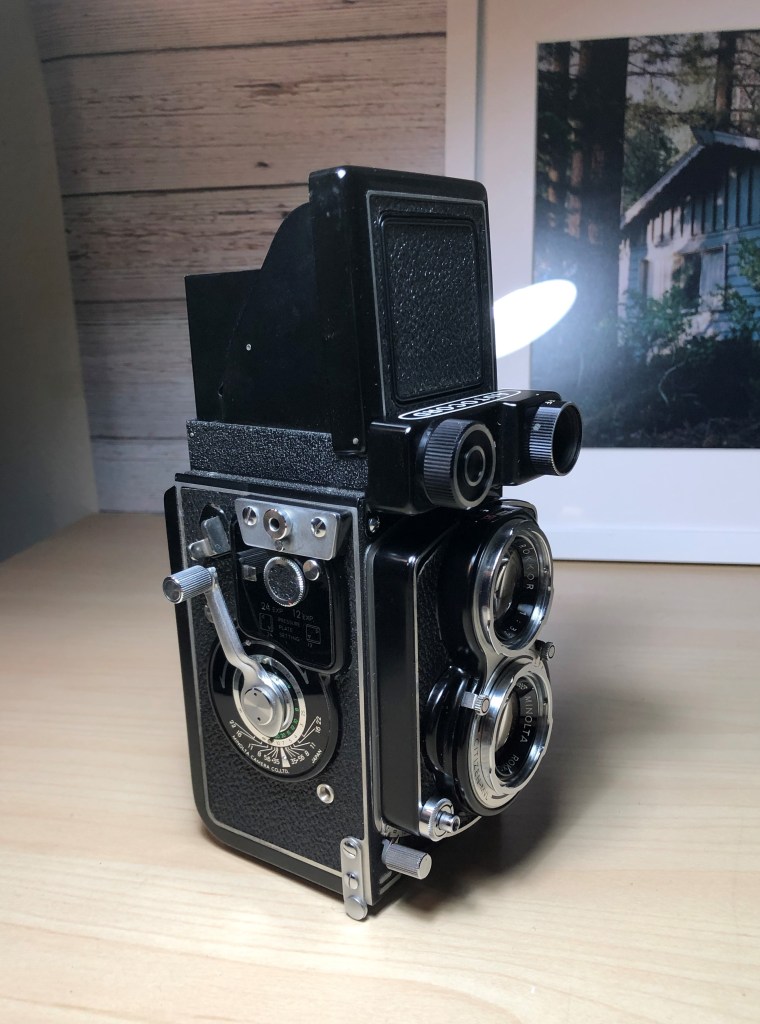
I came across this camera in a thrift store and couldn’t help myself but buy it. I’ve been wanting a TLR for a while now but decent TLRs are not cheap. Although I never touch a TLR before but I know enough about cameras in general to check the basic functions and this camera seems to work fine. So after purchased it, the first thing I did is cleaning it up. I always clean things up after I buy them, and also because of the Covid situation. I used rubbing alcohol and damp tissue to wipe the outside of the camera, I also used Q-tips and toothpick to get into places that I can’t with my fingers. For the lens, I used lens wipe and microfiber cloth to wipe them gently. Here’re some photos of the camera after I clean it. How beautiful it is!
1
2
3
4
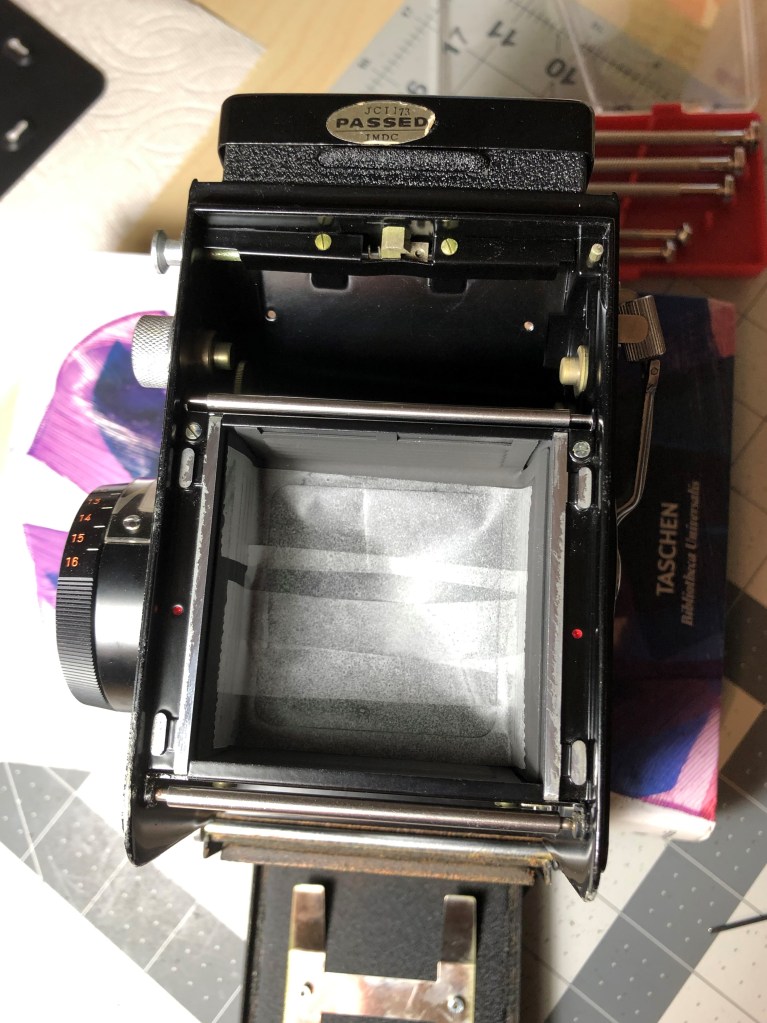
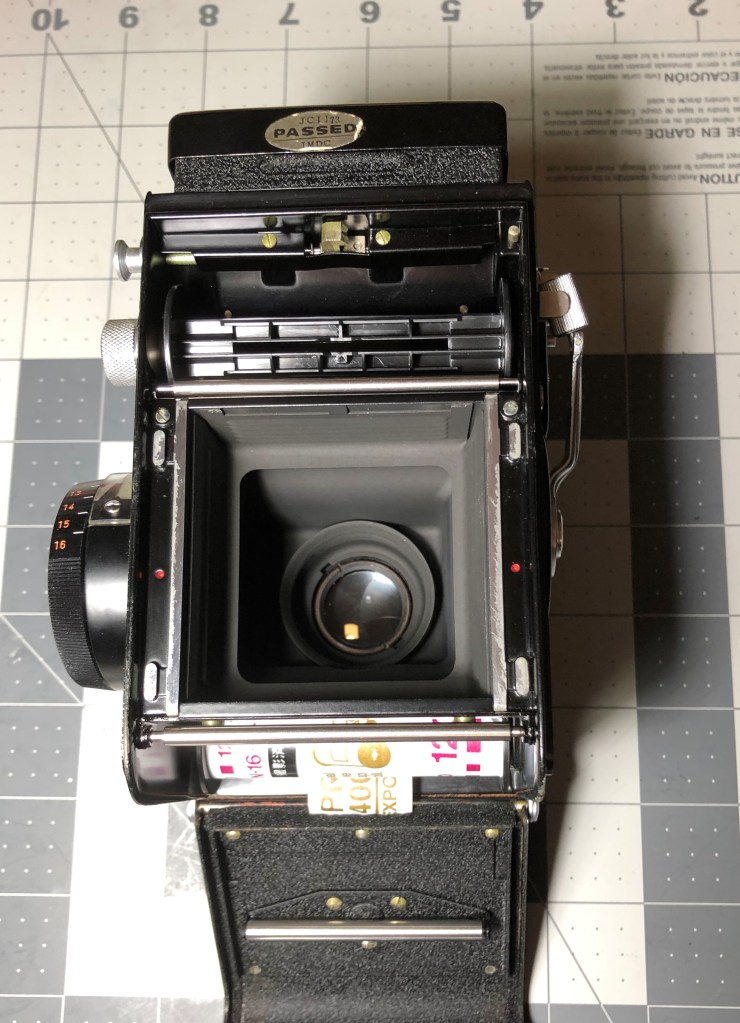
After the basic cleaning, I opened up the viewfinder to clean the ground glass and also to remove the old light seal and apply the new one. Here’s what you need for the process: a set of small screwdrivers, light seal foam ( I used the 1mm thickness), rubbing alcohol, and some additional stuffs such as baking soda, aceton, sewing machine oil.
5
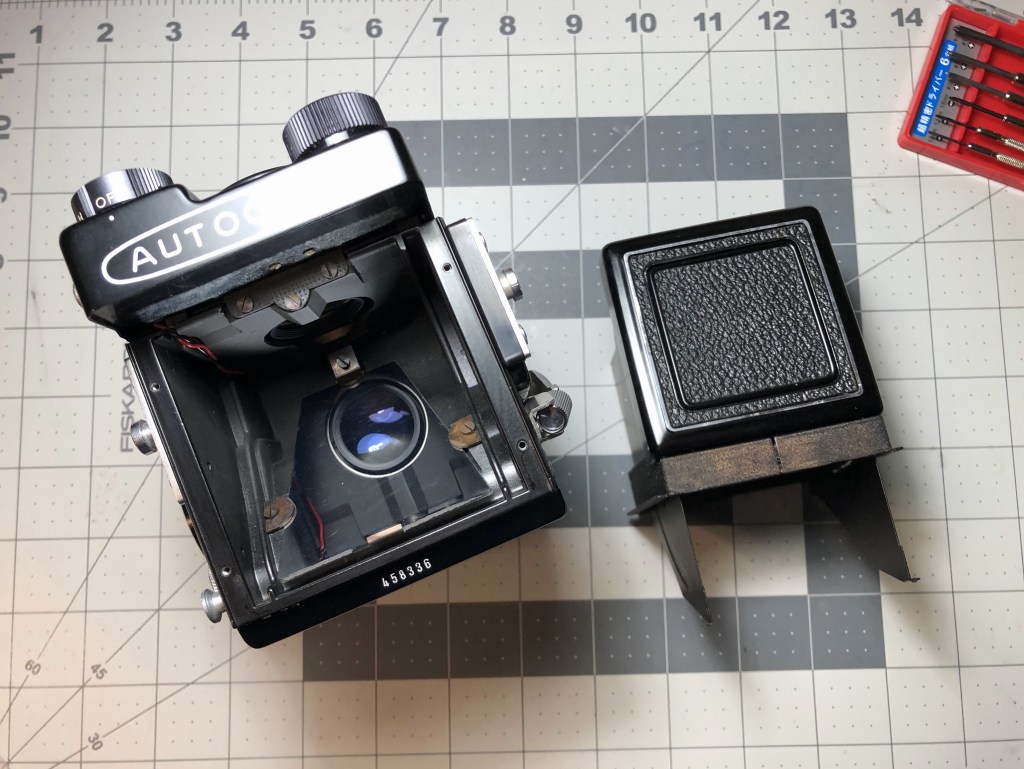
To remove the focusing hood off the camera, you need to unscrew the 4 screws on top of the camera, using a flat 1.6mm screwdriver.
6. The position of 4 screws
7
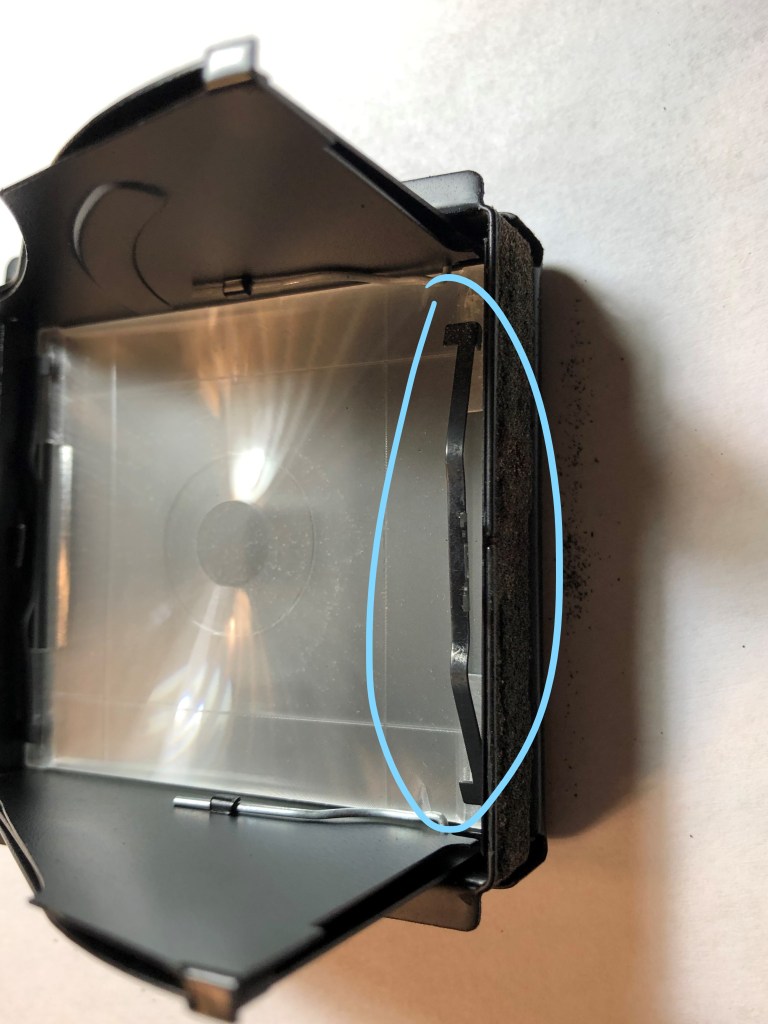
This is the focusing hood after I take it out (photo #8), you can see the dust on the glass surface and in between the ground glass and the focusing mat. I also need to remove the metal thin bars (there’re 2 of them) as in the photo on the right in order to remove the ground glass out of the hood.
8. Bottom of the viewfinder hood
9. The thin metal bars that keep the glass in place
Big advice: DON’T USE RUBBING ALCOHOL OR LENS WIPE TO CLEAN UP THE FOCUSING SCREEN!!! Because they will make the screen foggy and white and will destroy your screen. So what I read on the Internet told me that I can wash the focusing screen and ground glass with water and gentle soap and use my fingers to gently scrub them, so I did. And it worked fine. One tip is you can use the hair dryer to dry the screen and glass so they don’t have water drop marks on them. I also cleaned the magnifying glass with lens wipe and Q-tips.
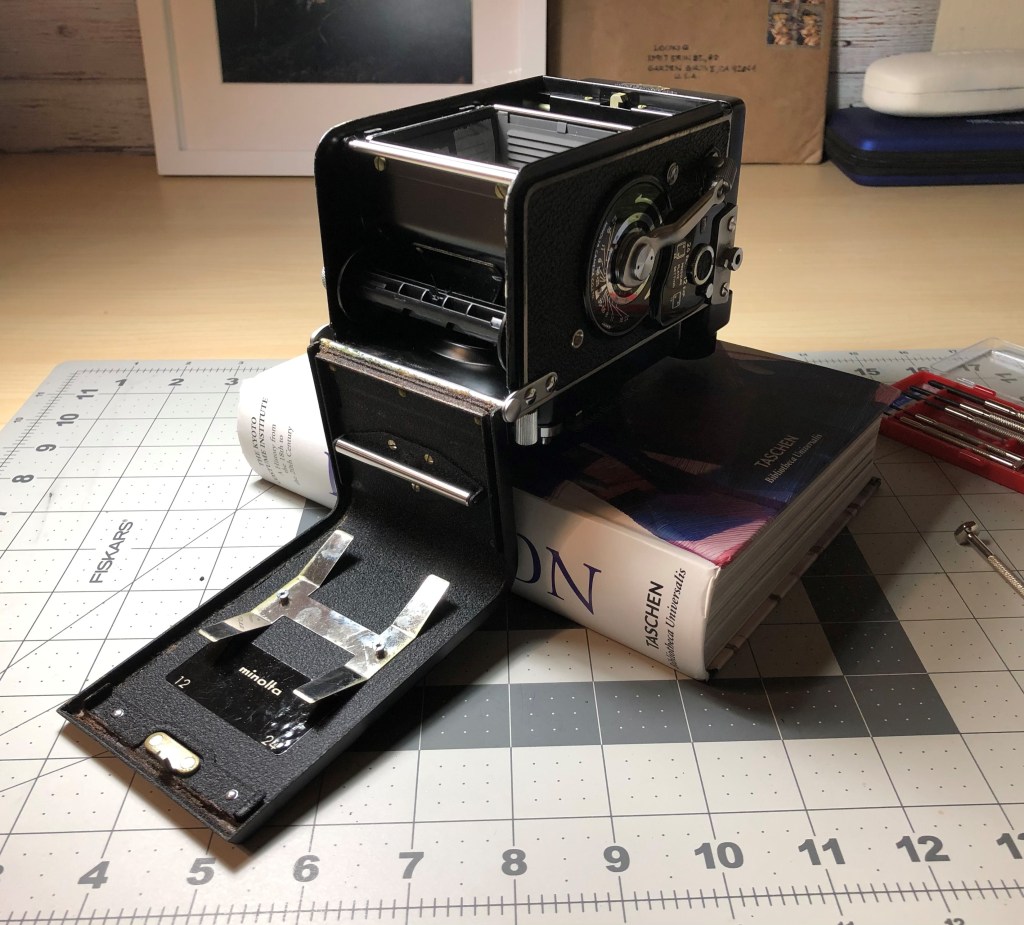
So when I finish the focusing screen and ground glass. I put them back into the viewfinder hood. Now it’s time for replacing the light seal. So, the first thing I do (and recommend you too) is using tape to cover the film chamber so the dust and old light seal crumb cannot fall on the taking lens.
10. I used tape to seal the film chamber from the dust and crumb
Also, remember to remove the pressure plate out of the camera door, just so the film back would be easier to clean.
11. Remove the pressure plate from the back
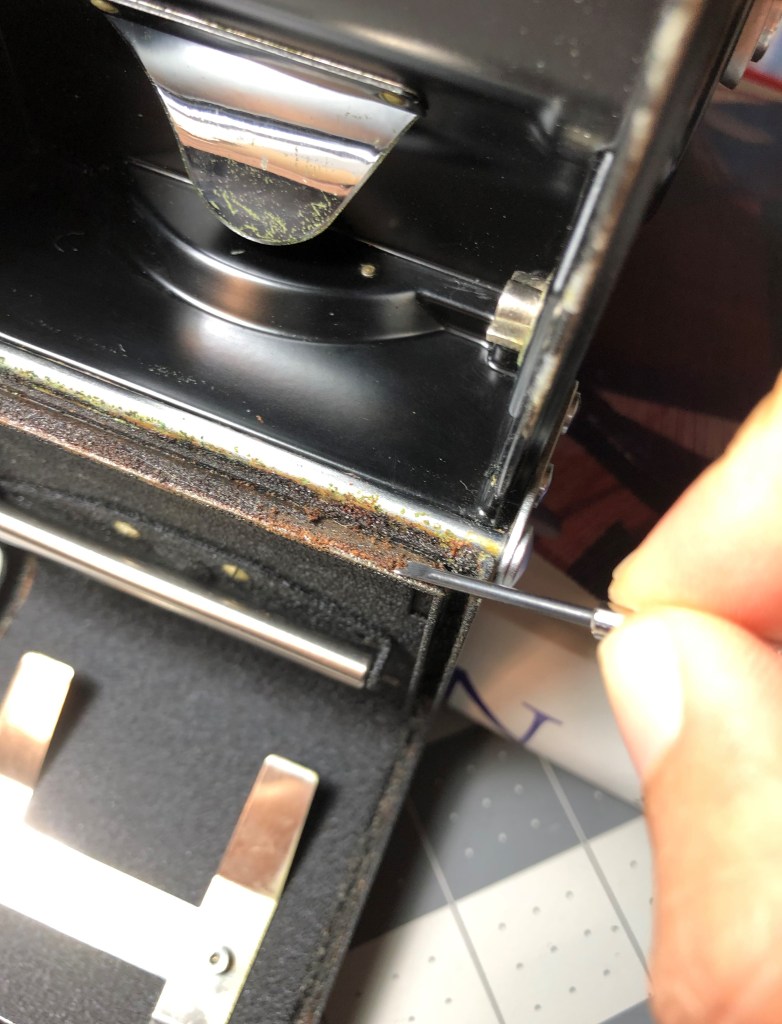
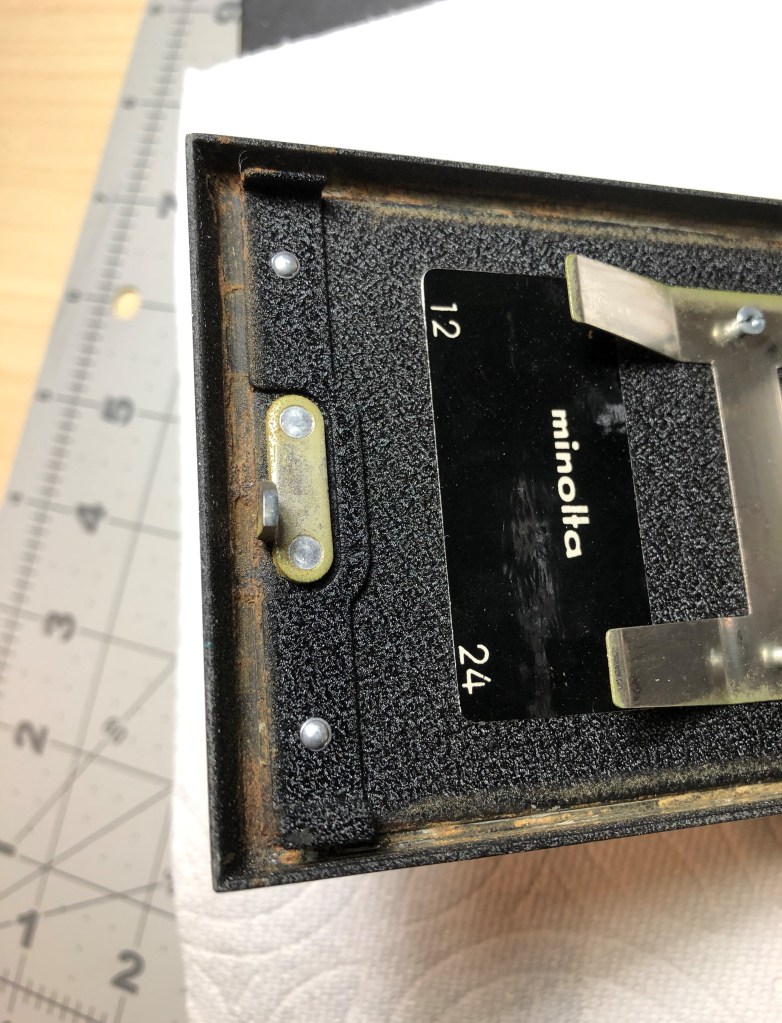
Next, I used toothpicks and the small flathead screwdriver to remove the old light seal and dust on the camera door. I put the camera on a thick book for more convenient. Then, I used Q-tips, toothpicks and rubbing alcohol to remove the crumb and rusted waste from the camera body, right at the hinge of the film door (as photo #13). As you can see, my flathead screwdriver is very affective at removing the old light seal in the small gaps along the film door.
12
13
14
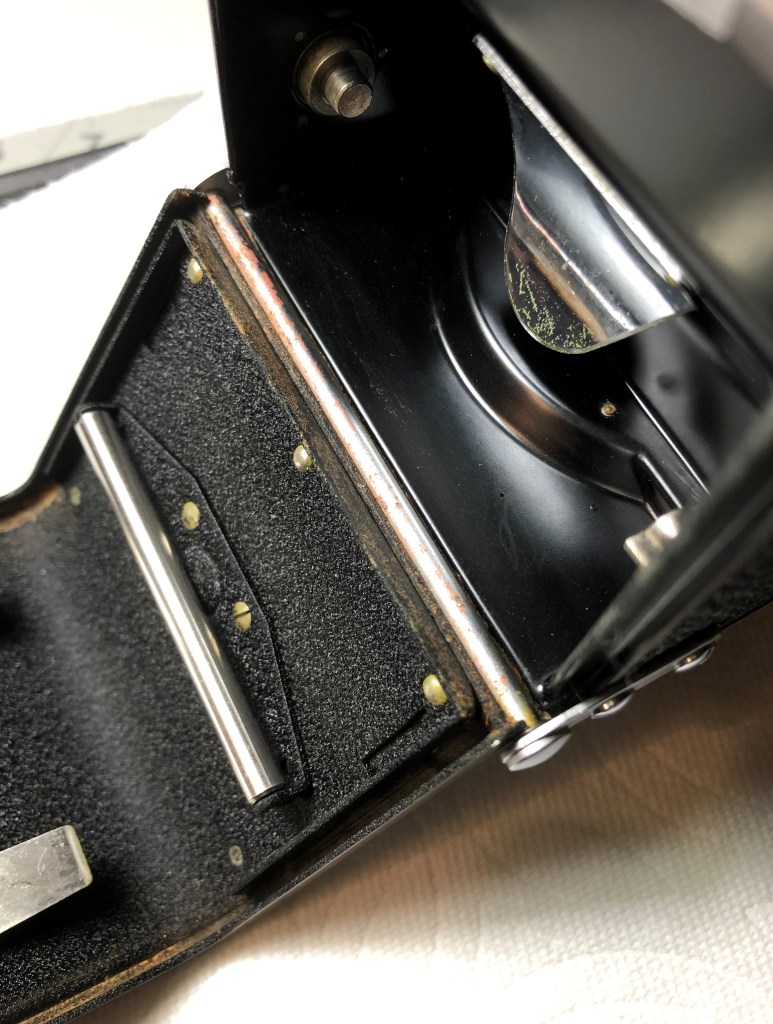
After clean the hinge area, I continued to clean the rest of the light seal, along the film door edges. The photos below show you the before and after I remove the old light seal.
15. Old light seal and crumb on the back door
Before
16. Old light seal removed
17. Crumb and dust removed on the hinge
18. Close up of the back door after remove old light seal
After
And I also used baking soda and water to wipe the metal parts that’s rusted along the way, such as screws or back door locking mechanism.
Next step is cutting the new light seal foam into the stripes to apply on the camera’s door. I asked Mr. Karl Bryan, who is a famous Minolta Autocord repair man, for the instruction of the replacement light seal since I couldn’t find the light seal pattern on the Internet, he did kindly reply me with the instructions. The light seal for the door should be 2-2.25mm wide and 1-1.5mm thickness, the light seal for the bottom of the door, right at the hinge should be wider. So in the end, I cut 2 stripes of foam 2mm wide, 250mm long (250mm is the length of the whole form, I didn’t measure for the length because I can always trim it later); 1 piece 5mm wide and 65mm long for the edge at the hinge. To cut it, I used regular paper cutter and a long ruler to guide the straight lines and put pressure on the ruler to stable the foam when I cutting.
19
20
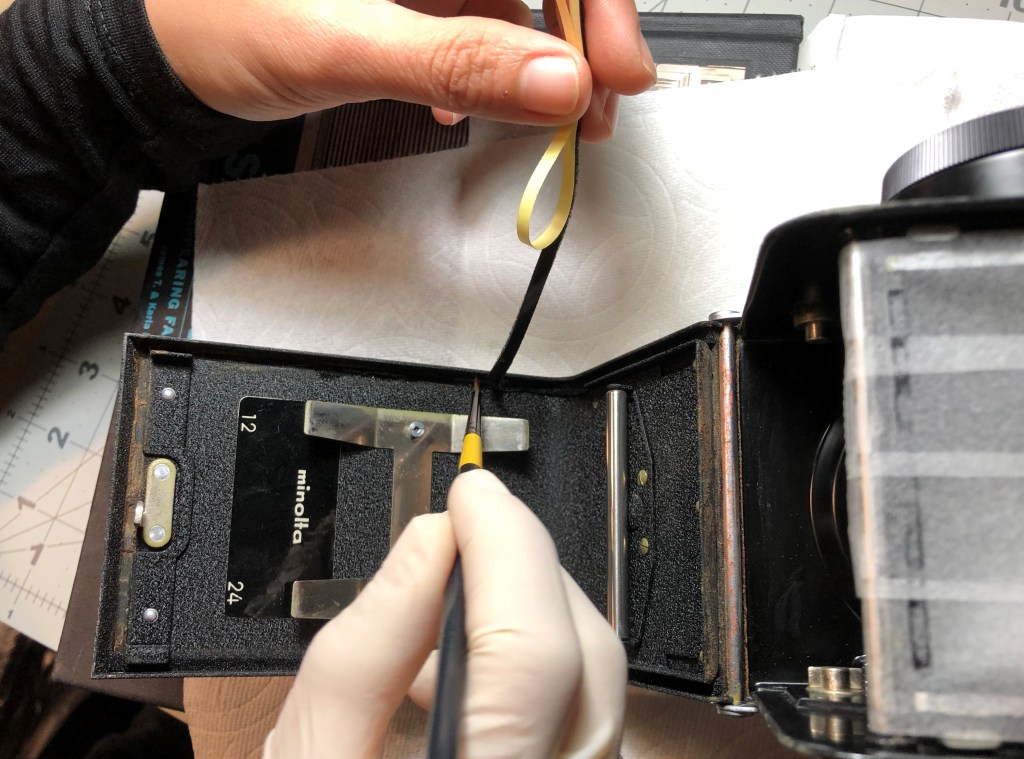
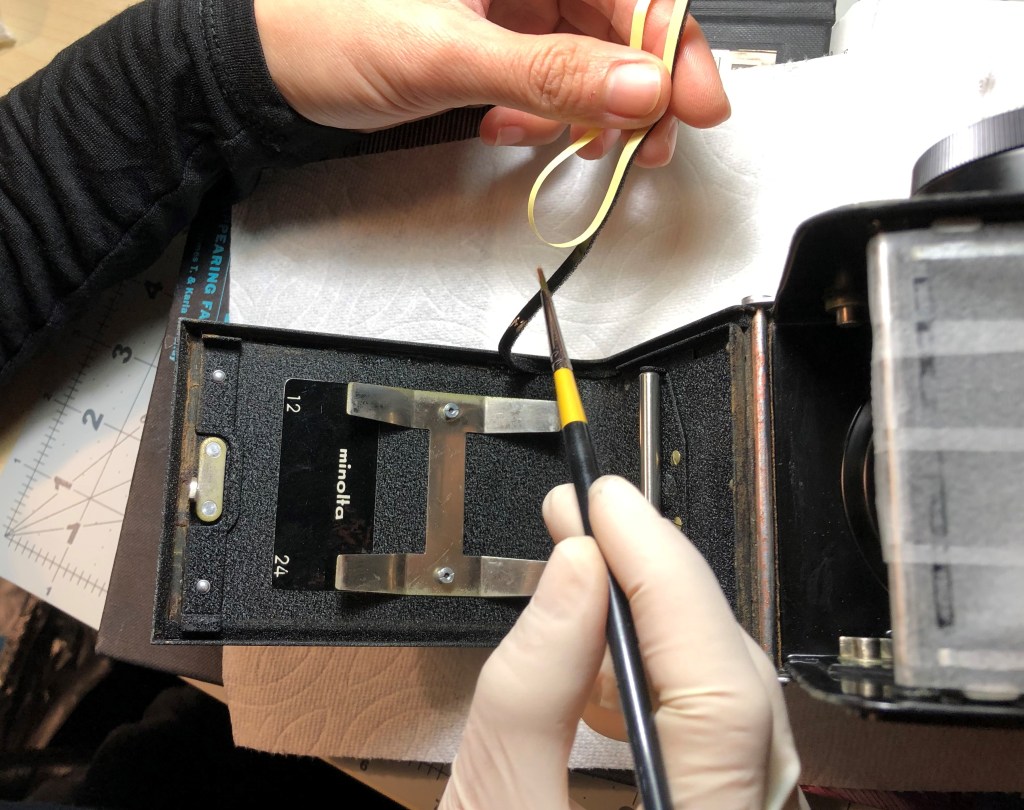
Mr. Karl Bryan also gave me a tip that applying rubbing alcohol onto the back of the light seal and on the surface of the area where we need to put the light seal on, and then lay the light seal down, slide it into place and let the alcohol evaporate. The nice thing here is the alcohol makes the adhesive backed foam and the camera door don’t stick together when they contact, so you can move or slide the foam into places easier. I used to replace the light seal in my Nikon F2 and didn’t know the trick, so when the light seal was put in the camera, it’s sticky and you may tear the foam stripe when you try to peal it out. As you can see from the photos below, I used a small paint brush to apply the rubbing alcohol on the gaps of the camera’s door and on the stripes (photos #21-22).
21. Applying rubbing alcohol on the area of the camera’s door
22. Applying rubbing alcohol on the back of the foam stripe
23. Using small screwdriver to put the foam into place
24. Applying rubbing alcohol for the door’s edge at the hinge
25. New light seal installed at the hinge
26. New light seal installed completely
After replace the light seal for the back door, I also noticed that the viewfinder hood also need a foam right at the front side where it touch the name plate. So I clean up the surface, measured the area and cut the proper light seal foam for it (photo #28). I guess the foam was put here to avoid the two parts bump and scratch each other.
27
28
29. New foam applied
30. New foam applied
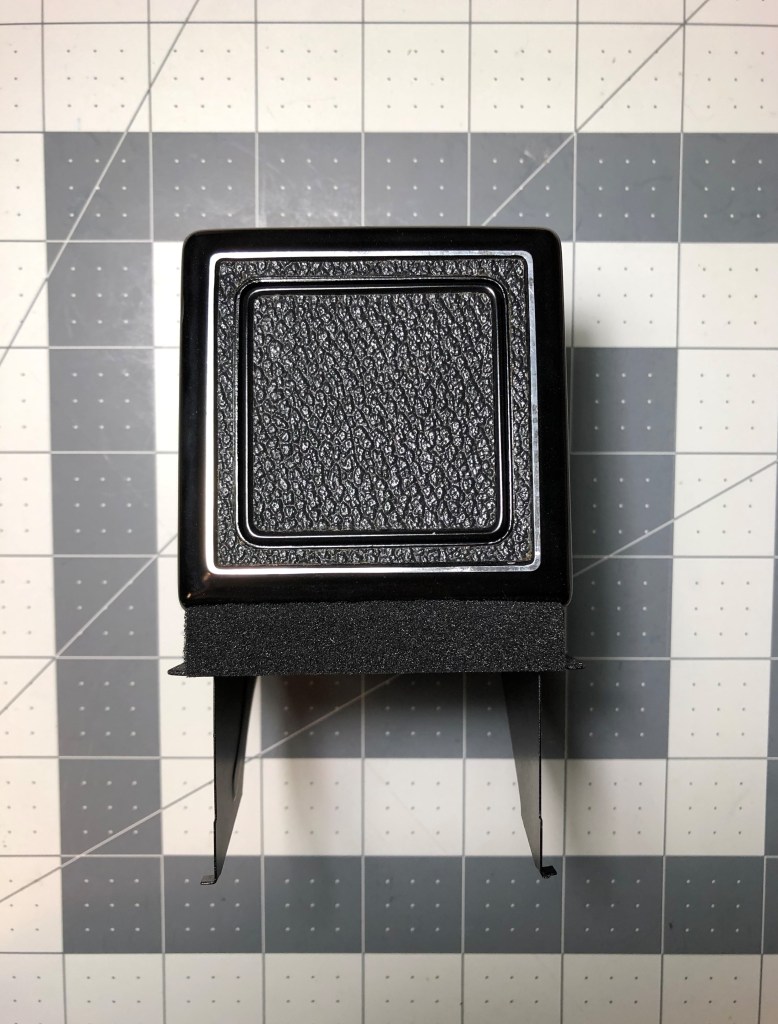
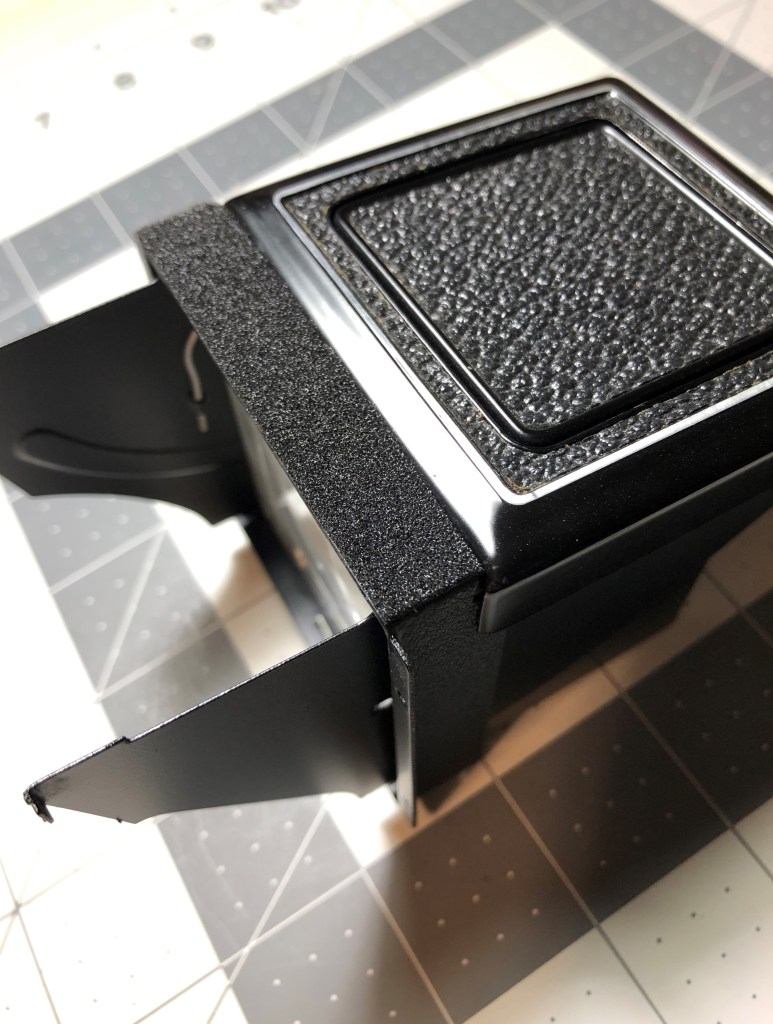
31. Putting back the viewfinder hood
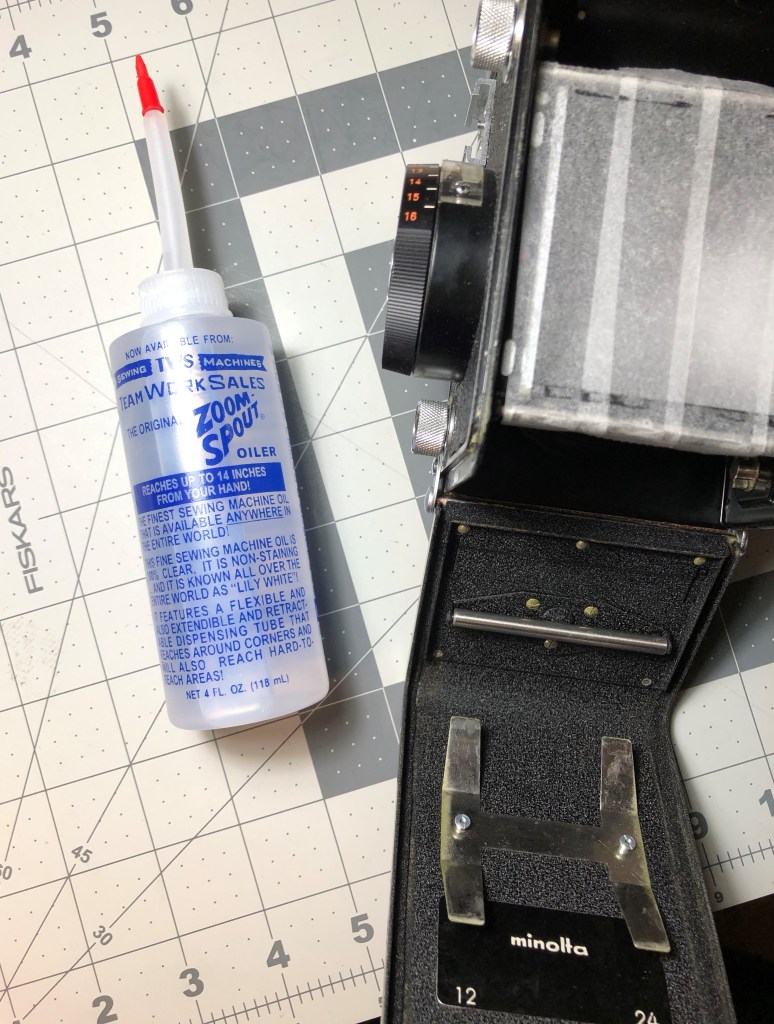
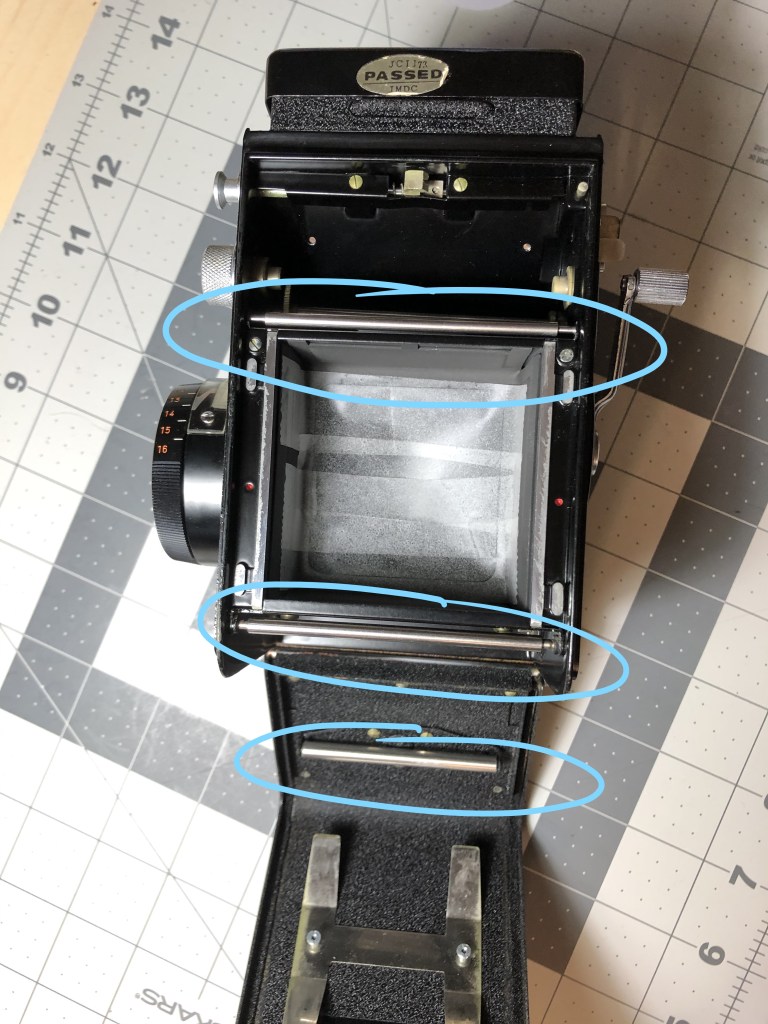
So the process almost finish here, but there’s still one last thing. As Mr. Karl Bryan advices, I applied sewing machine oil on each end of 3 film rollers (photo #33), on the upper film chamber gear (photo #34) and on the take up spoon gear (photo #35). Just put one drop of oil, spin the rollers or rotate the gear and wipe the excess oil. This will minimize scratching your film when winding.
32. Sewing machine oil for the lubrication, comes with a long tube, nice!
33. 3 film rollers
34. Upper chamber gear
35. Take up spoon gear (in lower film chamber)
In addition, I also put the oil on the hinge of the viewfinder hood since it’s a bit stiff to open and close. After applying sewing machine oil into the hinge, the viewfinder’s smooth like butter! Of course, always remember to wipe the excess oil because you don’t want the oil gather dust around in your camera.
Finally, time for the test roll. I used an empty roll that just has the paper back to test out the rollers and winding crank. Everything worked beautifully. After 12 dummy shots and winding, the roll’s transferred to the pick up spoon nicely, I open the paper back to check if there’s any scratches on the back but no, yay! This camera is now ready to shoot!
36. Time for a test roll
37. Loading the test roll
38. The roll’s transferred to the pick up spoon
Thank you Mr. Karl Bryan for the instructions and advices. I didn’t know anything about the Autocord series or this CDS model particularly but when I read about it, I’m in love. Just because the design is so special and the quality is one of the top. So I wanted to give it a nice treat by having a CLA by Mr. Karl Bryan but since my camera doesn’t seem to have any functional problem, he suggested I should use the camera until something goes wrong. I definitely recommend Mr. Karl Bryan to anyone who’s looking for a repairman for the Minolta Autocord, he’s the best, and also a super nice man! You can reach him at karl.kathy@frontier.com
Thank you for making it here. Hope to share with you guys some photos taken with this camera soon. Cheers!
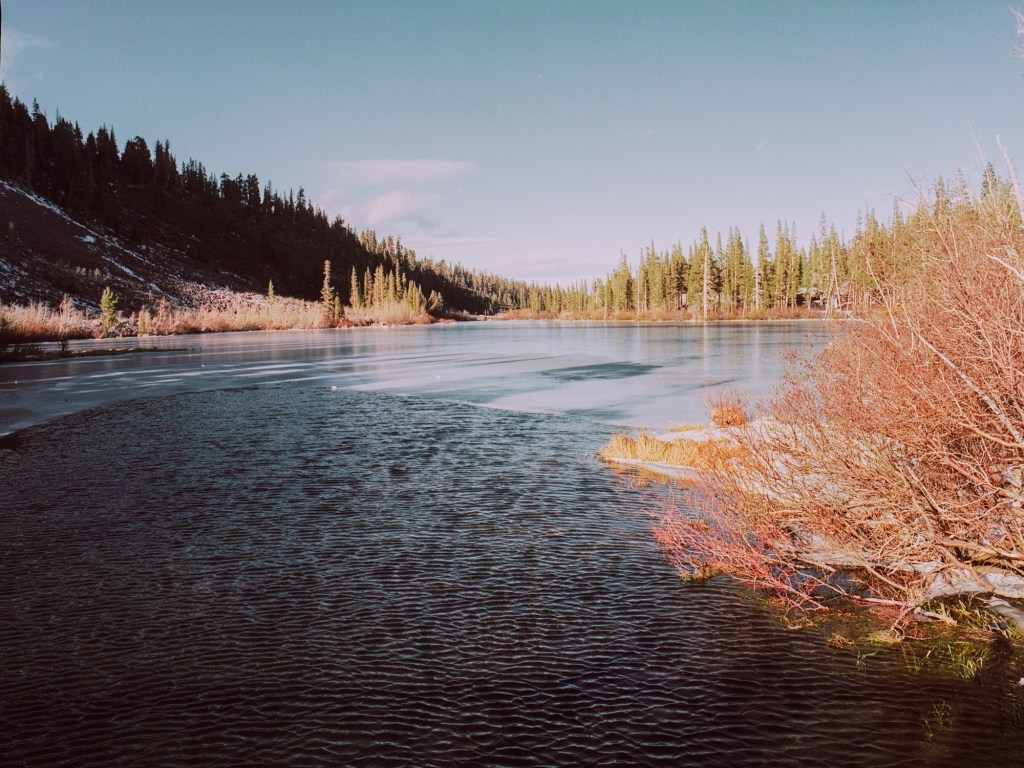
Here we are for the continue part of my Mammoth Lakes road trip.
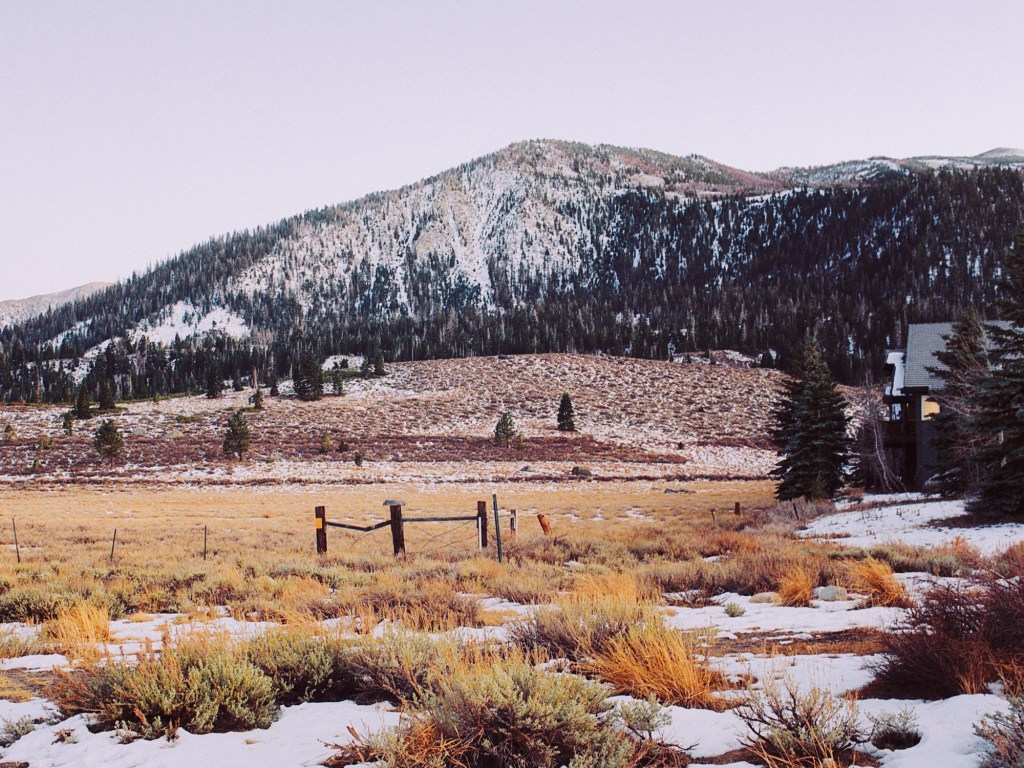
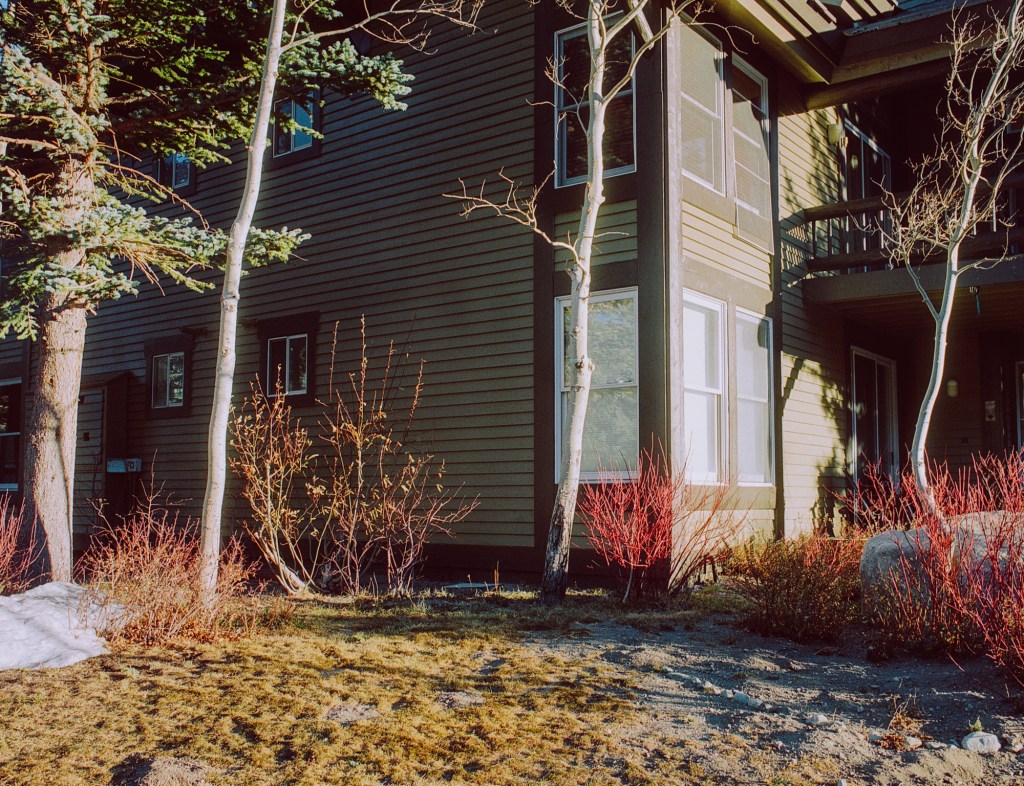
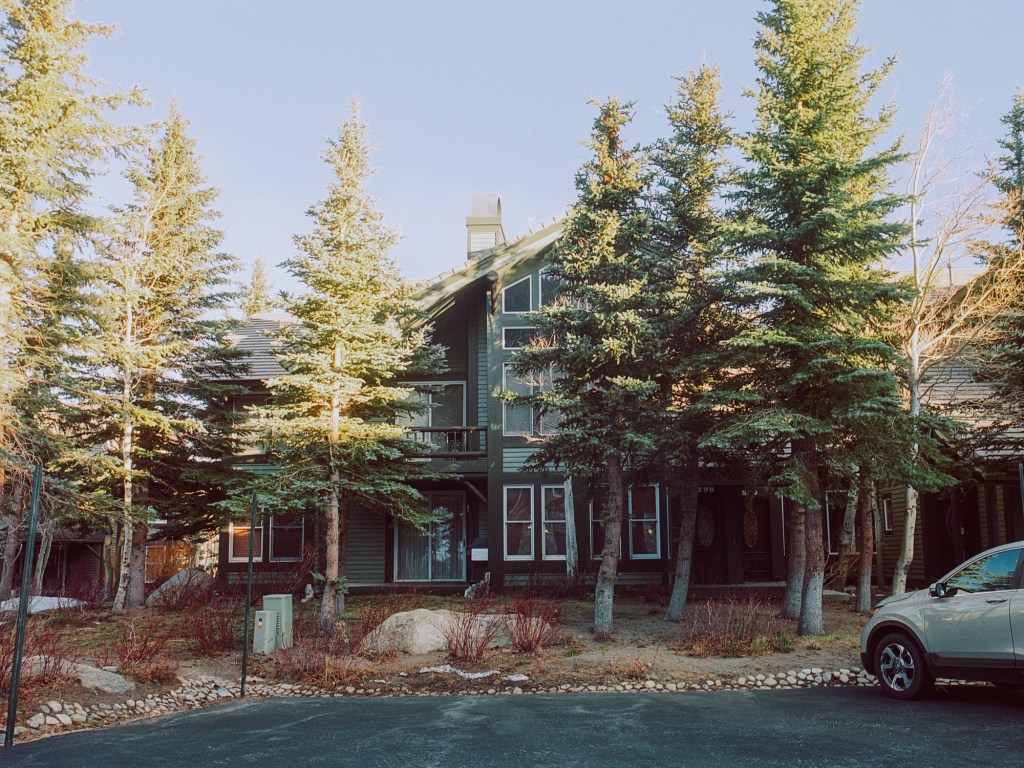
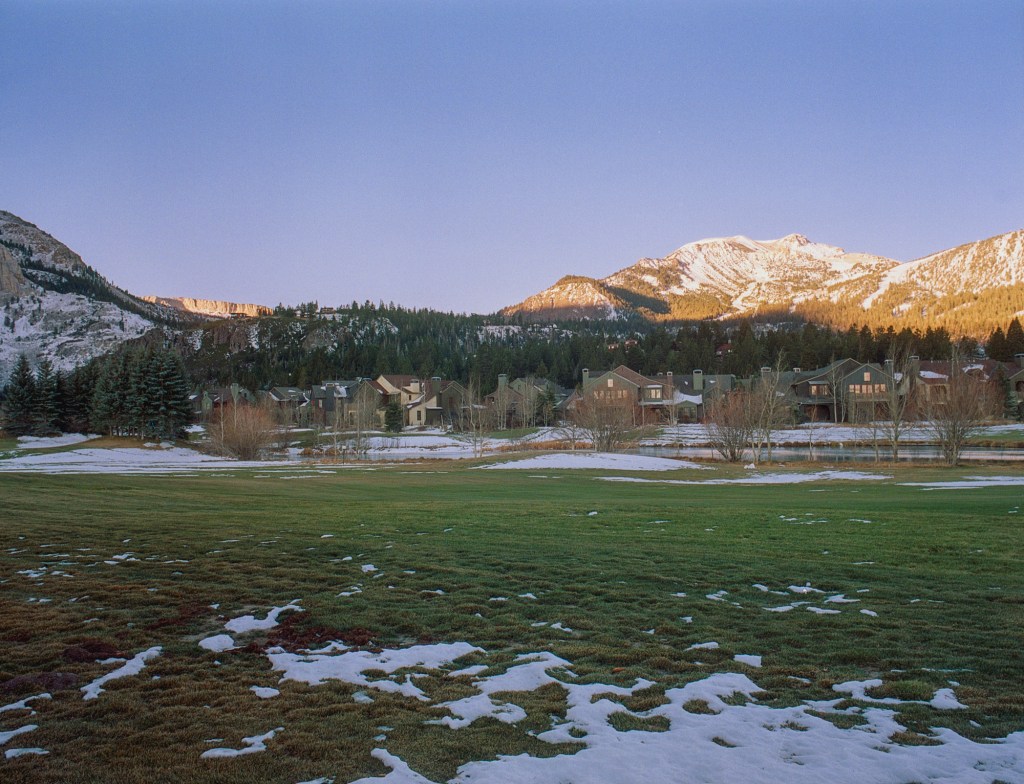
After the first day of going to Gull lake (which is I took a roll there but no photo came out that I want to post here 🙂 ) and another frozen lake that I forgot the name, we came back to the lodge because we weren’t sure to be out when the sun went down. So after getting back to the lodge, I walked out to take some sunset (or blue hour, for more precise) photos at the Meadow and stopped frequently on my way to take some nice house scenes. Here’re the photos that I like the most from the trip.
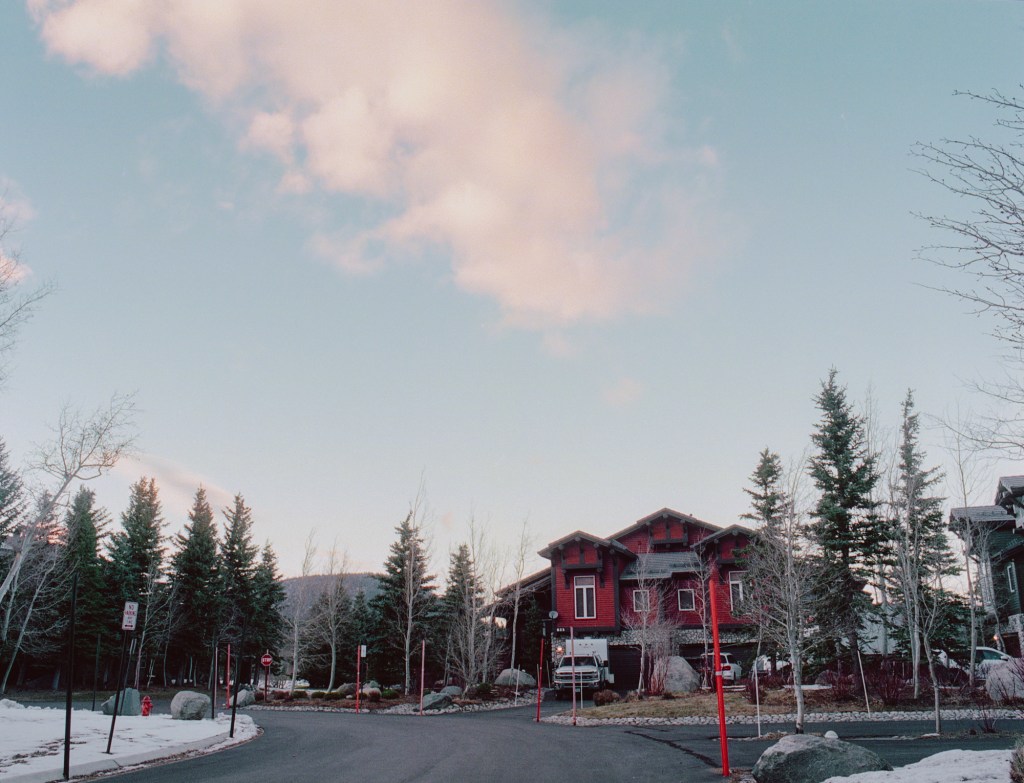
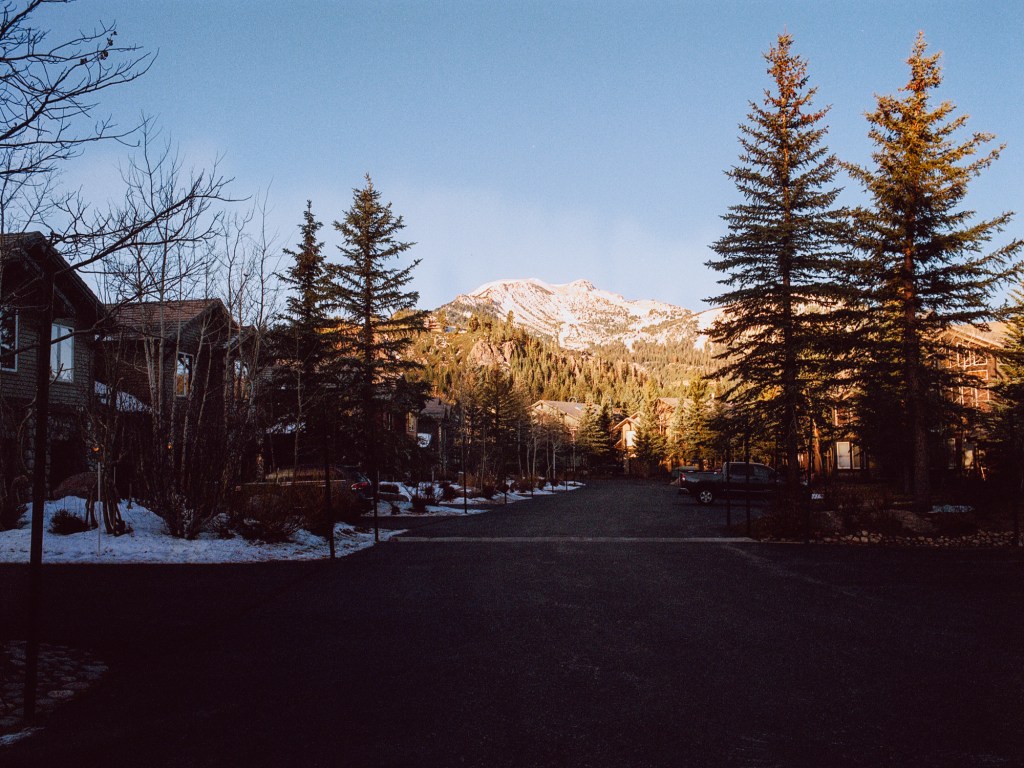
The first one is photo of one street in the lodging area, I captured it because it gives the general feel and architecture of the area, along with the massy mountain behind. The second one I took because the nice red house is quite interesting and the cloud above has a very nice shape and color. It’s a bit hard to take everything into the frame but I quite happy with the result, the only thing I don’t like is the bright red pole in the foreground that overlaps the house.
The photo on the right is when I went back the the lodge and the sky was dark. I saw the light from the light bulbs from the house was quite interesting and the tree in the front also had a nice shape and texture so I set up the shot for a long expose photo. I like how it came out but still think the composition is a bit off. I think if I had stepped back a bit and moved to the right couple inches, the composition would be much better, because the roof of the house wouldn’t ended right at the frame lines. Another lesson for watching your composition carefully before taking the shot.
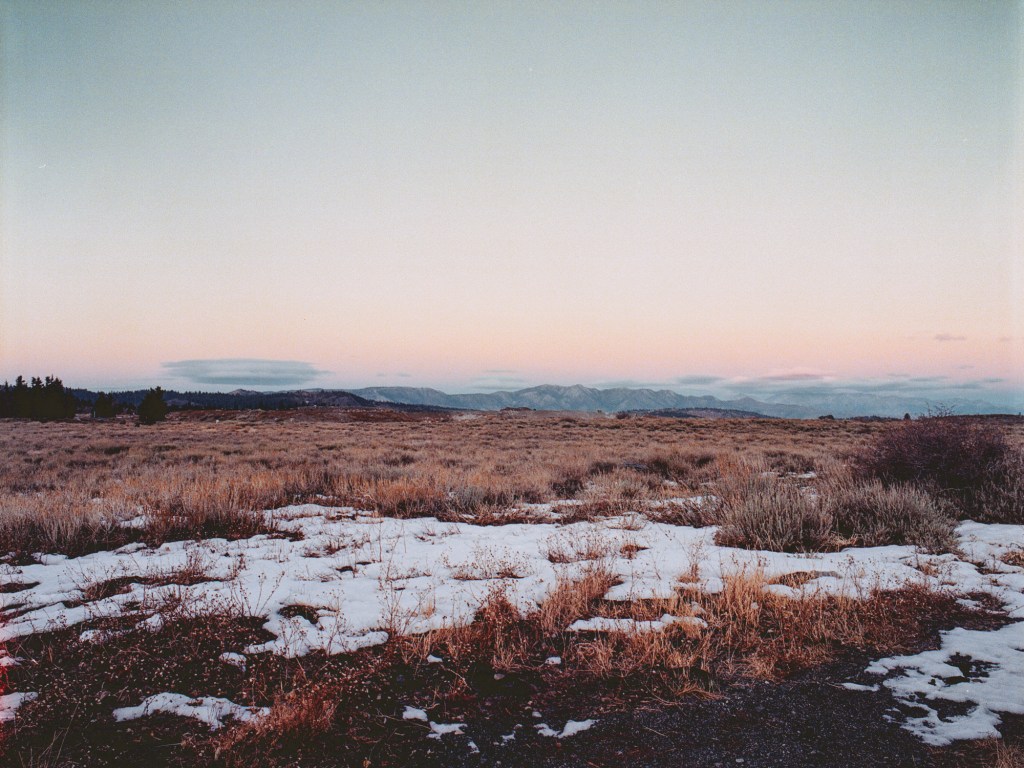
I like this very much. This is the first photo I took when I walked out for the sunset. The sun pretty much hided behind those mountain already but there’s still a bit orange glow at the horizon. I think the colors here work together very nice, the red is pop but not taking away the cold calm vibe in the photo. The reflection in the glass window also looks so dreamy and poetic. I also like the composition and the complex of the scene. To me, everything works together very well in this photo.
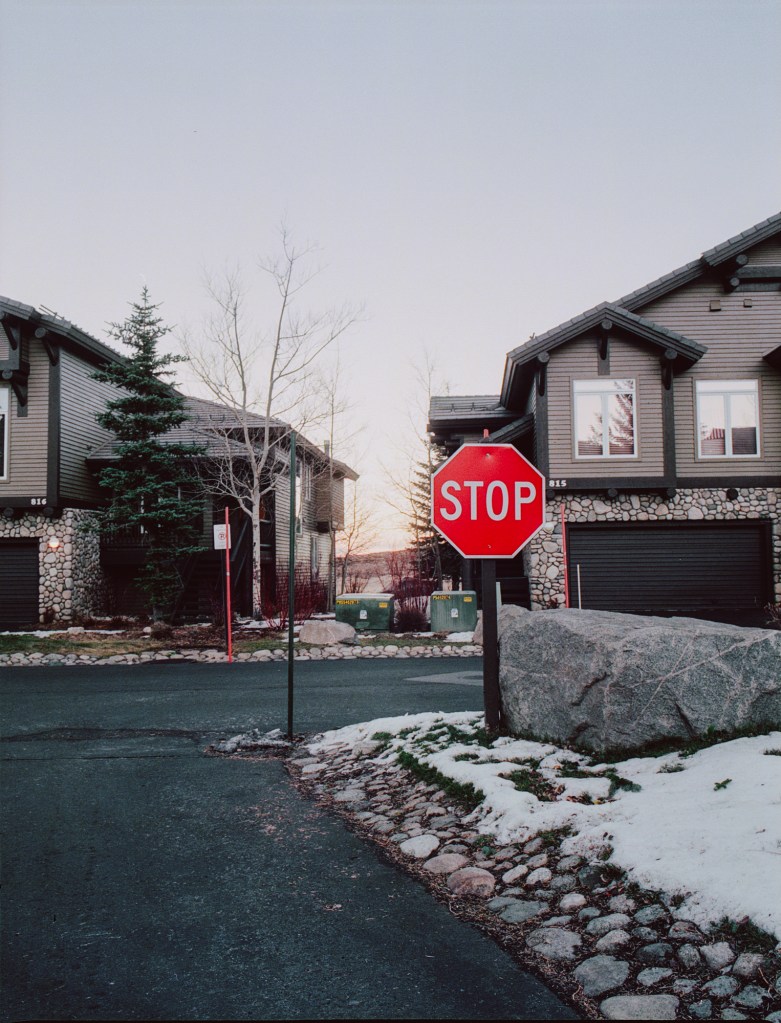
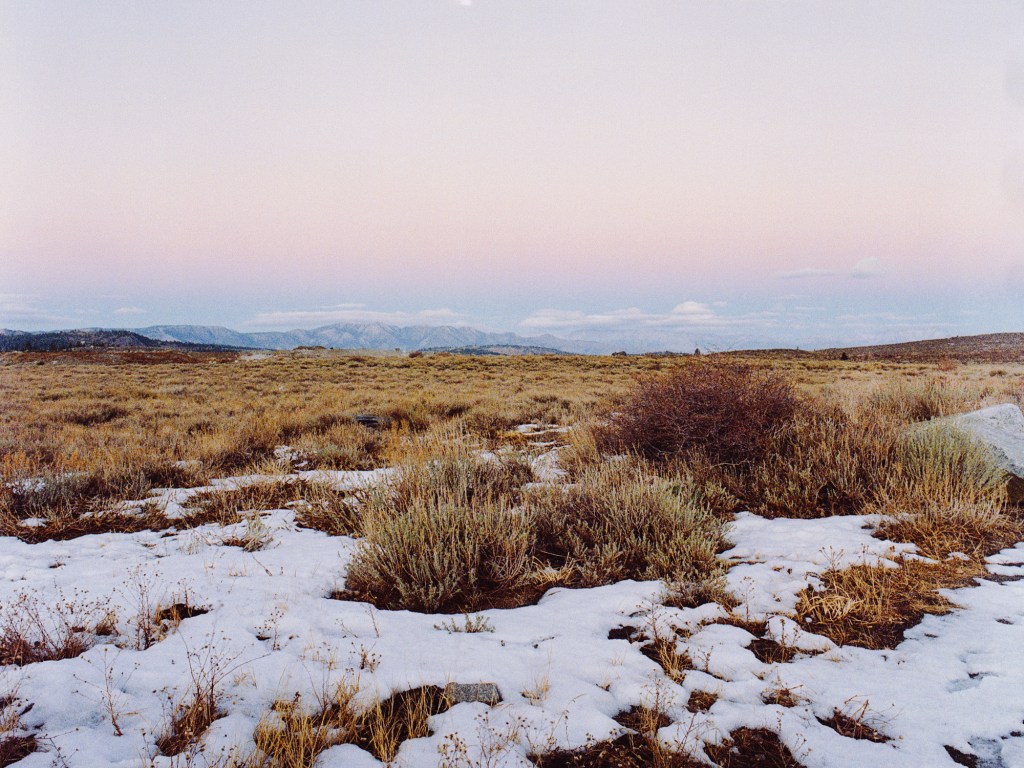
This photo of the “Private Property” sign I took on the way back to the lodge. It belongs to the Snowcreek Golf Course. I think the photo represents very well the calmness and coldness of a winter sunset in a meadow surrounded by mountains.
The photo above here is the first one I took on the Meadow. Took with Portra 800. The sun was behind a peak of mountain but the field still have plenty of light and the glow at the horizon was so beautiful. After took this shot, I managed to take the photo on the left, of a part of the house and the mountain behind it. I think the photo is not bad but still something is off about it. The reason I didn’t include the whole house because I wanted the photo to be suggestive, not just show the objects straight out. I also like the little fence[?] in the middle of the frame, it adds a very nice touch to the field. One thing I think I could do better for this photo is exposing for the house to get more details out of that, and hopefully don’t blow out the highlights. In general I still like it but it’s not good enough to be showed as my best work.
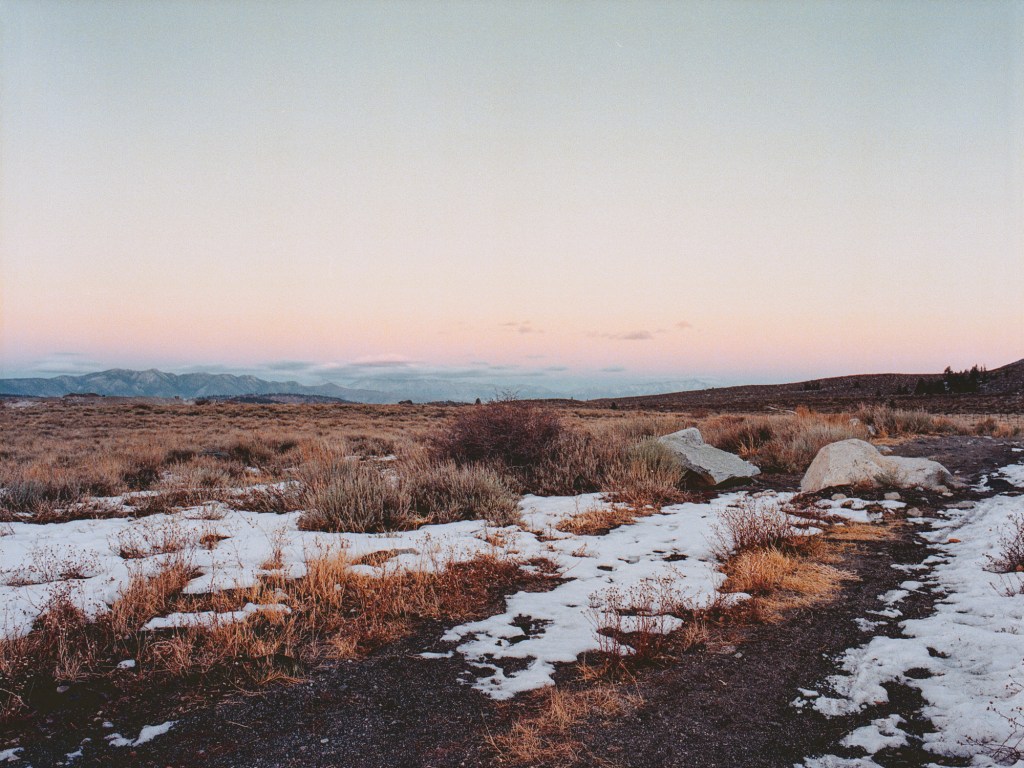
On the right side are photos I took when the sky is almost dark and there’s not much light on the grass field to expose. I took these in the much longer shutter speed than the previous photo above. You can see how much the difference is compared to the earlier photo taken 10-15 minutes apart. This merged photo describes the vast scene of the meadow in blue hour. I really enjoy this photo.
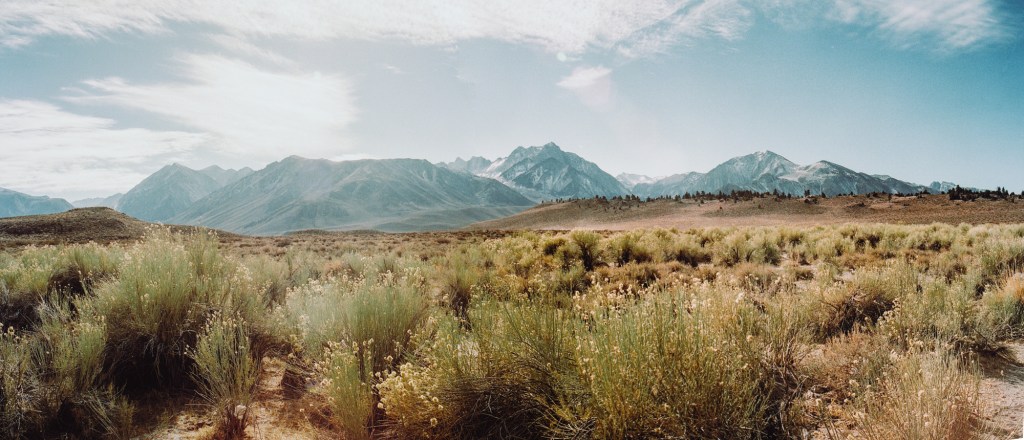
The photo below is another panorama merge from 2 photos. This is the scene at Rock Tub Hot Springs. The tub itself is quite small and funny in the middle of the vast land. When I got there, the sun was high up and the sunlight was extremely harsh. I took a couple photos but nothing come out as I like, so here just a photo for you to have an idea how the landscape looks like. All the daytime photos were taken with Fuji Pro400H.
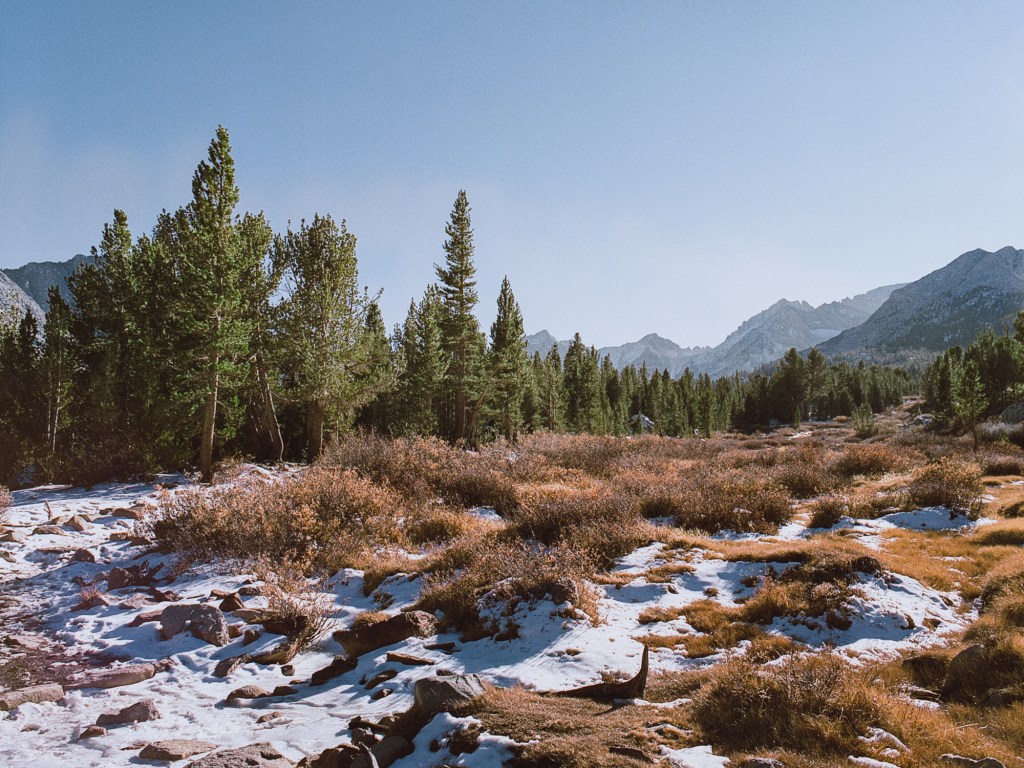
Final photos from the trip are some I took on my last hike to the place I forgot the name again, but that’s a long hike that passes couple lakes on the way. We could just have enough time to hike to the first lake and then had to come back but it’s quite a nice hike with beautiful view. The light was softer and warmer as it’s afternoon and we really enjoyed the hike.
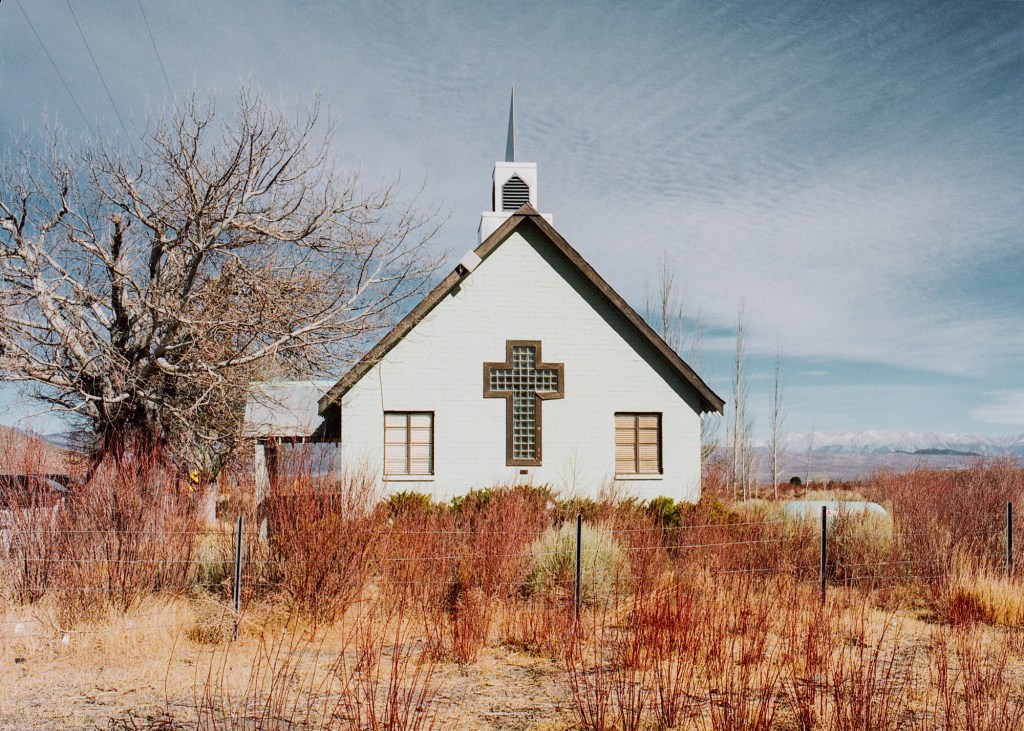
The photos above are of the Green Church near the hot springs. When I first saw it on the way to the hot springs, I was fascinated by it. A small green church in the middle of no where, who can resist that? So on the way back from the hot springs, I stopped by and took these photos. Of course with the harsh light condition, I could get the photos as good as I want. I really hope I can come back and take photos of this church in a better light. The last one is the composition that I like the most. I don’t really know why but I like the fact that a part of the building is included with the backdoor stairs and the white fence with the gate. You can also see the grass in the field behind and the mountain at the horizon. There’s many elements in this photo to look at.
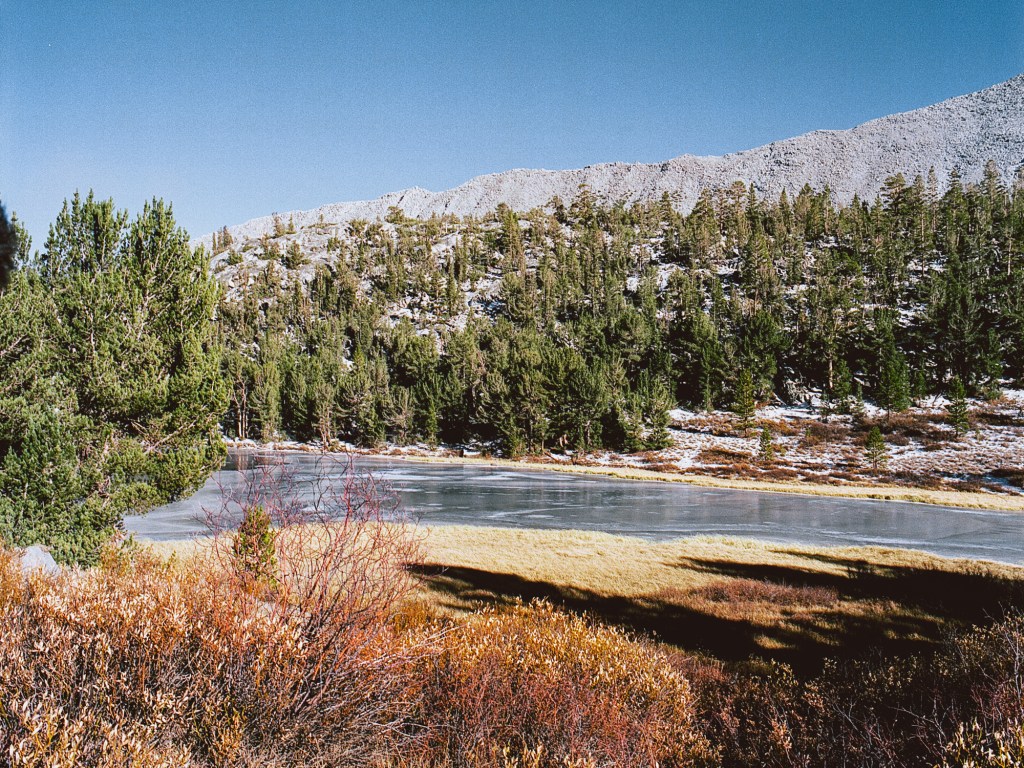
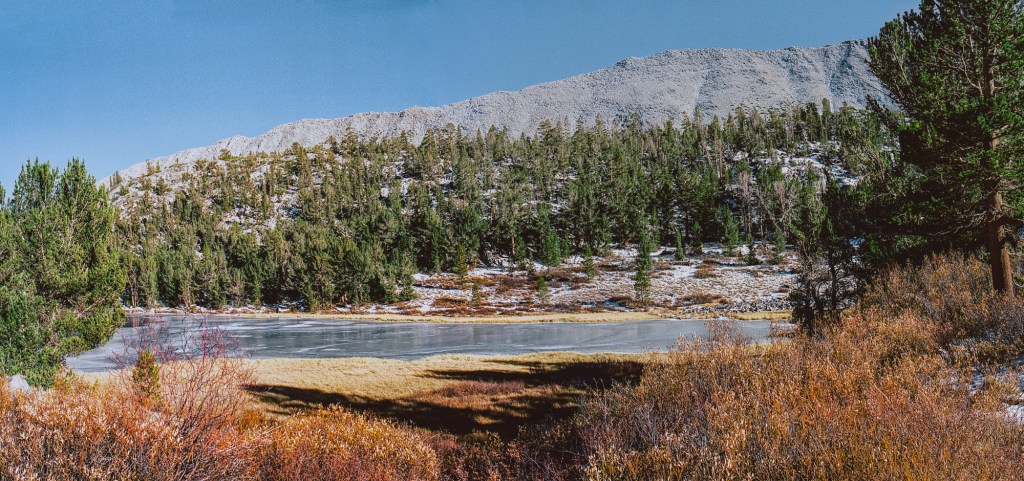
As you can see, the 2 photos on the left were merge to make the panorama below. Just so you know the view of the frozen lake that I got to see after the hike. I wish I could come down closer to the lake to have more close up photos but we’re really low on time so this is all I could get. I don’t think the composition is that good but it’s nice to see the whole view. I like the yellow grass field by the lake and the color of the sky reflect on the frozen surface.
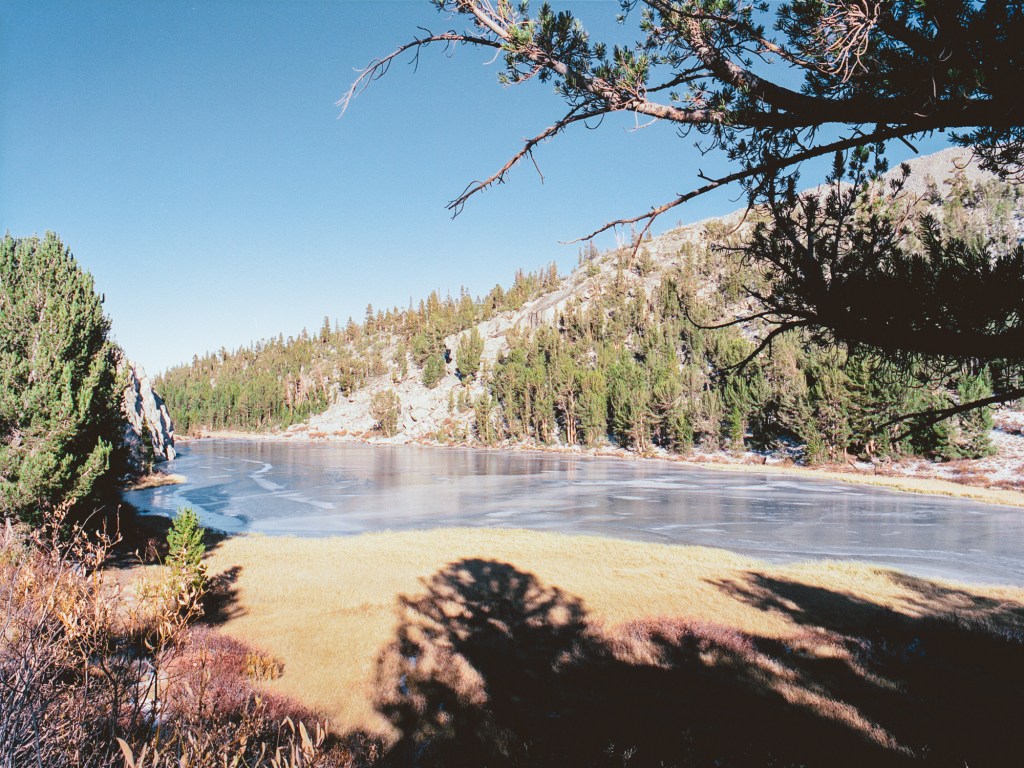
The last 2 photos are other composition that I took of the lake from a closer spot. I like the final one because the branches at top right foreground and the shadow at the bottom combines to give a direction to the eyes to look at the lake surface. I definitely blow out the highlight in this photo but I like that you can see the cliff behind the left side tree that you cannot see in previous photos.
That’s a wrap for this Mammoth Lakes trip. Thank you for making it all the way here. Hope you like the photos. Cheers!
It’s 2 months late after the trip to publish this post but I worked quite hard on the photos so I hope you enjoy it. I went to Mammoth Lakes in the middle of last November. The trip was nice and lovely, the weather was beautiful. This trip gave me some favorite shots that I’m quite happy with. In this trip, I tried something new with my photography: first, I practice merge 2 photos together to make a panorama scene; secondly, I used my new wide angle lens for the Bronica, the PE 50mm/2.8, for the first time. Having a wide angle lens gives you much more ability to shoot landscape or just more scenes in general, in the end, I shot all the photos here with the 50mm lens. Since I have a good amount of photos to share here so I make it 2 parts because I don’t want to overload my page or make you wait forever for the photos to load.
Since it’s 2 months already so I apologize for forgetting the names of some locations that I took photos of. When I went to Mammoth Lakes, the weather was very nice, not very cold, there’s thin layer of snow on the ground but I did not see any snowfall. The fall leaves were long gone and the snow was just appeared. The sky was very clear and bright in the morning and afternoon, at noon, the sky was so blue and the sunlight was very harsh, made it so hard to take photos at this time.
First off, let take a look at the area my friends and I stayed during our trip. It’s a lodging [compound?] called Snowcreek, it’s located by the Kerry’s Meadow and next to the Snowcreek Golf Course. These photos here I took with Bronica 645 system and Portra 800.
The first photo is the road at sunrise. This is a very high contrast scene where the peak of the mountain is lit up but the road and houses down here was very dark.
Next is some houses in the sunrise light. I took these with the promist filter 1/4 to have the glowing affect on the trees and windows.
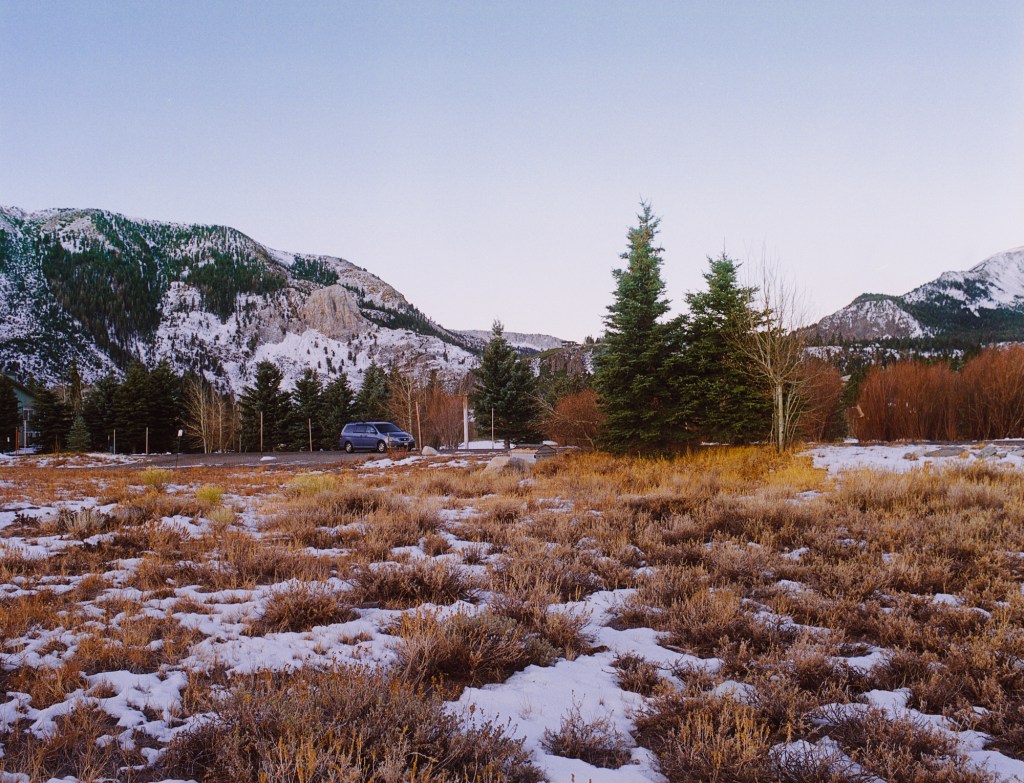
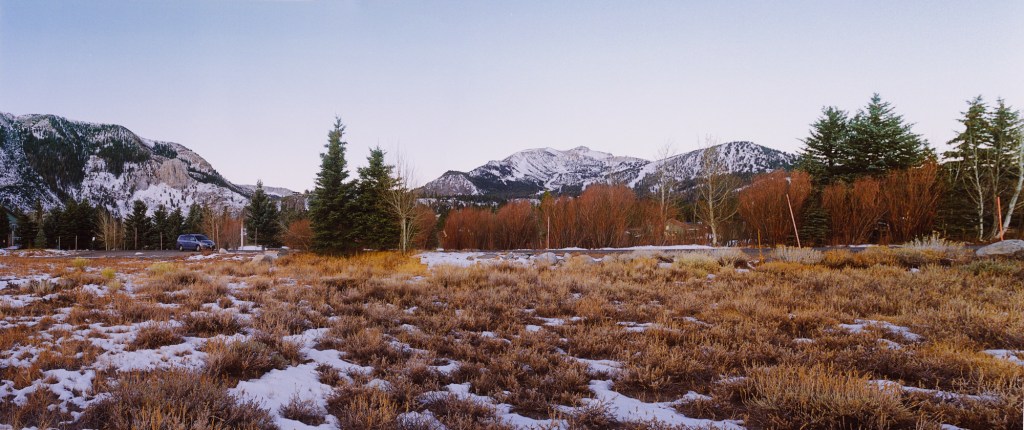
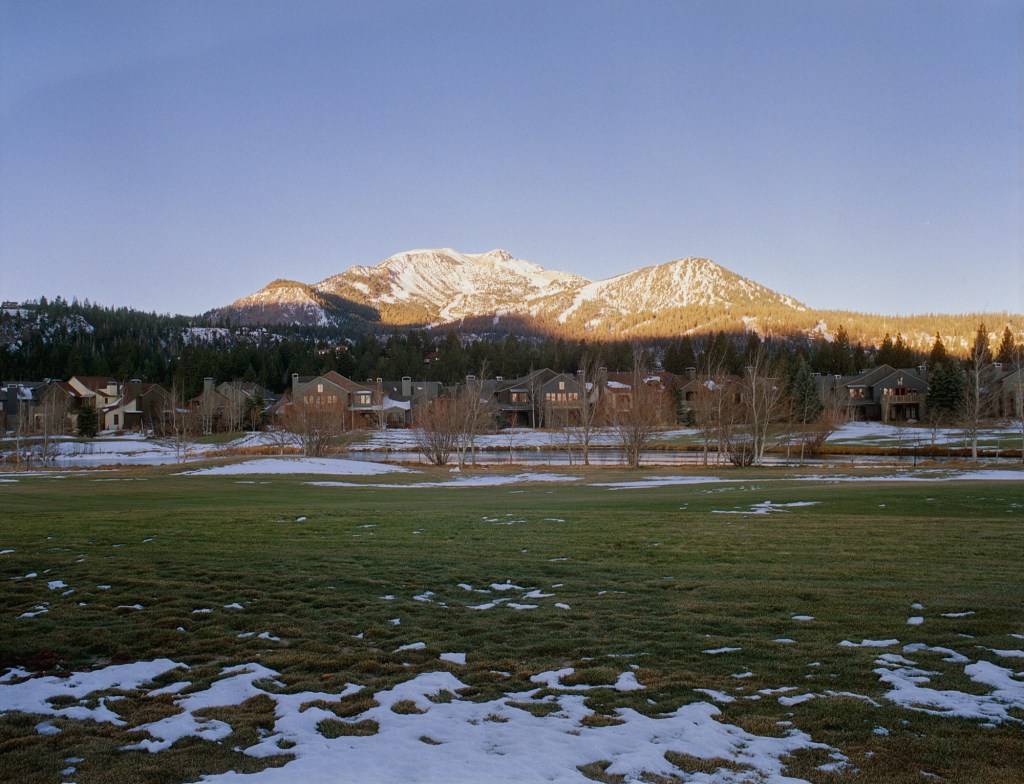
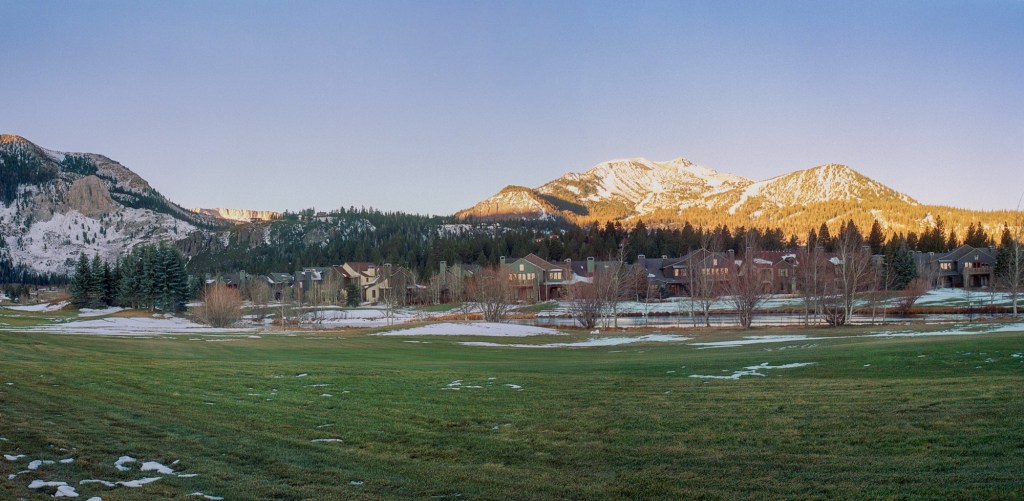
Next, the photos of the sunrise view that I took from the edge of the Kerry’s Meadow looking at the Mammoth Mountain. My specific spot here is just off the road between the Golf Course and the Meadow, I didn’t walk into the Meadow although it could be great if I did. Here I combined 2 photos together to make a panorama of the scene. When I went to the Meadow for the sunrise, I noticed the blue van was silently parked there, they must went there to watch the sunrise just like me. Even though I didn’t know them and we never talked to each other but since we came there for the same reason, I feel a connection to them, like ‘we were a same place at a same time waiting for the same thing’ vibe. Besides, the van is a nice addition to the photo in term of showing the scale of the scene. At this moment, the sun haven’t come out yet, as you can see the scene is flat and dim.
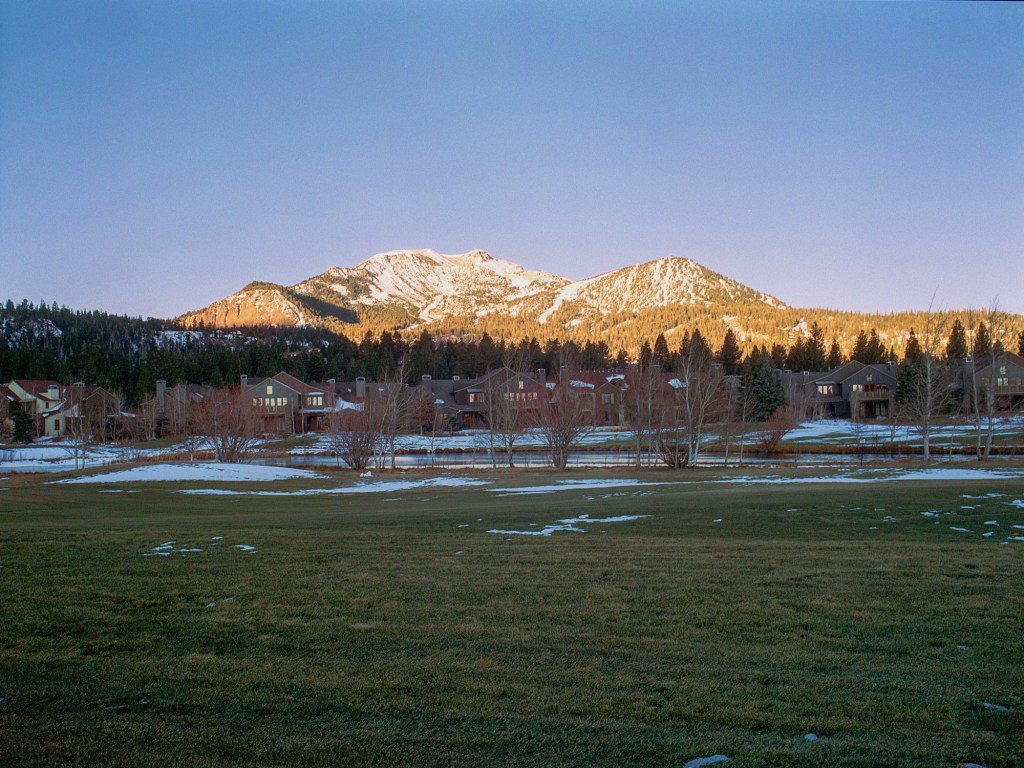
This one here is the view from the edge of the Golf Course looking at the peak of the Mammoth Mountain when the sun rises up.
Another panorama photo. I think I watch a lots of Nick Carver’s videos to make my photos into panorama ratio. But I don’t think my composition is that good, the first reason is I didn’t actually see the composition as panorama when I compose the shots, just the estimate and imagine from myself, so when I merged the photos together, the composition is always off. But it’s nice to make these photos and see the scene as wide as I can.
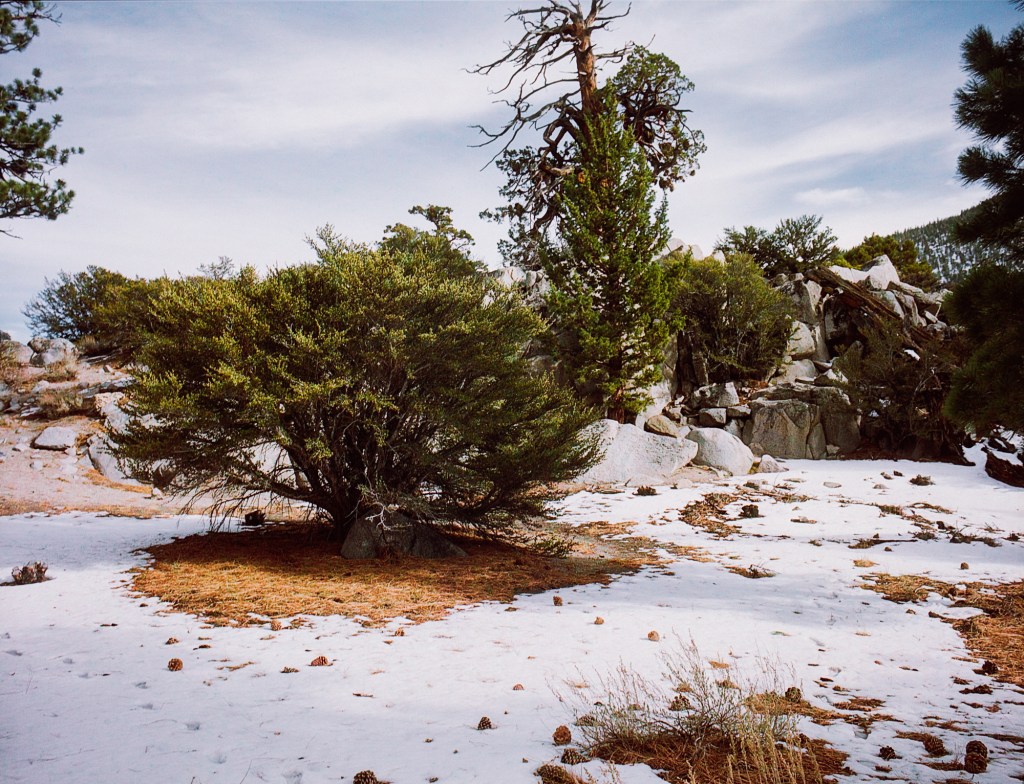
The following photos are some scene on the hike on the first day. Taking photos in the snow scenes was definitely hard because the snow is so bright and if you don’t know how to expose the shadow, your shadow will be pit black, just like my right side photo here. These were taken with Portra 160 expired.
Finally, these are photos of a lake that I forgot the name. I took these in harsh sunlight so the shadow was crushed to black. The film I used here was Fuji Pro 400H. I did heavily edit these photos because the “straight out of the scanner” were so terrible to look at [or just me being terrible at scanning]. The first two are not that great but still give you the nice view of the frozen lake. The last one is my favorite, I like the color palette and the way I can capture my shadow, just something about it makes me keep looking at it.
This is end of part 1. Thank you for making it here. Let’s check out the part 2! Cheers!
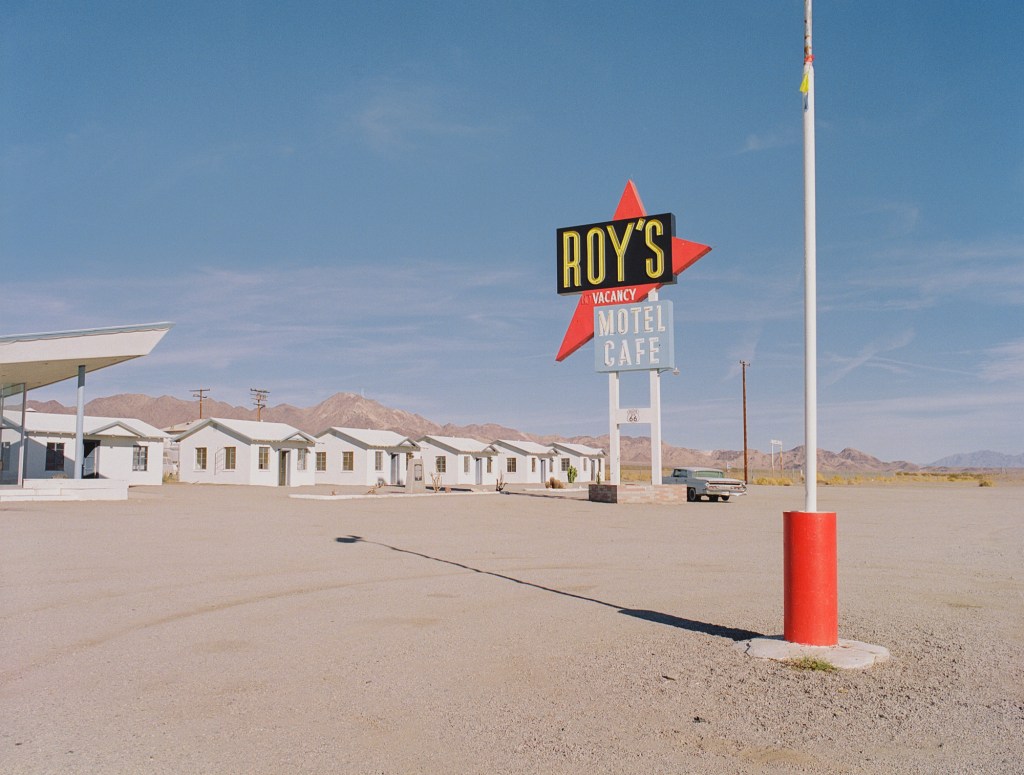
It’s been a while since my last post. Since then, I’ve constantly had a thinking that my photos are not matching my expectation. I don’t know if it’s because whenever I go out to take a photo, I always think about making photos for my blog post or just because I’m not improving my skills. Either way, I’ve chosen to slow down and think about the photos only, not about the purpose of the photos later. So here you are, some photos from my few hours in the famous Amboy town. I was there around 1pm so the sunlight was not very pleasing (compared to golden hour) but since it’s winter time, 1pm was not that harsh and strong. I got some photos that I’m happy with.
1
2
3
4
5
These photos were taken with Portra 800. I didn’t plan to shoot Portra 800 at midday but I was having the roll in my camera from the last trip so I have to finish the roll. It’s the famous Roy’s sign so I had to take a good amount of photos to make sure I got one that I can proudly share with people on the Internet :). The second (2) photo is a initial composition that I like when I look at the Roy’s sign while standing in front of the restroom :). Then I move to the right to take the third one. I like the composition and elements in the #3 photo but wish that I have the man in a nicer post (he was doing his job and I think he’s a good element to the photo but I was worried that he may blend into some objects so I take the photo when he just separated himself from the gas pump. I also wish that I moved away a bit to not cut the bottom of the “Cafe” sign and I also want to include the “no vacancy” in the photo :(. In the photo #4, I also want to include the light pole at the foreground because my photography goal is to create photos with complex layers, not sure if I tried so hard and ruin my composition in this case. Anyway, here’s the 2 photos that I think look best.
67
The #6 photo is just simple and straight forward about the environment and how vast the place is. When I look at the photo I can feel how lonely the sign is, there’s no other like this in miles. The #7 photo tells more about other structures around the sign and I like the affect of the wide angle lens here.
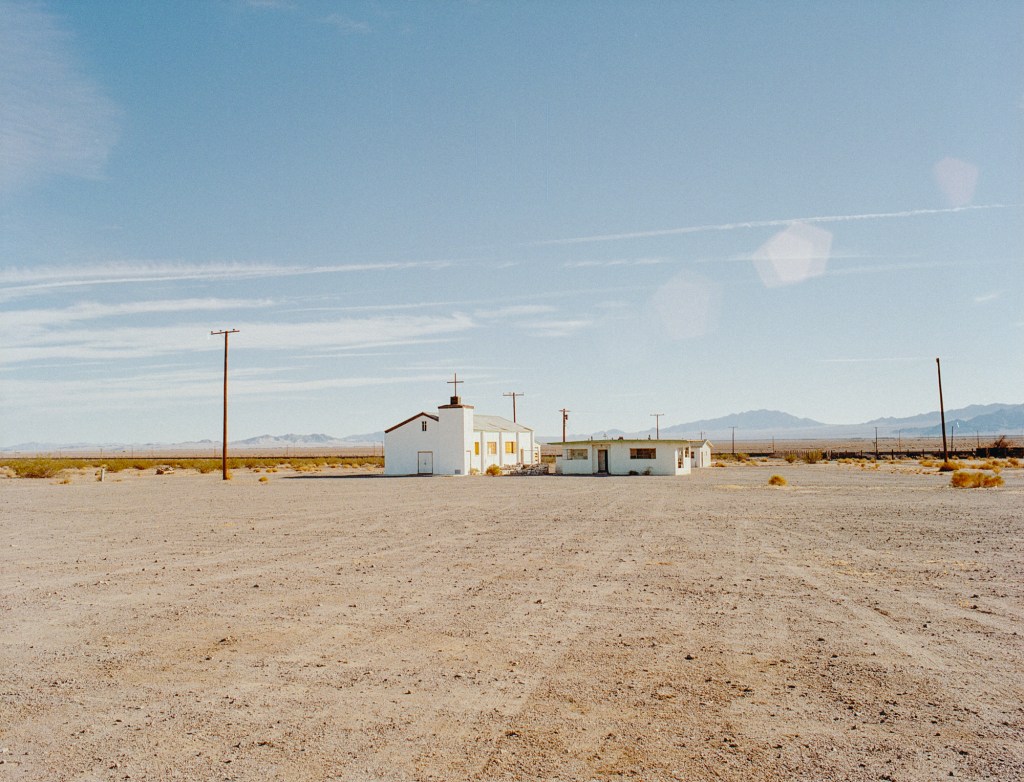
After taking photos of the sign, I cross the street to take photo of the church across Roy’s because who can reject a lonely white church in the middle of desert?
8
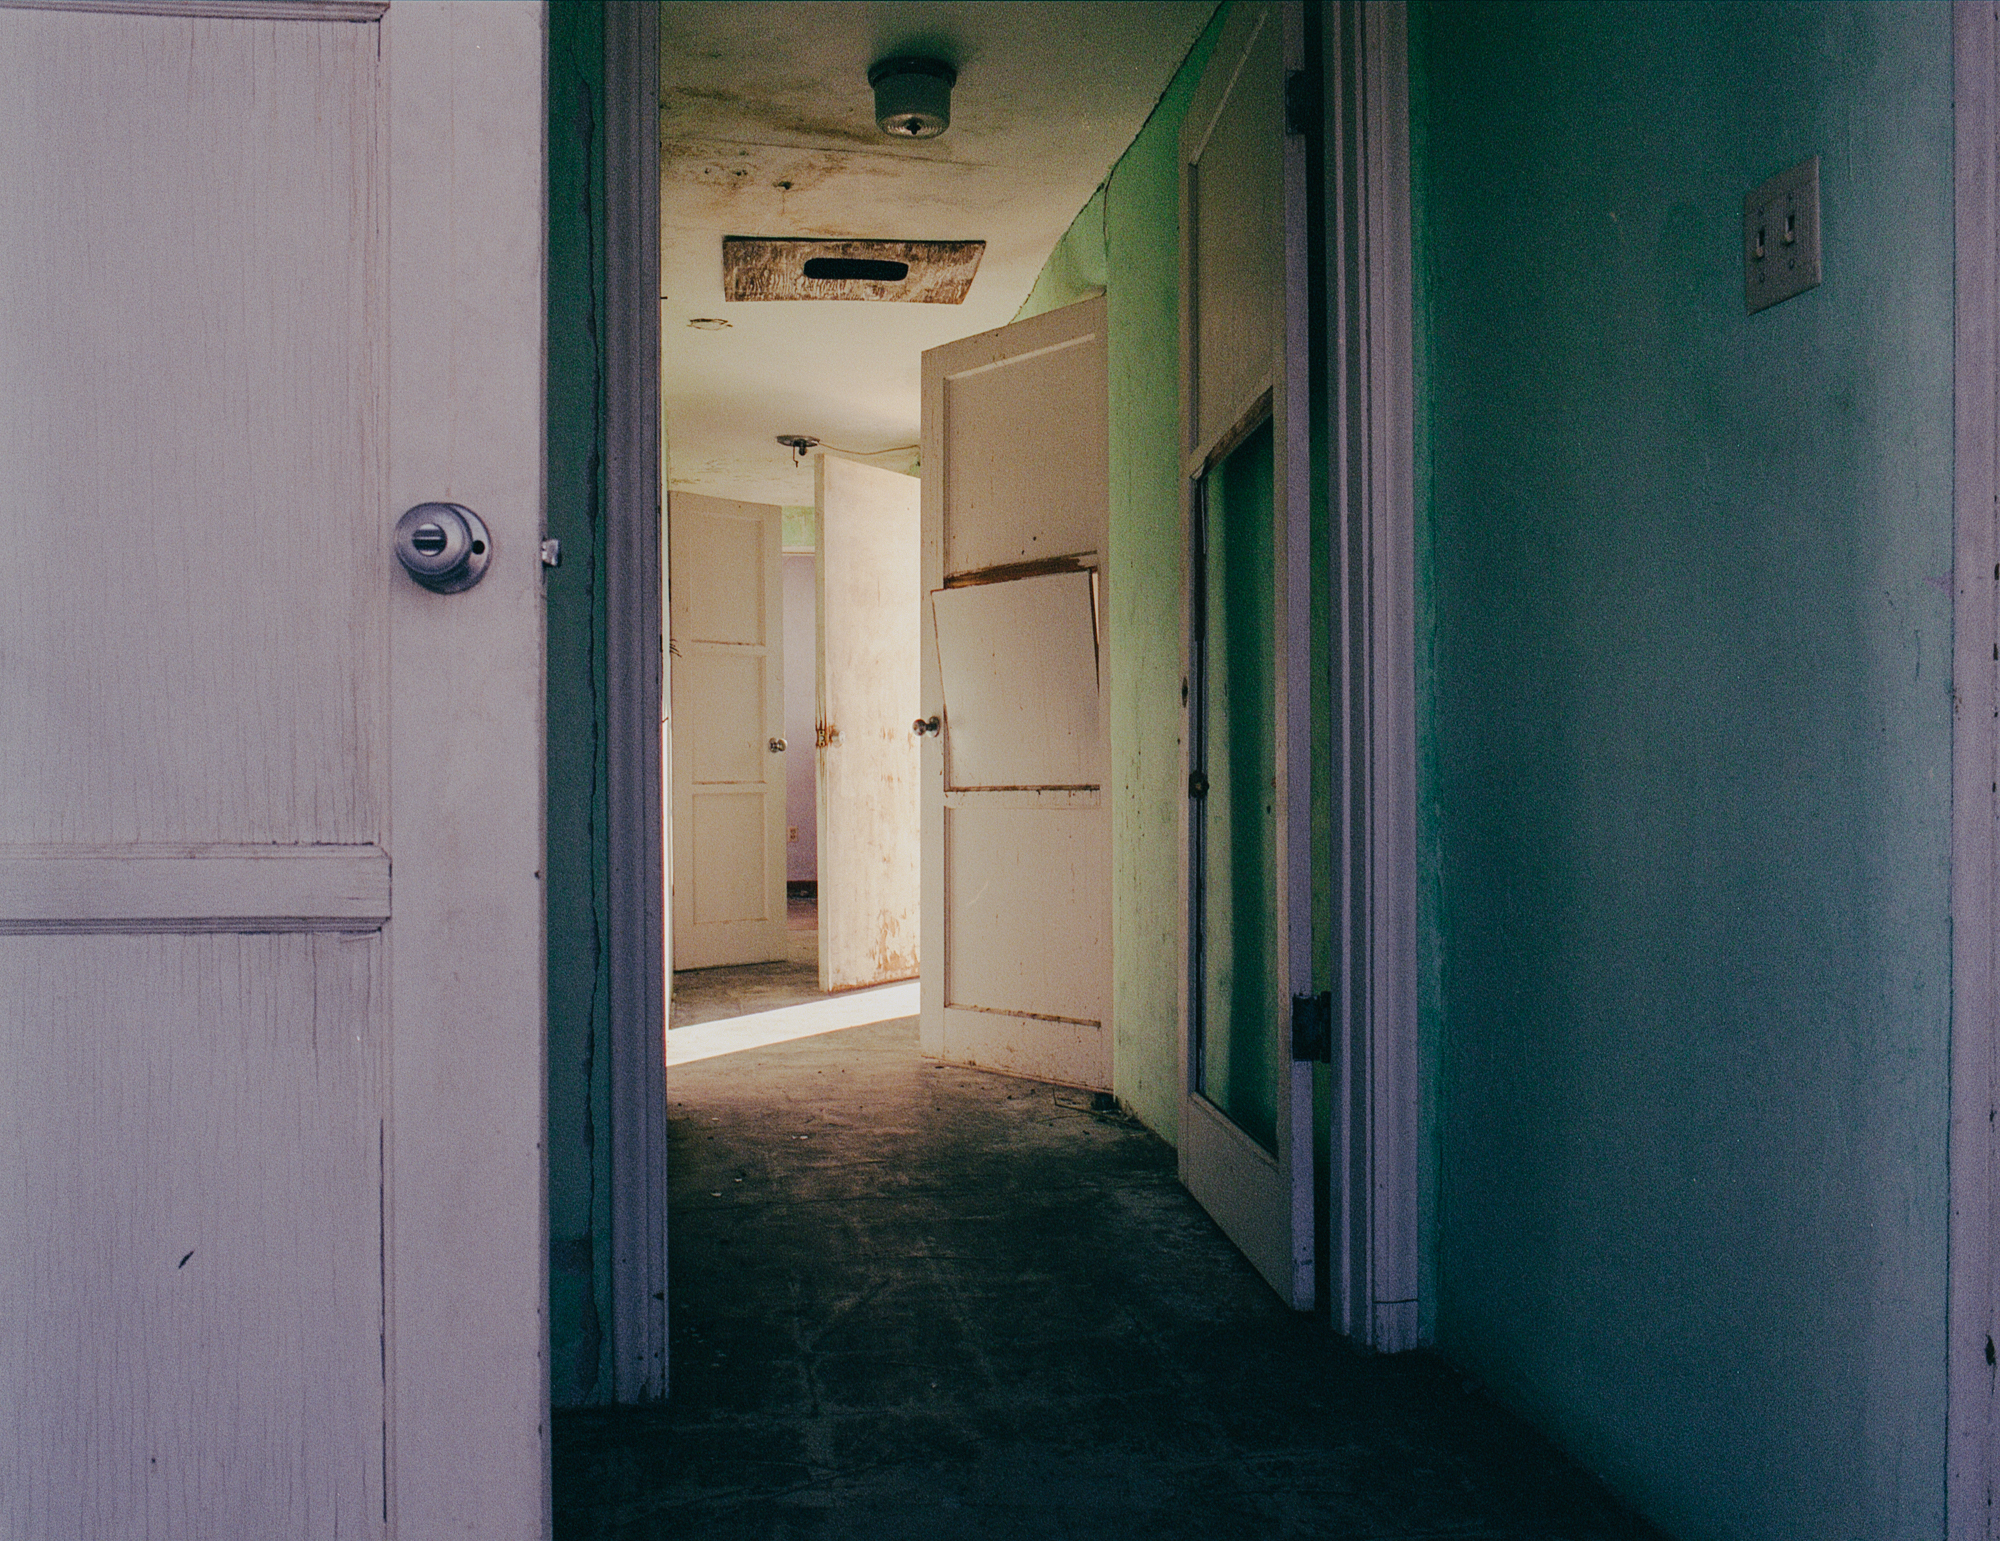
This is also the last shot from my roll of Portra, so I loaded Fuji 400H and continue shooting. I love abandoned things because they carry so many stories, they are unique and broken :).
91011
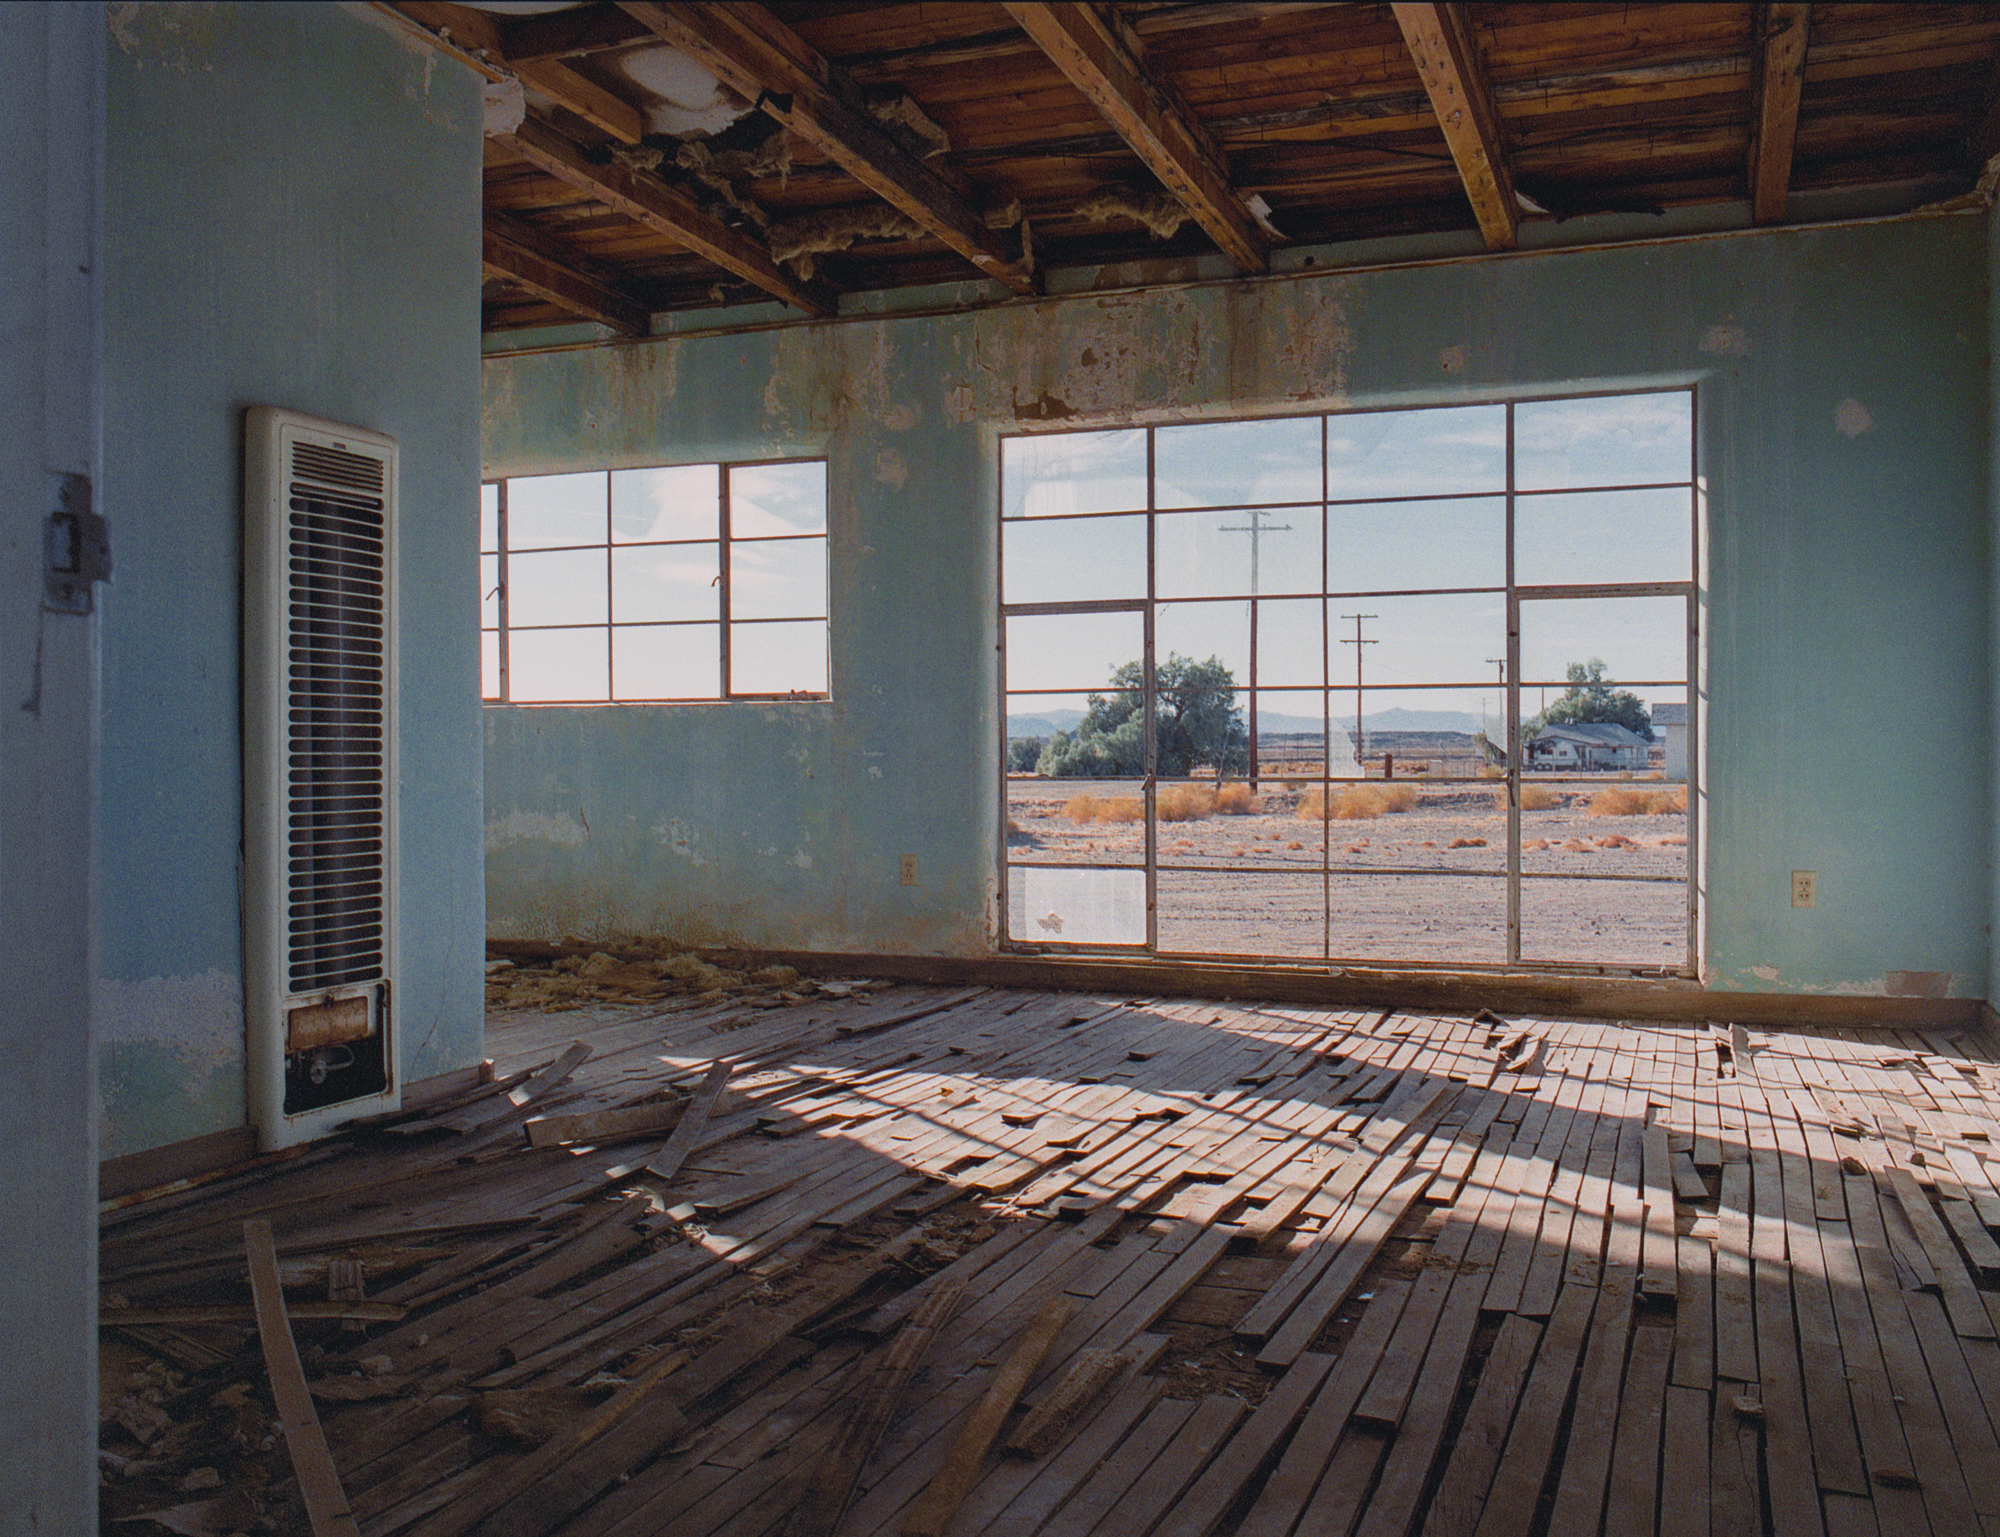
I like the #9 photo but I heard feedbacks said it not pleasing, I guess because of the ugly house on the right side, but I still like it because it’s life, beautiful and ugly, light and shadow, high and low, they just come hand in hand, nothing is 100% beautiful. I had high hope for the photo #10 but sadly it doesn’t come out the way I want. Subframe and multiple layers in a photo is something I thrive for but I guess still not success this time. The photo #11 is not that great but I like the fact that you can see the house over the window, and it also pair nicely with the last photo below (because of the heater?).
Finally, the last 3 photos are the best ones. I suppose to like the last one the most because, again, so many layers and elements to look for, but I still think it’s missing something to be one of the best of my work. The photo of the hallway and doors is fascinated to me because it’s mystery and make me wonder what’s inside those room, there’s so much possibilities inside those broken doors. It looks just like a scene in a movies. Last but not least, the whole church and abandoned houses around remind me of the TV series Preacher from AMC.
Thank you for coming all this way. Hope you enjoy it. And watch Preacher if you’re open to dark, ugly and cruel things 🙂
This blog is not meant to talk about gear but since I had opportunities to try some 645 SLR cameras I think I may can give you some advices if you are wanting to buy your first medium format camera. Other Youtubers or people on the Internet may give you a bunch of 645 cameras and talk about the pros and cons and leave the decision to you, I think it’s cool because no one asks you to choose like them, you have the freedom to decide for yourself. But since you’re already here, I give you the short answer, Bronica ETRS/Si. Of course, this is my opinion and you literally can use any 645 camera to take beautiful photos as long as you you know what to do with the camera, Bronica just happen to be the easiest one to use. Or, if you find any good deal on a 645 camera, just take it, price can overrule all of the reasons I’ll show you below.
First, let’s talk about Mamiya 645. I haven’t use the m645 or the 1000s yet, so I can’t speak for those, but I used the Mamiya 645 Super, and I believe the Pro/Pro TL are very similar. Honestly, the Mamiya 645 Super/Pro is the one I wanted when I looking for my first ever medium format camera, but I couldn’t afford it because the price tag. I like the design of this series a lot, and while using it later, I really like the form factor of the camera, it feels really nice to hold the camera and take photos with it. Even though the box design may feel weird to hold but I was really surprise how fast I like to hold it, without using the grip. At first, the mechanism to open and remove the back and prism feel a little annoy (because you have to press 1 button down and slide the other button with the same finger at the same time) but I believe you can get used to it very quickly. The other thing I don’t think ergonomic about the camera is the ISO dial, it’s so damn hard to turn the dial. You have to use your finger’s nail to turn it and it’s not easy to move, not mention that the dial is half beneath the prism finder [as photo below] makes it even harder because you have a very little space to move your finger around. Of course you can dial the ISO before you put the film back onto the camera to avoid the prism finder (but it’s still hard) and yes, you just have to dial it once per roll or don’t have to redial if you continue to shoot same ISO film but to me, it’s worth notice. The Metering Mode dial and Exposure Compensation dial are the same, they’re just on the top of the prism so they’re a bit easier than the ISO dial but you get the idea. The shutter speed dial on the other hand, so easy and friendly to use! Other than that, the camera is great. The lens are a bit rigid to turn when you’re focusing but not too much, compare to Pentax or Bronica lens. One thing better than the Bronica is it has a hot shoe on the side. And of course, why I said Bronica is a better choice for your first medium format camera? The price.
Top view of Mamiya 645 Super and Prism Finder
Photos taken with Mamiya 645 Super
Next, the Pentax 645. I will not talk about the N and Nii because I haven’t use them, and since they have auto focus and higher price range for “first medium format camera” we newbie looking for, let’s just talk about the 645 original. Not having interchange backs, fully battery depends, no Mirror Up, and buttons for mode, not dials, these are some downsides for the Pentax. If you can get used to the buttons operation, you are good to go take beautiful photos, but it can be hard at first, and of course, it can be more time consuming when you want to change mode or setting, compare to dials. The Pentax 645N has dials instead of button if you’re curious.
Pentax 645 buttons locate on top of the camera
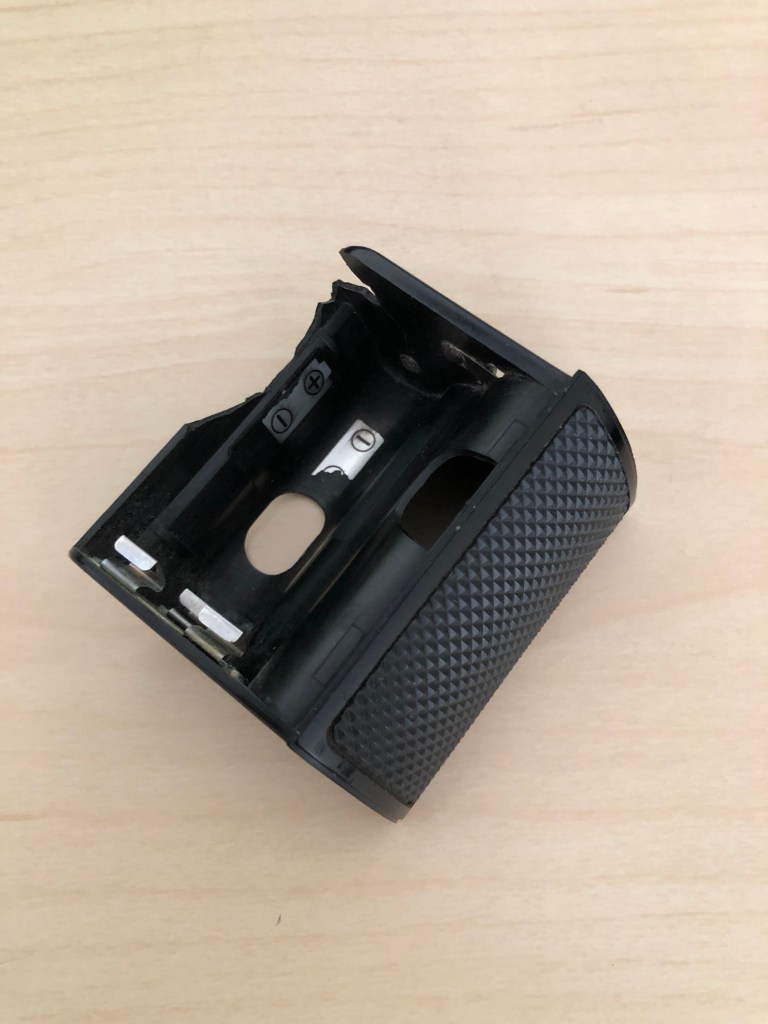
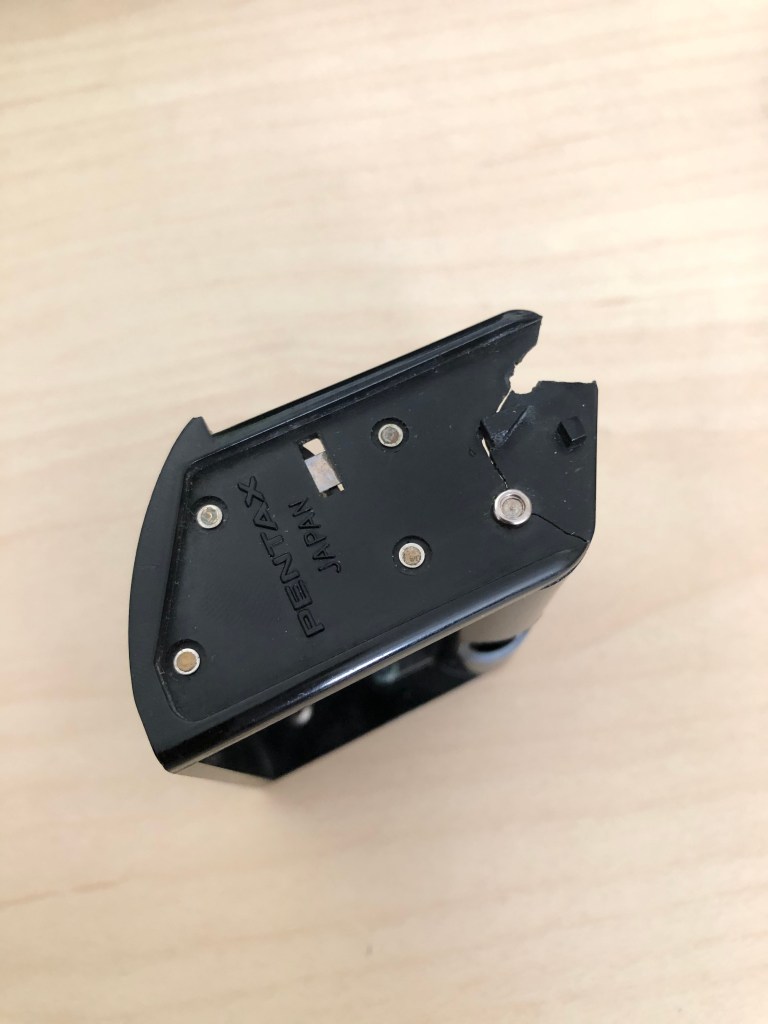
One big drawback of the Pentax 645 is the battery holder, it’s extremely easy to break, especially the plastic holder is couple decade years old. This is a common problem of the Pentax 645, because the way people designed the holder was not very effective I guess, 6 AA batteries are hold in a thin plastic holder (not that thin and fragile but if you have to put the batteries in and out quite often, there’s a good chance you will break it at some point). And of course you have to put the batteries in and out because if you don’t use the camera in weeks or months, you have to take the batteries out or corrosion will happen to your battery compartment. And it’s hard to put the 6 batteries in, especially if you have big fingers. If you buy a Pentax 645, careful with the battery holder please. It’s super hard to find the replacement because there’s no replacement. Pentax discontinued the battery grip long before, and there’s no left. There’s no single one on eBay. The replacement you may find is just from Pentax 645 cameras that stop working and they take their parts for sell but trust me, the holder always breaks before the camera. My battery holder was broken as you can see in the photos here and it’s so freaking hard to find the replacement battery grip or holder, until I bought a remote battery pack for Pentax 645, which is a battery pack that not attachable to the camera like the original grip, you connect the battery pack to the camera through a cord so the camera can use battery but now you have to solve the problem how to attach the battery pack to the camera. Luckily I tried to put the holder from the remote pack into the original grip and it works, even though they’re not identical! Keep this in mind if you are purchasing a Pentax 645. The remote battery pack is available on eBay but there’re not so many and around $100 or more/pack. The Pentax 645 is cheaper than Bronica but you don’t need to deal with the battery holder issue with Mamiya or Bronica because they have battery compartment inside the body, and they also require one single battery only. Please note that even if you can buy a replacement holder for your Pentax, there’s always a change you can break it later because they’re just easy to break. Here the link you can check to see the headache of having a broken battery holder 🙂 https://www.pentaxforums.com/forums/48-pentax-medium-format/400427-645-battery-holder.html
The holder of the battery pack also works on the original grip!
Okay, so now we talk about Bronica ETRS/Si. The ETR is the oldest in the line and doesn’t work with the AE prism finder, the ETRC doesn’t have interchange backs and mirror up feature. The ETRS/Si can use the AE prism finder for meter and interchange backs, they’re best choices in ETR line. If you use Bronica ETRS/Si, you may need the speed grip because the boxing design is harder to handling like the Mamiya. I don’t know why but I feel more comfortable to hold the Mamiya Super without a grip than the Bronica. And 1 more reason to buy a speed grip is you can attach flash on the grip, because the camera itself doesn’t have a hot shoe mount. Another disadvantage of the Bronica is the aperture ring on the lens is small and hard to find (because they placed it more to the front of the lens, not way back like other lens), you may looking around to find it when taking a photo but you will get used to it eventually. Other than that, the Bronica has everything you want, affordable, effective, build quality, interchange backs, interchange finder (but please use the prism finder, the waist level finder is super hard to use if you want to take vertical photos), mirror lock up, multi exposure, leaf shutter in the lens (means you can have flash sync at every speed). It’s easy to use and as far as I know, there’s not much common problems with it.
A photo taken with Bronica ETRSi
Other cameras can be mentioned are Contax 645 but that’s another level and super expensive, Mamiya 645AF/AFD is also great but high price range for first time Medium Format shooters, too. I didn’t talk about lens or photos quality of these brands I mentioned above because honestly I don’t see much a different. Every camera here is more than capable of taking beautiful photos as long as you know how to use it. I hope these experiences I share here can help you on choosing your first medium format camera. A man in a camera shop once told me “If you want to shoot film, you better shoot now because film will go away” so I guess my advice is buy it because the price are continue to raise because film is trendy now and yes, film will go away eventually. Shoot more, have fun!
Mình và 1 số người bạn vừa có chuyến road trip ngắn đi Sequoia National Park cách đây 3 tuần. Khởi hành từ 8h tối thứ 6, đến 1h30 khuya sáng thứ 7 mình đến nơi. Mình dành cả ngày thứ 7 và nửa ngày Chủ Nhật để hiking và lên xe lái về OC lúc 6h chiều Chủ Nhật. Lý do đến bây giờ mình mới đặng bài blog này là vì mình cảm thấy chuyến đi này mình không chụp được nhiều ảnh đẹp như mong muốn. Nhìn chung hình không phải là tệ (hoặc tệ thật?!) nhưng mình không tìm được ảnh nào thật sự ưng ý và đẹp như chuyến đi Lake Tahoe lần trước. Đó là lý do khiến mình không tự tin để post ảnh nhưng sau đó mình nghĩ có thể ảnh không xuất sắc nhưng mình có thể chia sẻ kinh nghiệm và những sai sót của mình cho các bạn qua những bức ảnh này. Mong các bạn thấy bài blog này hữu ích và truyền cảm hứng.
Về camera và film thì mình mang máy Bronica ETRSi và 75mm/2.8 lens, đây cũng là lens duy nhất mình có cho máy, mình đã muốn có lens 50mm từ chuyến Lake Tahoe lần trước nhưng vẫn chưa mua vì thật sự vẫn còn cân nhắc về số tiền. Mình cũng mang theo 35mm camera là Nikon F2 cùng vài cuộn Kodak ProImage 100 (sau vài lần thử thì mình không thích màu của ProImage nhưng mua vẫn còn dư nên phải dùng cho hết), Portra 160 và 1 cuộn Portra 800 (vì Portra 800 đắt xắt ra miếng thật!). Film 120 mình dủng Fuji Pro 400H và Ilford XP2 trắng đen. Mình chưa bao giờ chụp trắng đen nhưng gần đây có bạn bảo mình nên thử chụp trắng đen để focus vô mảng khối và contrast trong khung hình, và bản thân mình nghĩ mình cũng nên chú ý hơn đến bố cục khi chụp nên mình đã mua 5 cuộn XP2, đây là film trắng đen nhưng dùng C-41 để develop như film màu, giúp mình tiết kiệm và đỡ nhức đầu research về hóa chất cho film trắng đen 🙂 Ảnh trắng đen của mình không đẹp như mình mong nhưng mình xin chia sẻ ở đây để ghi lại quá trình chụp của mình.
1. Bức ảnh đầu tiên trong chuyến đi
2
3
4
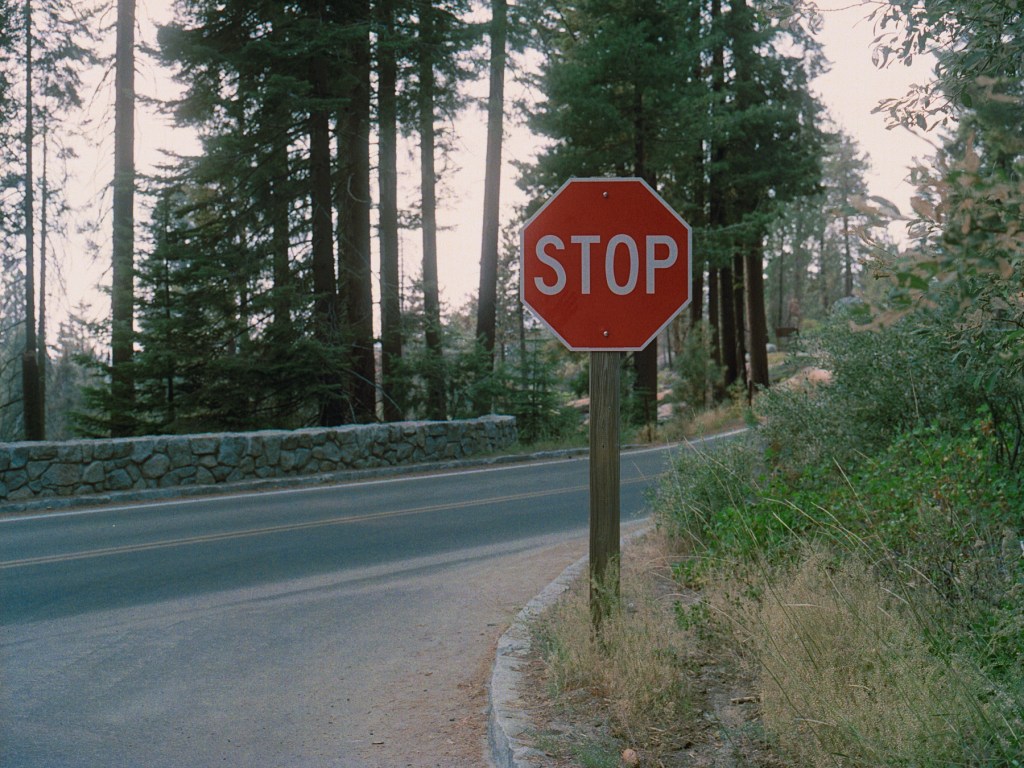
5. Bầu trời màu nâu nhạt và tầm nhìn rất hạn chế do khói
Một điều các bạn nên biết về chuyến đi này là mình đi trong lúc cháy rừng đang diễn ra trên diện rộng ở California. Tuy không quá gần khu vực mình ở và hiking nhưng khói từ đám cháy theo gió đã phủ lên bầu trời 1 lớp bụi than mỏng làm bầu trời ngả màu vàng nâu trông khá u ám. Đây không phải là điều kiện lý tưởng để chụp hình nhưng mình vẫn cảm thấy thích chuyến đi lần này.
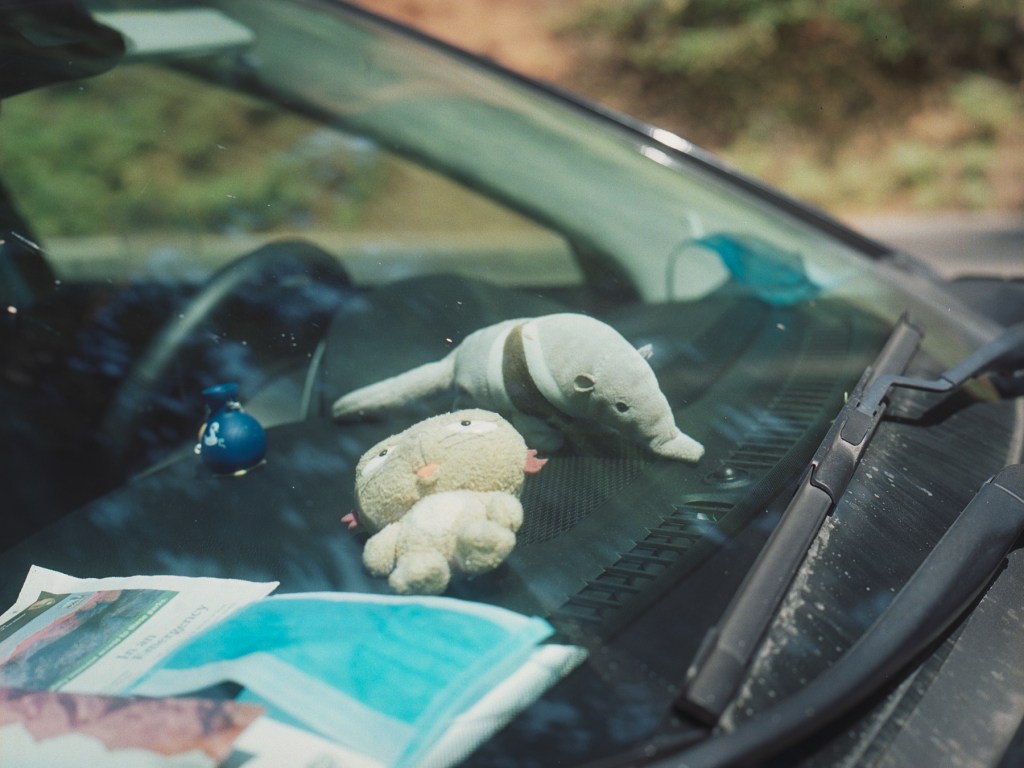
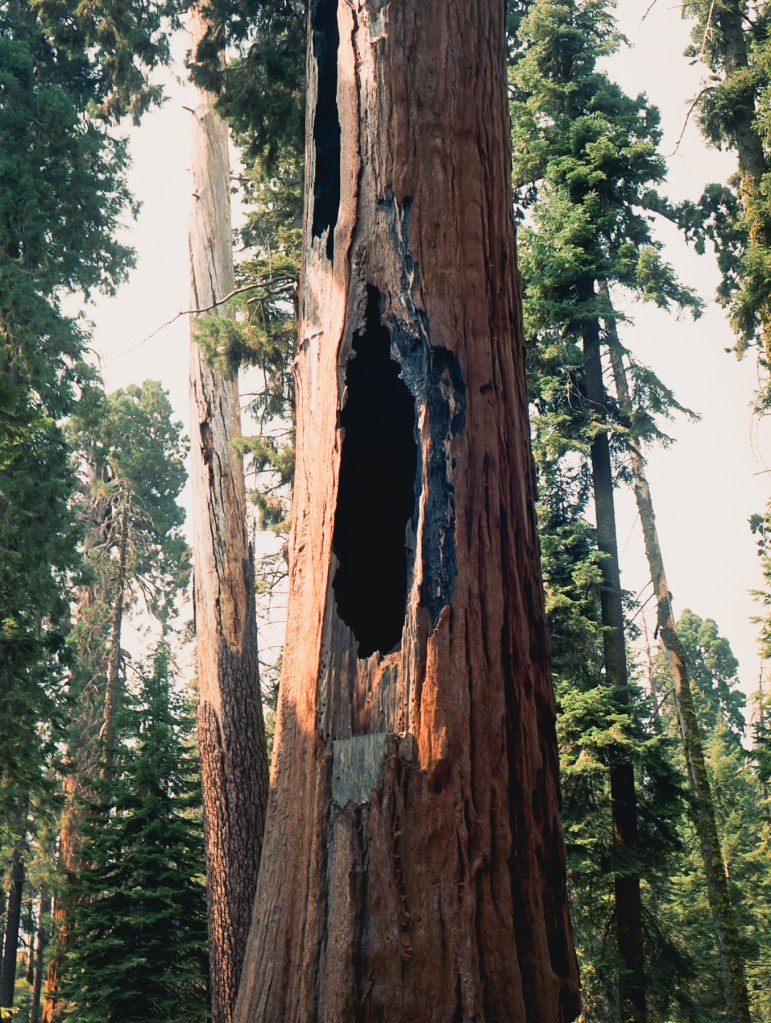
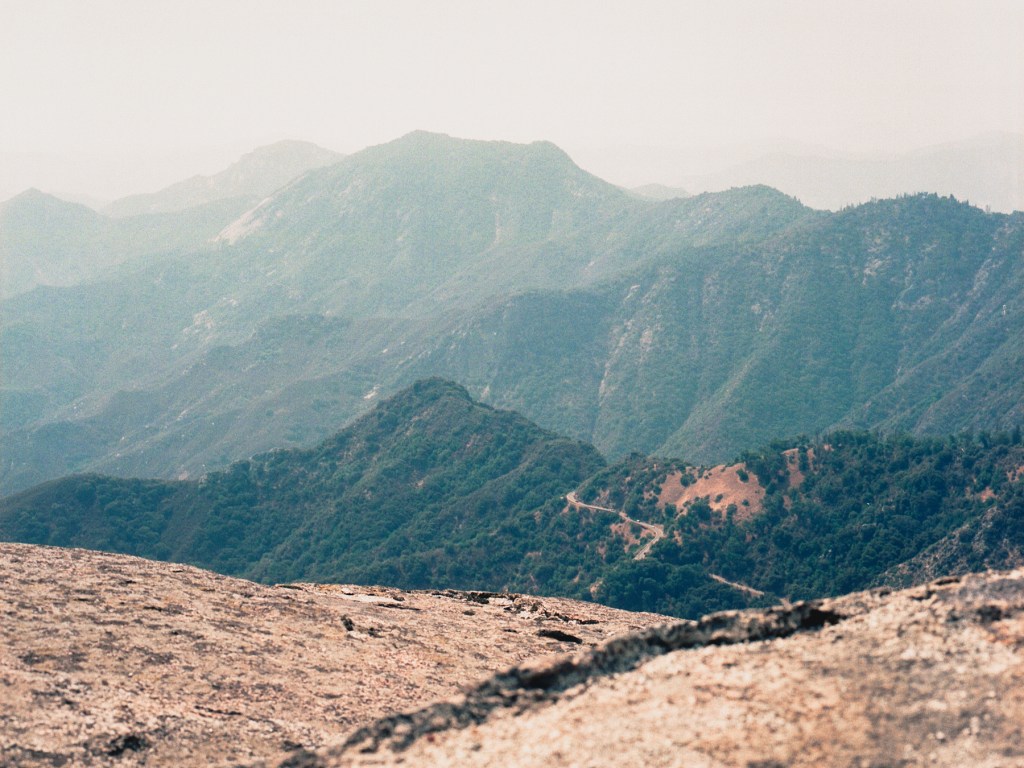
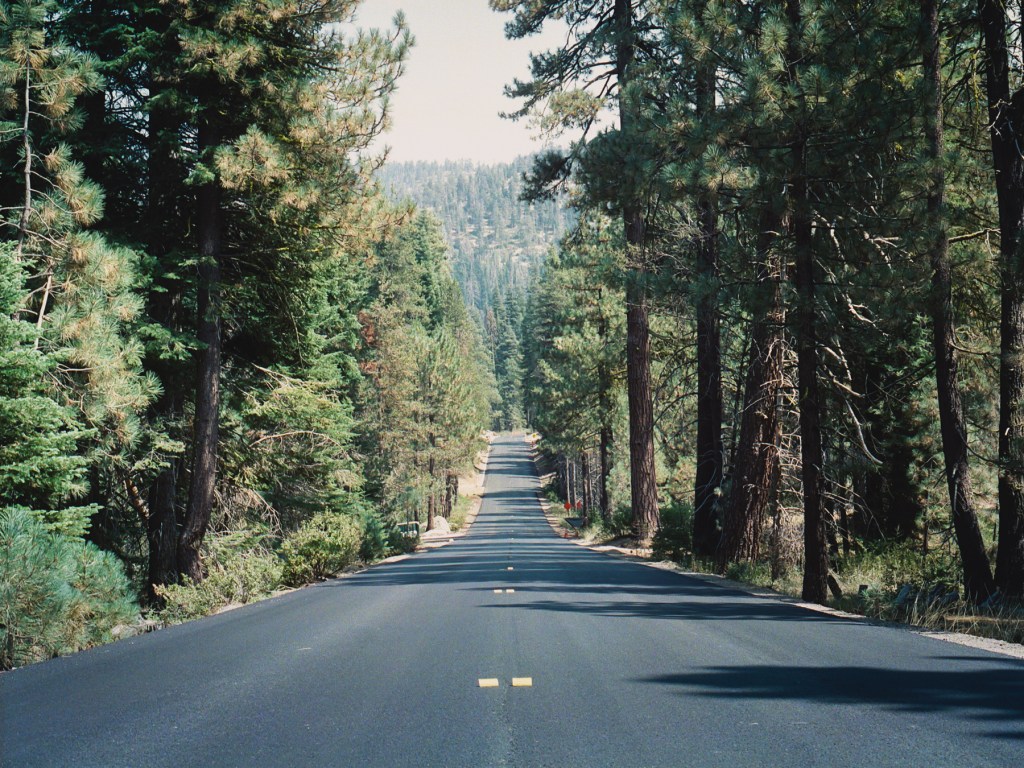
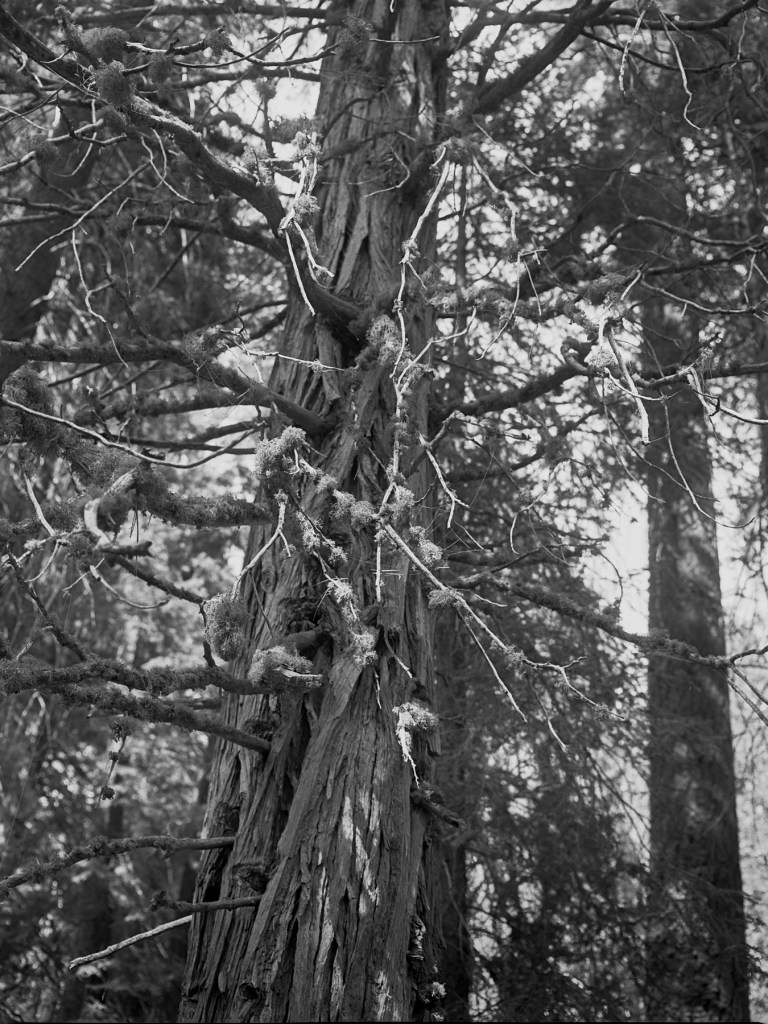
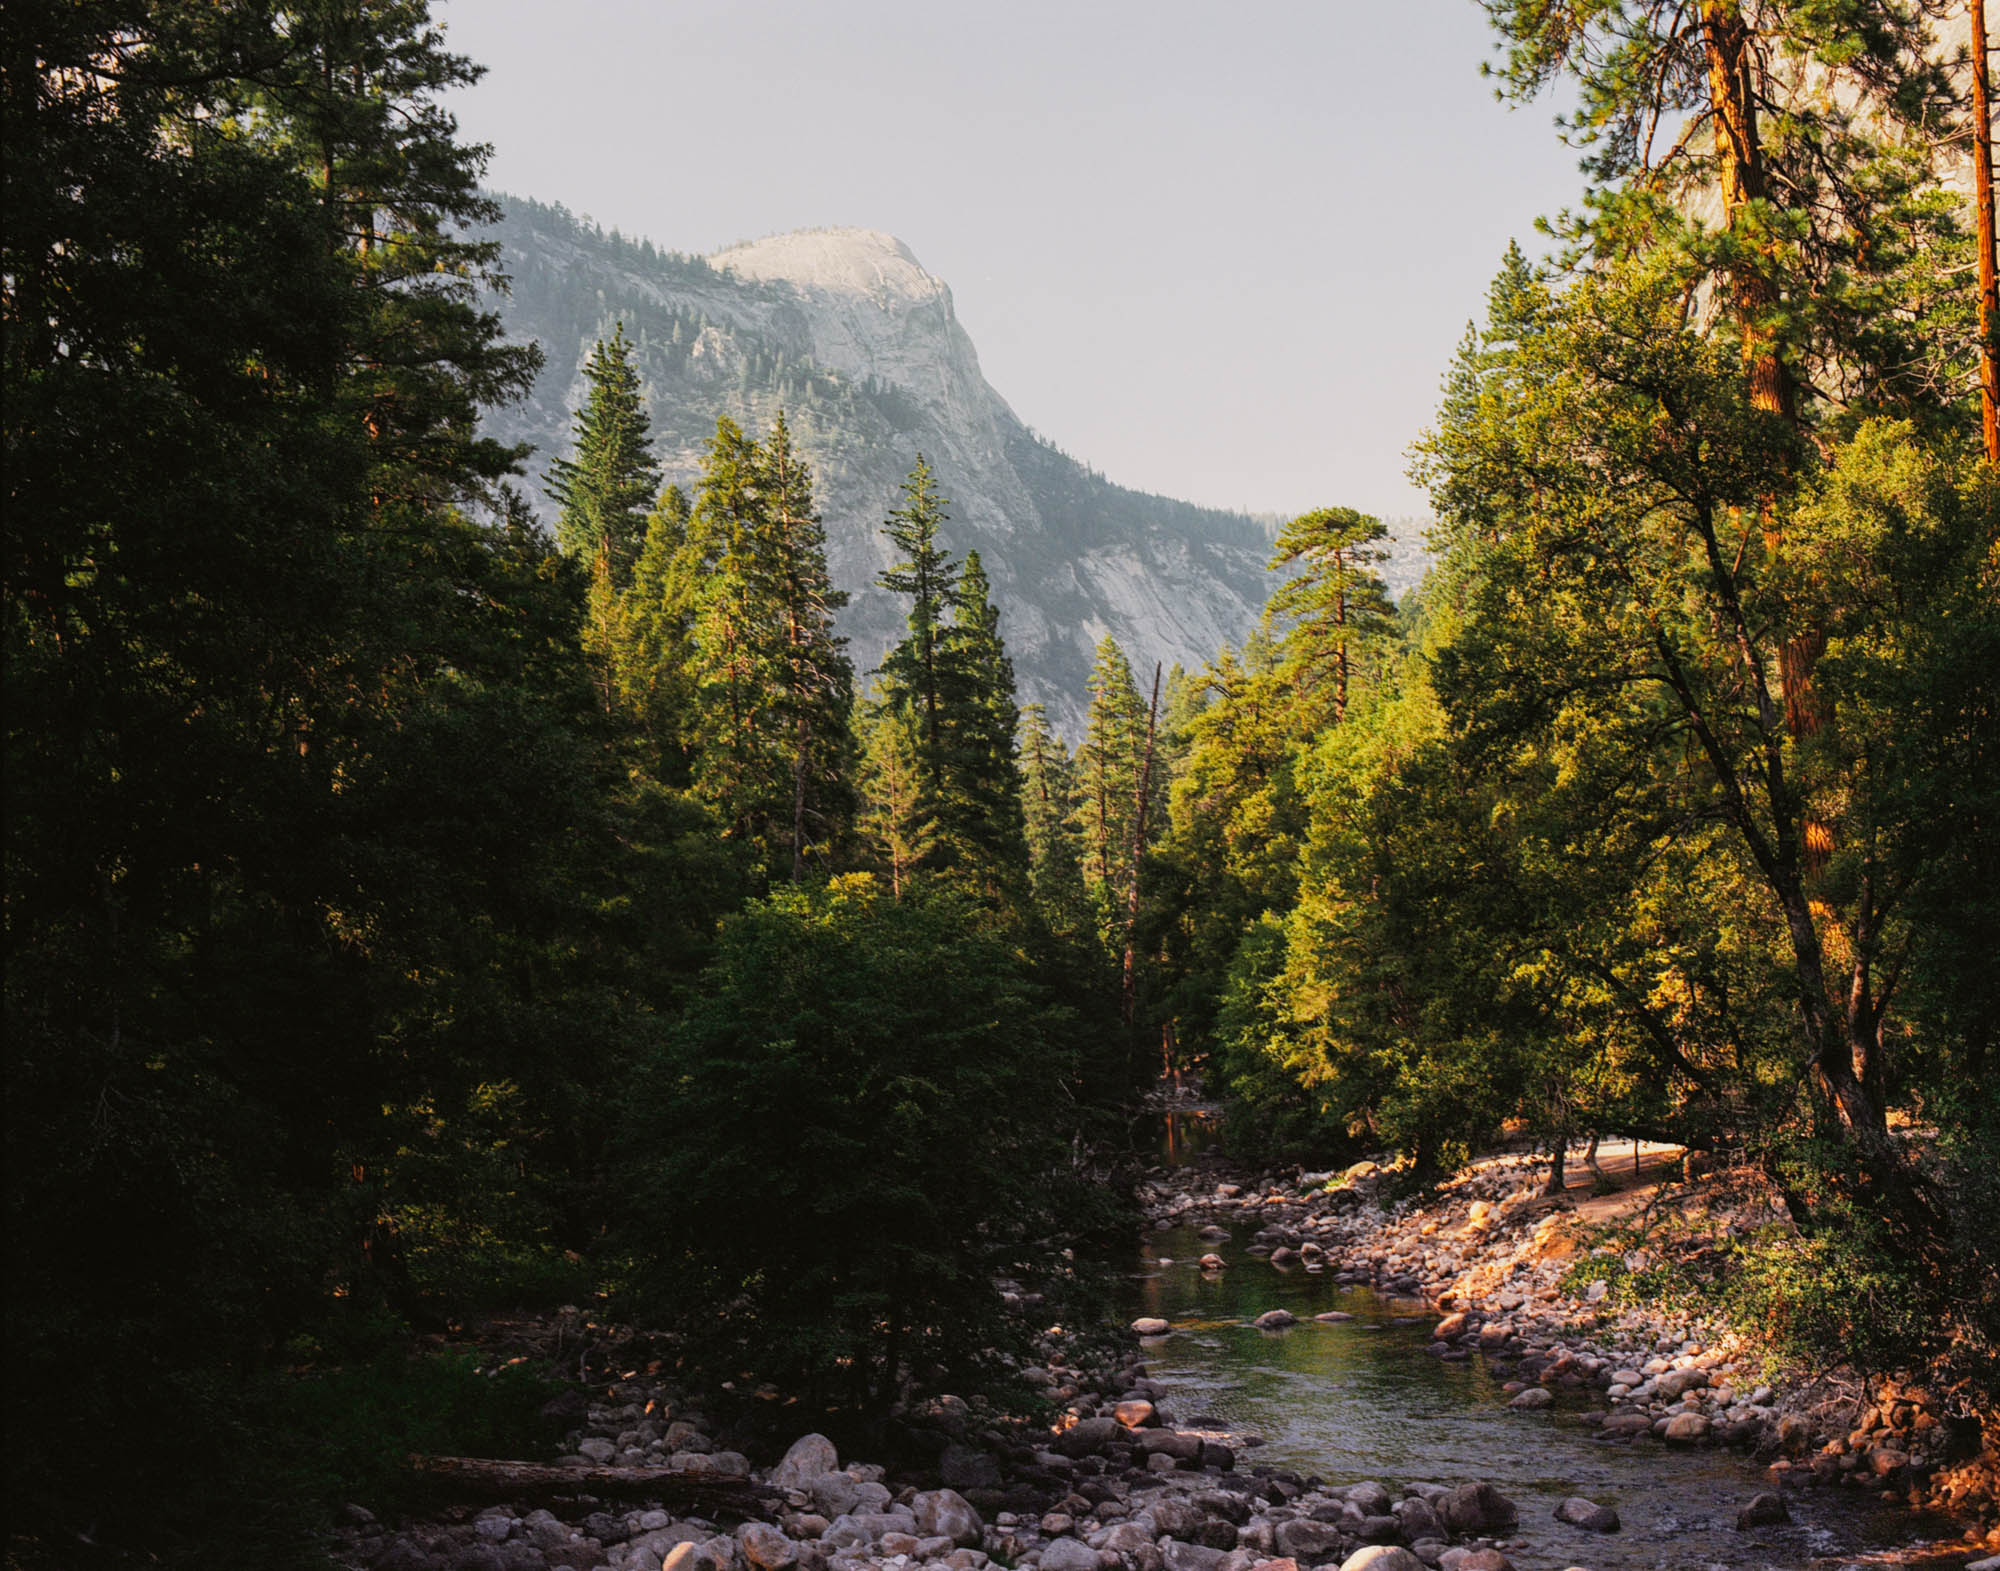
Tấm hình đầu tiên mình chụp khi đang dừng xe trên đường để ăn trưa trên xe. Đây vẫn còn là khu vực rìa của Sequoia National Park nhưng cây cối đã phủ xanh um tùm, một điều mình rất thích. Mình đang ngắm để chụp thì nghe tiếng xe moto từ xa vọng lại, thế là mình đã đợi chiếc moto chạy vào khung hình rồi bấm máy. Dĩ nhiên là mình đã canh bố cục và lấy nét sẵn để khi xe chạy tới đúng khoảng lấy nét thì mình sẽ bấm máy. Mình để khẩu độ 11 nên dĩ nhiên là phần lớn khung hình sẽ in focus. Một điều đáng tiếc trong bức ảnh này là mình đã bấm máy hơi sớm, khi moto còn đang khá xa mình cho nên chiếc moto và người lái bị nhỏ và chìm vào background. Nếu moto chạy tới mình gần hơn thì bức ảnh sẽ tốt hơn nhiều. Tấm hình tiếp theo mình chụp windshield xe của bạn mình, như 1 tấm ảnh ký sự về chiếc xe và đi chơi thời Covid, với thú bông và khẩu trang giấy 🙂 Tiếp đến là 1 thân cây bị cháy đen ở bên trong. Tuy tấm ảnh không xuất sắc nhưng đây là lần đầu tiên mình thấy 1 thân cây cháy đen bên trong nhưng vẫn còn sống và bên ngoài vỏ cây màu cam rực rỡ nhìn rất thú vị. 2 ảnh kế đến chỉ là cảnh landscape bình thường nhưng cũng đủ để thấy bầu trời trông như thế nào những ngày mình ở Sequoia.
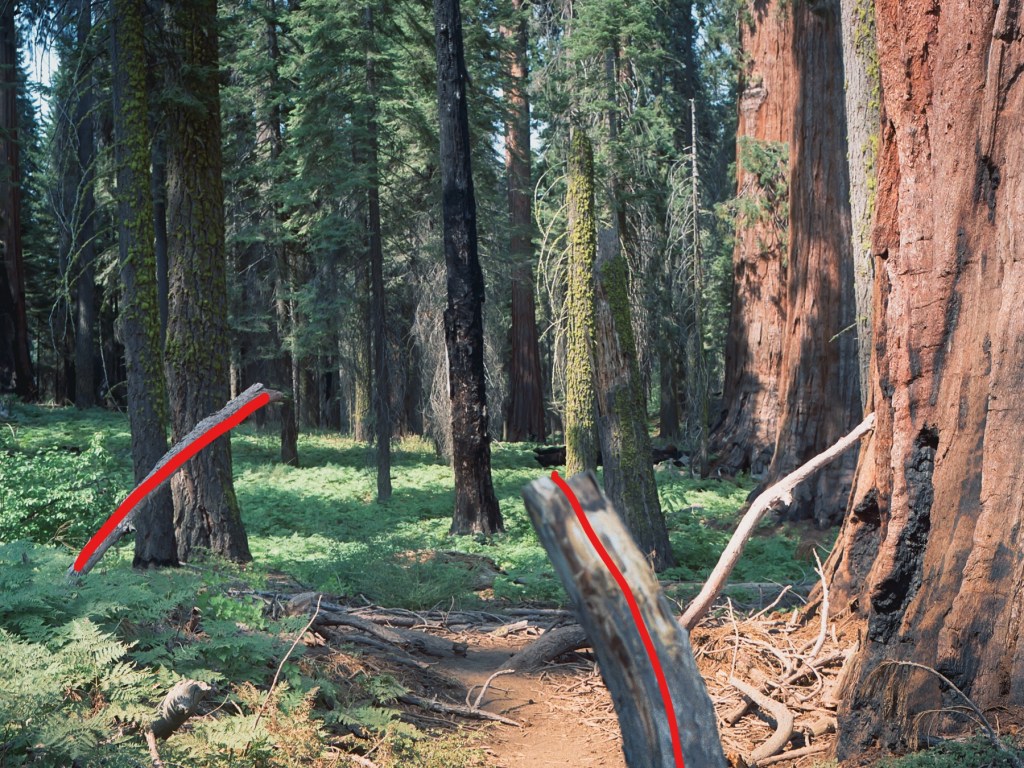
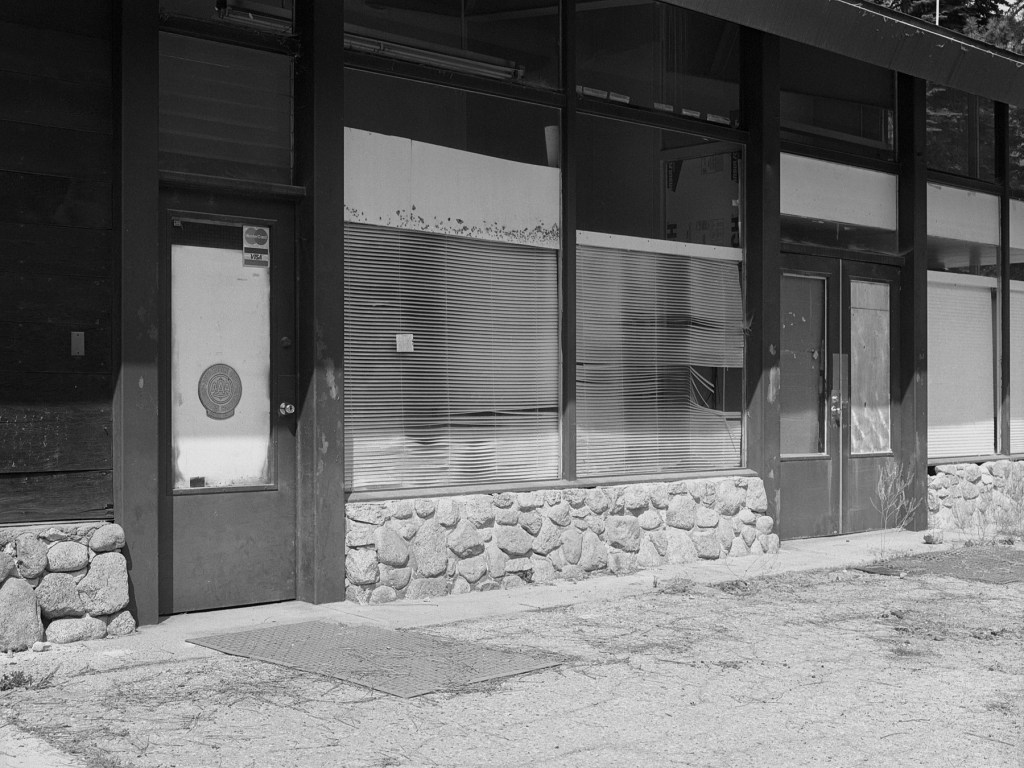
Ảnh tiếp theo [6] mình đã chú thích ý đồ trên hình. Rất tiếc mình đã không thể hiện được điều mình muốn trên ảnh. Còn lại là các ảnh [7,8,9,10] mình chụp trong ngày thứ 7. Mình thích ảnh [10] vì đó là chủ đề ưa thích của mình, những ngôi nhà nhỏ trong town nho nhỏ với nét retro và tĩnh lặng. Nếu được chụp lại mình sẽ nâng máy cao hơn để lấy phần cột đèn nhiều hơn, dĩ nhiên tâm điểm bức ảnh không phải là cột đèn nhưng ảnh lại cắt ngay lúc dây diện rẻ ngang ra làm mình có cảm giác mình cắt vật thể ngay mép, rất khó chịu khi nhìn. Mình đã được học về trang trí và bố cục rằng hoặc là mình lấy trọn vật thể hoặc cắt ngay lúc vật thể không có biến chuyển gì thú vị, tuyệt đối không cắt vật thể ngay mép (như mình đang làm) hoặc ngay góc. Nhưng nhìn chung mình vẫn rất thích ảnh này vì cảm giác nó mang lại. Ảnh [11] cũng là 1 ảnh mình thấy khá thú vị, mình thích màu xanh trong hình mang 1 cảm giác lành lạnh và mơ hồ rất đặc biệt.
6
Mình đã muốn dùng 2 thân cây cong này để tạo 1 đường dẫn hay 1 khung nhỏ nhằm hướng người nhìn về trung tâm của bức ảnh là thảm cỏ và cây thấp được nắng rọi xuống rất đẹp. Dĩ nhiên các bạn cũng thấy là mình fail rồi 🙂
7
8
9
10
11
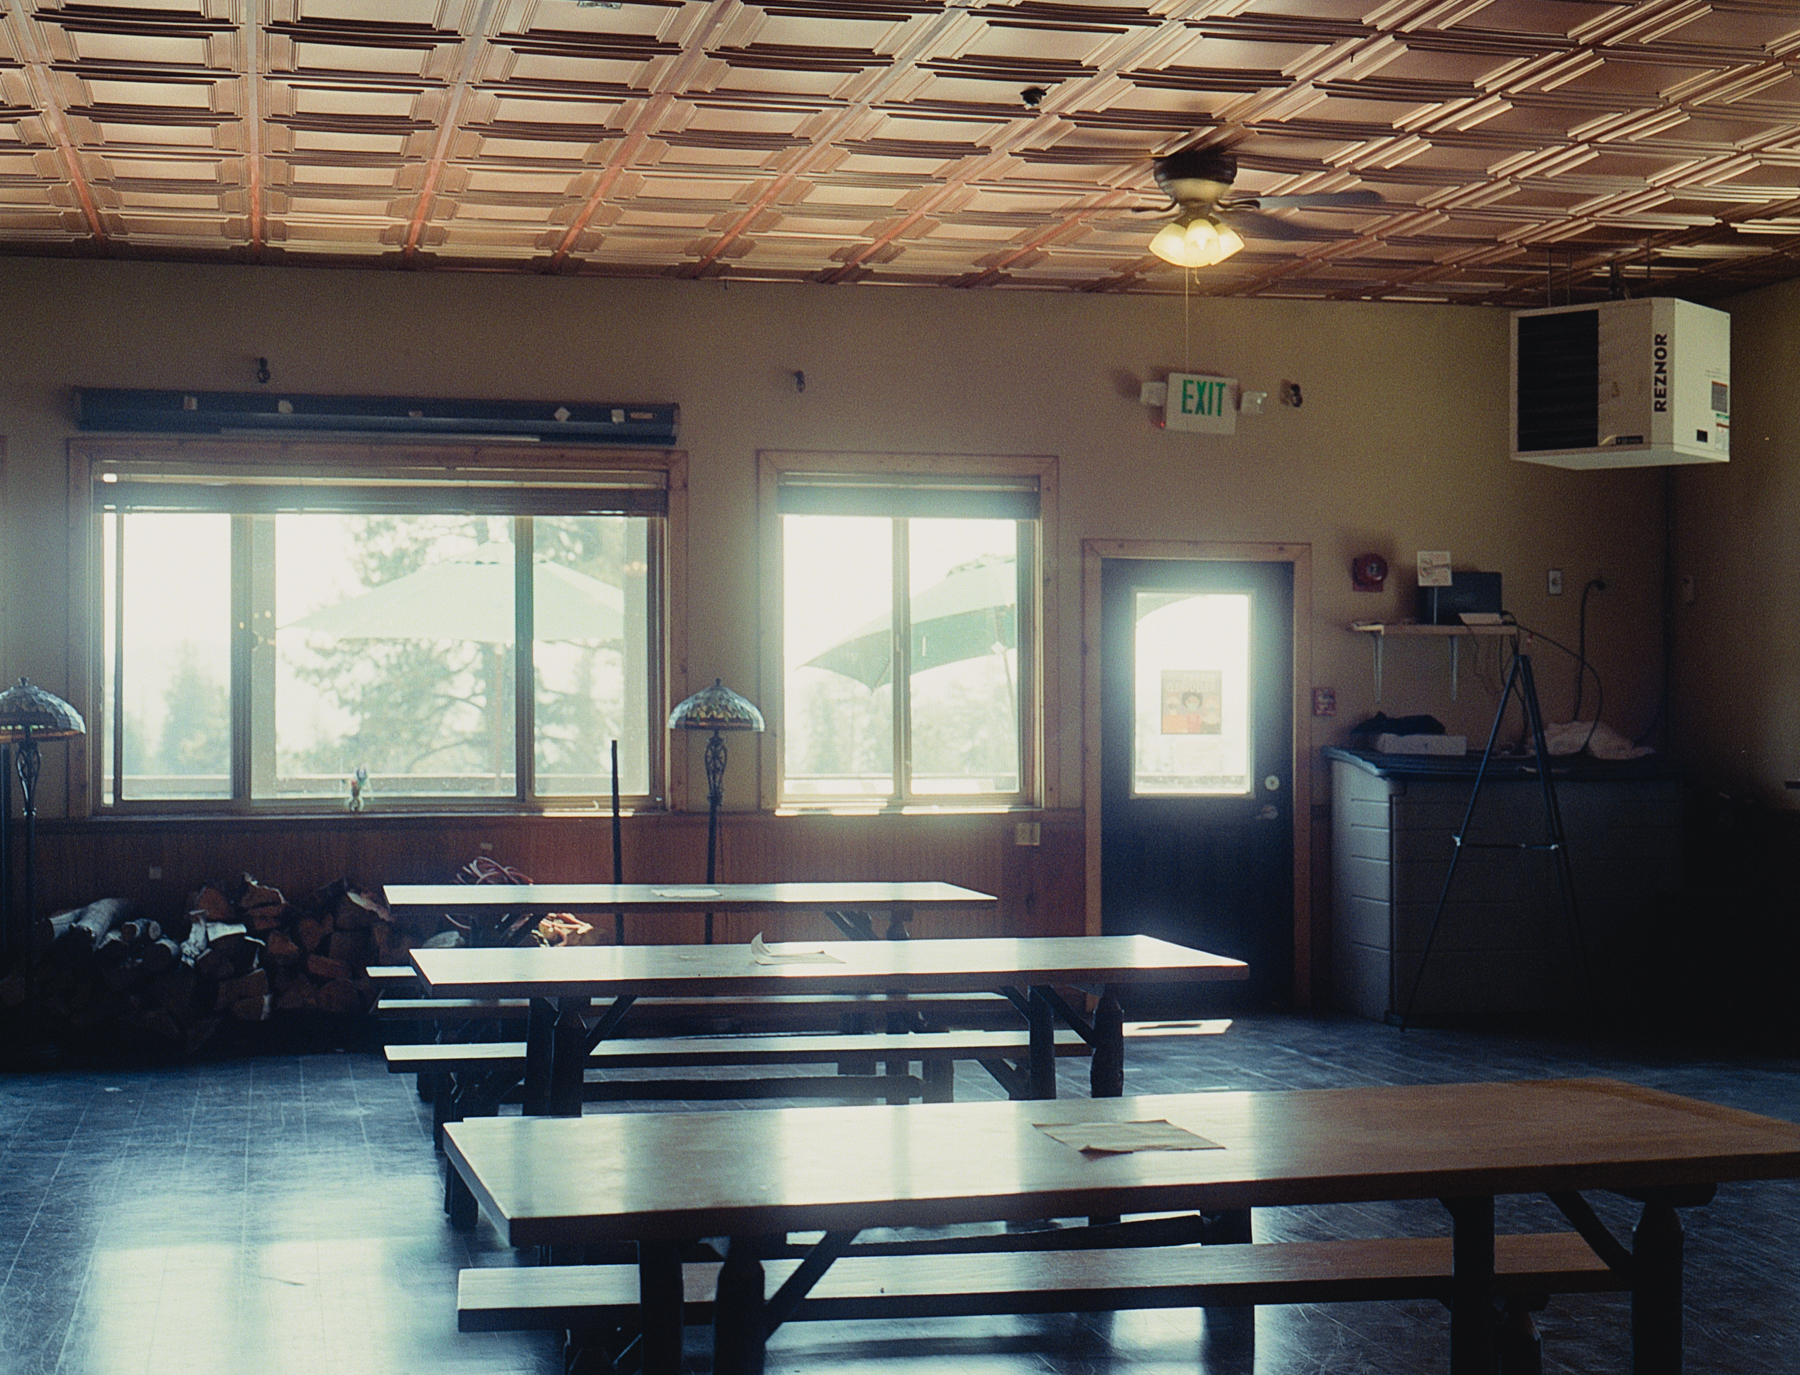
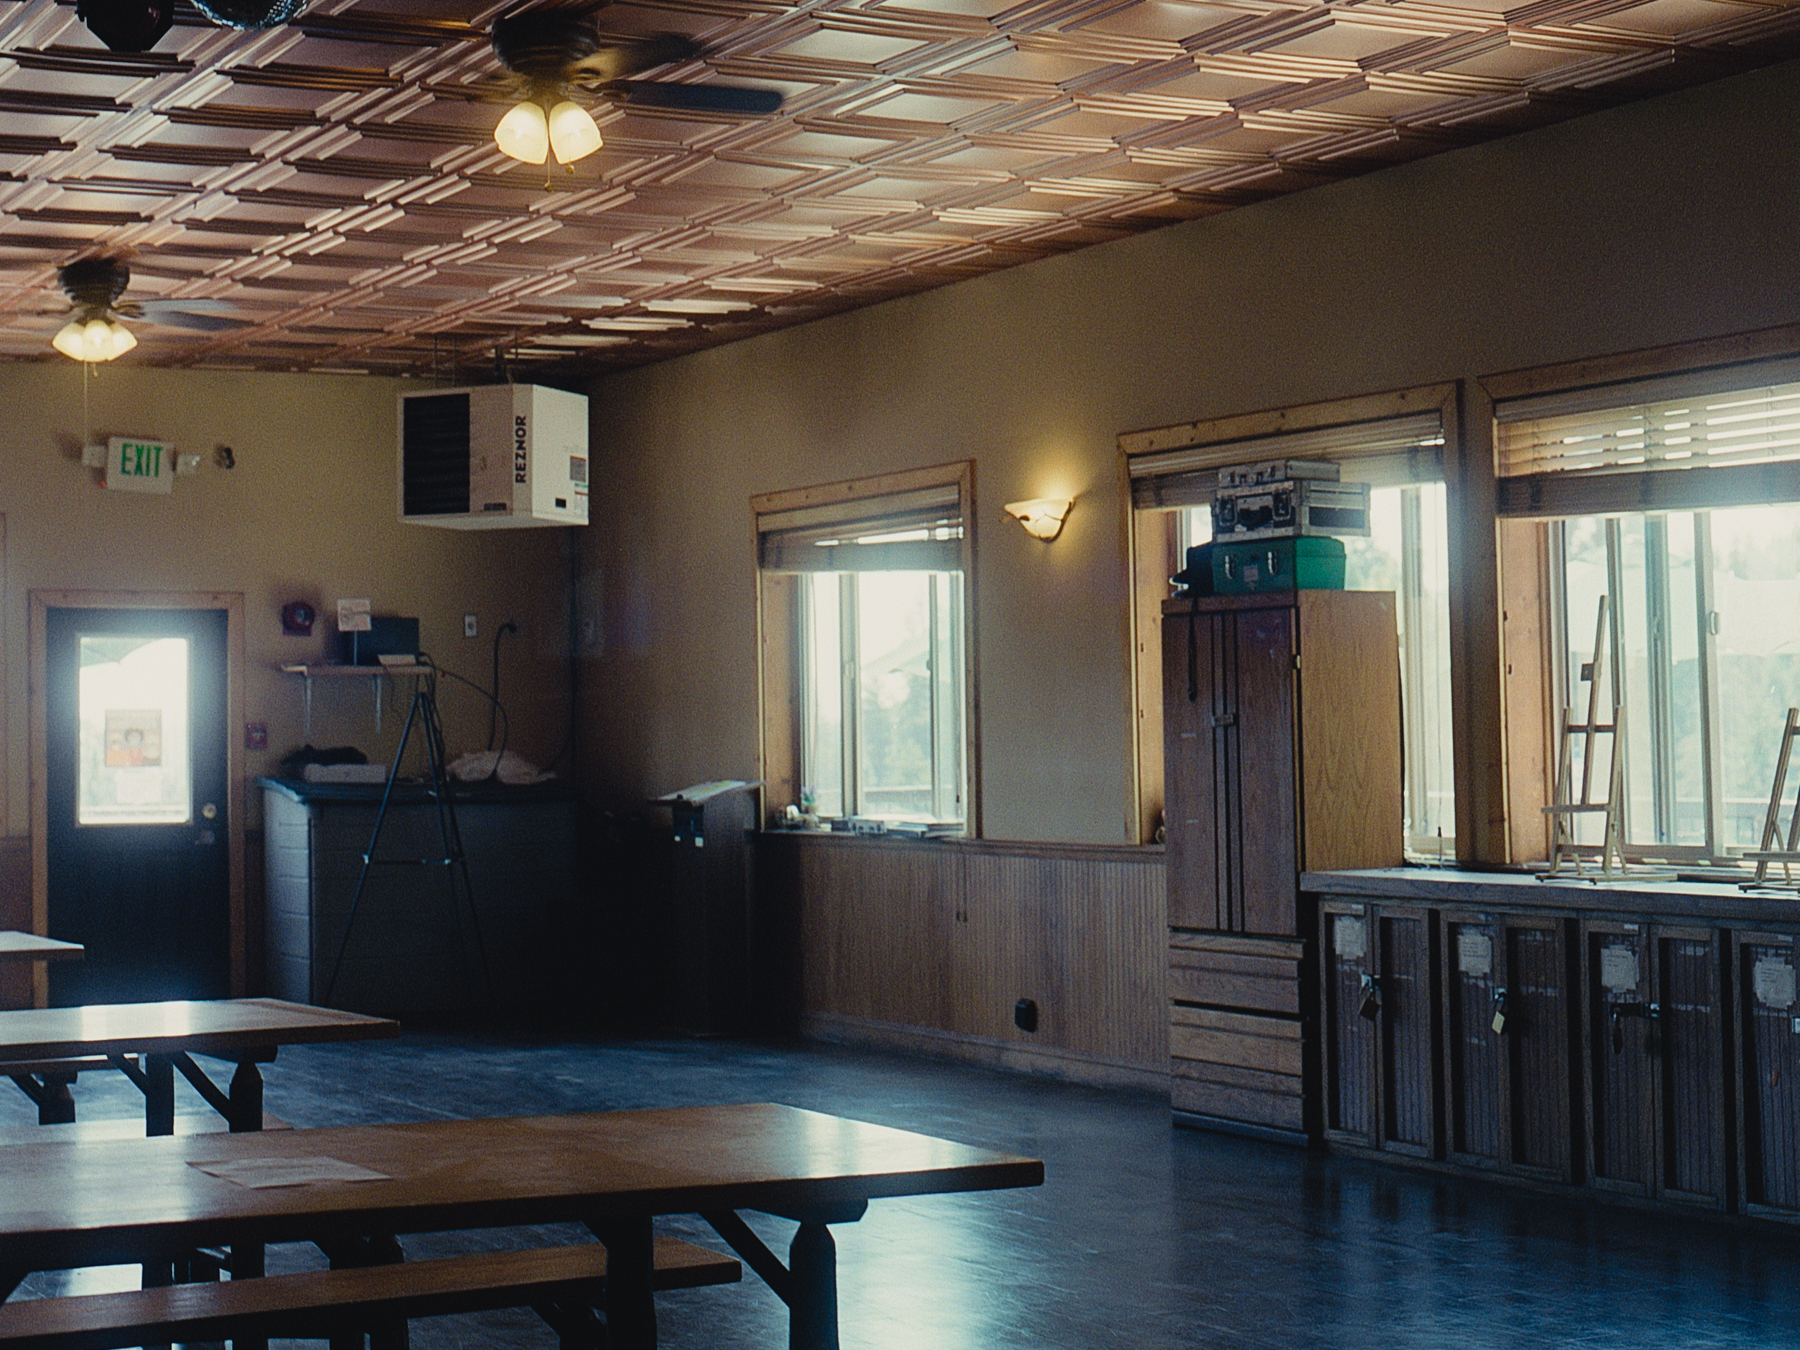
Mình vừa mua pro mist filter 1/4 để chụp thử vì mình thấy công dụng của nó khá hay. Pro mist filter dùng để giảm highlight xuống và đồng thời làm highlight glow 1 chút, như có thể thấy ở 2 tấm hình bên phải. Đây là trưa Chủ Nhật khi mình và các bạn dừng lại trước 1 nhà hàng trong ski resort để ăn trưa. Dĩ nhiên ski resort khá vắng vẻ mùa này, như trong hình là 1 sự trống trải và âm u trong phòng ăn không 1 bóng người.
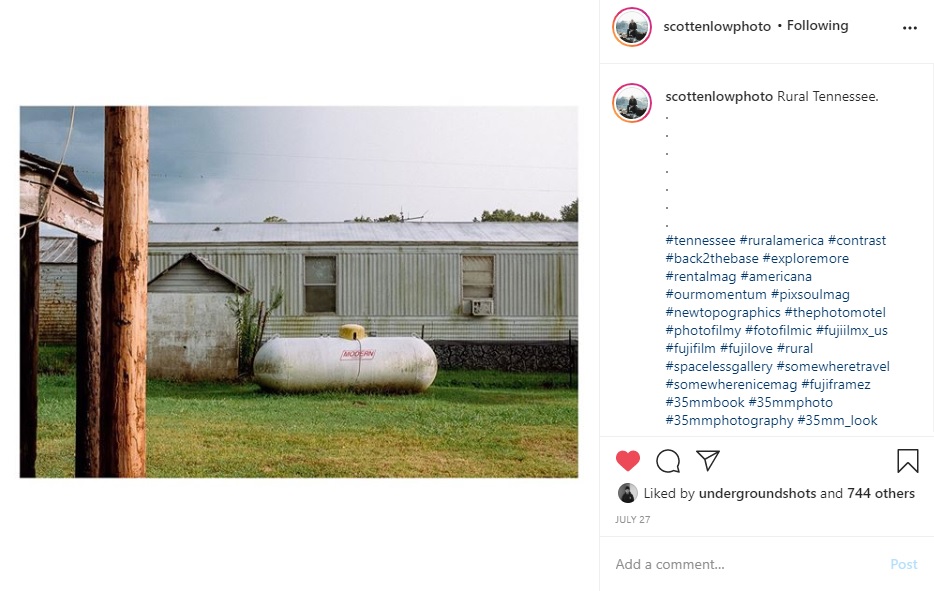
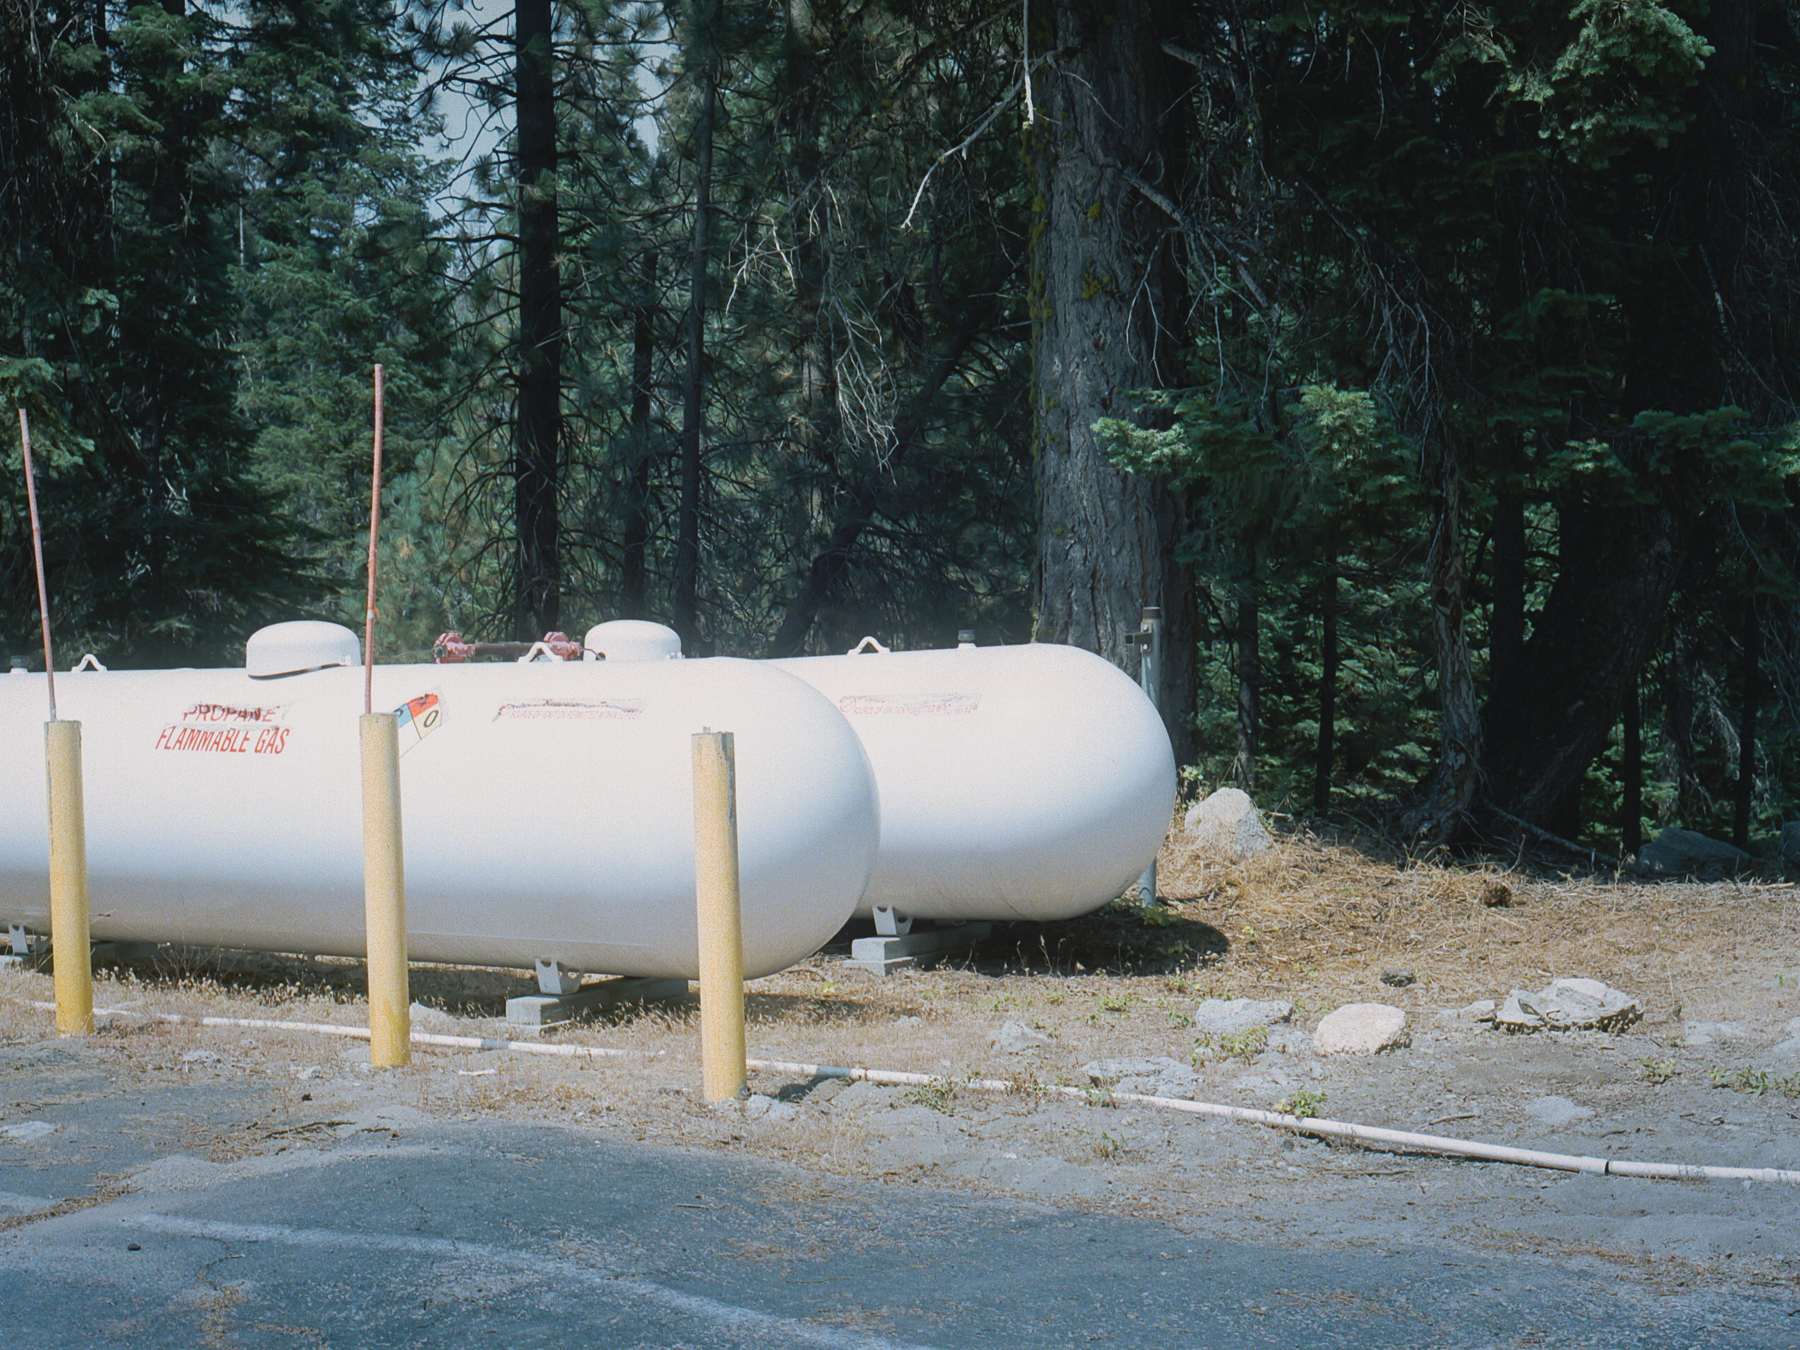
Ảnh bồn gas này mình chụp theo 1 bức ảnh của photographer Scott Enlow đăng bên dưới. Mình đặc biệt thích tấm ảnh này của Enlow vì nó chứa đựng tất cả những gì mình muốn nhìn thấy trong 1 bức ảnh, tiền cảnh, trung cảnh, hậu cảnh, cỏ xanh, ánh mặt trời trong và vàng ấm, bầu trời hơi u ám nhưng toàn bộ hình lại không có cảm giác u ám nặng nề. Mình thích sự cũ kỹ và hơi hoang tàn nhưng cũng rất “neat” và tươi mát mà bức ảnh mang lại. Mình đặc biệt thích cây cột gỗ ở tiền cảnh, mình cảm thấy cây cột gỗ làm tấm ảnh rất sống động và thú vị. Các bạn nên xem thêm ảnh của Scott Enlow qua Instagram như trong hình bên dưới. Mình rất thích Scott Enlow vì ảnh của nhiếp ảnh gia này rất retro và dreamy.
Quay trở lại với ảnh của mình, mình nghĩ ảnh bên phải tốt hơn ảnh trái bởi vì ảnh trái có chiếc lều nhỏ khá kỳ cục trên bồn gas làm mình không thể nào chọn được 1 bố cục đẹp cho ảnh. Hình thứ 2 khá hơn vì bồn gas màu trắng, dễ tách biệt giữa chủ thể và background hơn. Thật ra cũng không phải là tấm ảnh mình ưng ý 100% nhưng mình cũng thấy nó khá thú vị. Nhất định lần sau gặp 1 bồn gas mình sẽ thử lại.
16
17
18
19
Tấm ảnh mấy tấm ván bị bỏ lại trên hồ nhìn khá buồn và cũ. Không hiểu sao 2 tấm này màu scan ra nhìn hơi ám tím và trầm dù mình chỉ dùng Fuji 400H, có thể là do cảnh quá tương phản giữa highlight và shadow nên khi scan máy cố tone down highlight để giữ lại chi tiết ở highlight (thật ra mình không rõ lắm, cũng có thể do mình chưa biết cách chụp, scan trong điều kiện tương phản mạnh). Nhưng mình nghĩ nó khá hợp với nội dung của ảnh, về đồ vật bị con người bỏ lại vội vã nằm chơi vơi bên bờ hồ giữa đám cỏ mọc lố nhố không ai chăm sóc. Tấm thứ 2 có bố cục đẹp và nhiều lớp (tiền cảnh, trung cảnh, hậu cảnh) hơn ảnh thứ 1. Nhưng mình nghĩ 2 ảnh đi chung sẽ mang nội dung mạnh và thuyết phục hơn.
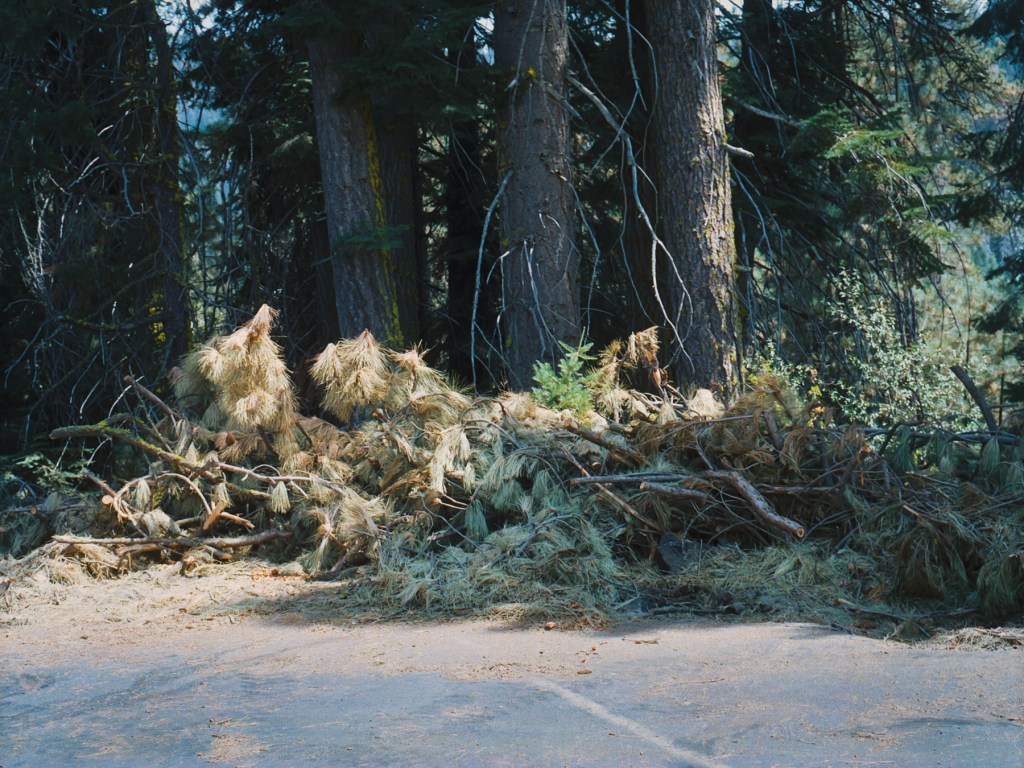
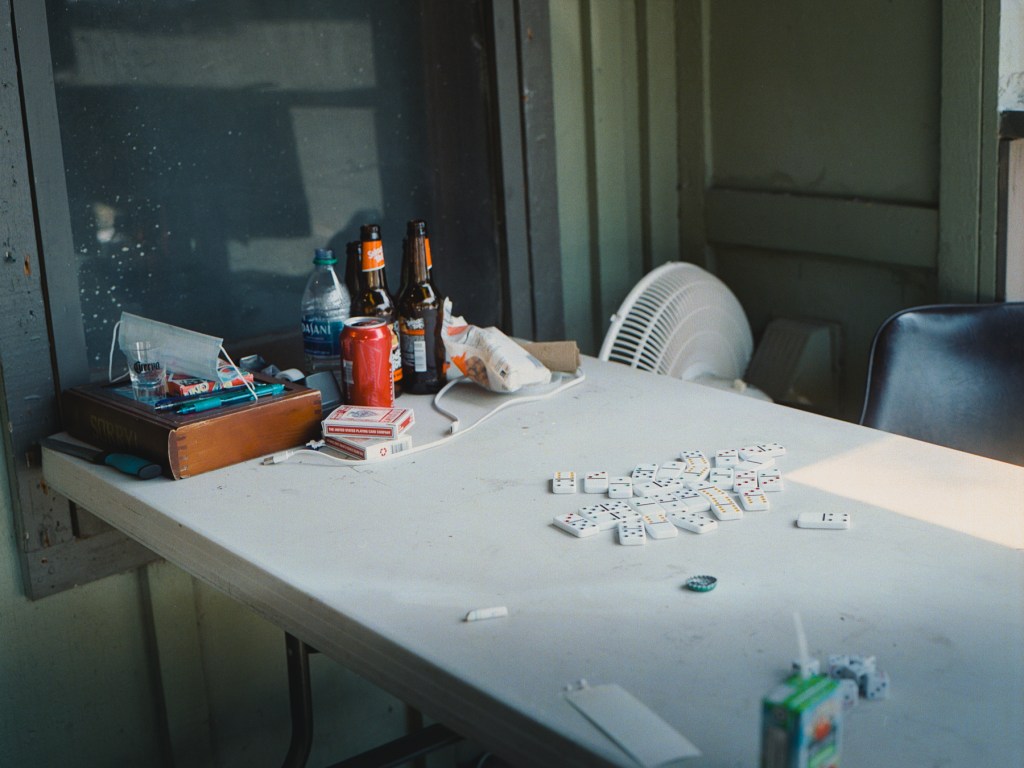
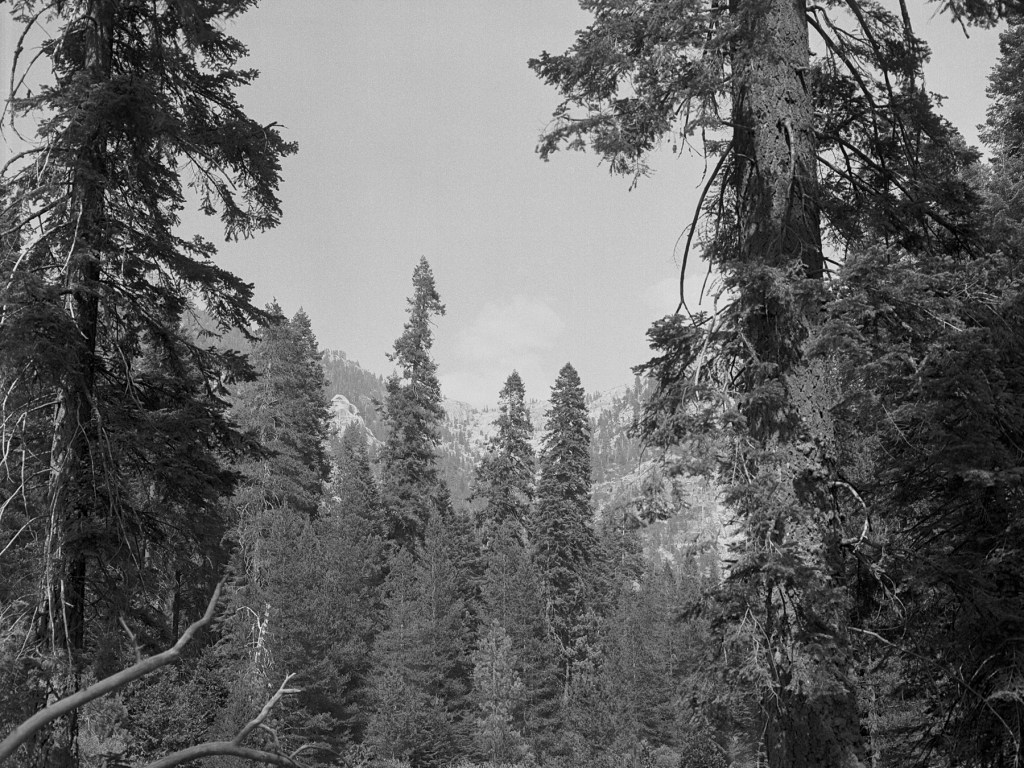
Ảnh [18] mình chụp vì ánh nắng rọi xuống chóp của những cành thông khô nhìn rất bắt mắt, Đây cũng là 1 cảnh tương phản mạnh về độ sáng cũng như màu sắc, màu vàng cam của chóp thông khô và màu xanh thẫm của cành thông dưới bóng râm làm cảnh nhìn rất thu hút. Rất tiếc lên hình mình không thể hiện được vẻ đẹp đó. Ảnh [19] mình rất thích, vì đó là chủ đề ưa thích của mình, những cảnh bình thường hàng ngày của cuộc sống nơi xa cách chốn thành thị hiện đại tấp nập. Ảnh này chụp ở khẩu 5.6 nên không có nhiều vùng in focus, là 1 điều mình rất tiếc, nhưng cảnh khá thiếu sáng nên đây là những gì tốt nhất mình có thể làm.
20
21
Cuối cùng là những hình chụp casual trên đường hoặc lúc đi hiking. Thật ra mình có thể chụp nhiều hơn trong lúc hike nhưng mình không thể cảm nhận được vẻ đẹp của đá nên mình không chụp nhiều dù trong lúc hiking có đi quang qua 1 đoạn đường toàn đá xanh, chỉ có 1 khe nhỏ đủ để 1 người chui qua, cảnh nhìn rất Thập Diện Mai Phục vibe vì thật ra bạn không thể thấy gì xung quanh mình ngoại trừ đá, và mình luôn có cảm giác ai đó có thể nấp đằng sau 1 tảng đá và nhảy ra mai phục mình[?!] lol. Nhìn chung, mình nghĩ nó khá thú vị nhưng không nghĩ nó photographic cho mình.
Cuối cùng là 2 hình cuối của 1 thác nước nhưng đã cạn nước vì đây là mùa khô. Lần sau mình nên kiểm tra thác nước trước khi mang theo tripod đi hiking 🙂 Không có nước cảnh chỉ toàn đá khô khốc nhưng mình cũng thấy vui vì chuyến đi này.
Sau đây là ảnh từ cuộn film trắng đen duy nhất mình chụp trong chuyến đi này.
Cảm ơn các bạn đã theo dõi đến đây. Mình biết bài viết khá dài nhưng mong hữu ích cho các bạn. Chúc các bạn chụp ảnh nhiều hơn và hài lòng về ảnh của mình. Cheers!


![mammoth lakes road trip [part 2]](https://filmsequence.com/wp-content/uploads/2021/01/mammoth-lake-28-1.jpg?w=1200)


![mammoth lakes road trip [part 1]](https://filmsequence.com/wp-content/uploads/2021/01/mammoth-lake-20.jpg?w=1200)


![[Vietnamese] Sequoia road trip](https://filmsequence.com/wp-content/uploads/2020/09/sequoia-17-6.jpg?w=1200)