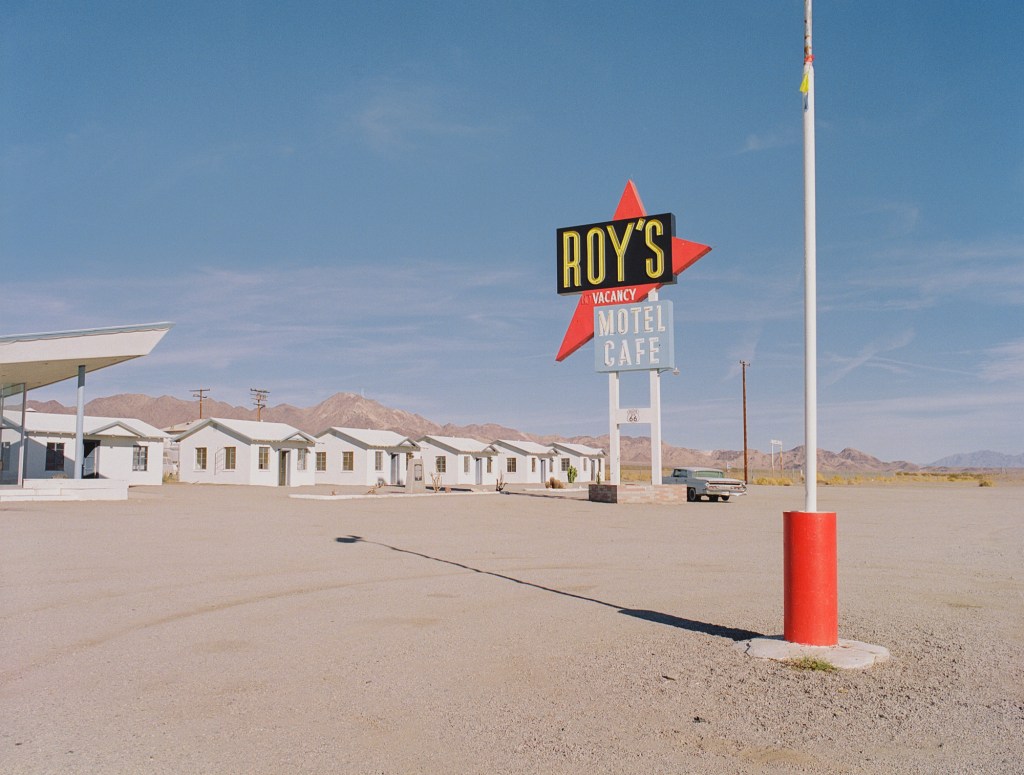
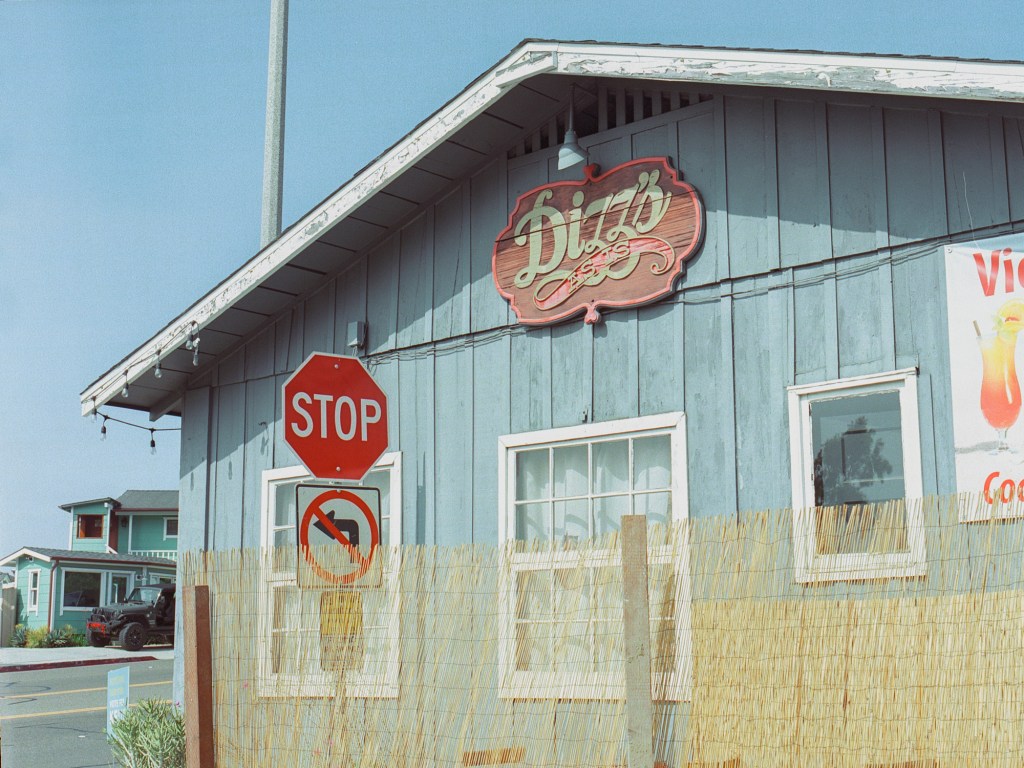
It’s been a while since my last post. Since then, I’ve constantly had a thinking that my photos are not matching my expectation. I don’t know if it’s because whenever I go out to take a photo, I always think about making photos for my blog post or just because I’m not improving my skills. Either way, I’ve chosen to slow down and think about the photos only, not about the purpose of the photos later. So here you are, some photos from my few hours in the famous Amboy town. I was there around 1pm so the sunlight was not very pleasing (compared to golden hour) but since it’s winter time, 1pm was not that harsh and strong. I got some photos that I’m happy with.
1
2
3
4
5
These photos were taken with Portra 800. I didn’t plan to shoot Portra 800 at midday but I was having the roll in my camera from the last trip so I have to finish the roll. It’s the famous Roy’s sign so I had to take a good amount of photos to make sure I got one that I can proudly share with people on the Internet :). The second (2) photo is a initial composition that I like when I look at the Roy’s sign while standing in front of the restroom :). Then I move to the right to take the third one. I like the composition and elements in the #3 photo but wish that I have the man in a nicer post (he was doing his job and I think he’s a good element to the photo but I was worried that he may blend into some objects so I take the photo when he just separated himself from the gas pump. I also wish that I moved away a bit to not cut the bottom of the “Cafe” sign and I also want to include the “no vacancy” in the photo :(. In the photo #4, I also want to include the light pole at the foreground because my photography goal is to create photos with complex layers, not sure if I tried so hard and ruin my composition in this case. Anyway, here’s the 2 photos that I think look best.
67
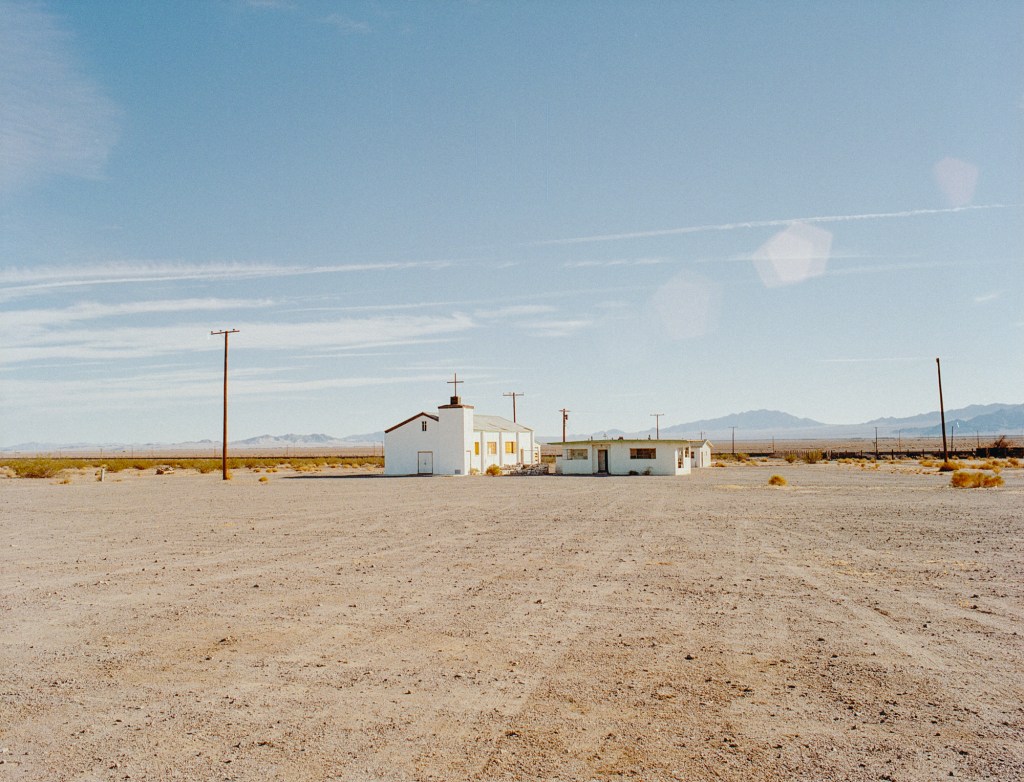
The #6 photo is just simple and straight forward about the environment and how vast the place is. When I look at the photo I can feel how lonely the sign is, there’s no other like this in miles. The #7 photo tells more about other structures around the sign and I like the affect of the wide angle lens here.
After taking photos of the sign, I cross the street to take photo of the church across Roy’s because who can reject a lonely white church in the middle of desert?
8
This is also the last shot from my roll of Portra, so I loaded Fuji 400H and continue shooting. I love abandoned things because they carry so many stories, they are unique and broken :).
91011
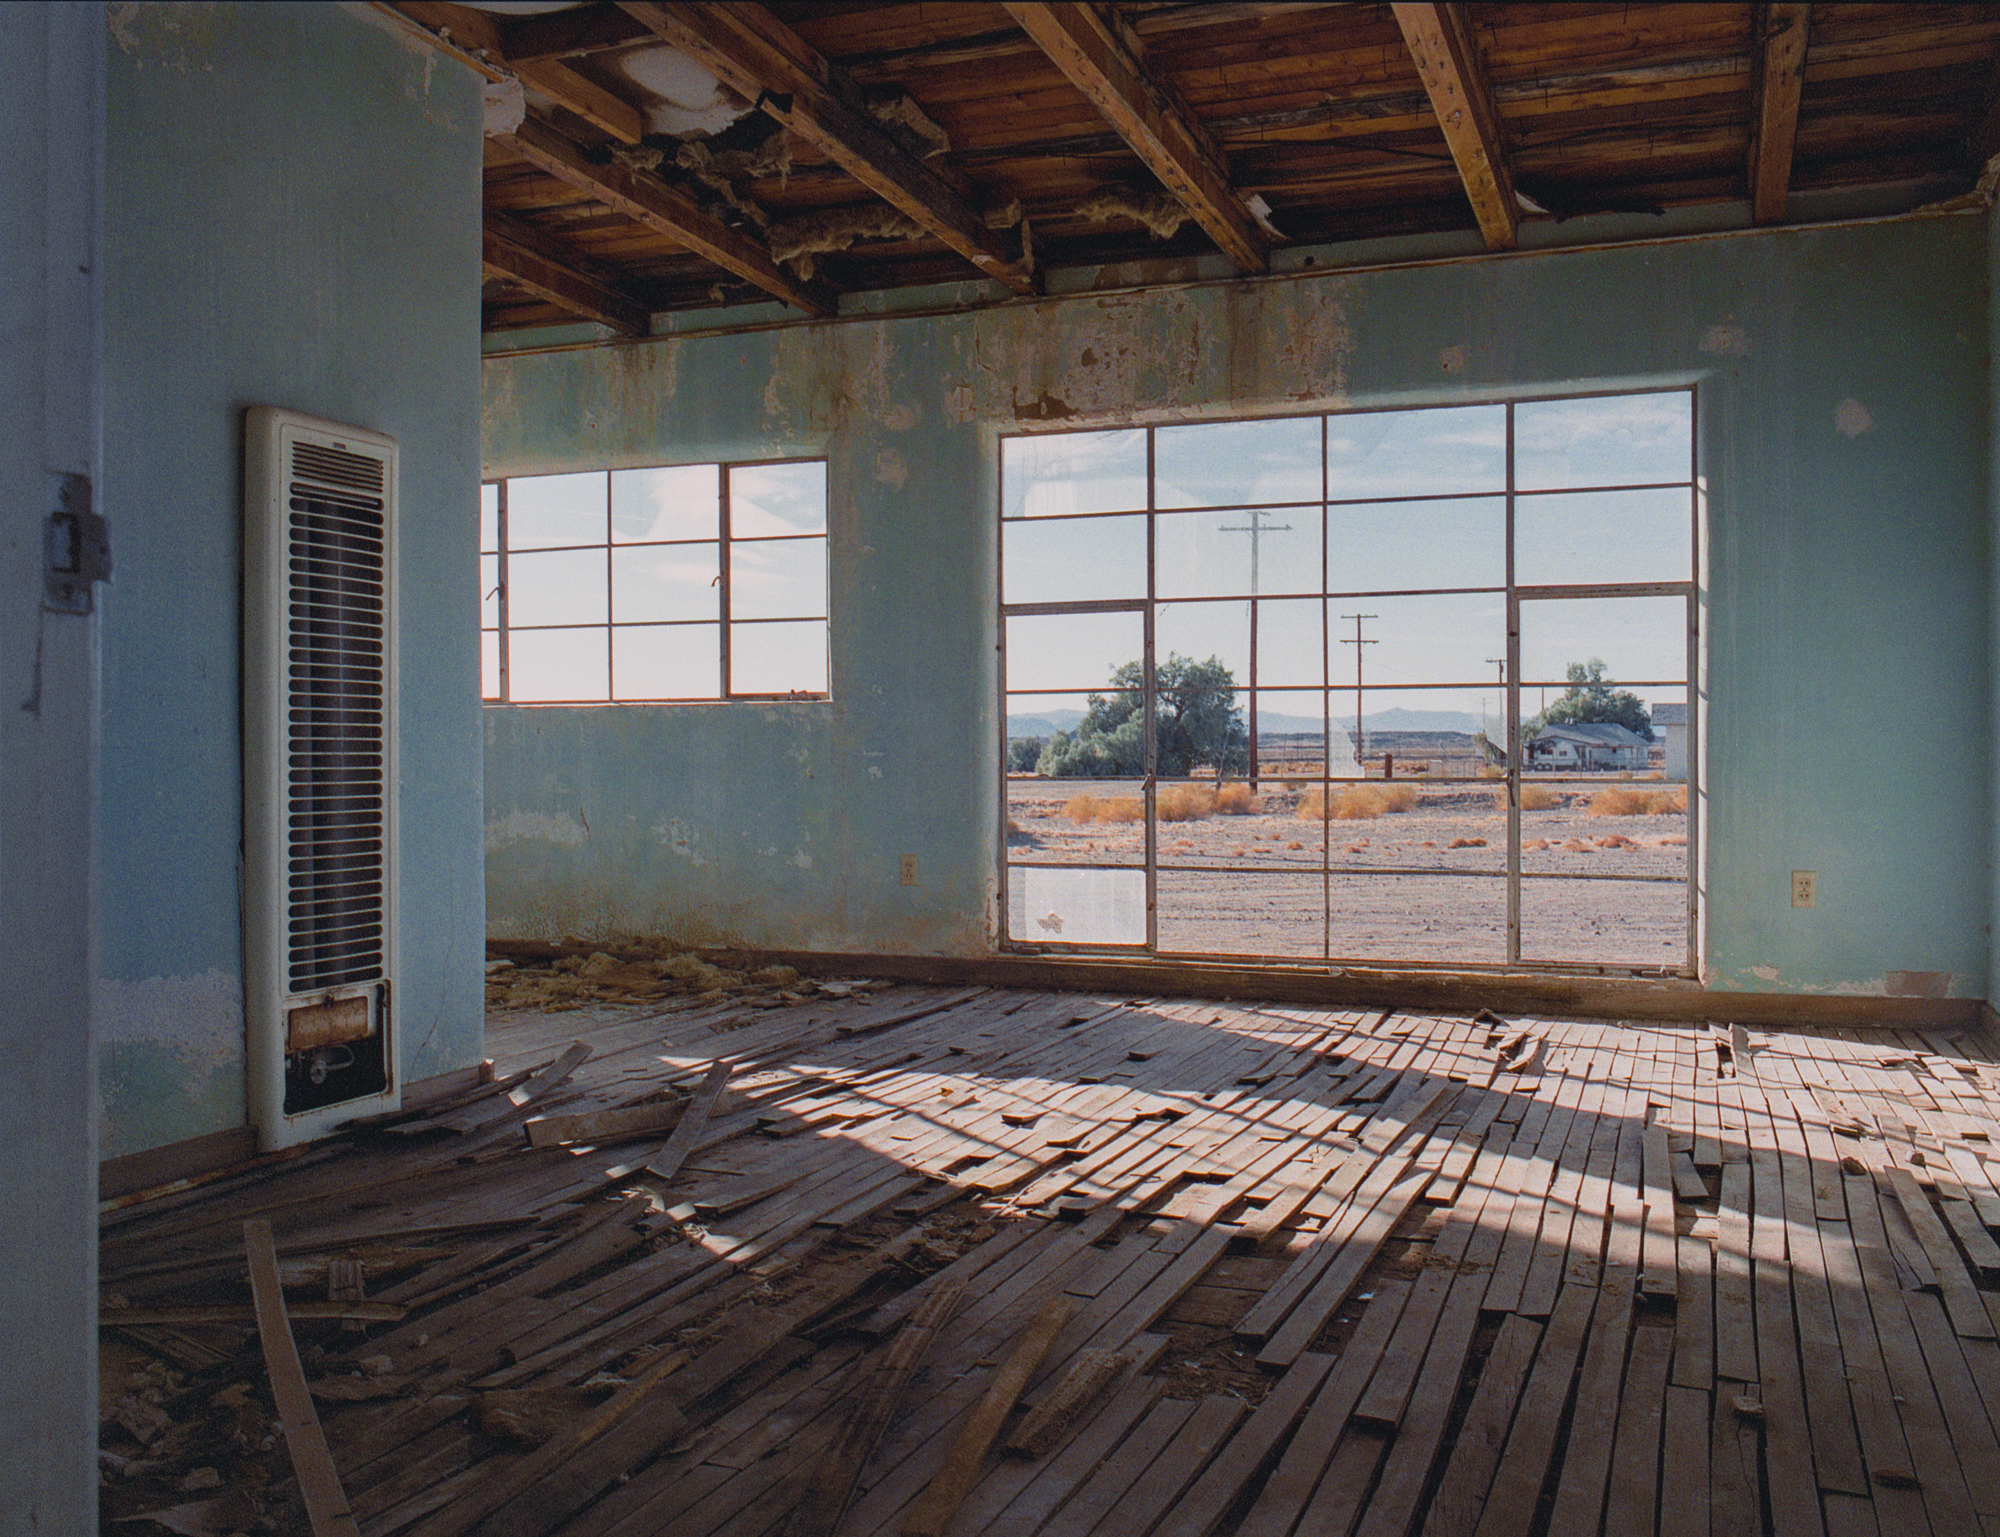
I like the #9 photo but I heard feedbacks said it not pleasing, I guess because of the ugly house on the right side, but I still like it because it’s life, beautiful and ugly, light and shadow, high and low, they just come hand in hand, nothing is 100% beautiful. I had high hope for the photo #10 but sadly it doesn’t come out the way I want. Subframe and multiple layers in a photo is something I thrive for but I guess still not success this time. The photo #11 is not that great but I like the fact that you can see the house over the window, and it also pair nicely with the last photo below (because of the heater?).
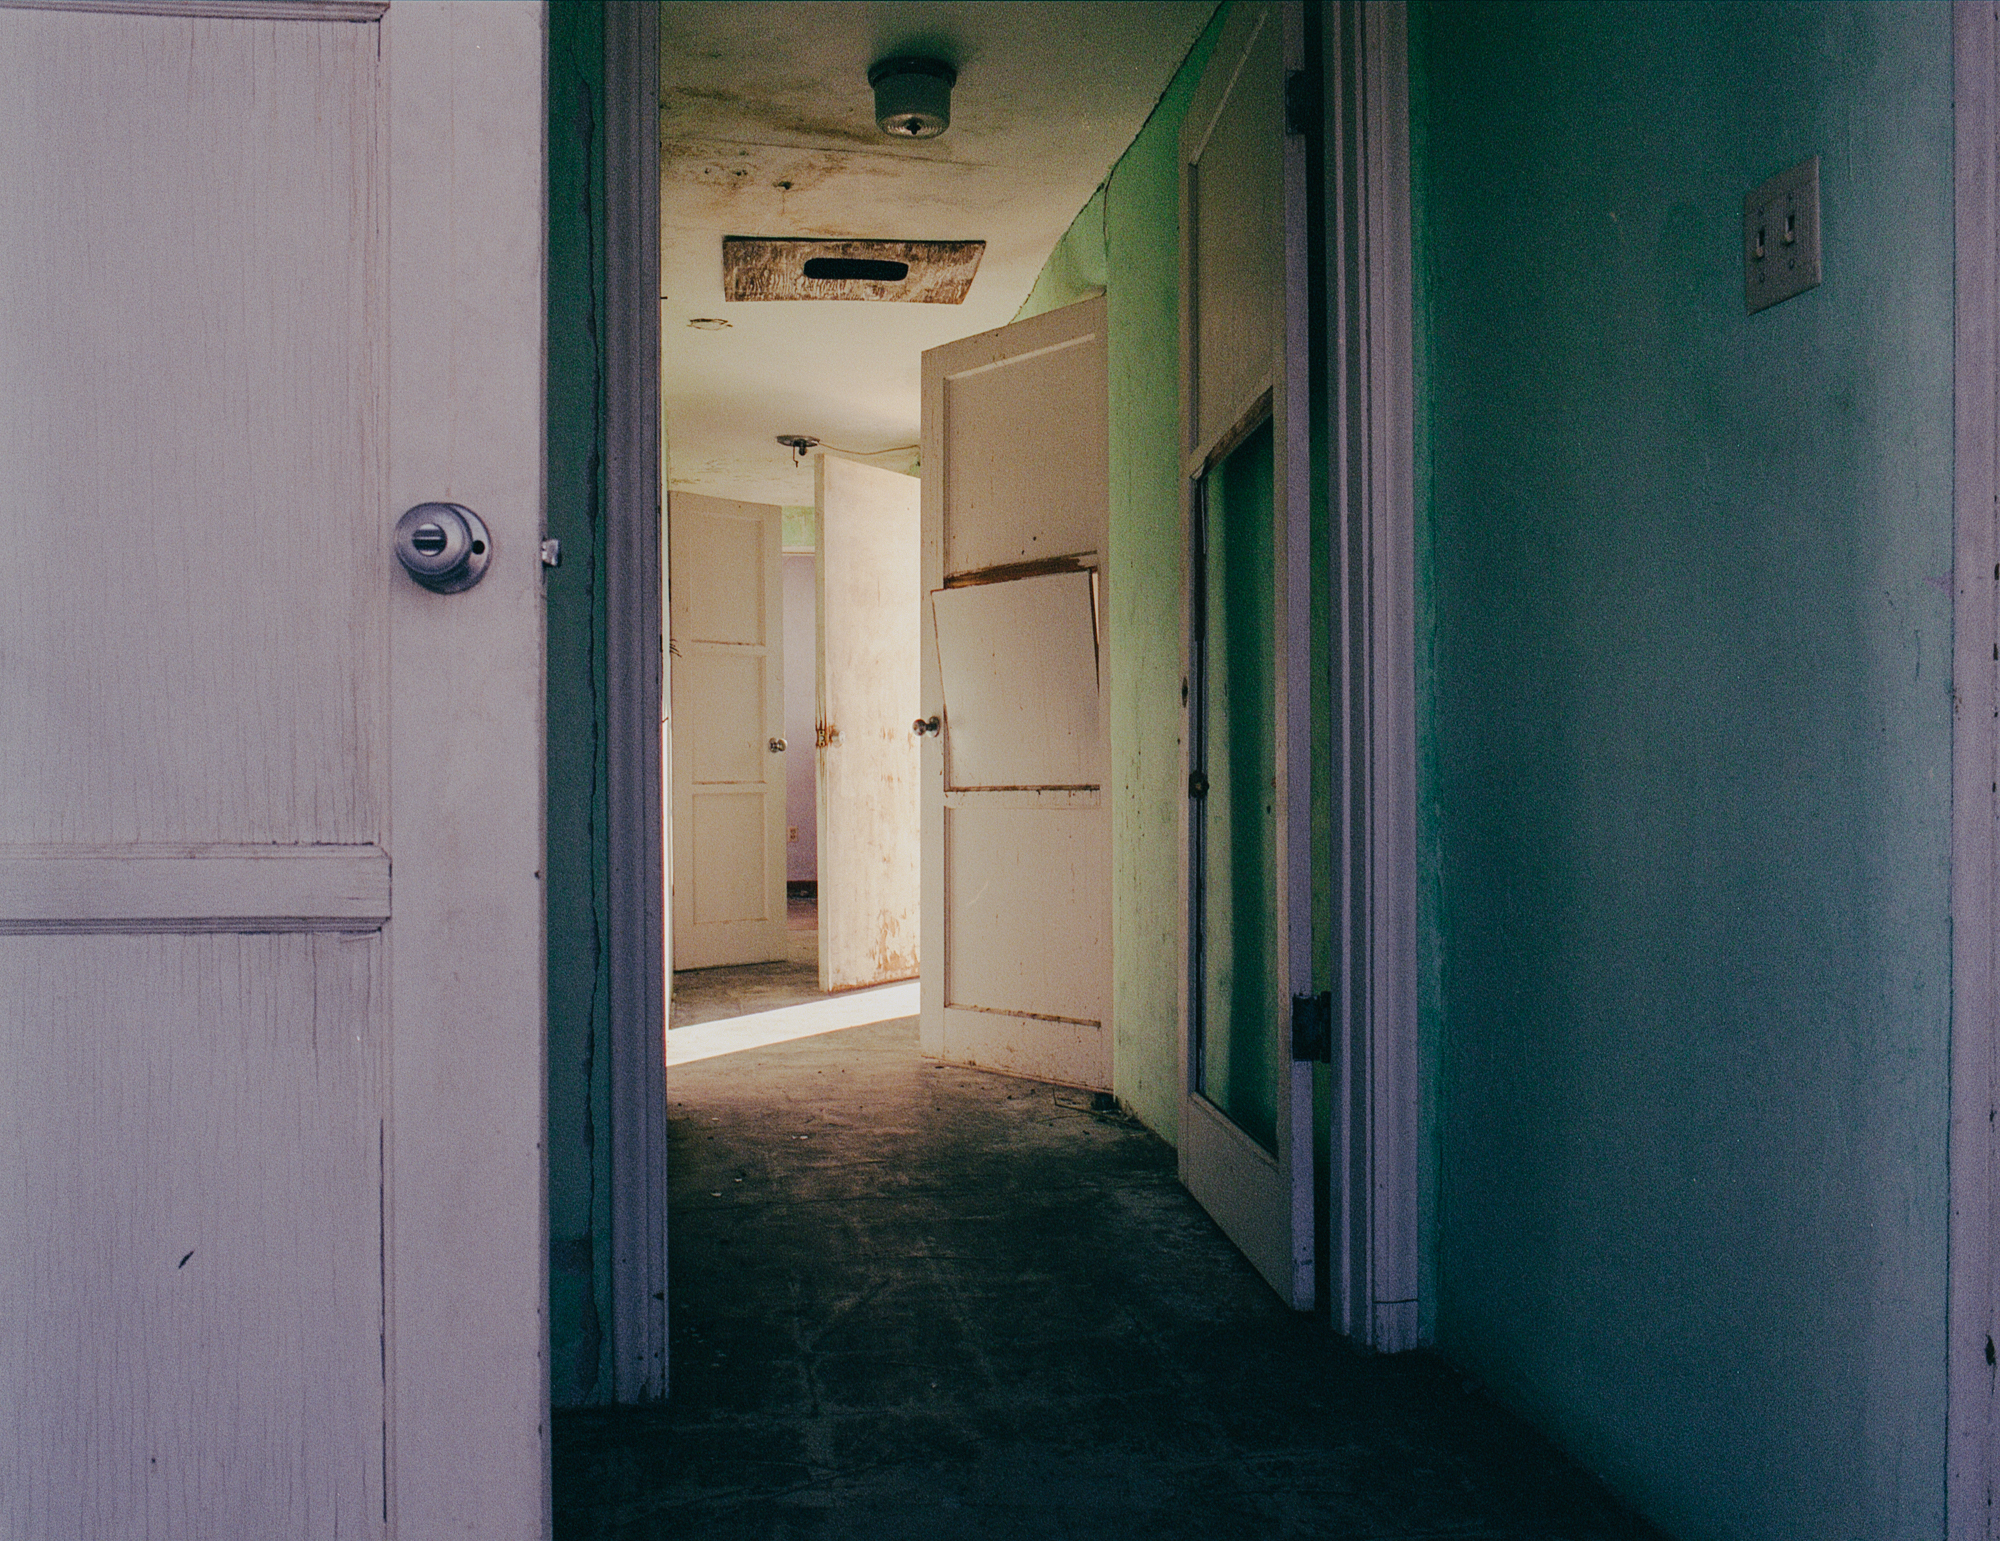
Finally, the last 3 photos are the best ones. I suppose to like the last one the most because, again, so many layers and elements to look for, but I still think it’s missing something to be one of the best of my work. The photo of the hallway and doors is fascinated to me because it’s mystery and make me wonder what’s inside those room, there’s so much possibilities inside those broken doors. It looks just like a scene in a movies. Last but not least, the whole church and abandoned houses around remind me of the TV series Preacher from AMC.
Thank you for coming all this way. Hope you enjoy it. And watch Preacher if you’re open to dark, ugly and cruel things 🙂
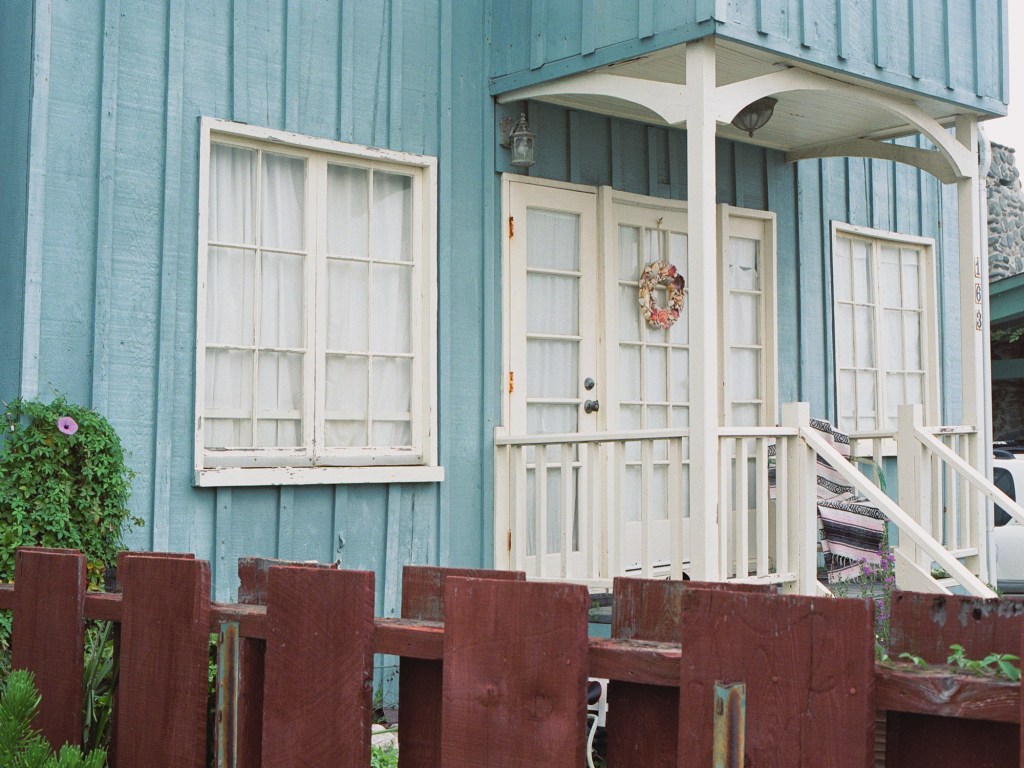
I went to the beach town by Victoria beach few week ago in sunset hour to take some sunset on the beach shots but got caught up in these residential houses scenes. I love the calmness and quiet atmosphere here, along with some nice little houses and windows that feels so warm and homely.
Before get into the photos from that afternoon, let me show you 2 photos I took in another morning walk in the same area. These shots are not anything special but I was testing my Mamiya 645 150mm lens before I sell it. Even though the composition is not that great but I love the tones here and the sharpness is really nice.
Mamiya 645. 150mm/3.5. Fuji NPS 160 expired
Mamiya 645. 150mm/3.5. Fuji NPS 160 expired
The next 2 shots I took one in golden hour and one in blue hour. That wasn’t the plan but somehow I feel drawn into the windows and the way it’s slide open just a bit to show a present of a person inside the room is quite nice and elegant. When I got back to the car after take photos on the beach, I came across it in blue hour and the yellow light came out of it is just nicely contrast with the blue sky outside. I think this is a short and straight forward form of “story telling”, something I desire to do in this blog. Wish that I were having the same composition so that the similarity and contrast are highlighted but it’s good to learn that same composition sometimes can help in story telling. I know that the trash cans are distractive but sometimes I just think if it’s there and I was capturing the scene, is it bad to exclude something out just because it’s not aesthetically pleasing? Or I should document the scene as its good and bad? So, I show you the non-crop and cropped version of the photo. Let me know if you hate the trash cans so bad 🙂
This one is a photo that I really like but I still feel something doesn’t work out in this. The whole house feel very mysterious and old, all the windows and doors were covered with white thick curtain like the owner doesn’t want anyone to look inside. The house blends into the blue hour sky and those bush in general feel weirdly but sad at the same time.
Bronica ETRSi. 75mm/2.8. Fuji Pro 400H
Bronica ETRSi. 75mm/2.8. Fuji Pro 400H
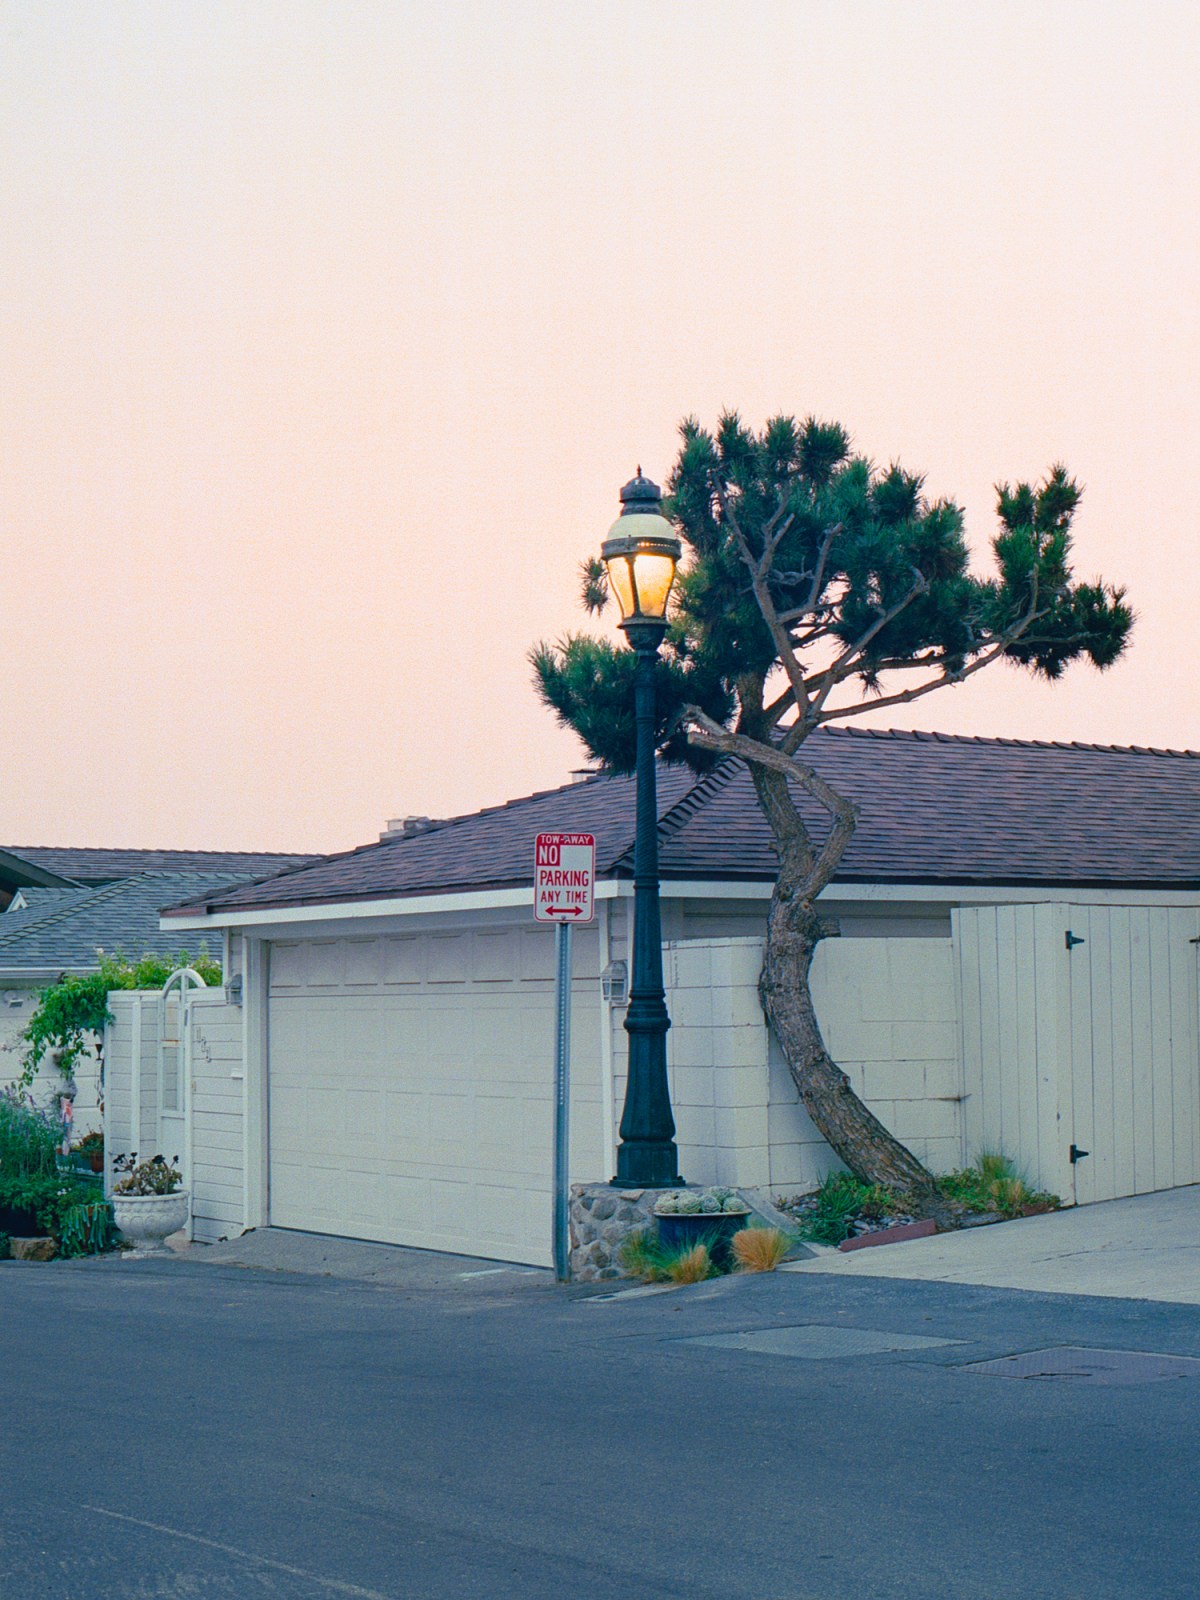
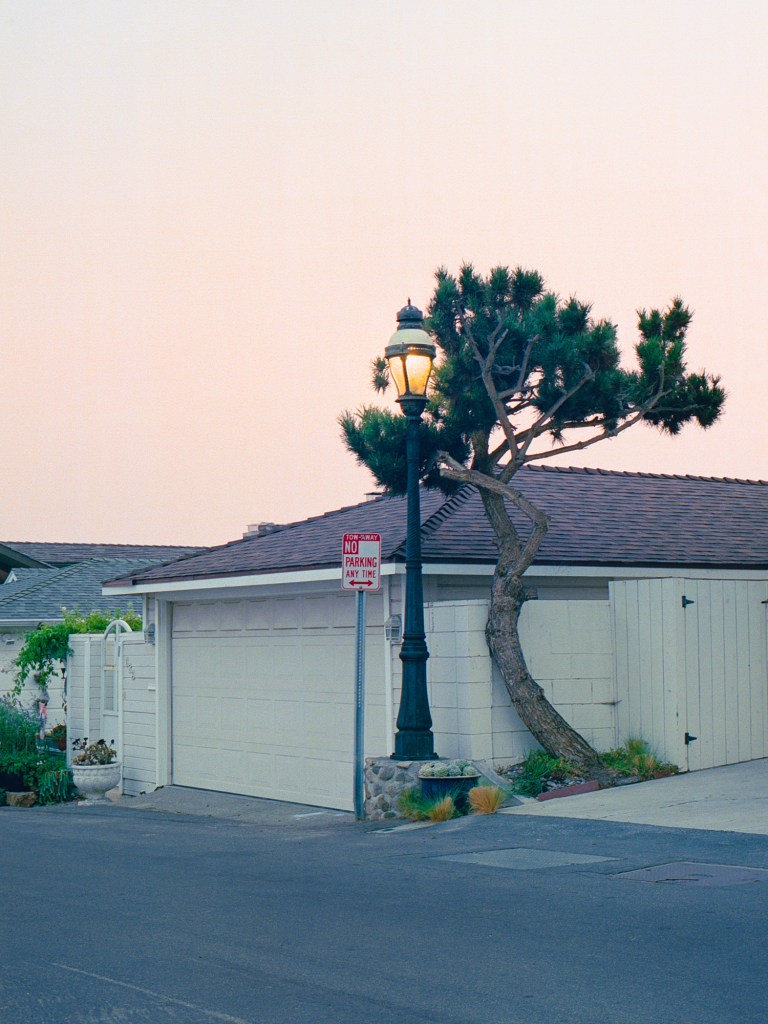
This photo is my favorite in the day. It’s the first scene captured my eyes in the town. I like the way the branches twist and the straight up street light glowing just in front of the tree. The scene was much more dynamic as in the photo but I think my photo is kind of 7/10 get to that atmosphere. The sky is subtle and soft while the green is quite saturated and pop.
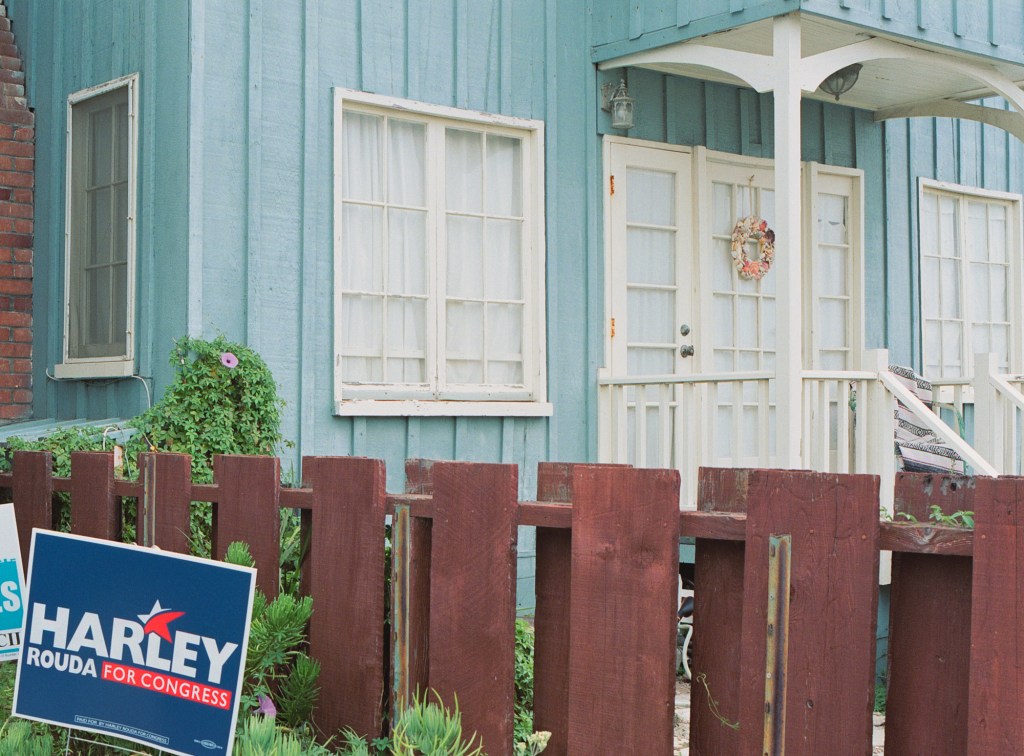
After not successfully capturing the vibe of the house, I went back another day to try again. And these shots turn out okay I guess. The photo with the Harley sign makes me go down into the rabbit hole again about include and exclude things as it is or get the thing you want and ignore the rest. The others are nice in term of tones and composition.
Pentax 645. 75mm/2.8. Fuji Pro 400H
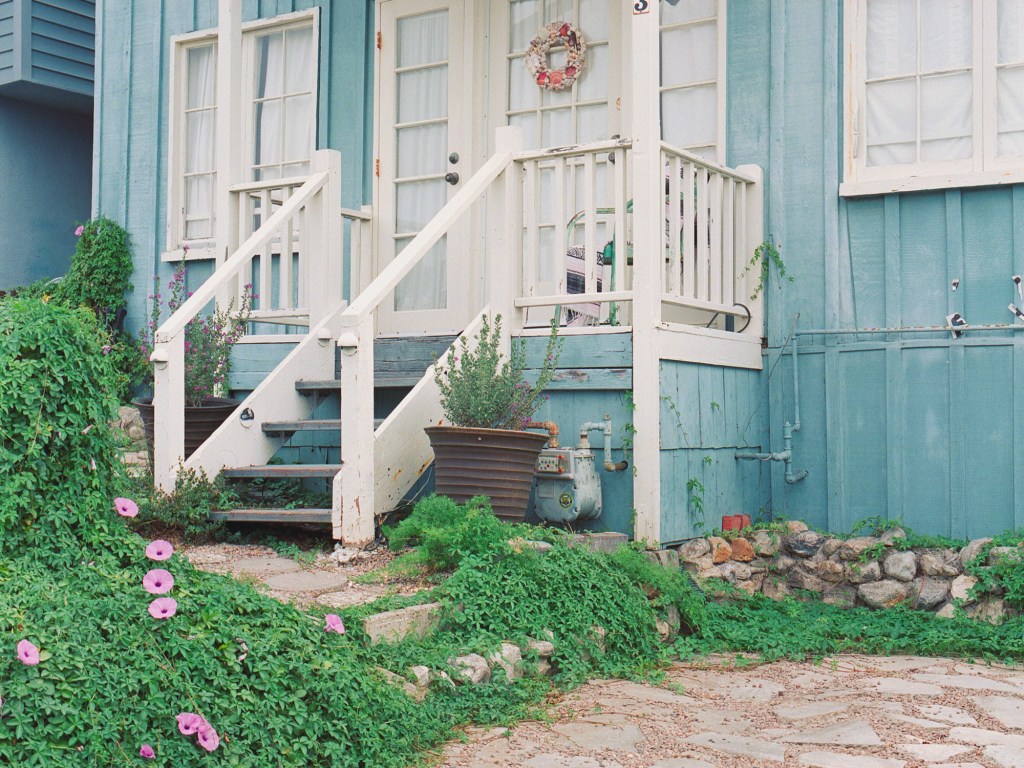
So now you know how the whole house looks. This time I went in the morning so there’s no warm light as in previous photo but the photos are nice nevertheless.
This blog is not meant to talk about gear but since I had opportunities to try some 645 SLR cameras I think I may can give you some advices if you are wanting to buy your first medium format camera. Other Youtubers or people on the Internet may give you a bunch of 645 cameras and talk about the pros and cons and leave the decision to you, I think it’s cool because no one asks you to choose like them, you have the freedom to decide for yourself. But since you’re already here, I give you the short answer, Bronica ETRS/Si. Of course, this is my opinion and you literally can use any 645 camera to take beautiful photos as long as you you know what to do with the camera, Bronica just happen to be the easiest one to use. Or, if you find any good deal on a 645 camera, just take it, price can overrule all of the reasons I’ll show you below.
First, let’s talk about Mamiya 645. I haven’t use the m645 or the 1000s yet, so I can’t speak for those, but I used the Mamiya 645 Super, and I believe the Pro/Pro TL are very similar. Honestly, the Mamiya 645 Super/Pro is the one I wanted when I looking for my first ever medium format camera, but I couldn’t afford it because the price tag. I like the design of this series a lot, and while using it later, I really like the form factor of the camera, it feels really nice to hold the camera and take photos with it. Even though the box design may feel weird to hold but I was really surprise how fast I like to hold it, without using the grip. At first, the mechanism to open and remove the back and prism feel a little annoy (because you have to press 1 button down and slide the other button with the same finger at the same time) but I believe you can get used to it very quickly. The other thing I don’t think ergonomic about the camera is the ISO dial, it’s so damn hard to turn the dial. You have to use your finger’s nail to turn it and it’s not easy to move, not mention that the dial is half beneath the prism finder [as photo below] makes it even harder because you have a very little space to move your finger around. Of course you can dial the ISO before you put the film back onto the camera to avoid the prism finder (but it’s still hard) and yes, you just have to dial it once per roll or don’t have to redial if you continue to shoot same ISO film but to me, it’s worth notice. The Metering Mode dial and Exposure Compensation dial are the same, they’re just on the top of the prism so they’re a bit easier than the ISO dial but you get the idea. The shutter speed dial on the other hand, so easy and friendly to use! Other than that, the camera is great. The lens are a bit rigid to turn when you’re focusing but not too much, compare to Pentax or Bronica lens. One thing better than the Bronica is it has a hot shoe on the side. And of course, why I said Bronica is a better choice for your first medium format camera? The price.
Top view of Mamiya 645 Super and Prism Finder
Photos taken with Mamiya 645 Super
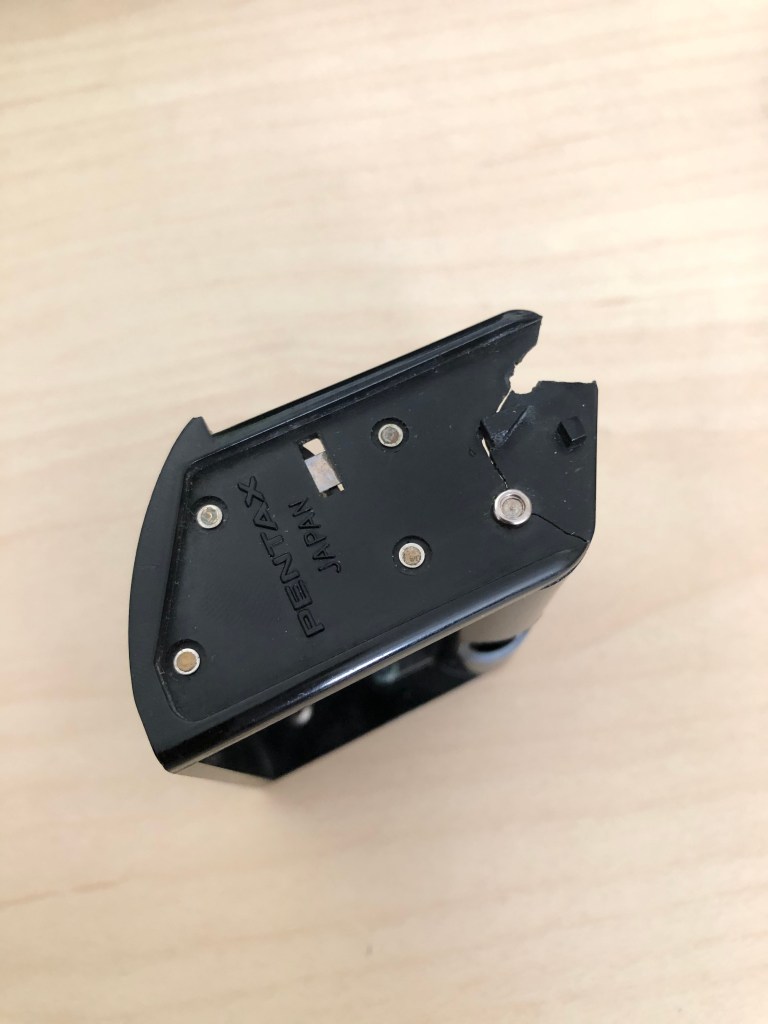
Next, the Pentax 645. I will not talk about the N and Nii because I haven’t use them, and since they have auto focus and higher price range for “first medium format camera” we newbie looking for, let’s just talk about the 645 original. Not having interchange backs, fully battery depends, no Mirror Up, and buttons for mode, not dials, these are some downsides for the Pentax. If you can get used to the buttons operation, you are good to go take beautiful photos, but it can be hard at first, and of course, it can be more time consuming when you want to change mode or setting, compare to dials. The Pentax 645N has dials instead of button if you’re curious.
Pentax 645 buttons locate on top of the camera
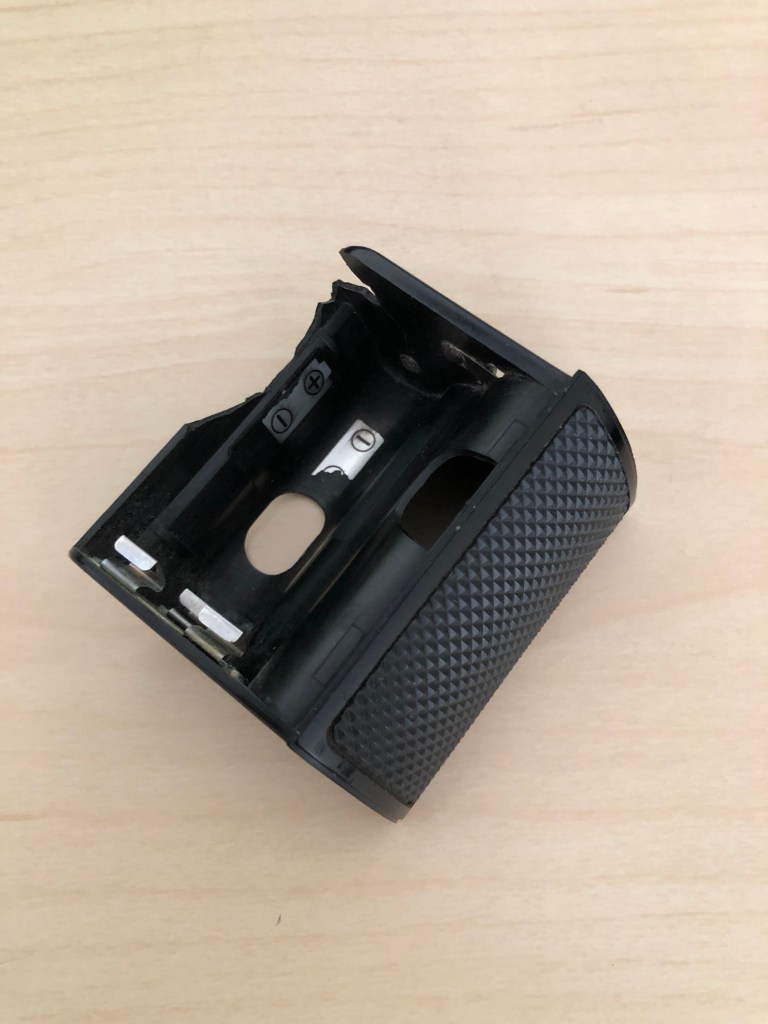
One big drawback of the Pentax 645 is the battery holder, it’s extremely easy to break, especially the plastic holder is couple decade years old. This is a common problem of the Pentax 645, because the way people designed the holder was not very effective I guess, 6 AA batteries are hold in a thin plastic holder (not that thin and fragile but if you have to put the batteries in and out quite often, there’s a good chance you will break it at some point). And of course you have to put the batteries in and out because if you don’t use the camera in weeks or months, you have to take the batteries out or corrosion will happen to your battery compartment. And it’s hard to put the 6 batteries in, especially if you have big fingers. If you buy a Pentax 645, careful with the battery holder please. It’s super hard to find the replacement because there’s no replacement. Pentax discontinued the battery grip long before, and there’s no left. There’s no single one on eBay. The replacement you may find is just from Pentax 645 cameras that stop working and they take their parts for sell but trust me, the holder always breaks before the camera. My battery holder was broken as you can see in the photos here and it’s so freaking hard to find the replacement battery grip or holder, until I bought a remote battery pack for Pentax 645, which is a battery pack that not attachable to the camera like the original grip, you connect the battery pack to the camera through a cord so the camera can use battery but now you have to solve the problem how to attach the battery pack to the camera. Luckily I tried to put the holder from the remote pack into the original grip and it works, even though they’re not identical! Keep this in mind if you are purchasing a Pentax 645. The remote battery pack is available on eBay but there’re not so many and around $100 or more/pack. The Pentax 645 is cheaper than Bronica but you don’t need to deal with the battery holder issue with Mamiya or Bronica because they have battery compartment inside the body, and they also require one single battery only. Please note that even if you can buy a replacement holder for your Pentax, there’s always a change you can break it later because they’re just easy to break. Here the link you can check to see the headache of having a broken battery holder 🙂 https://www.pentaxforums.com/forums/48-pentax-medium-format/400427-645-battery-holder.html
The holder of the battery pack also works on the original grip!
Okay, so now we talk about Bronica ETRS/Si. The ETR is the oldest in the line and doesn’t work with the AE prism finder, the ETRC doesn’t have interchange backs and mirror up feature. The ETRS/Si can use the AE prism finder for meter and interchange backs, they’re best choices in ETR line. If you use Bronica ETRS/Si, you may need the speed grip because the boxing design is harder to handling like the Mamiya. I don’t know why but I feel more comfortable to hold the Mamiya Super without a grip than the Bronica. And 1 more reason to buy a speed grip is you can attach flash on the grip, because the camera itself doesn’t have a hot shoe mount. Another disadvantage of the Bronica is the aperture ring on the lens is small and hard to find (because they placed it more to the front of the lens, not way back like other lens), you may looking around to find it when taking a photo but you will get used to it eventually. Other than that, the Bronica has everything you want, affordable, effective, build quality, interchange backs, interchange finder (but please use the prism finder, the waist level finder is super hard to use if you want to take vertical photos), mirror lock up, multi exposure, leaf shutter in the lens (means you can have flash sync at every speed). It’s easy to use and as far as I know, there’s not much common problems with it.
A photo taken with Bronica ETRSi
Other cameras can be mentioned are Contax 645 but that’s another level and super expensive, Mamiya 645AF/AFD is also great but high price range for first time Medium Format shooters, too. I didn’t talk about lens or photos quality of these brands I mentioned above because honestly I don’t see much a different. Every camera here is more than capable of taking beautiful photos as long as you know how to use it. I hope these experiences I share here can help you on choosing your first medium format camera. A man in a camera shop once told me “If you want to shoot film, you better shoot now because film will go away” so I guess my advice is buy it because the price are continue to raise because film is trendy now and yes, film will go away eventually. Shoot more, have fun!
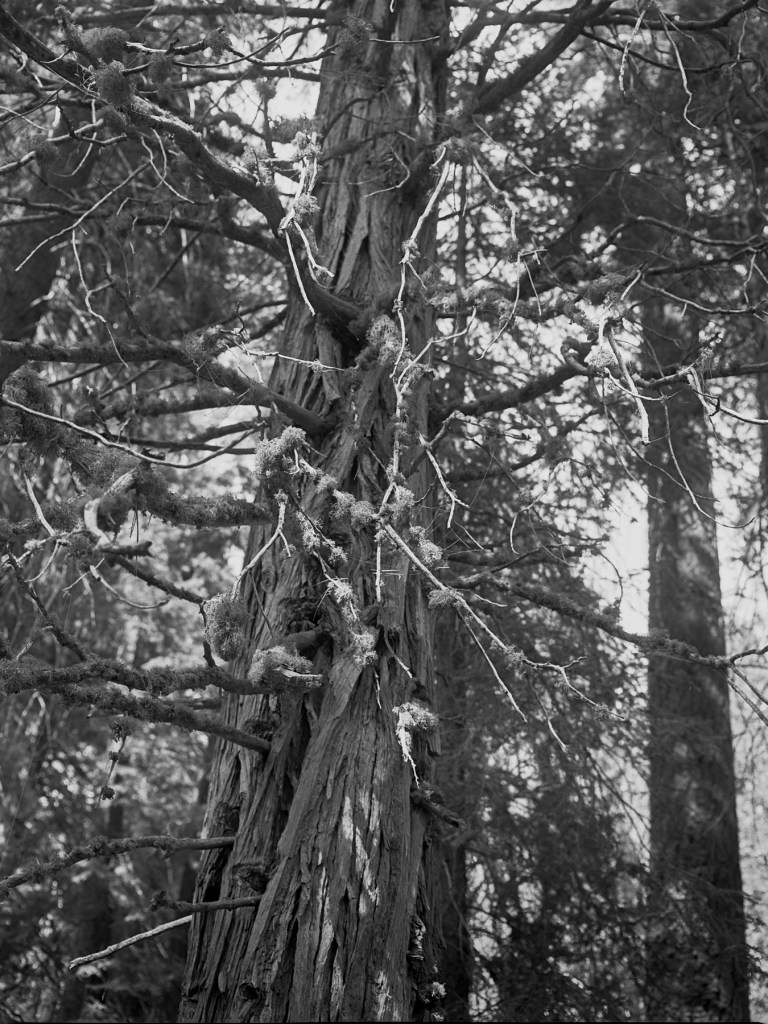
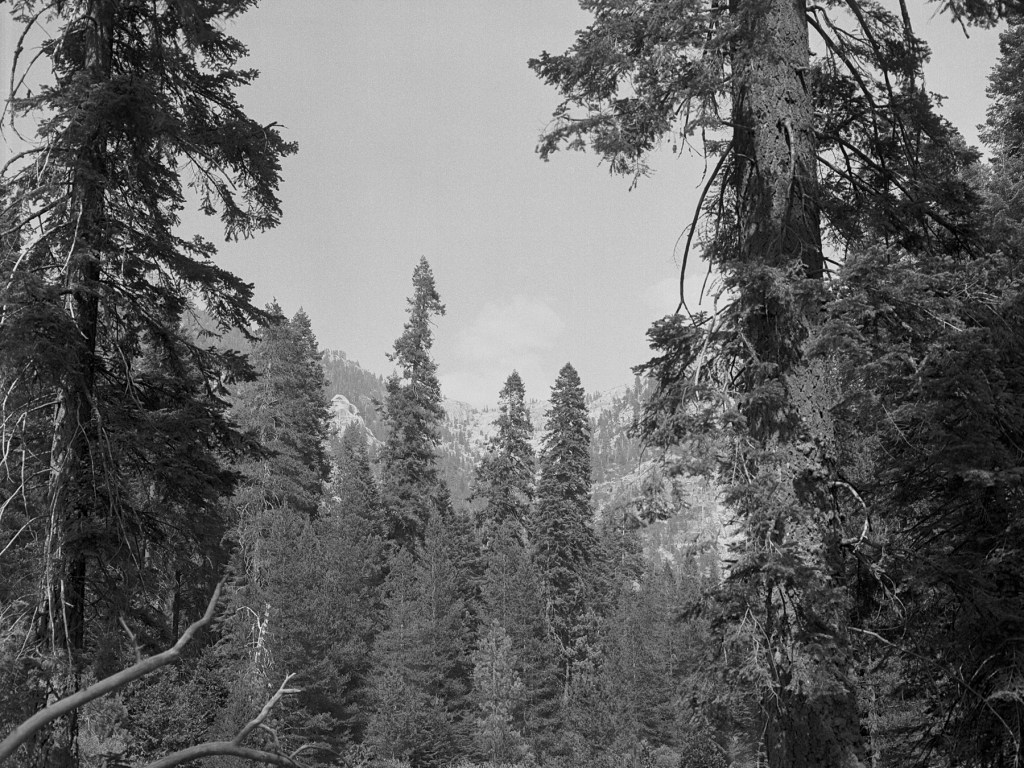
Mình và 1 số người bạn vừa có chuyến road trip ngắn đi Sequoia National Park cách đây 3 tuần. Khởi hành từ 8h tối thứ 6, đến 1h30 khuya sáng thứ 7 mình đến nơi. Mình dành cả ngày thứ 7 và nửa ngày Chủ Nhật để hiking và lên xe lái về OC lúc 6h chiều Chủ Nhật. Lý do đến bây giờ mình mới đặng bài blog này là vì mình cảm thấy chuyến đi này mình không chụp được nhiều ảnh đẹp như mong muốn. Nhìn chung hình không phải là tệ (hoặc tệ thật?!) nhưng mình không tìm được ảnh nào thật sự ưng ý và đẹp như chuyến đi Lake Tahoe lần trước. Đó là lý do khiến mình không tự tin để post ảnh nhưng sau đó mình nghĩ có thể ảnh không xuất sắc nhưng mình có thể chia sẻ kinh nghiệm và những sai sót của mình cho các bạn qua những bức ảnh này. Mong các bạn thấy bài blog này hữu ích và truyền cảm hứng.
Về camera và film thì mình mang máy Bronica ETRSi và 75mm/2.8 lens, đây cũng là lens duy nhất mình có cho máy, mình đã muốn có lens 50mm từ chuyến Lake Tahoe lần trước nhưng vẫn chưa mua vì thật sự vẫn còn cân nhắc về số tiền. Mình cũng mang theo 35mm camera là Nikon F2 cùng vài cuộn Kodak ProImage 100 (sau vài lần thử thì mình không thích màu của ProImage nhưng mua vẫn còn dư nên phải dùng cho hết), Portra 160 và 1 cuộn Portra 800 (vì Portra 800 đắt xắt ra miếng thật!). Film 120 mình dủng Fuji Pro 400H và Ilford XP2 trắng đen. Mình chưa bao giờ chụp trắng đen nhưng gần đây có bạn bảo mình nên thử chụp trắng đen để focus vô mảng khối và contrast trong khung hình, và bản thân mình nghĩ mình cũng nên chú ý hơn đến bố cục khi chụp nên mình đã mua 5 cuộn XP2, đây là film trắng đen nhưng dùng C-41 để develop như film màu, giúp mình tiết kiệm và đỡ nhức đầu research về hóa chất cho film trắng đen 🙂 Ảnh trắng đen của mình không đẹp như mình mong nhưng mình xin chia sẻ ở đây để ghi lại quá trình chụp của mình.
1. Bức ảnh đầu tiên trong chuyến đi
2
3
4
5. Bầu trời màu nâu nhạt và tầm nhìn rất hạn chế do khói
Một điều các bạn nên biết về chuyến đi này là mình đi trong lúc cháy rừng đang diễn ra trên diện rộng ở California. Tuy không quá gần khu vực mình ở và hiking nhưng khói từ đám cháy theo gió đã phủ lên bầu trời 1 lớp bụi than mỏng làm bầu trời ngả màu vàng nâu trông khá u ám. Đây không phải là điều kiện lý tưởng để chụp hình nhưng mình vẫn cảm thấy thích chuyến đi lần này.
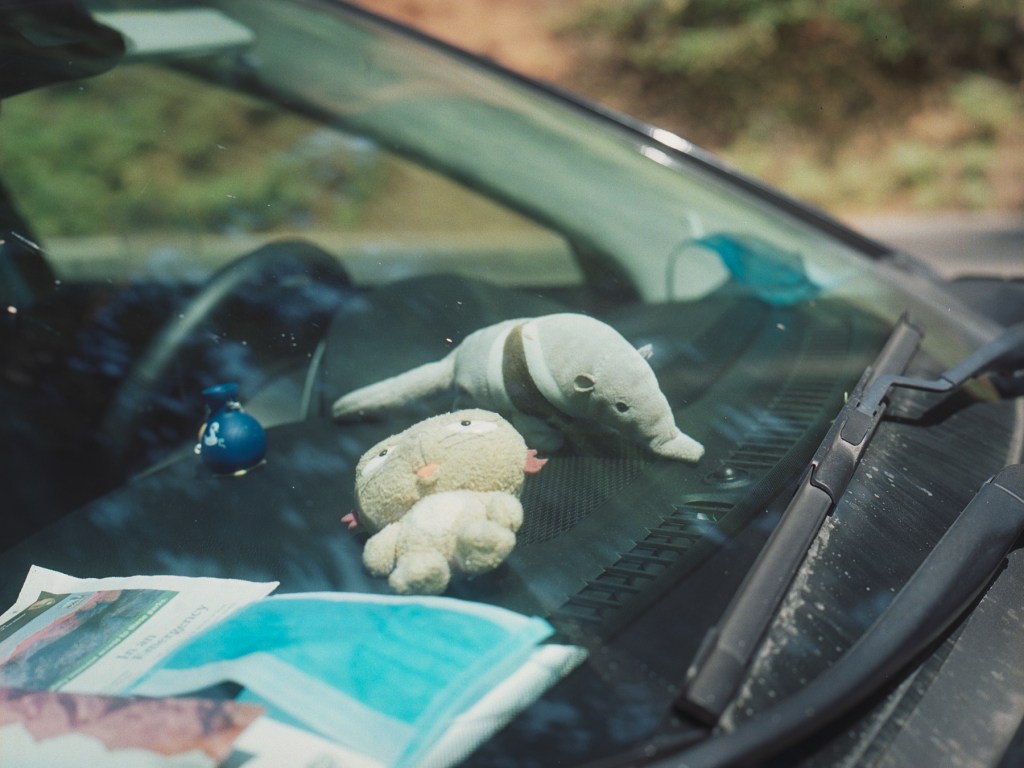
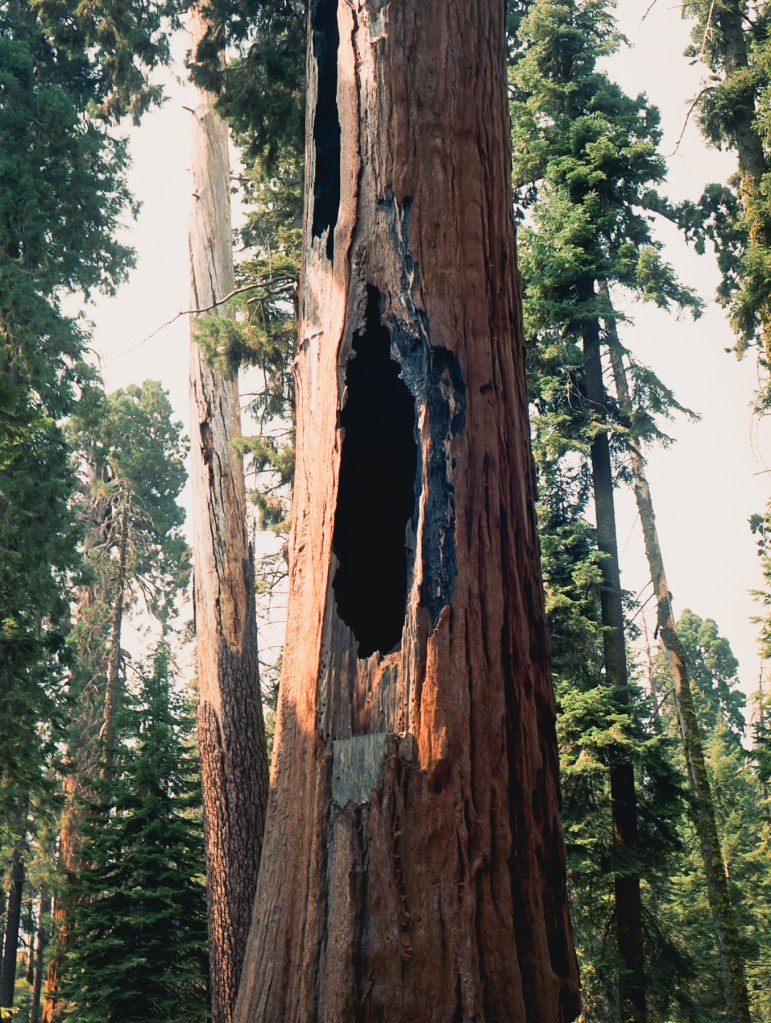
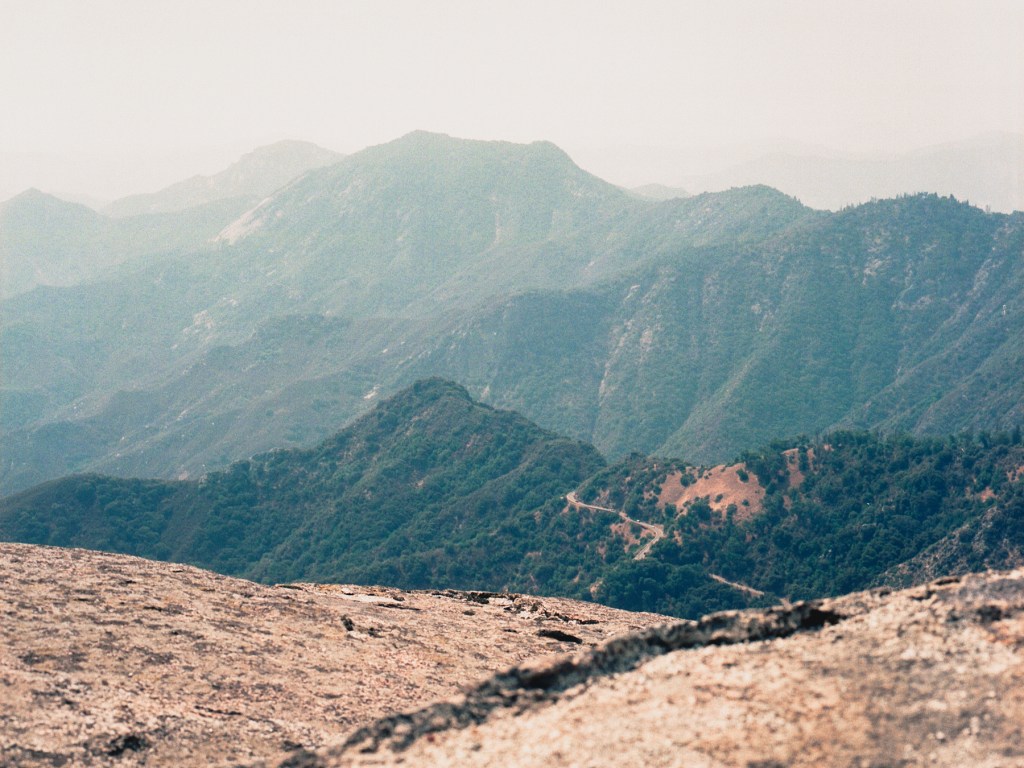
Tấm hình đầu tiên mình chụp khi đang dừng xe trên đường để ăn trưa trên xe. Đây vẫn còn là khu vực rìa của Sequoia National Park nhưng cây cối đã phủ xanh um tùm, một điều mình rất thích. Mình đang ngắm để chụp thì nghe tiếng xe moto từ xa vọng lại, thế là mình đã đợi chiếc moto chạy vào khung hình rồi bấm máy. Dĩ nhiên là mình đã canh bố cục và lấy nét sẵn để khi xe chạy tới đúng khoảng lấy nét thì mình sẽ bấm máy. Mình để khẩu độ 11 nên dĩ nhiên là phần lớn khung hình sẽ in focus. Một điều đáng tiếc trong bức ảnh này là mình đã bấm máy hơi sớm, khi moto còn đang khá xa mình cho nên chiếc moto và người lái bị nhỏ và chìm vào background. Nếu moto chạy tới mình gần hơn thì bức ảnh sẽ tốt hơn nhiều. Tấm hình tiếp theo mình chụp windshield xe của bạn mình, như 1 tấm ảnh ký sự về chiếc xe và đi chơi thời Covid, với thú bông và khẩu trang giấy 🙂 Tiếp đến là 1 thân cây bị cháy đen ở bên trong. Tuy tấm ảnh không xuất sắc nhưng đây là lần đầu tiên mình thấy 1 thân cây cháy đen bên trong nhưng vẫn còn sống và bên ngoài vỏ cây màu cam rực rỡ nhìn rất thú vị. 2 ảnh kế đến chỉ là cảnh landscape bình thường nhưng cũng đủ để thấy bầu trời trông như thế nào những ngày mình ở Sequoia.
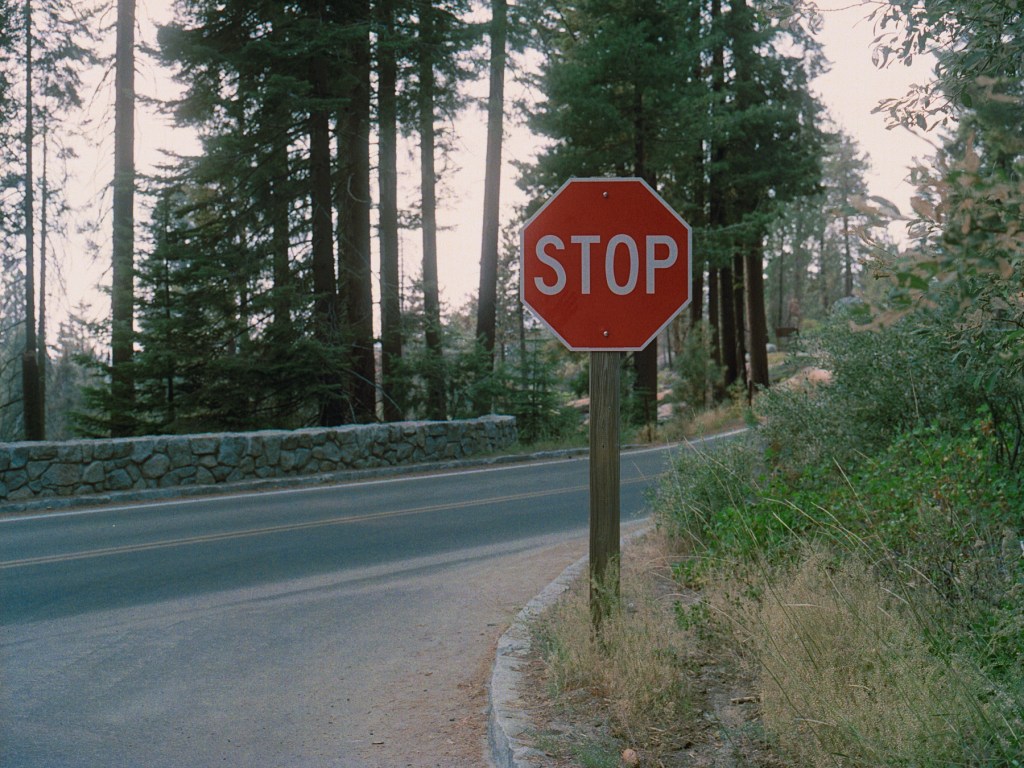
Ảnh tiếp theo [6] mình đã chú thích ý đồ trên hình. Rất tiếc mình đã không thể hiện được điều mình muốn trên ảnh. Còn lại là các ảnh [7,8,9,10] mình chụp trong ngày thứ 7. Mình thích ảnh [10] vì đó là chủ đề ưa thích của mình, những ngôi nhà nhỏ trong town nho nhỏ với nét retro và tĩnh lặng. Nếu được chụp lại mình sẽ nâng máy cao hơn để lấy phần cột đèn nhiều hơn, dĩ nhiên tâm điểm bức ảnh không phải là cột đèn nhưng ảnh lại cắt ngay lúc dây diện rẻ ngang ra làm mình có cảm giác mình cắt vật thể ngay mép, rất khó chịu khi nhìn. Mình đã được học về trang trí và bố cục rằng hoặc là mình lấy trọn vật thể hoặc cắt ngay lúc vật thể không có biến chuyển gì thú vị, tuyệt đối không cắt vật thể ngay mép (như mình đang làm) hoặc ngay góc. Nhưng nhìn chung mình vẫn rất thích ảnh này vì cảm giác nó mang lại. Ảnh [11] cũng là 1 ảnh mình thấy khá thú vị, mình thích màu xanh trong hình mang 1 cảm giác lành lạnh và mơ hồ rất đặc biệt.
6
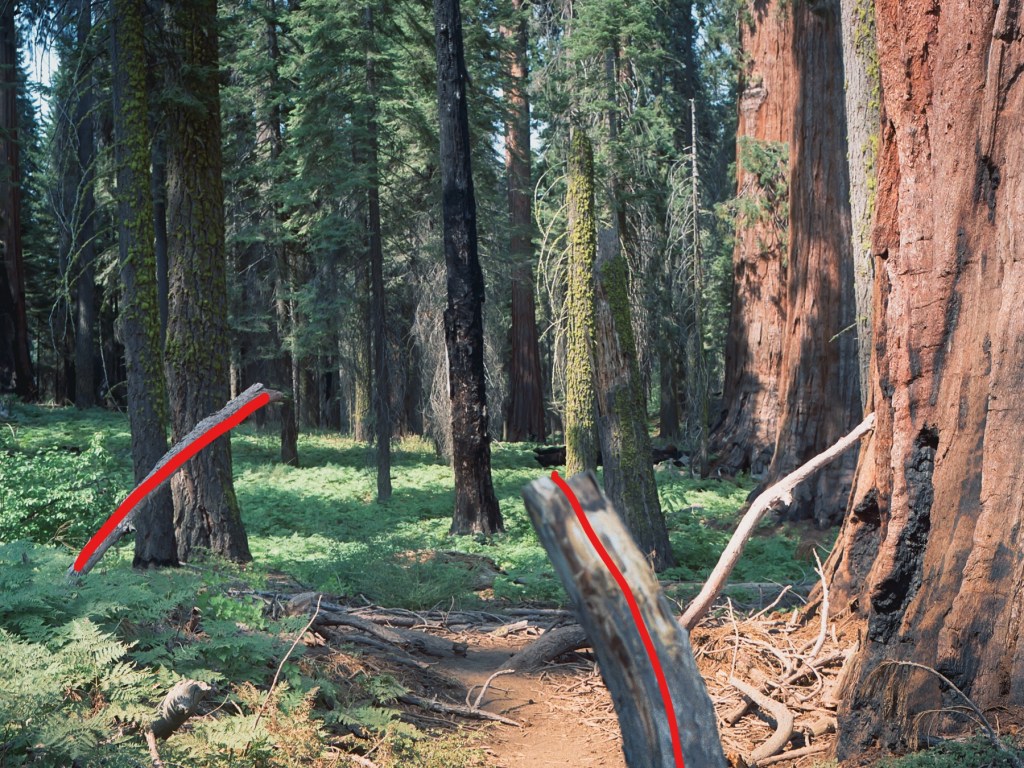
Mình đã muốn dùng 2 thân cây cong này để tạo 1 đường dẫn hay 1 khung nhỏ nhằm hướng người nhìn về trung tâm của bức ảnh là thảm cỏ và cây thấp được nắng rọi xuống rất đẹp. Dĩ nhiên các bạn cũng thấy là mình fail rồi 🙂
7
8
9
10
11
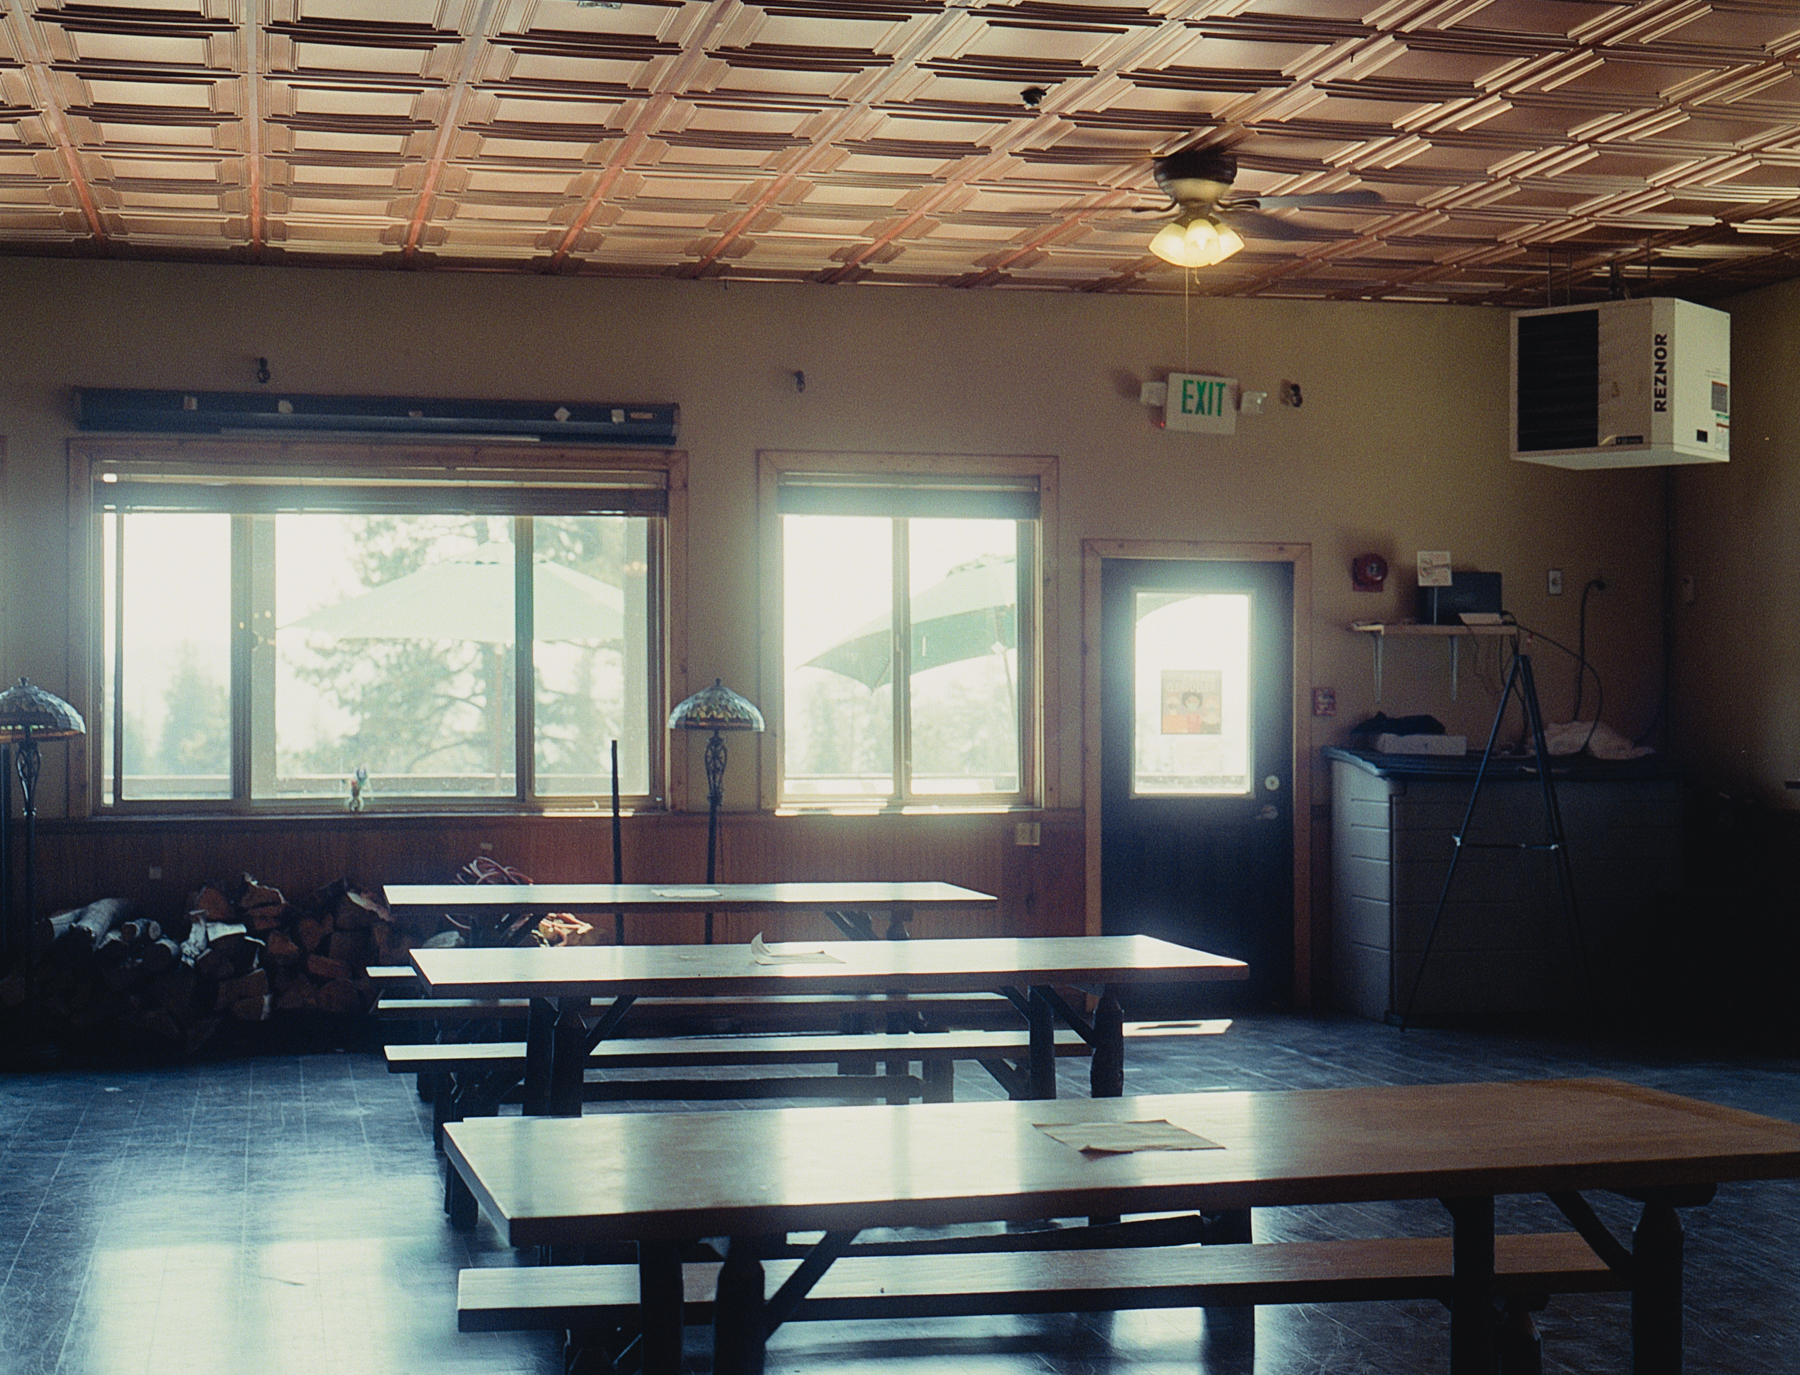
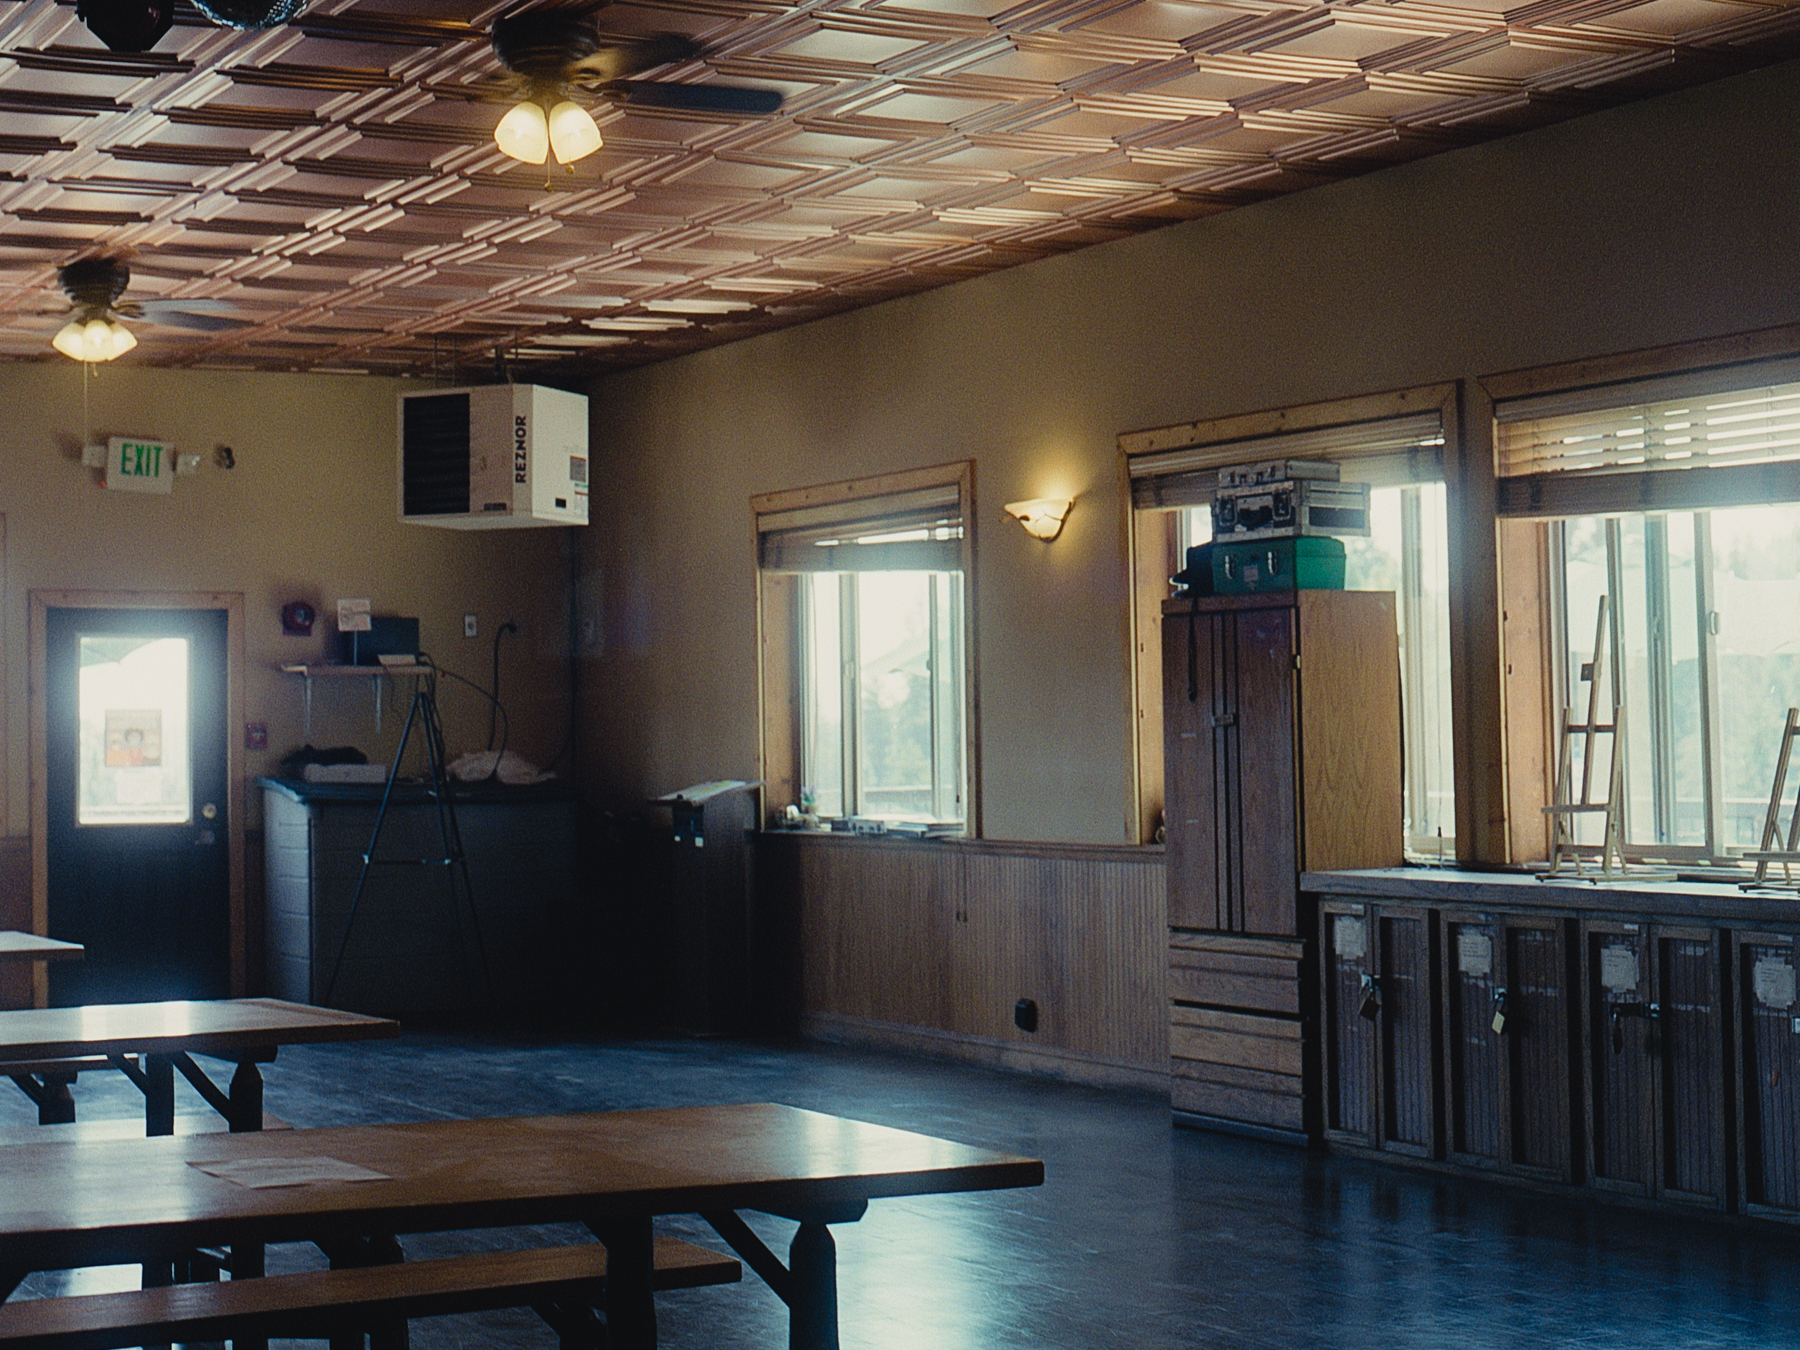
Mình vừa mua pro mist filter 1/4 để chụp thử vì mình thấy công dụng của nó khá hay. Pro mist filter dùng để giảm highlight xuống và đồng thời làm highlight glow 1 chút, như có thể thấy ở 2 tấm hình bên phải. Đây là trưa Chủ Nhật khi mình và các bạn dừng lại trước 1 nhà hàng trong ski resort để ăn trưa. Dĩ nhiên ski resort khá vắng vẻ mùa này, như trong hình là 1 sự trống trải và âm u trong phòng ăn không 1 bóng người.
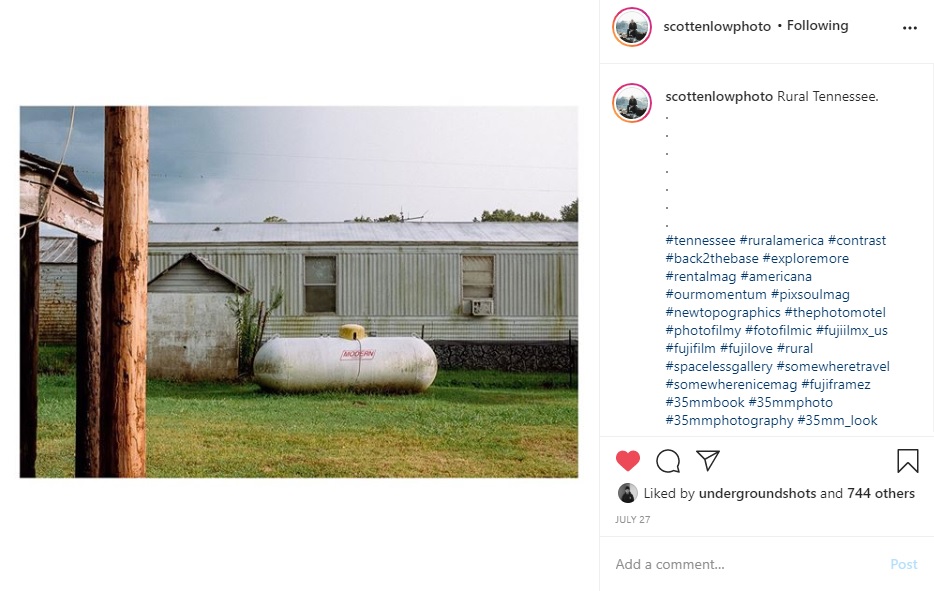
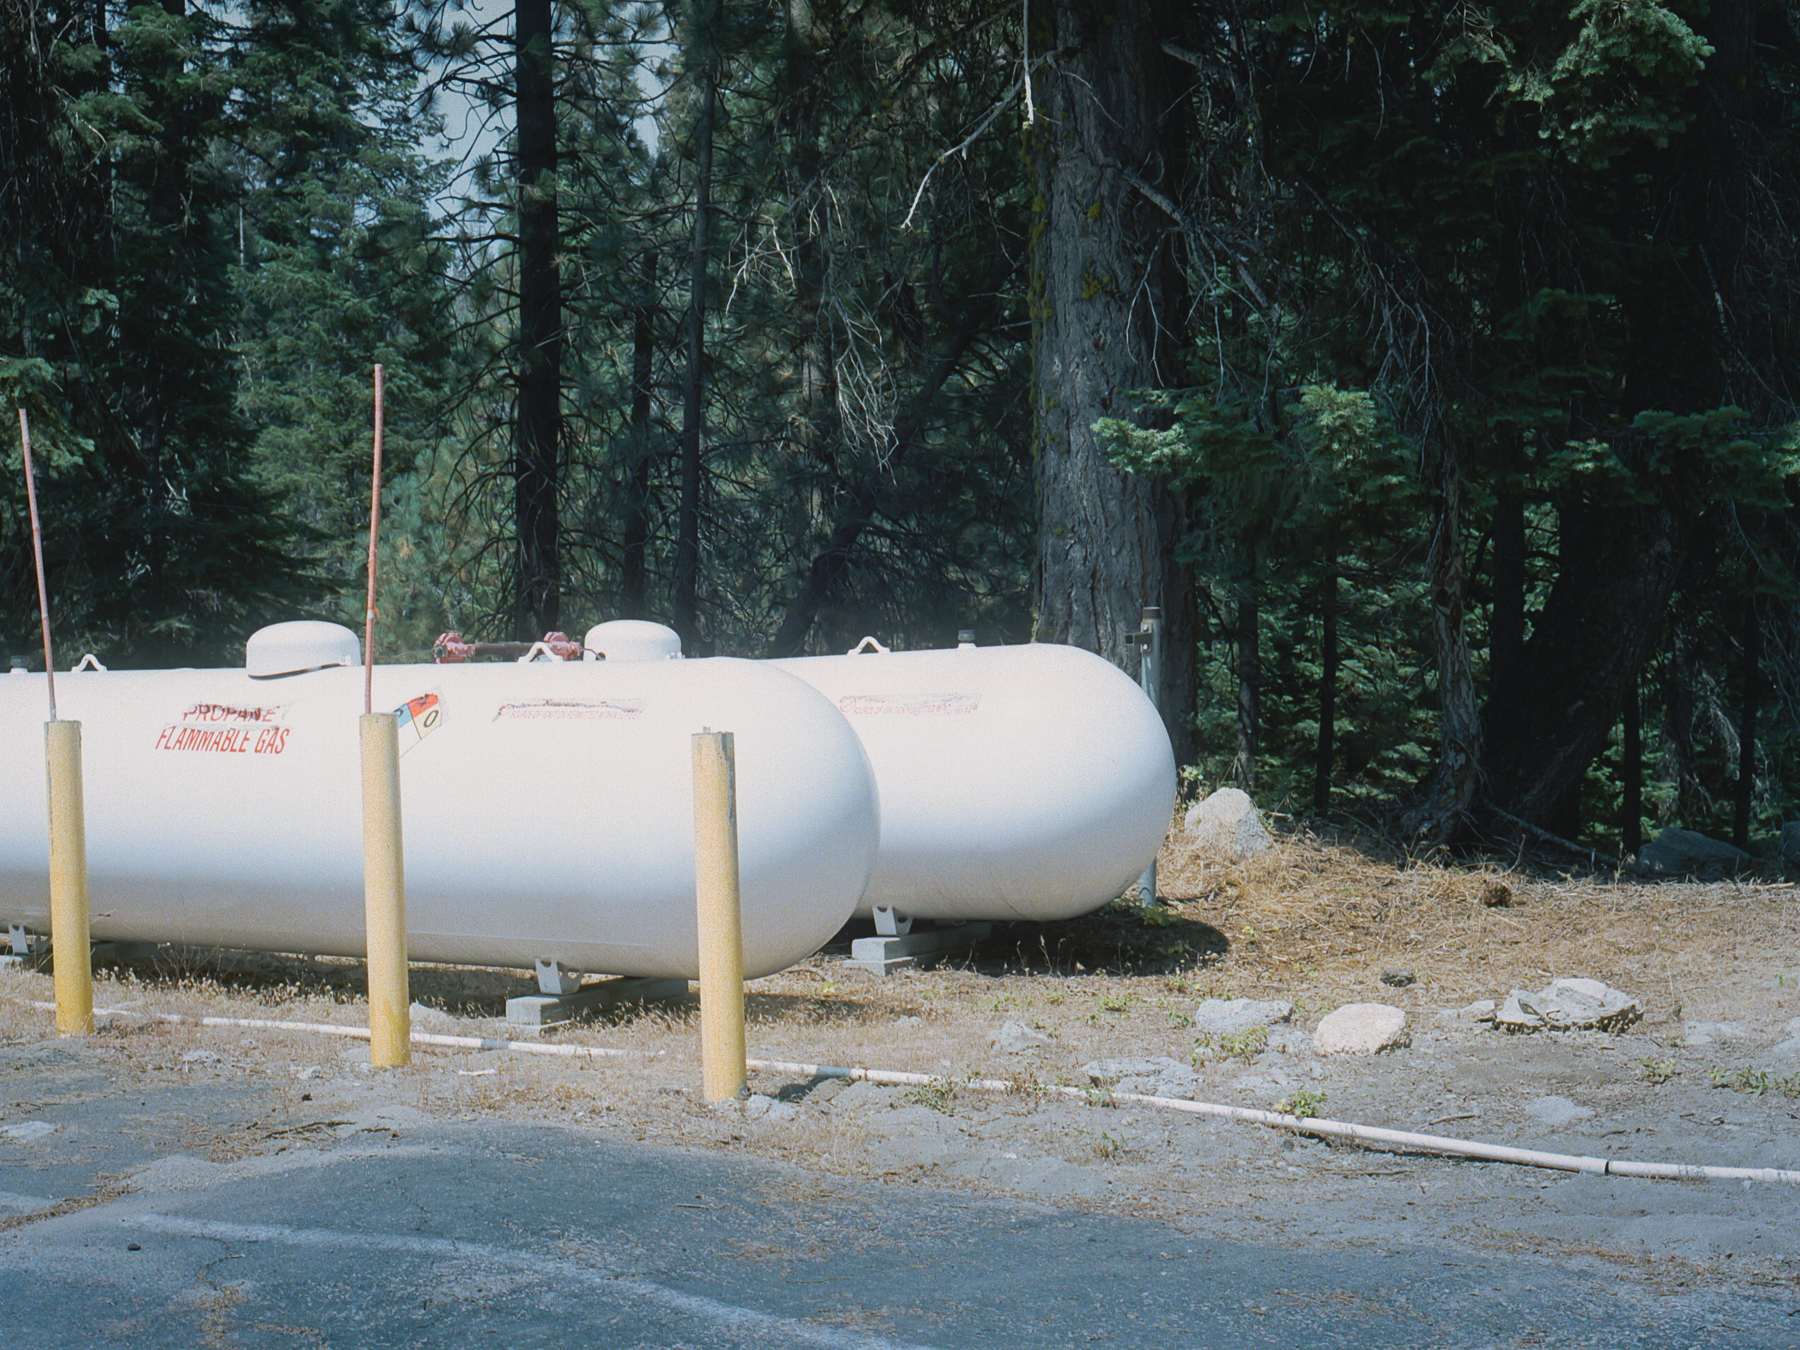
Ảnh bồn gas này mình chụp theo 1 bức ảnh của photographer Scott Enlow đăng bên dưới. Mình đặc biệt thích tấm ảnh này của Enlow vì nó chứa đựng tất cả những gì mình muốn nhìn thấy trong 1 bức ảnh, tiền cảnh, trung cảnh, hậu cảnh, cỏ xanh, ánh mặt trời trong và vàng ấm, bầu trời hơi u ám nhưng toàn bộ hình lại không có cảm giác u ám nặng nề. Mình thích sự cũ kỹ và hơi hoang tàn nhưng cũng rất “neat” và tươi mát mà bức ảnh mang lại. Mình đặc biệt thích cây cột gỗ ở tiền cảnh, mình cảm thấy cây cột gỗ làm tấm ảnh rất sống động và thú vị. Các bạn nên xem thêm ảnh của Scott Enlow qua Instagram như trong hình bên dưới. Mình rất thích Scott Enlow vì ảnh của nhiếp ảnh gia này rất retro và dreamy.
Quay trở lại với ảnh của mình, mình nghĩ ảnh bên phải tốt hơn ảnh trái bởi vì ảnh trái có chiếc lều nhỏ khá kỳ cục trên bồn gas làm mình không thể nào chọn được 1 bố cục đẹp cho ảnh. Hình thứ 2 khá hơn vì bồn gas màu trắng, dễ tách biệt giữa chủ thể và background hơn. Thật ra cũng không phải là tấm ảnh mình ưng ý 100% nhưng mình cũng thấy nó khá thú vị. Nhất định lần sau gặp 1 bồn gas mình sẽ thử lại.
16
17
18
19
Tấm ảnh mấy tấm ván bị bỏ lại trên hồ nhìn khá buồn và cũ. Không hiểu sao 2 tấm này màu scan ra nhìn hơi ám tím và trầm dù mình chỉ dùng Fuji 400H, có thể là do cảnh quá tương phản giữa highlight và shadow nên khi scan máy cố tone down highlight để giữ lại chi tiết ở highlight (thật ra mình không rõ lắm, cũng có thể do mình chưa biết cách chụp, scan trong điều kiện tương phản mạnh). Nhưng mình nghĩ nó khá hợp với nội dung của ảnh, về đồ vật bị con người bỏ lại vội vã nằm chơi vơi bên bờ hồ giữa đám cỏ mọc lố nhố không ai chăm sóc. Tấm thứ 2 có bố cục đẹp và nhiều lớp (tiền cảnh, trung cảnh, hậu cảnh) hơn ảnh thứ 1. Nhưng mình nghĩ 2 ảnh đi chung sẽ mang nội dung mạnh và thuyết phục hơn.
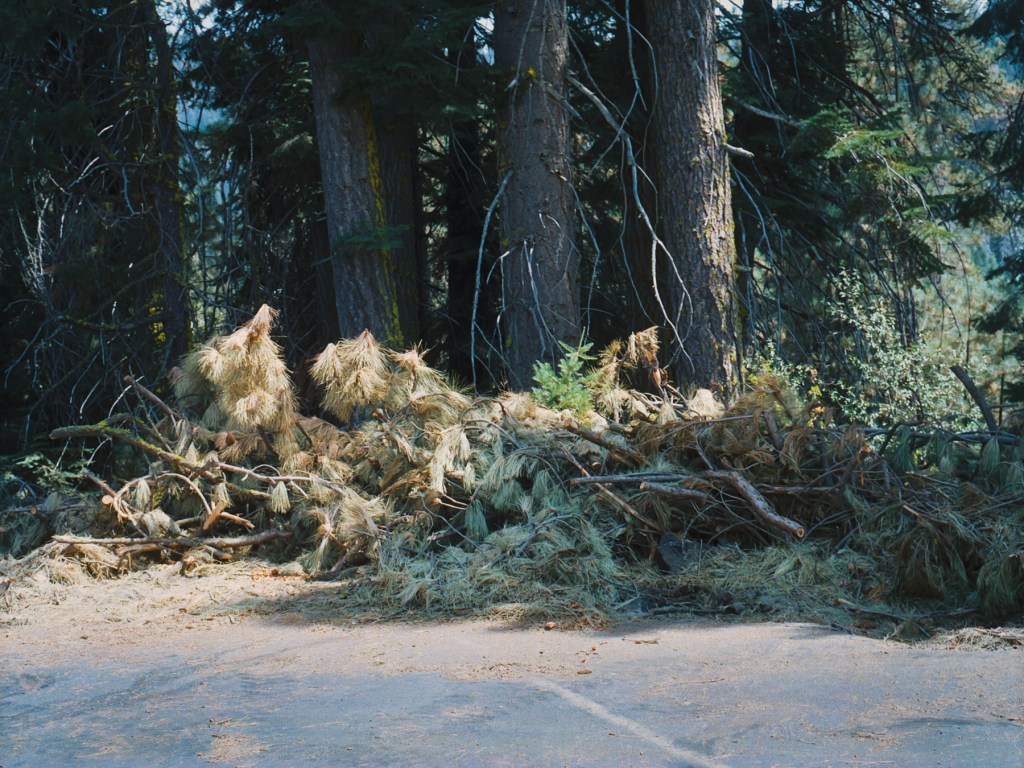
Ảnh [18] mình chụp vì ánh nắng rọi xuống chóp của những cành thông khô nhìn rất bắt mắt, Đây cũng là 1 cảnh tương phản mạnh về độ sáng cũng như màu sắc, màu vàng cam của chóp thông khô và màu xanh thẫm của cành thông dưới bóng râm làm cảnh nhìn rất thu hút. Rất tiếc lên hình mình không thể hiện được vẻ đẹp đó. Ảnh [19] mình rất thích, vì đó là chủ đề ưa thích của mình, những cảnh bình thường hàng ngày của cuộc sống nơi xa cách chốn thành thị hiện đại tấp nập. Ảnh này chụp ở khẩu 5.6 nên không có nhiều vùng in focus, là 1 điều mình rất tiếc, nhưng cảnh khá thiếu sáng nên đây là những gì tốt nhất mình có thể làm.
20
21
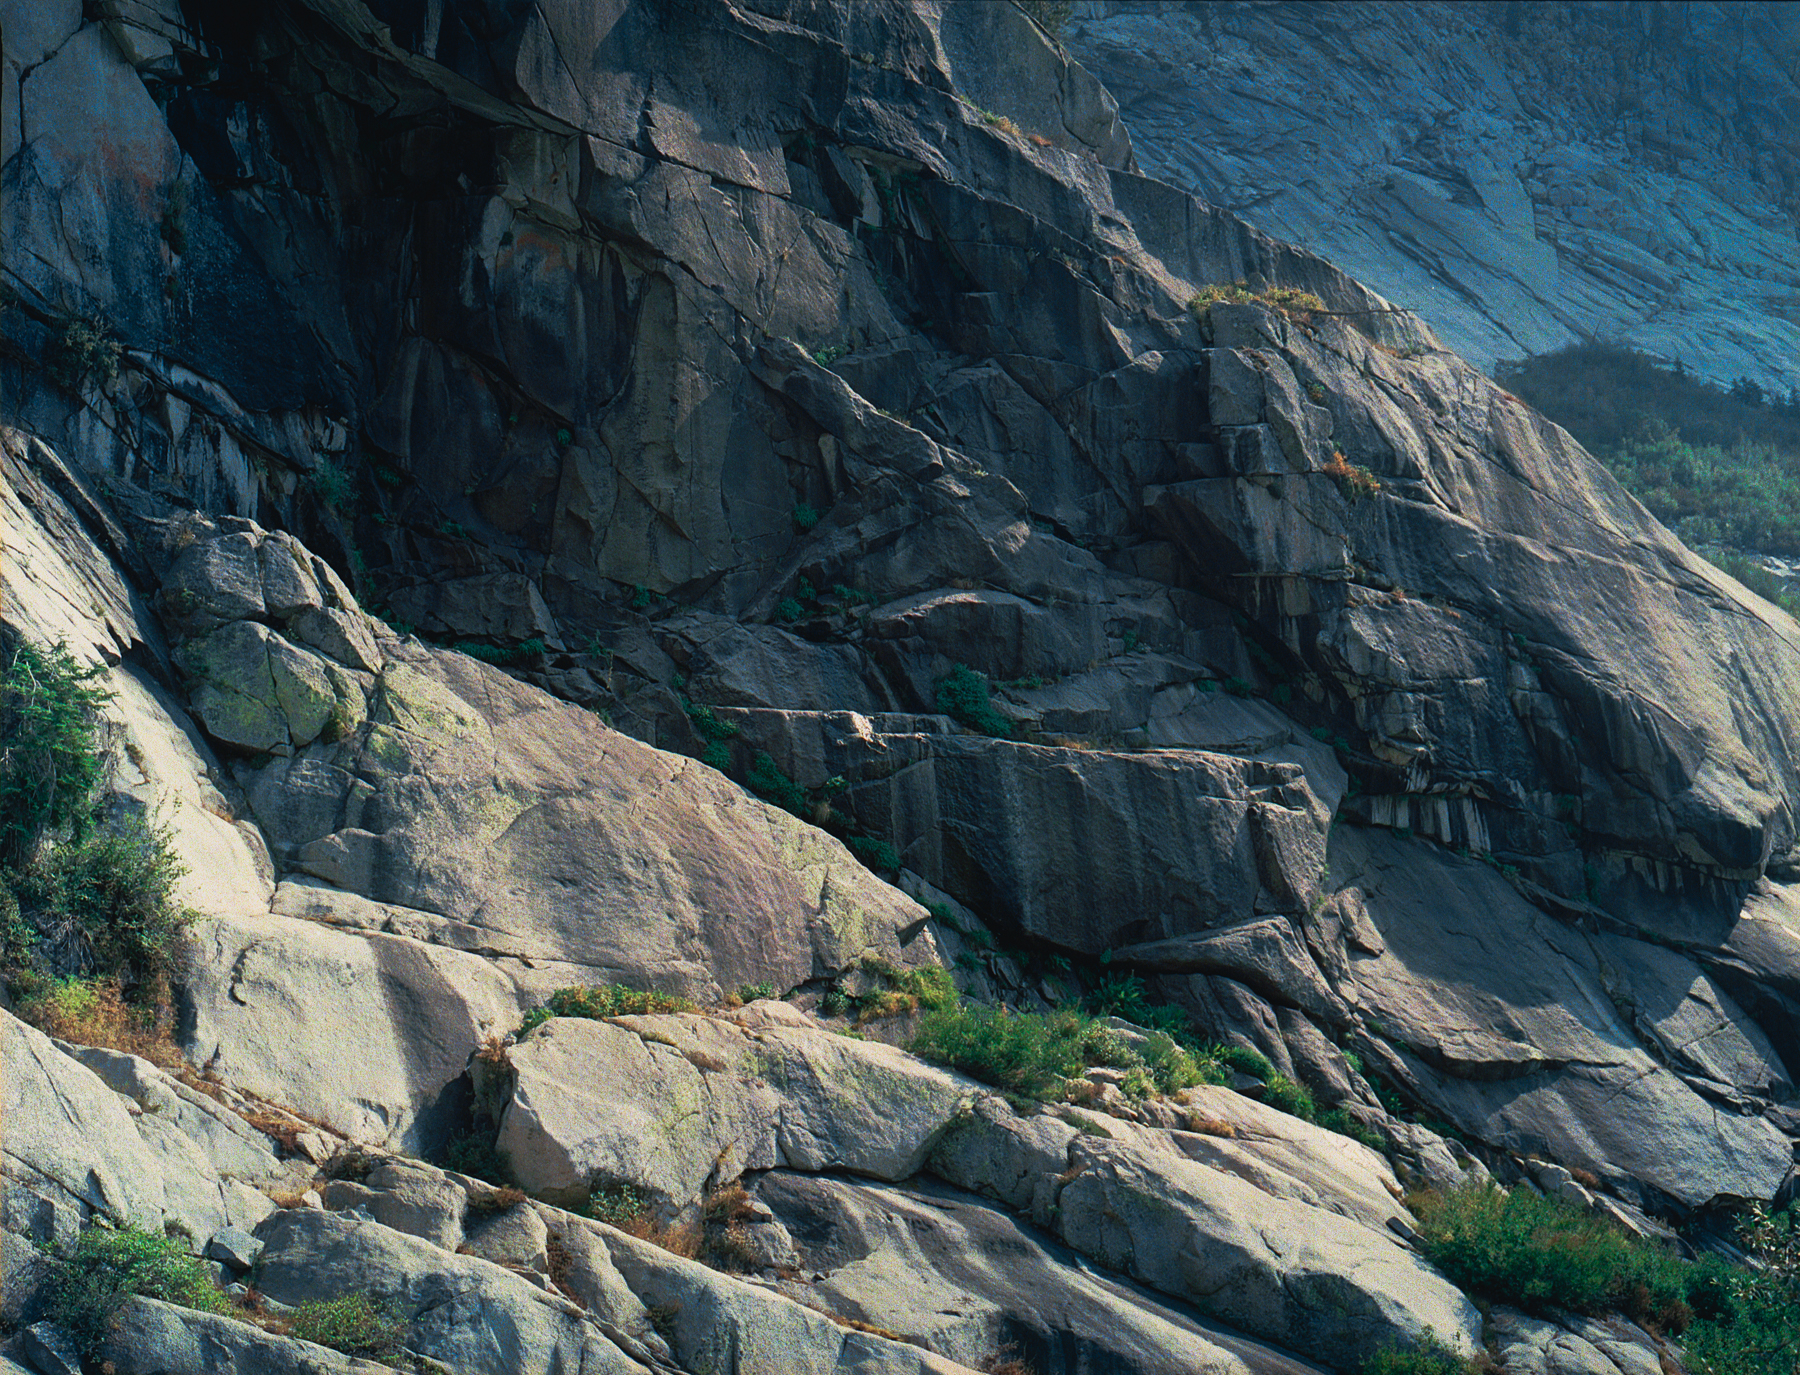
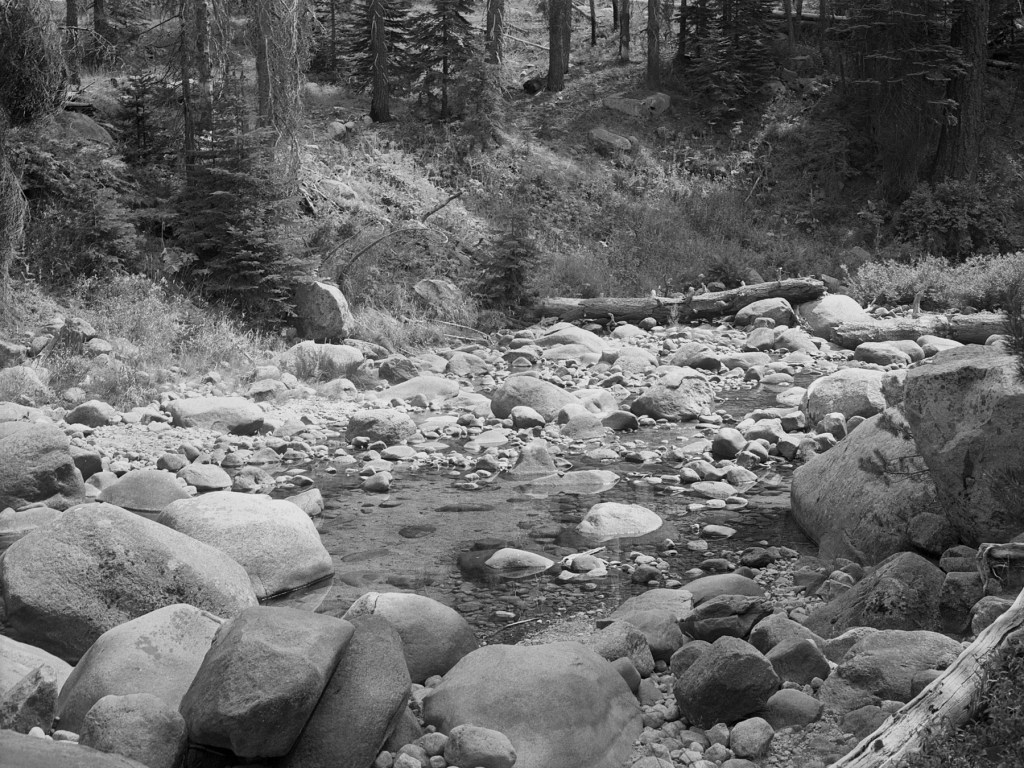
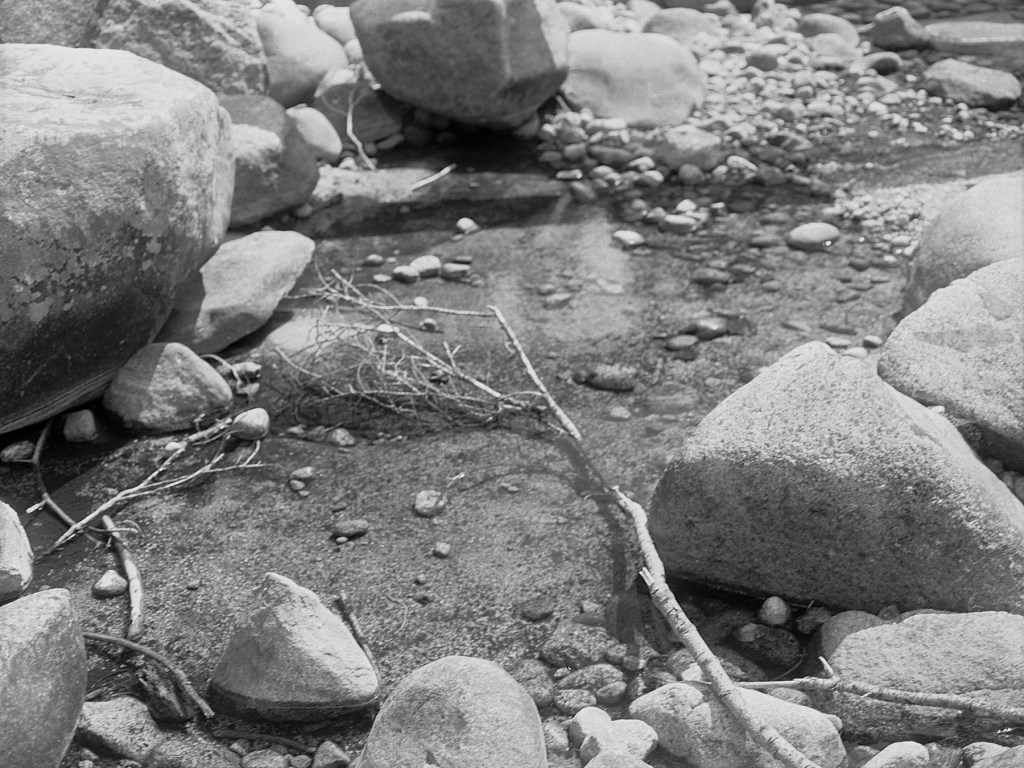
Cuối cùng là những hình chụp casual trên đường hoặc lúc đi hiking. Thật ra mình có thể chụp nhiều hơn trong lúc hike nhưng mình không thể cảm nhận được vẻ đẹp của đá nên mình không chụp nhiều dù trong lúc hiking có đi quang qua 1 đoạn đường toàn đá xanh, chỉ có 1 khe nhỏ đủ để 1 người chui qua, cảnh nhìn rất Thập Diện Mai Phục vibe vì thật ra bạn không thể thấy gì xung quanh mình ngoại trừ đá, và mình luôn có cảm giác ai đó có thể nấp đằng sau 1 tảng đá và nhảy ra mai phục mình[?!] lol. Nhìn chung, mình nghĩ nó khá thú vị nhưng không nghĩ nó photographic cho mình.
Cuối cùng là 2 hình cuối của 1 thác nước nhưng đã cạn nước vì đây là mùa khô. Lần sau mình nên kiểm tra thác nước trước khi mang theo tripod đi hiking 🙂 Không có nước cảnh chỉ toàn đá khô khốc nhưng mình cũng thấy vui vì chuyến đi này.
Sau đây là ảnh từ cuộn film trắng đen duy nhất mình chụp trong chuyến đi này.
Cảm ơn các bạn đã theo dõi đến đây. Mình biết bài viết khá dài nhưng mong hữu ích cho các bạn. Chúc các bạn chụp ảnh nhiều hơn và hài lòng về ảnh của mình. Cheers!
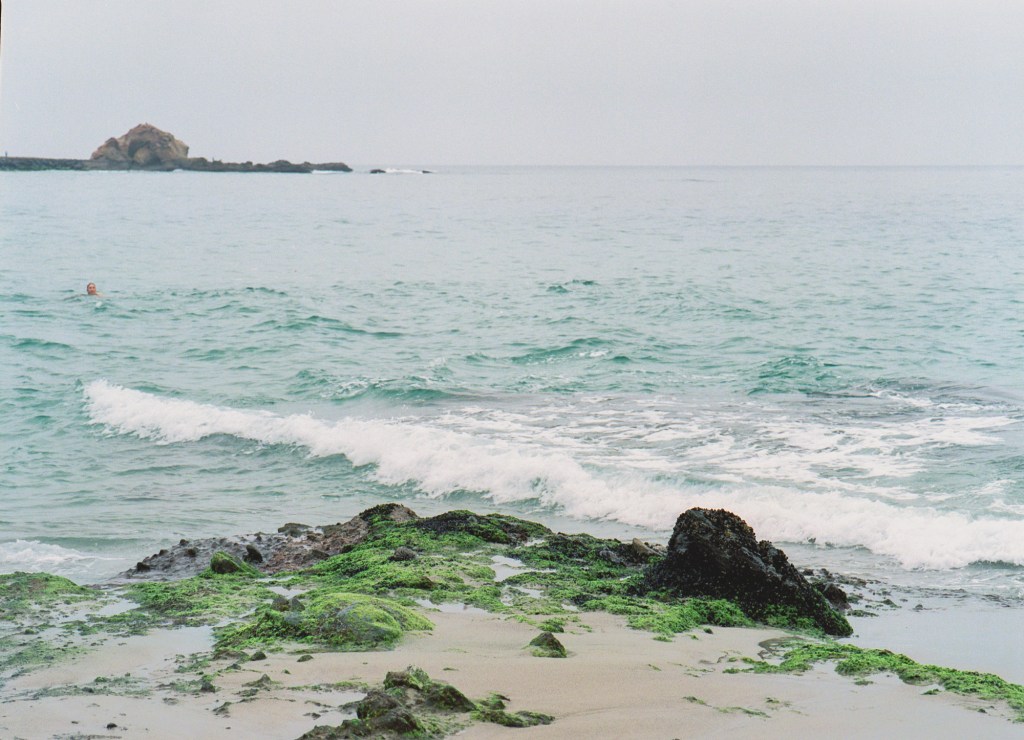
On a Sunday morning, I got up much earlier than usually to go to a beach for a photo walk. I haven’t taken any photo since I got back from the North California road trip, just because of personal stuffs and I don’t feel like the city around me is photo worthy. Then I watched a YouTube video of a film photographer/YouTuber named Faizal Westcott about he created a photography club via Discord app to connect photographers and others who like photography alike. In this club/group, you can share your work, ask for feedback, discuss photo related topics and networking with others. My favorite channel is photo feedback obviously, since I really want to know what others think about my photos and I love to share value thoughts to others’ work as well. If you feel like Faizal’s Discord server, I encourage you to check it out. Here the link: https://discord.gg/99w7Z5x
After join the server and have several discussions with others inspired photographers and photographer wanna be, I got an urge to go out and shoot and get better. That’s why I woke up at 6am that Sunday morning.
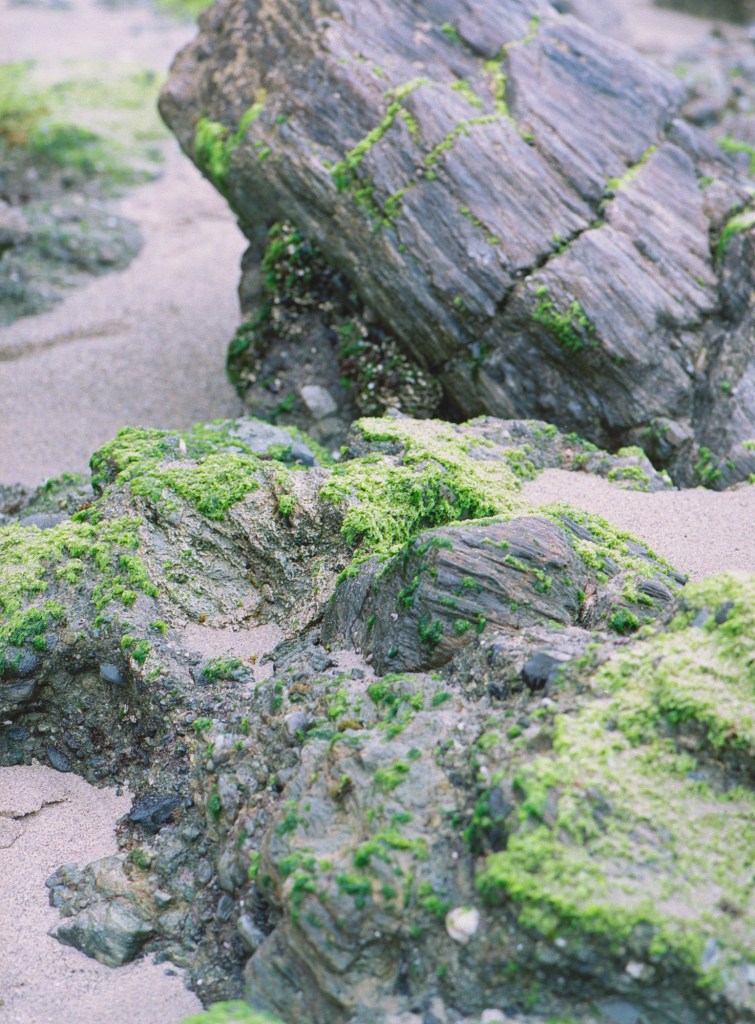
Since I live in Orange County, I already visited a bunch of beaches around here (Long beach, Seal beach, Huntington beach, New Port beach, Corona Del Mar, and every small beach in between) and honestly, I don’t feel very enthusiastic to go those beaches again. So this time I tried a new one, a little further but worth it, Victoria beach in Laguna. To search for a location, I just look at Google map and pin point to a potential location to have Google street view of that area and decide if that worth going. The reason I like this beach is not because of its famous Pirate Tower but the mosses on the rocks right by the beach. You know I love trees and plants and that kind of green stuff. Another thing I like about this location the color of the water, a beautiful shade of emerald. The sand is so clean and white (not literally white but whiter than other muddy brownie sand. The sky was so clear when I driving but as soon as I got half way to the beach, I realized it’s not gonna clear anymore. I guess sky on the beach is always foggy?! Anyway I hope you can feel the cool atmosphere in that early foggy morning through these photos.
love the tones here. Fuji 160 NPS expired
my favorite in the day
And here’re some photos that not the best.
In the first photo, the composition is just doesn’t work. I couldn’t bring out my main focus in the photo. In the second photo, the composition is bad again. Another thing doesn’t work out is lack of meaning in this photo. I tried to capture the beauty of the rocks creating a little valley and water from the waves can flow through it like a river, but the timing is not there yet, I should press the shutter right when the wave hitting the rocks. I was too late so the water run out already. I think I should open the lens up to create a shallower depth of field in order to isolate the rocks and little valley from the back ground.
Next are some casual shots around the rocks. 🙂 I know not everybody like to see rocks and mosses like me.
In the second photo, I like the way the sand feel so smooth and warm and was imbued with water from the wave so the surface was reflective so beautifully. The last photo is some cliché scene that you all get bored of :p
First time using Mamiya 645 Super and prism viewfinder and no split focusing screen, thanks God I didn’t miss focus much!
[Mình muốn chia sẻ bằng tiếng Việt cho các bạn Việt Nam có thể dễ đọc hiểu, nhưng mình chưa tìm được cách tốt nhất để chia sẻ song ngữ trong cùng 1 post nên các bạn tạm thời có thể đọc các post riêng bằng tiếng Việt với nội dung chính xác như post tiếng Anh trong thời gian mình tìm được cách làm việc đỡ mất công hơn nhé!]
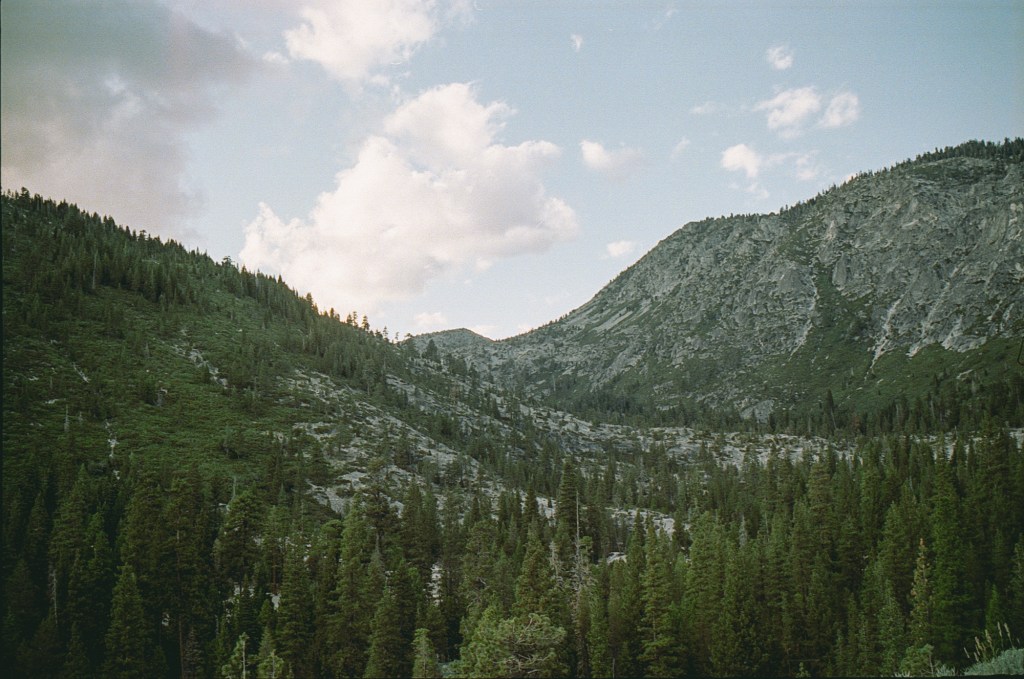
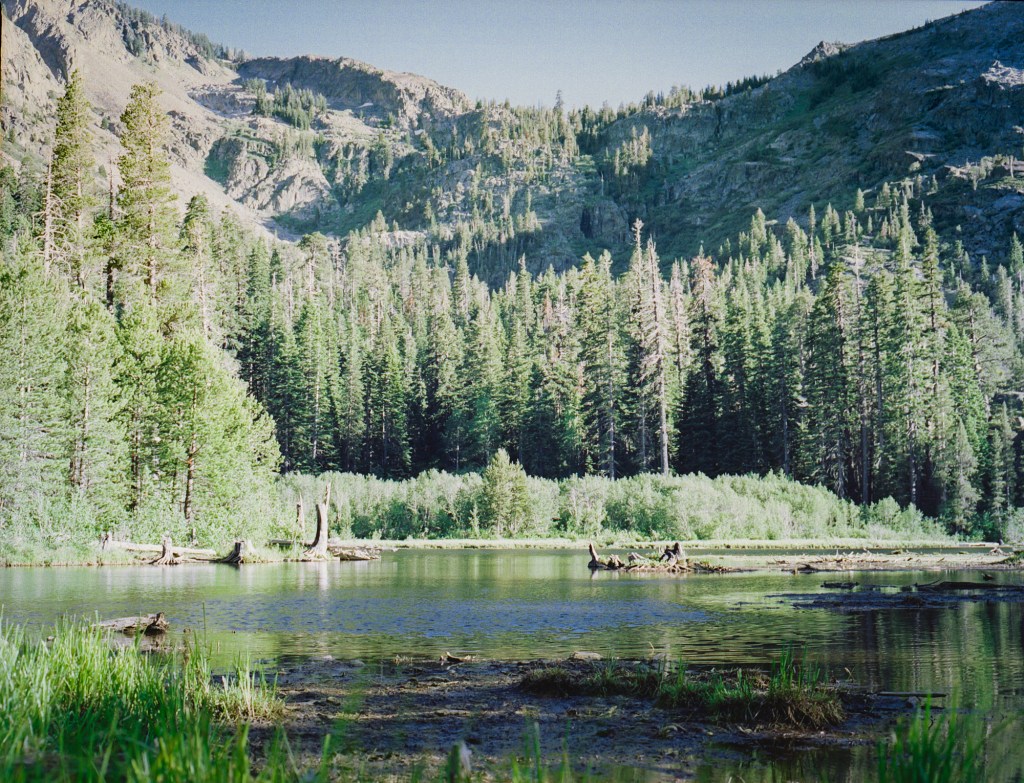
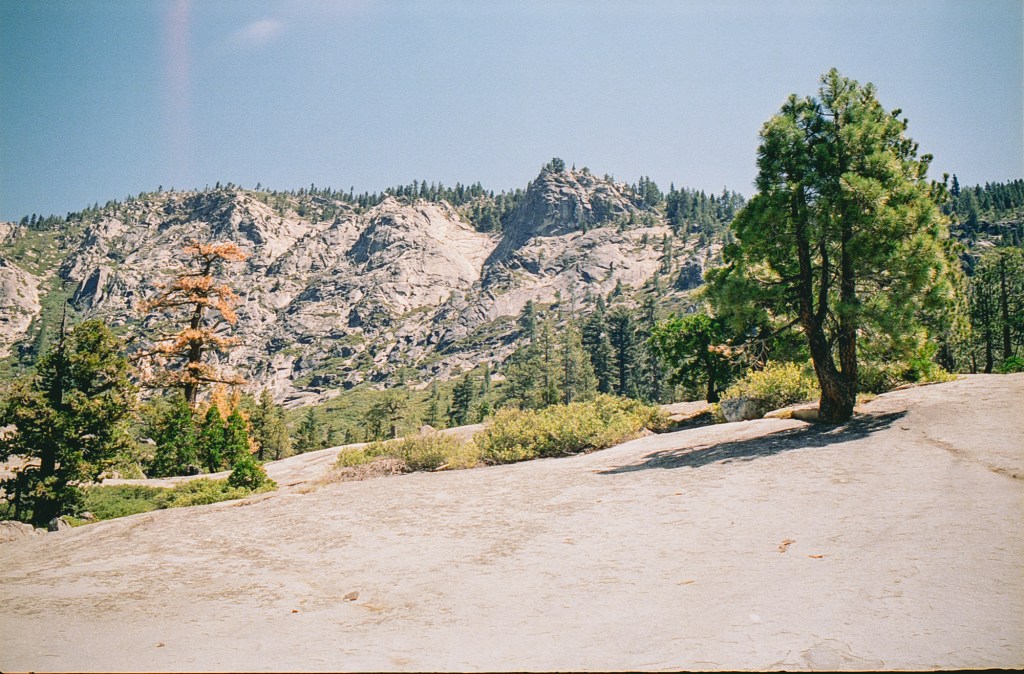
Tháng 6 rồi mình có đi 1 chuyến road trip từ Orange County đến Lake Tahoe, California. Mình ở Lake Tahoe 3 ngày, sau đó ghé qua San Jose 1 ngày rồi về lại OC. Mình coi đây là 1 cơ hội tốt để chụp những khung cảnh mới lạ mà mình ít được thấy ở nam Cali (nam Cali khô cằn và ít cây cối, rừng rậm như bắc Cali). Mình rất thích được bao bọc bởi thiên nhiên, đặc biệt là cây cối và rừng rậm, rừng đối với mình luôn rất đặc biệt, mình có thể lạc giữa rừng nhưng vẫn cảm thấy bình an như được thuộc về. Mình vẫn nhớ cái cảm giác đứng 1 mình giữa rừng núi, xung quanh không 1 bóng dáng hay tiếng nói của con người, chỉ có mặt đất mềm âm ẩm, những bụi cỏ cao thấp xen kẽ, thân cây già gãy đổ xen giữa rừng thân chắc nịch với lớp vỏ nứt toác để lộ những mảng rêu xanh non mơn mởn, cạnh đó là dòng nước trong vắt chảy qua con rạch nhỏ luồn lách giữa rừng, bên trên tiếng chim hót rộn ràng giữa những tán cây lao xao. Nếu bạn là người yêu rừng, hẳn bạn sẽ hiểu cảm giác lâng lâng hạnh phúc khi đó của mình. Bên cạnh đó, được chụp hình trong rừng thì còn gì bằng! Mình chia sẻ bài blog này với niềm hân hoan được chia sẻ về điều mình yêu thích với những bạn chung sở thích, hi vọng các bạn sẽ cảm thấy được truyền cảm hứng đi và khám phá [và chụp hình] sau khi đọc xong.
Về mặt chuẩn bị máy chụp hình và phụ kiện, mình lên kế hoạch sẽ chụp long exposure thác nước để có hình thác nước chảy nhìn mướt như dải lụa (nghe có vẻ hơi cliché nhưng mình chưa bao giờ chụp thể loại này nên cũng đáng thử qua). Để chụp long exposure giữa ban ngày, mình cần ND filter để chặn bớt ánh sáng vào lens. Mình mua 10 atop ND filter cho lens Bronica 75mm của mình, mình đã cân nhắc mua các filter ít stop hơn nhưng vì ngân sách chỉ có thể mua 1 filter nên mình quyết định mua 10 stop vì mình luôn có thể kéo dài thời gian shutter speed ra hơn là chụp không đủ lâu để nước chảy thành 1 dải dài liền mạch. Mình cũng mua 1 polarizer filter để chụp mặt nước hồ trong suốt (polarizer filter rất hữu dụng khi bạn muốn chụp các bề mặt phản chiếu như nước hay kính cửa sổ, ánh sáng sẽ đi xuyên qua bề mặt nước hay kính hơn là phản chiếu ngược lại lens của bạn tạo ra ảnh phản chiếu không mong muốn). Mình cũng mua stepdown ring để dùng ND filter và polarizer cho máy số Nikon của mình (mình mang máy số theo để chụp thử những shot long exposure). Mình đã có sẵn cable release cho máy film (vì mình cũng từng chụp ban đêm với máy Nikon F2). Ngoài ra thì tripod là KHÔNG thể thiếu cho long exposure. Về film thì mình dùng Fuji Pro 400H, Portra 400 và 1 pack Fuji 160 NPS expired (hình ra mình không thích lắm vì màu shifted hơi nhiều) cho Bronica ETRSi và Fuji Pro 400H, Portra 160, Kodak ProImage cho máy 35mm.
Đây là 2 shots đầu tiên khi mình dừng lại ngắm hoàng hôn lúc gần tới nhà Airbnb mình thuê. Hình ảnh đồi núi trùng điệp phủ dày đặc những hàng thông già mình vẫn thấy trên hình ảnh và movies nay mình đã được nhìn bằng mắt thật, cảm giác như trong mơ vì mình chưa bao giờ nghĩ có cảnh đẹp và siêu thực như thế này trên đời. Tuy 2 bức ảnh dưới không thể hiện được sự hùng vĩ và mênh mông như mình cảm nhận được nhưng cũng đáng chia sẻ.
Nikon F2. Fuji Pro 400H
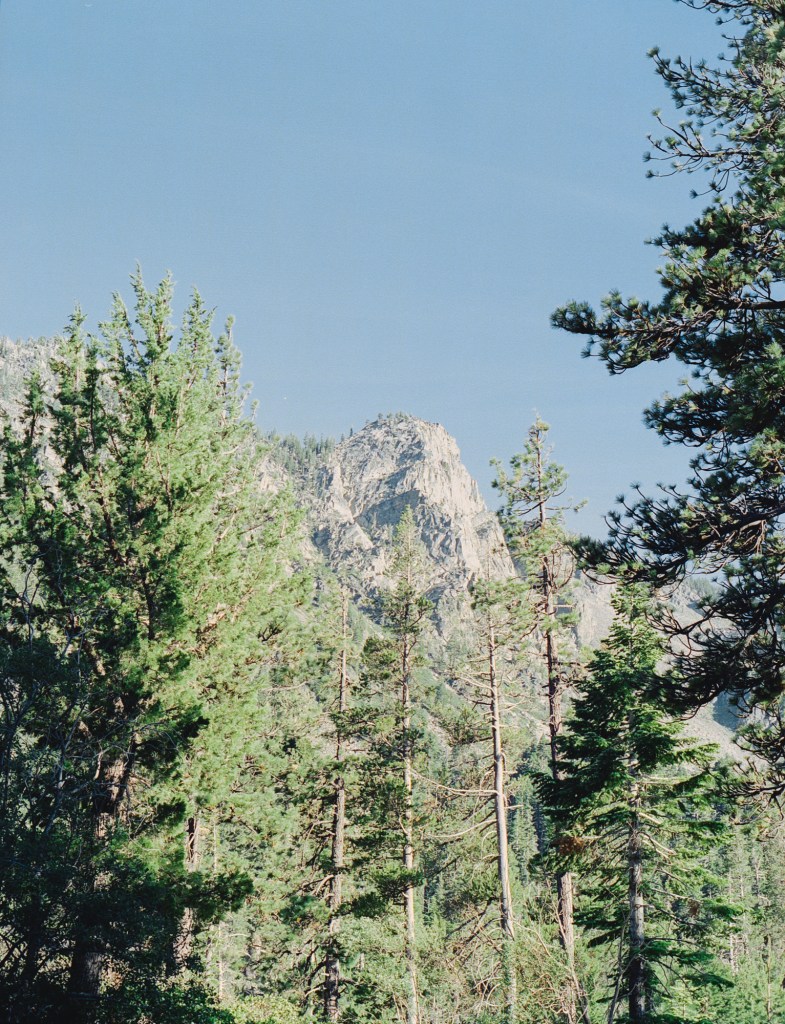
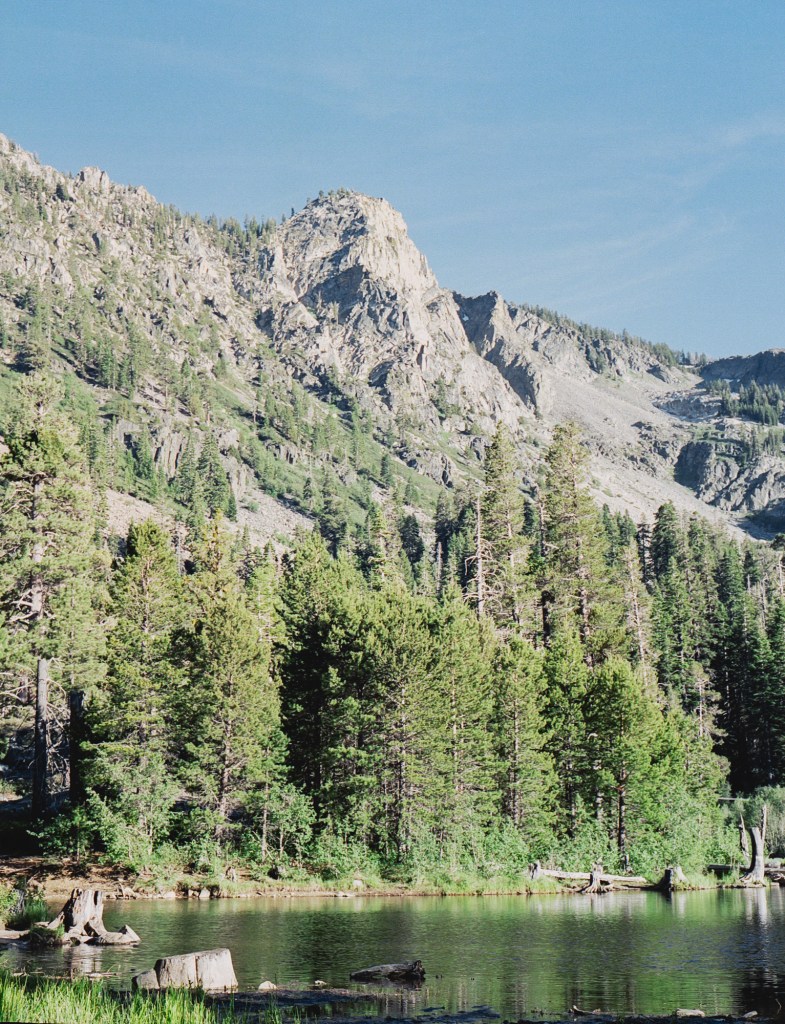
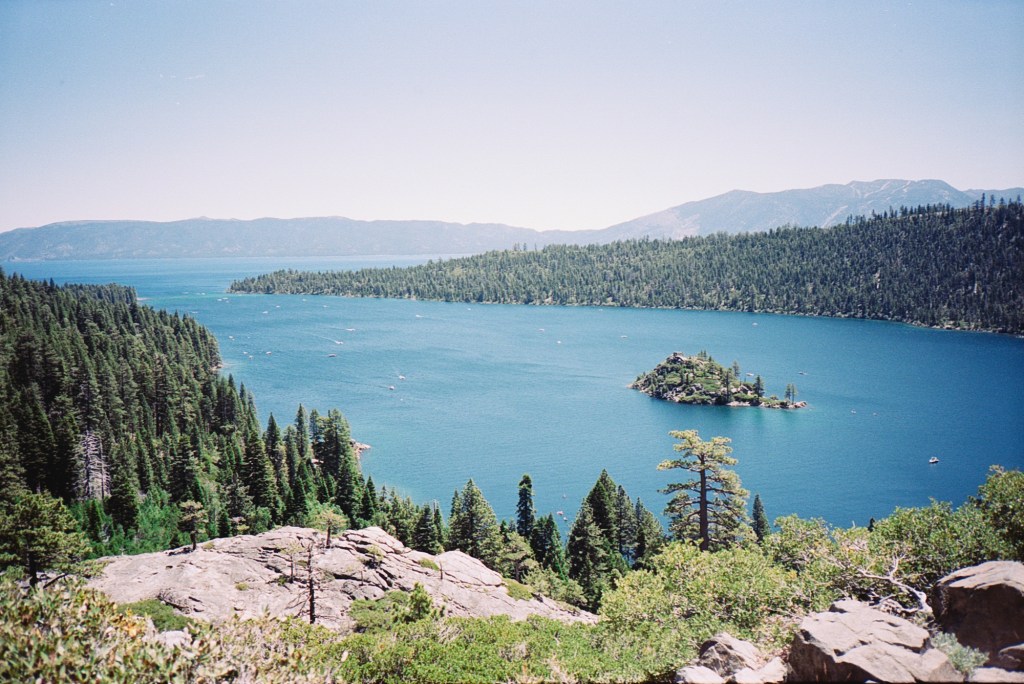
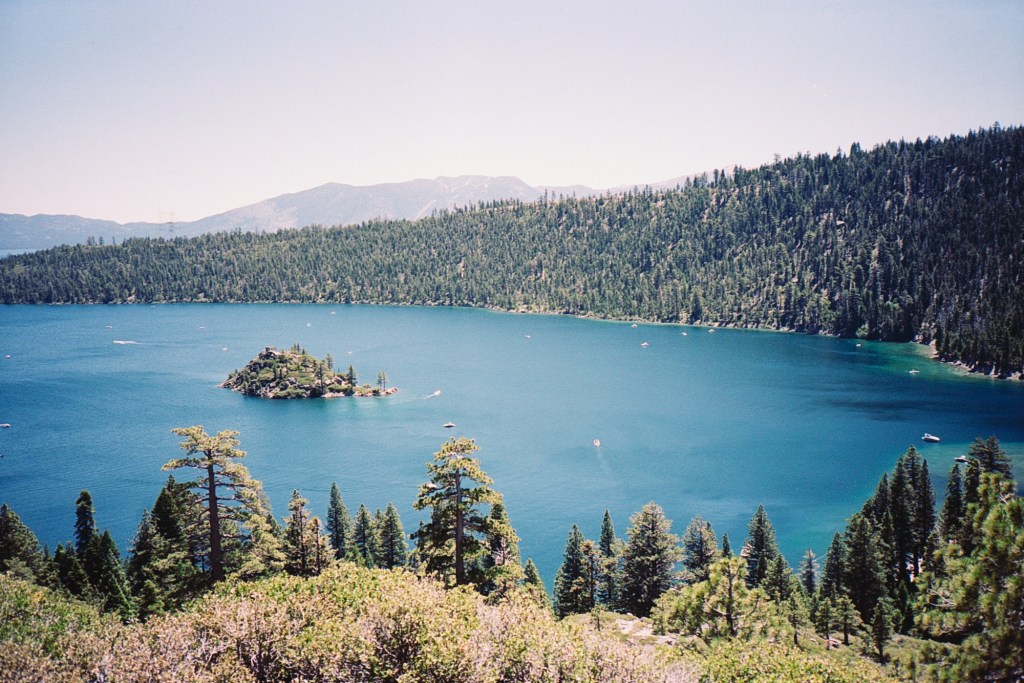
Kế đến là những hình ảnh mình chụp trong ngày thứ 1 và thứ 2 ở Lake Tahoe, khi mình đi hike ở Emerald Bay.
Nikon F2
Nikon F2
Emerald Bay
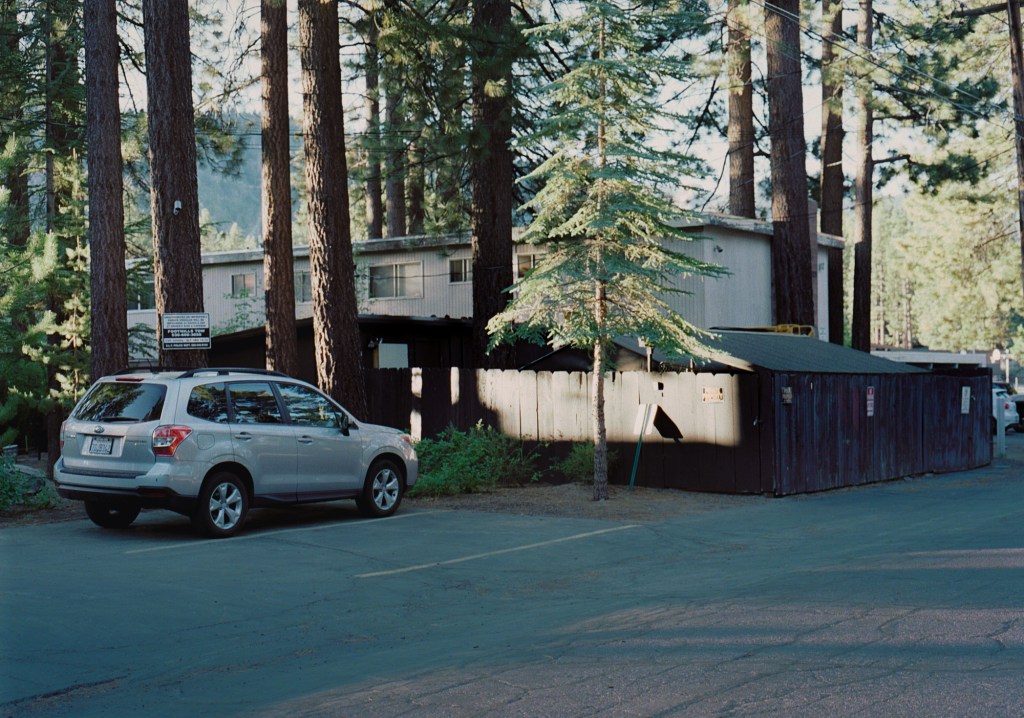
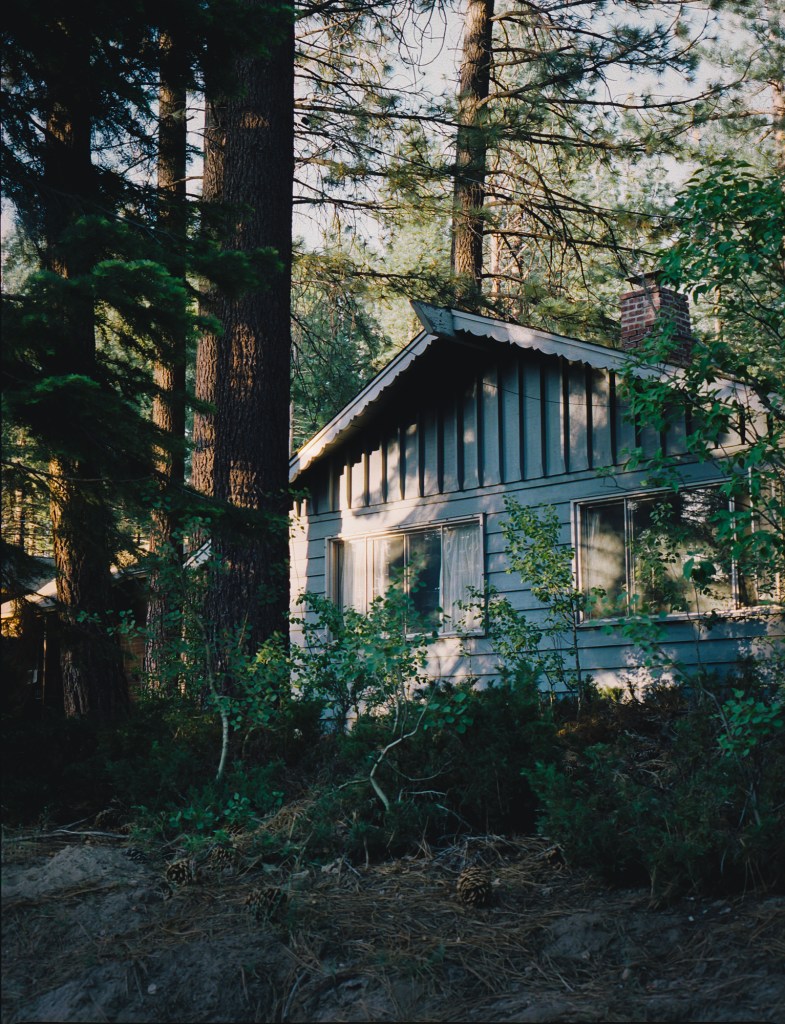
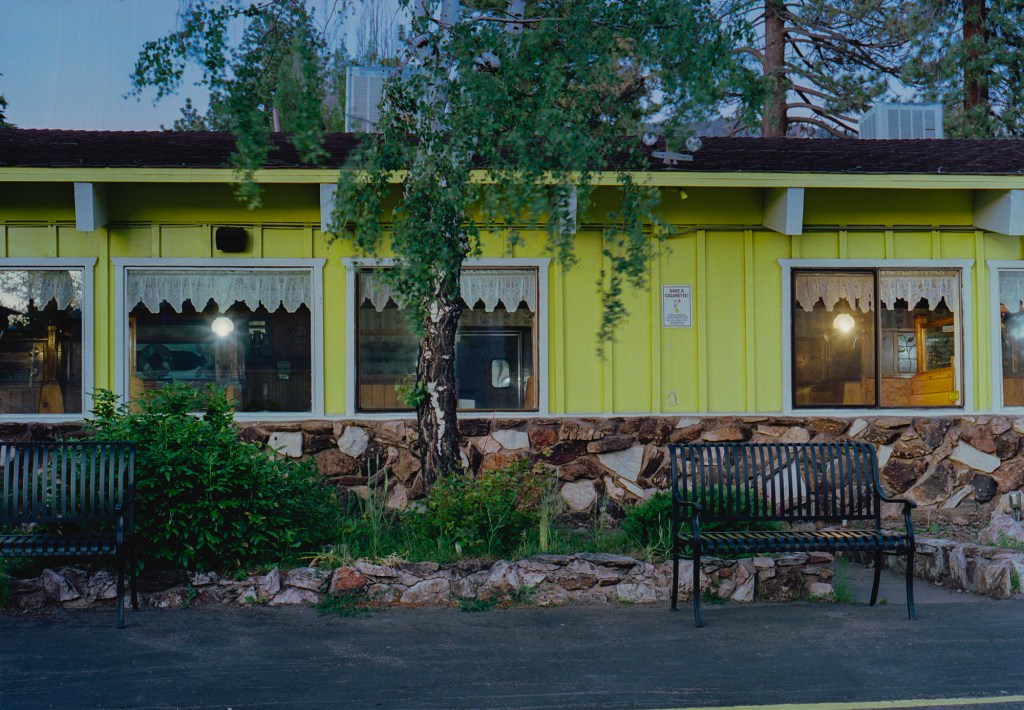
Và tiếp theo là vài cảnh mình chụp lúc chiều tà trong khu Airbnb mình ở. Mình dự định mang máy và tripod ra bờ hồ chụp cảnh hoàng hôn nhưng khi đi ngang những cảnh nắng rọi từng mảng lên tường và cửa sổ mình không thể không dừng lại được. Những hình này mình chụp trên tripod ở tốc 1/30-2s.
cảnh chiều xuống dưới những hàng thông
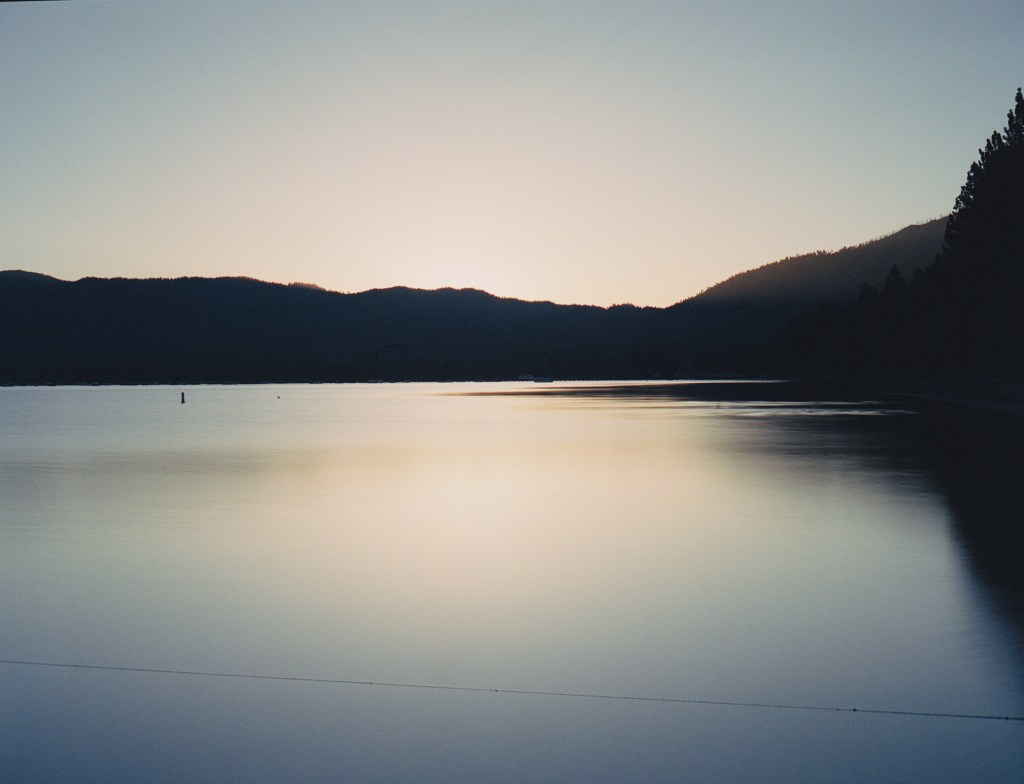
Dĩ nhiên tiếp theo sẽ là cảnh hoàng hôn trên mặt hồ. Mình thử long exposure ở những tốc độ khác nhau nhưng ở bức ảnh dưới, 8s, là mình thích nhất, bởi vì mặt nước ở đây tuy đã phẳng hơn không thấy chuyển động cụ thể của sóng nhưng vẫn còn chút lăn tăn trên bề mặt.
Lake Tahoe lúc hoàng hôn
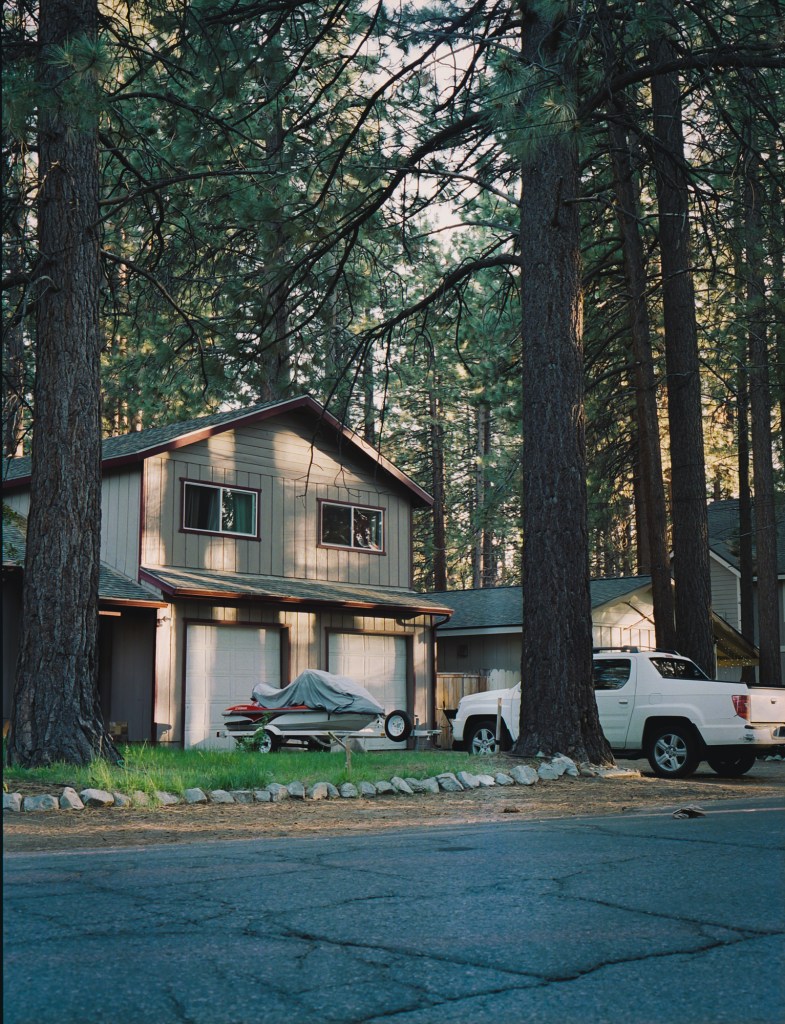
3 tấm ảnh bên dưới mình chụp sau khi mặt trời lặn. Cả 3 tấm mình đều rất thích. Mình đặc biệt thích những cảnh suburban (ngoại ô, hay những town nhỏ và xa trung tâm nhưng không phải miền quê) vì không khí hoài cổ và có chút u buồn của nó.
Fuji 400H
Portra 400
Portra 400
blue hour
Mình cũng chụp vài cảnh trong khu Airbnb vào buổi sáng, dưới đây là 2 hình mình ưng nhất. Tấm thứ 3 với mình bố cục không được đẹp, mình muốn dùng hàng rào gỗ làm foreground cho hình nhưng mình để máy hơi cao nên hàng rào bị sát mép dưới của hình quá làm không cân xứng, nếu có thể mình sẽ hơi khuỵu gối 1 chút để hàng rào sẽ dâng cao hơn và khoảng cách gần hơn với chủ thể là chiếc van nhỏ màu bạc.
vài cảnh suburban
Ngày hôm sau, mình thức dậy lúc 4:30 sáng để chụp ảnh mặt trời mọc trên mặt hồ. Sau khi rửa và scan hình, mình cảm thấy long exposure mặt nước không phải là điều mình yêu thích, vì mặt nước phẳng như trang giấy cảm thấy không thực với mình, nó thiếu sự chuyển động và tràn đầy năng lượng mà mình yêu thích ở nước.
cảnh mặt trời mọc bên bờ hồ
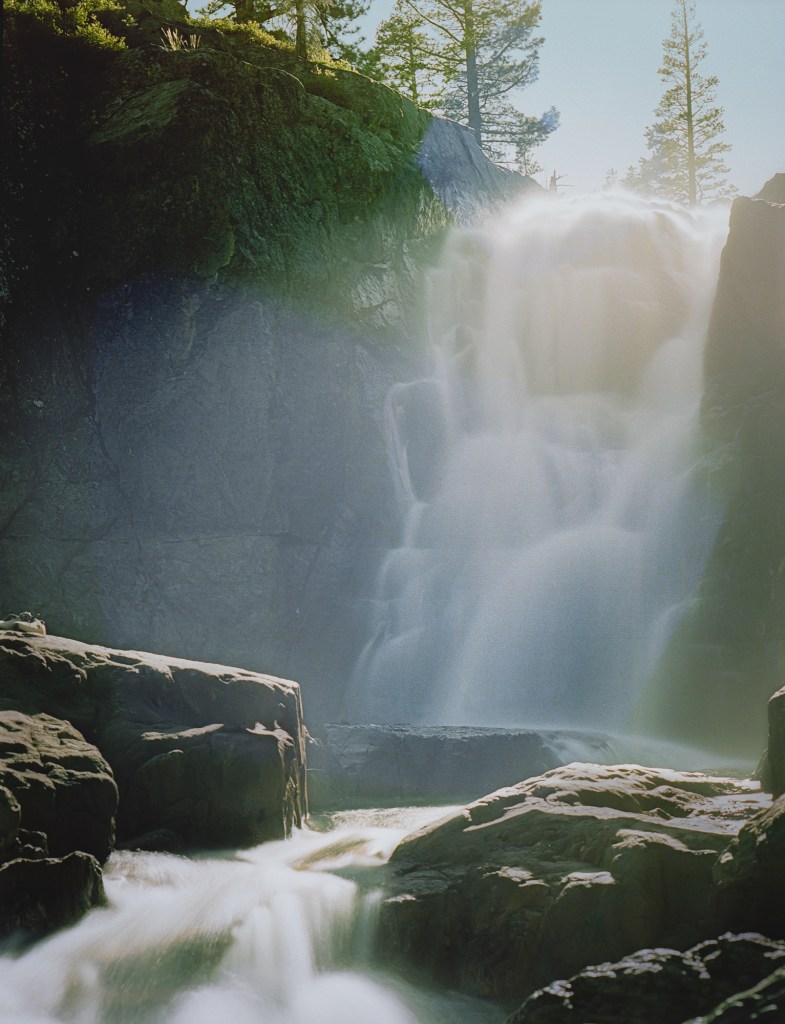
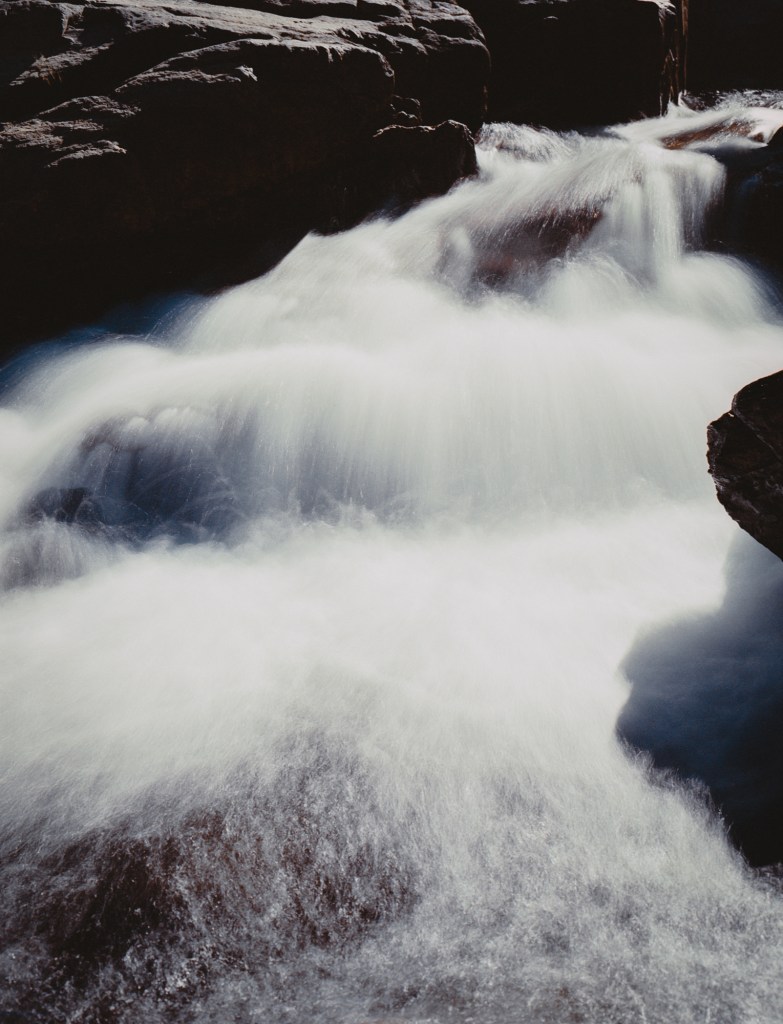
Và đây là điều mình mong mỏi nhất trong suốt chuyến đi, chụp ảnh thác nước như dải lụa. Khi mình leo đến thác, mặt trời đang ở phía sau thác và chiếu thẳng vào ống kính của mình ánh nắng chiều chói chang đặc quánh. Với lần đầu chụp long exposure trong tình trạng backlit (ngược sáng) và phải liên tục tháo và gắn 10 stop ND filter lên lens để ngắm và chụp, thú thật mình không chắc lắm về bố cục và cả setting máy. Mình đã không hi vọng nhiều vào kết quả nhưng khi scan và edit hình xong, mình cảm thấy khá hài lòng.
lần đầu chụp thác nước ngược sáng
Cuối cùng là những hình mình chụp trong những lúc leo núi và những hình chụp bằng máy Nikon F2 và Yashica T4.
Nikon F2
Nikon F2
Nikon F2
Nikon F2
Nikon F2
Yashica T4
Yashica T4
cảnh chụp ngẫu nhên
Cảm ơn các bạn đã theo dõi đến đây. Hi vọng các bạn thấy những chia sẻ của mình bổ ích. Nếu các bạn có thắc mắc hay muốn góp ý về hình ảnh cũng như nội dung của mình xin đừng ngại comment nhé, mình luôn thích film talks! Cheers!
Lake Tahoe on Bronica 645 ETRSi medium format film camera
I had a road trip from LA to north California last month, stayed in Lake Tahoe for 3 days and San Jose for 1 day. I took this trip as a photography opportunity more than just a vacation time. I always love nature, especially forest, there’s something in the forest and trees that I feel like I belong to. I still remember the feeling of being alone in middle of the woods with just grass, woods, leaves, water flowing in the creek and birds on the branches, I felt a sweet lonely happiness there. And photograph forest on film was a thing I wanted for so long. If you like forest as me, I hope this post and photos from here will inspire you and warm you.
Back to the technical side, I knew I must prepare the equipment for the trip, because I wanted to make some long exposure of the waterfalls and the lake Tahoe in sunrise or sunset (I know this sound cliche but I haven’t do this before so worth trying). I bought a 10 stop ND filter for my Bronica ETRSi 75mm lens. I thought about other ND filters with less stops than the 10 stop but since I just can buy one, I decided to buy the 10 stop because it’s better to have longer exposure than don’t have enough time to make the water look silky. I also bought a polarizer filter for taking photos of the water, of course. I already have a cable release. I brought a bunch of batteries for my Bronica, Nikon F2, and my digital camera (I used digital camera for long exposure test shot). And a steady tripod is crucial! I also want to have a wide angle lens on my Bronica but when I decided to buy it, there’s nowhere can ship it to me before the trip, so I tried to make the best out of the 75mm lens. For film, I used Fuji 400H, Portra 400 and Fuji 160 NPS expired (which is not so good) for 120, and Fuji 400H and Kodak ProImage for 35mm.
sunset behind the mountain. Nikon F2massive cloud lit by setting sun. Nikon F2
Here’re some photos on the first hike day.
Nikon F2
Nikon F2
first hike scenes
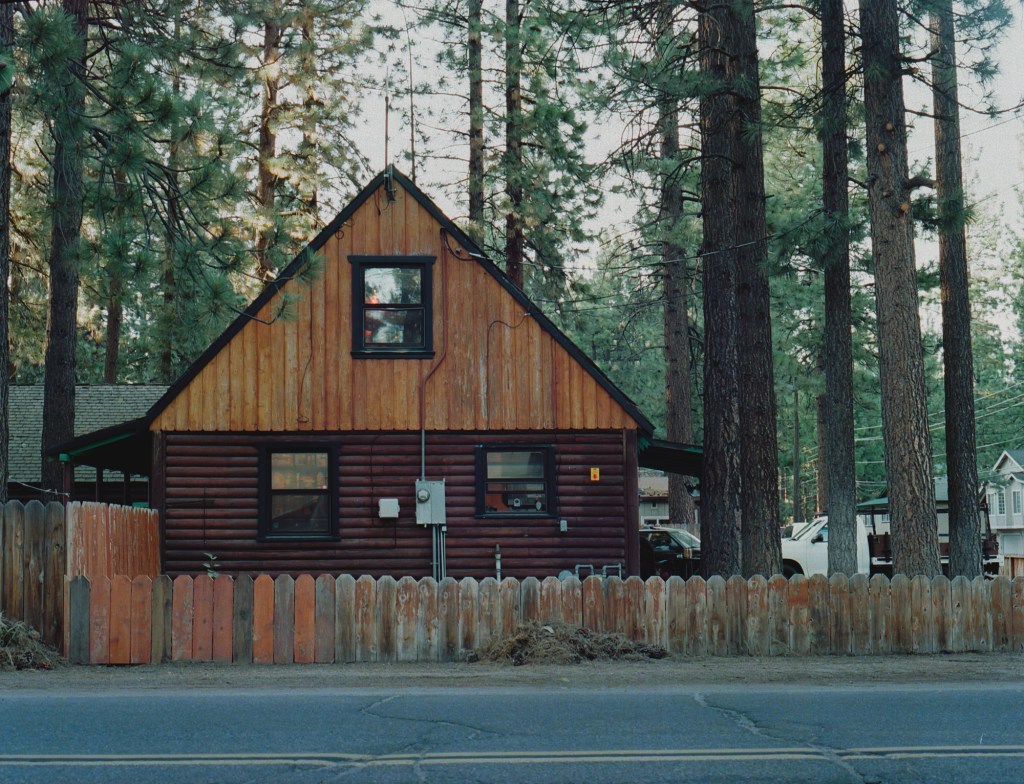
Next is some scenes near my Airbnb, beautiful sunset light on these houses, I was walking to the lake to take my long exposure on the water at sunset but couldn’t help myself not to stop by these scenes. These were shot on tripod at 1/30-2s.
everything I ever wanted in a photo
my favorite from the series
neighborhood in golden hour
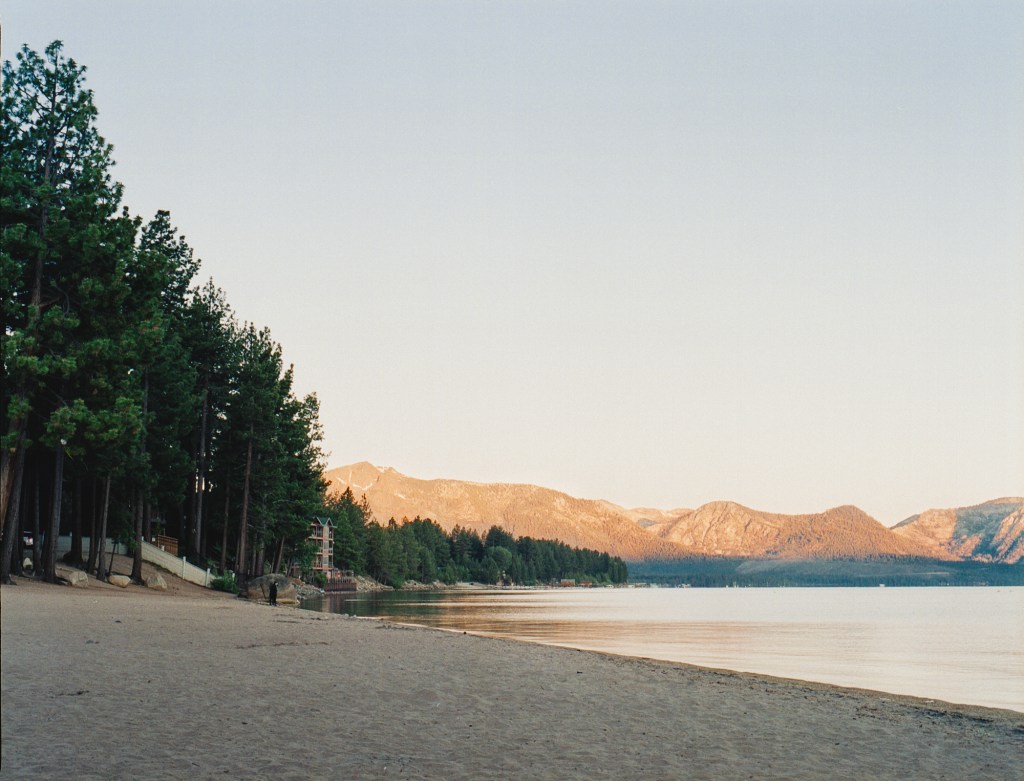
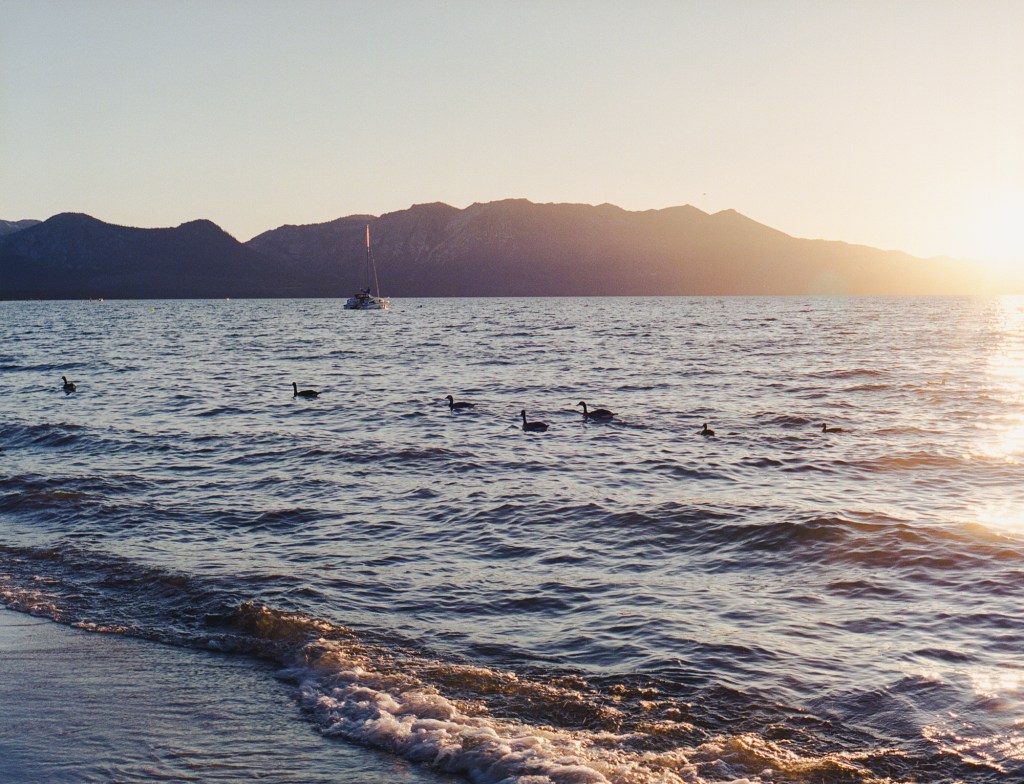
Of course next thing is sunset shots on the lake. Nothing so fancy here but I like the long exposure that give the water a nice texture to it, it’s not totally flat but still blurry and has dimension for light to fall on.
exposured for 8s
lake tahoe in sunset
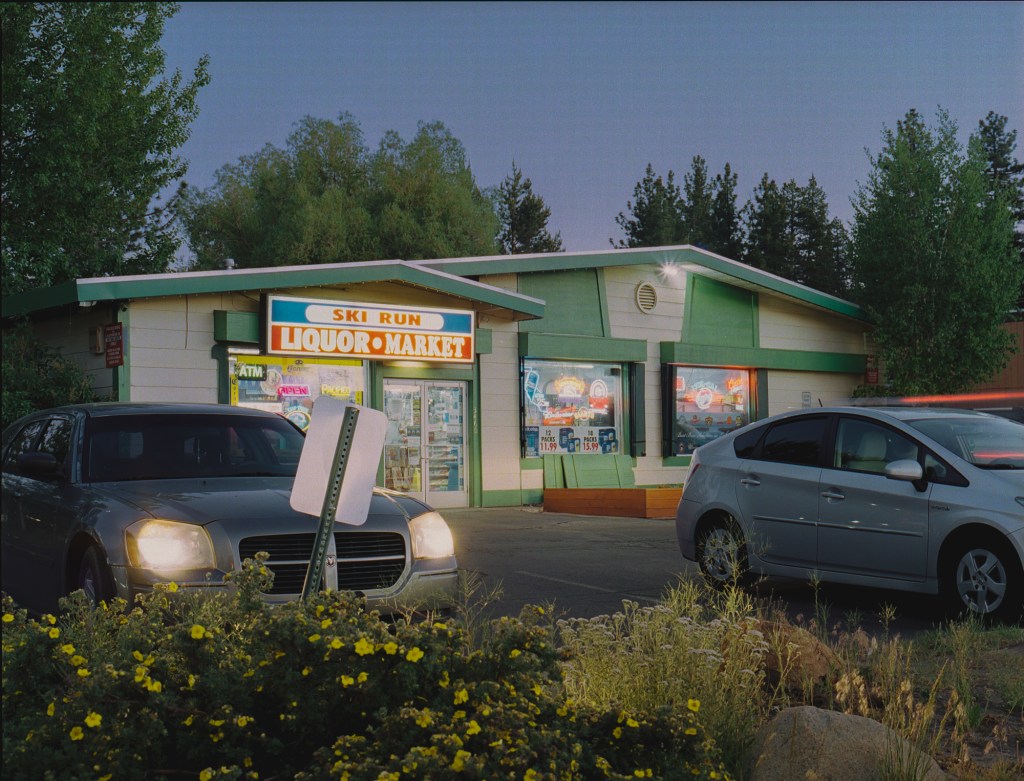
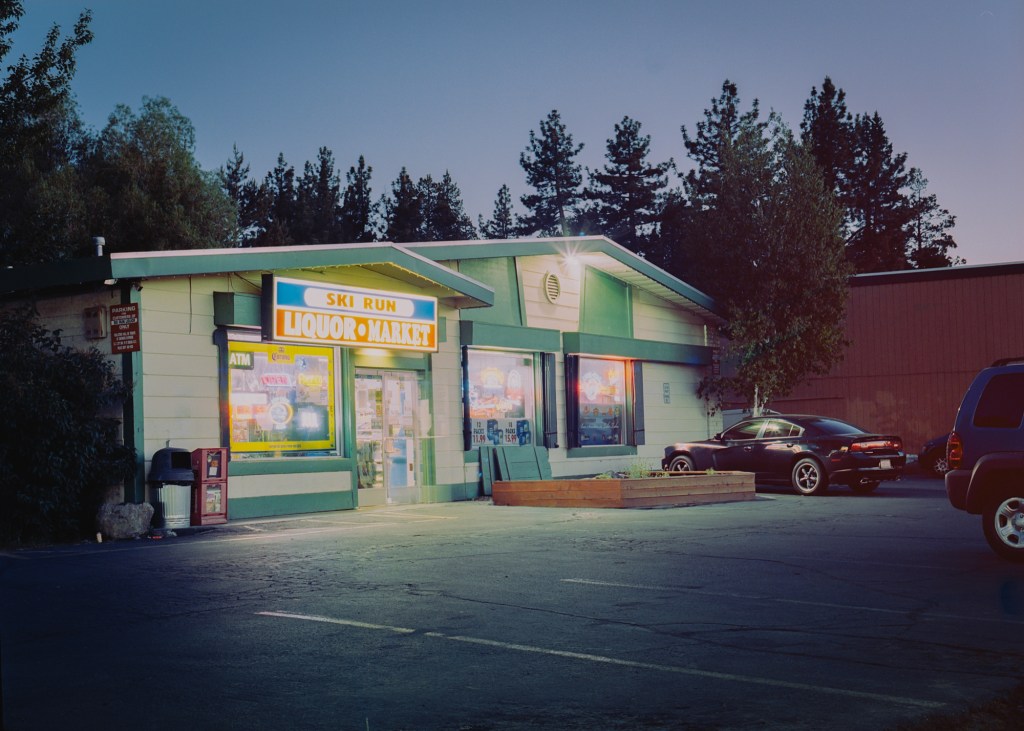
And 3 night photos that I like a lot. I had to wait in front of the liquor store for 15′ to get the shot when no car or people get in between my camera and the store, but I think the one with 2 cars parked in front is quite nice. I like the suburban vibe here pretty much.
shot on fuji 400h
shot on portra 400
portra 400
night photos
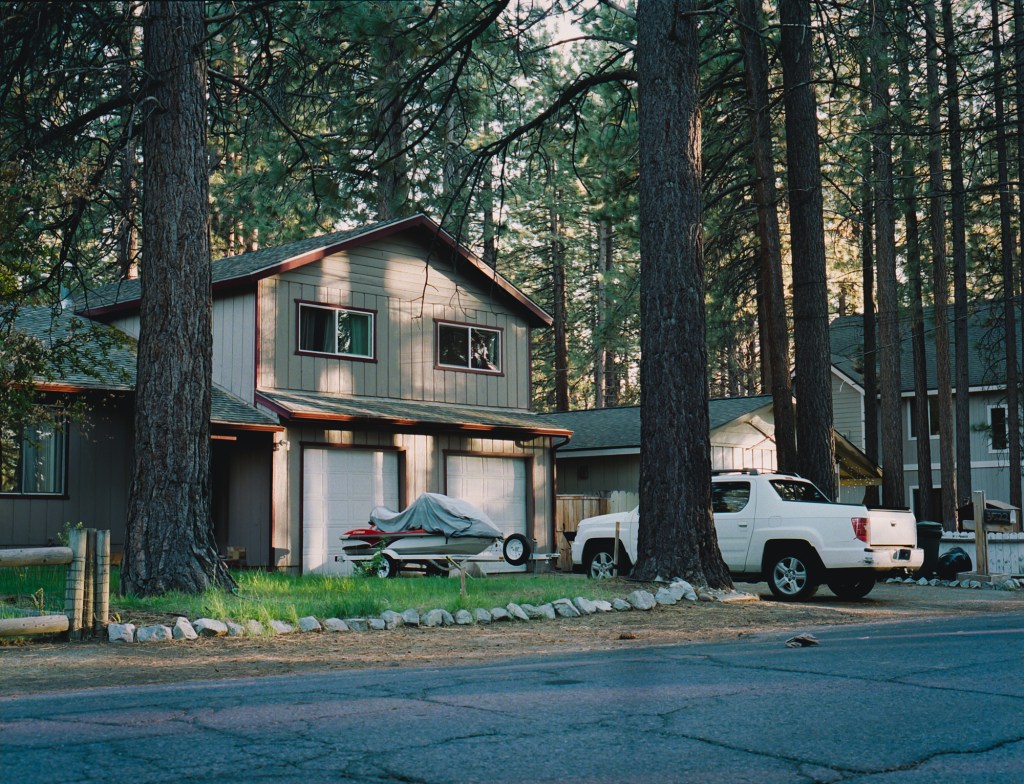
More photos from the neighborhood in the morning.
These two feel like a nice pair
Next day, I woke up at 4:30am to walk to the lake with my Bronica, digital camera and tripod for the shot I came here for, long exposure at sunrise. These photos turn out not bad but I honestly not a big fan of long exposure water, it’s just look so flat and lack of dynamic to me.
i wonder if the 10 stop ND filter make the photo less saturated. exposured for 15s
sunrise scenes
Last is series of photos took on the last hike in lake Tahoe. On this day, I hike to a waterfall with a plan for a nice silky waterfall photo but when I got there, the sun is so high right behind the waterfall. The sun shine direct to my lens made it really hard to look into the viewfinder to compose. First time working with 10 stop ND filter in backlit situation and million droplet falling to the camera made me did a very rush job and honestly I didn’t have high hope for these photos at all. But these came out quite nice.
silky waterfall 1st attempt
Here’s the rest.
Nikon F2
Nikon F2
Nikon F2
Nikon F2
Nikon F2
Yashica T4
Yashica T4
hike views
Thank you for making it here. I hope that you enjoy the photos and some thought about them. Cheers!


![[Vietnamese] Sequoia road trip](https://filmsequence.com/wp-content/uploads/2020/09/sequoia-17-6.jpg?w=1200)