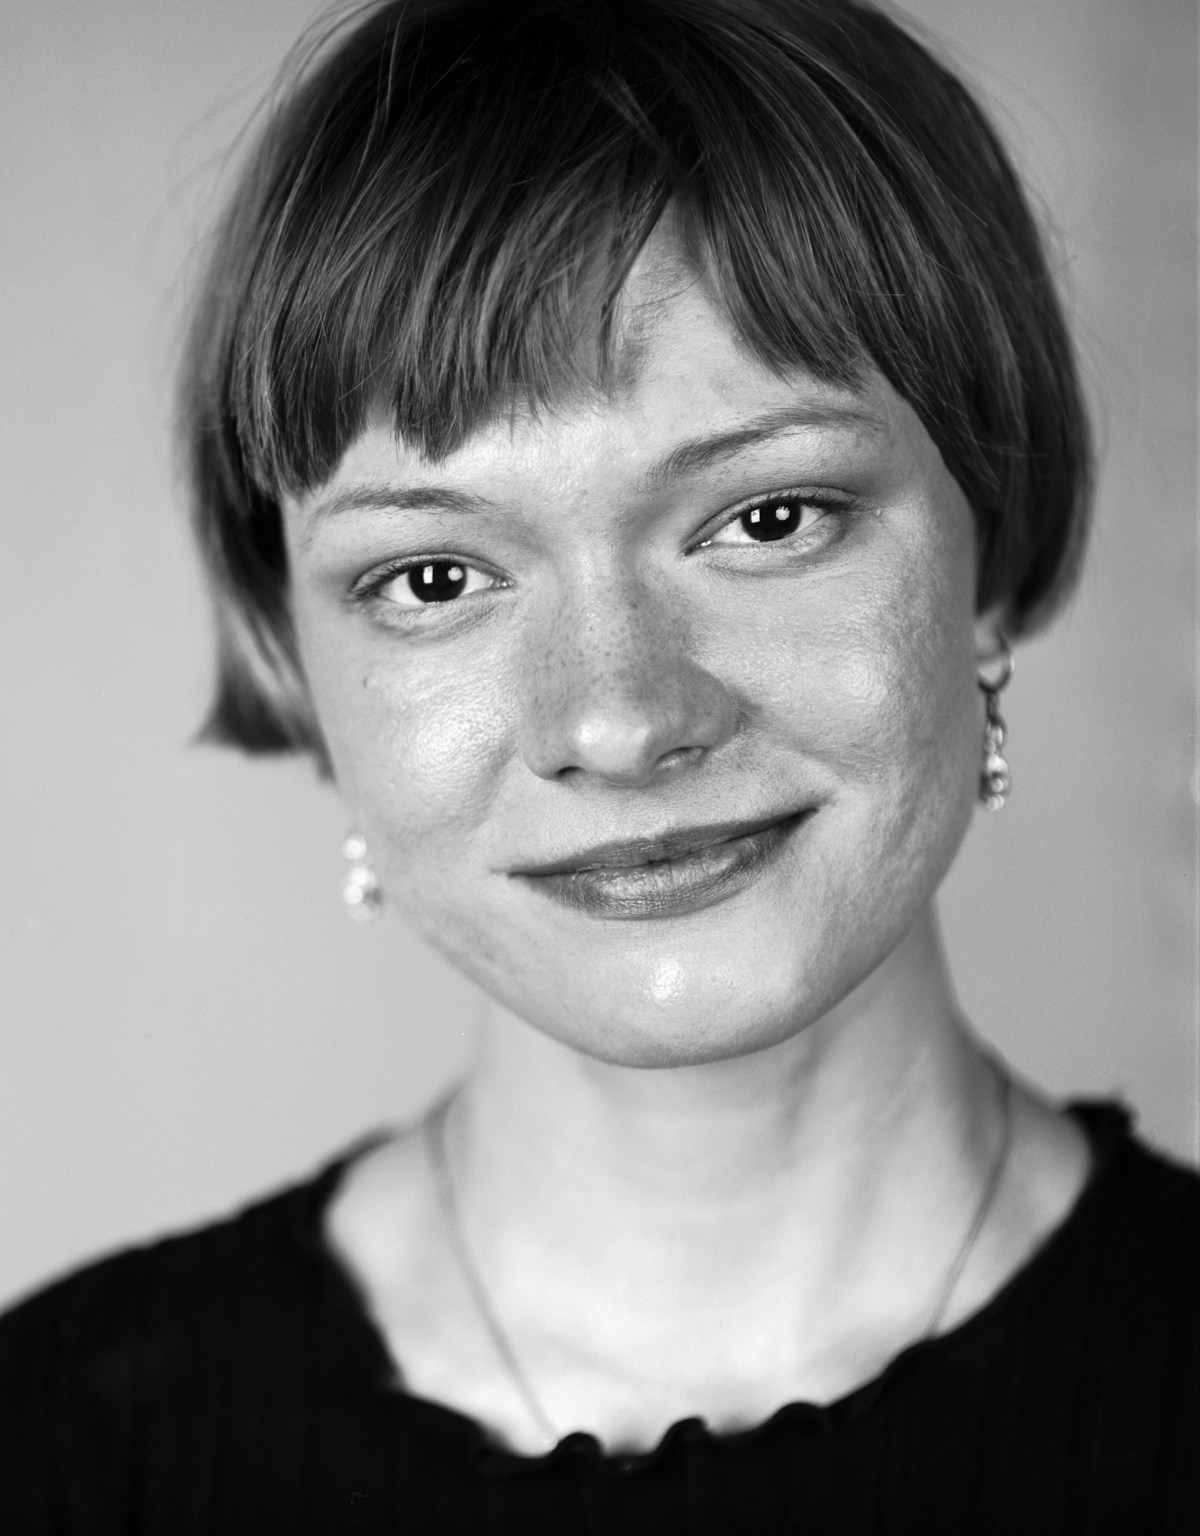
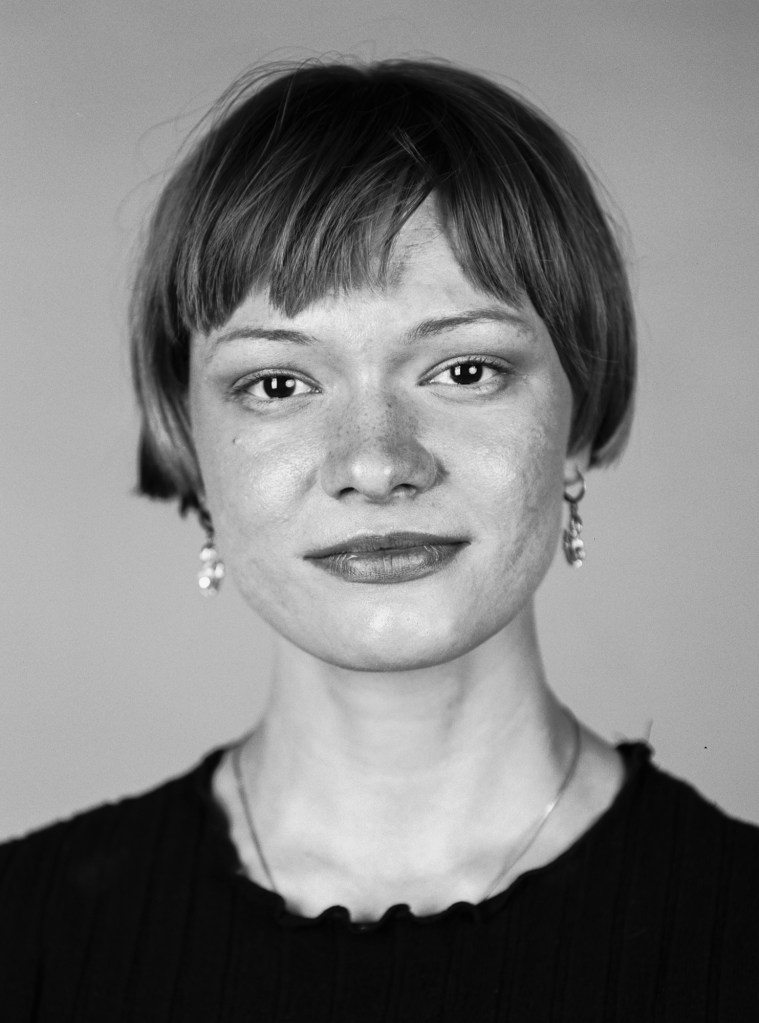
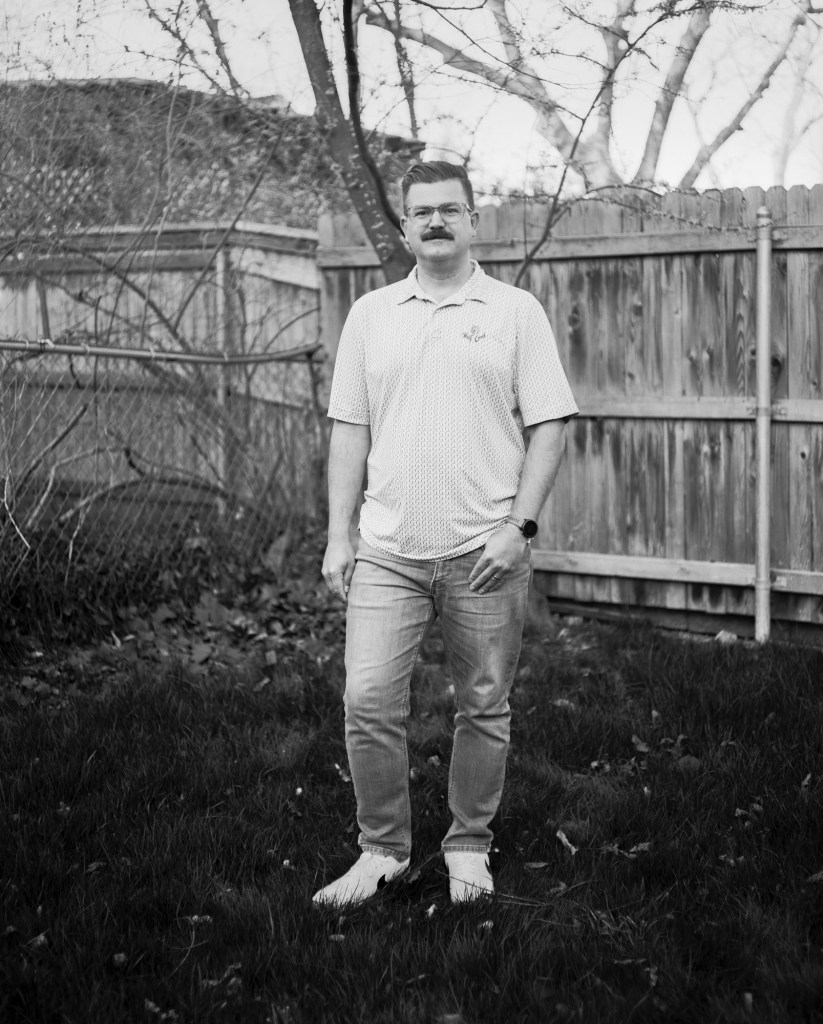
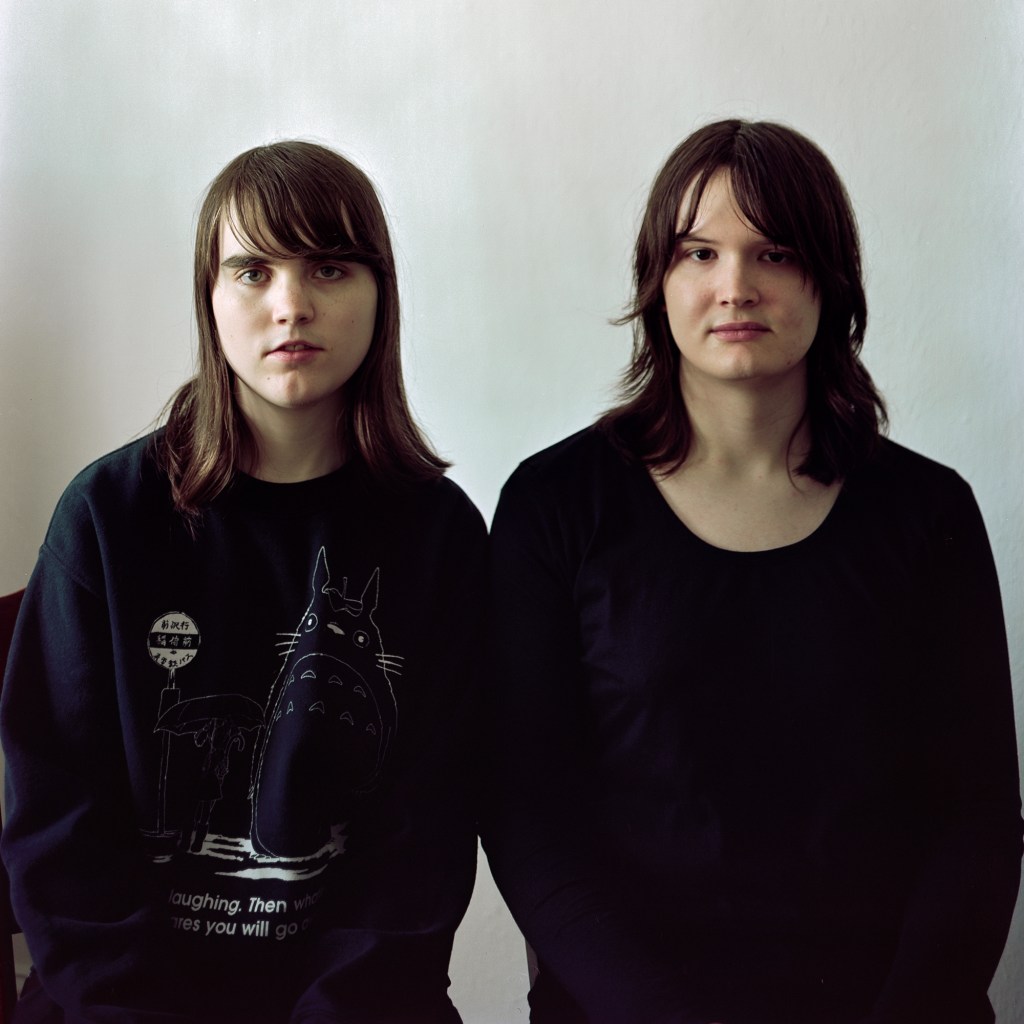
I got to learn how to use 4×5 camera this semester at school. And I am in love with 4×5. This is a whole new level of making photos as it brings so much possibilities into the photographs. I am learning how to focus on the subjects and how to use the camera movements to focus on multiple subjects in the frames. Here are some portraits I have made during the last 3 months. I hope somewhat capture the subjects’ characteristics or an essence of their feelings, this is my goal in large format portraits.
SamSamMark in his backyardMark in his backyardBobby and June in their apartmentBobby and June in their apartmentBobby and June in their apartment
This is the third roll in my photography journey in 6×6 ratio, still getting used to it but I’ve been enjoying the experience a lot. I think it doesn’t matter what aspect ratio I shoot with, just the experience of taking a camera and making some photos is already a sweet thing to me. That’s why I enjoy shooting with the 645, 6×6, 6×7 or panoramic regardless. The downside of this is I don’t spend enough time to master a camera or a ratio and might not get the most out of one aspect ratio. But I think keeping my context consistent throughout different ratios is also an important skill. I’m not an educator or a proper educated photography student so I’m not 100% sure my way of learning in this case is right but I think I made a little progress in my development through this.
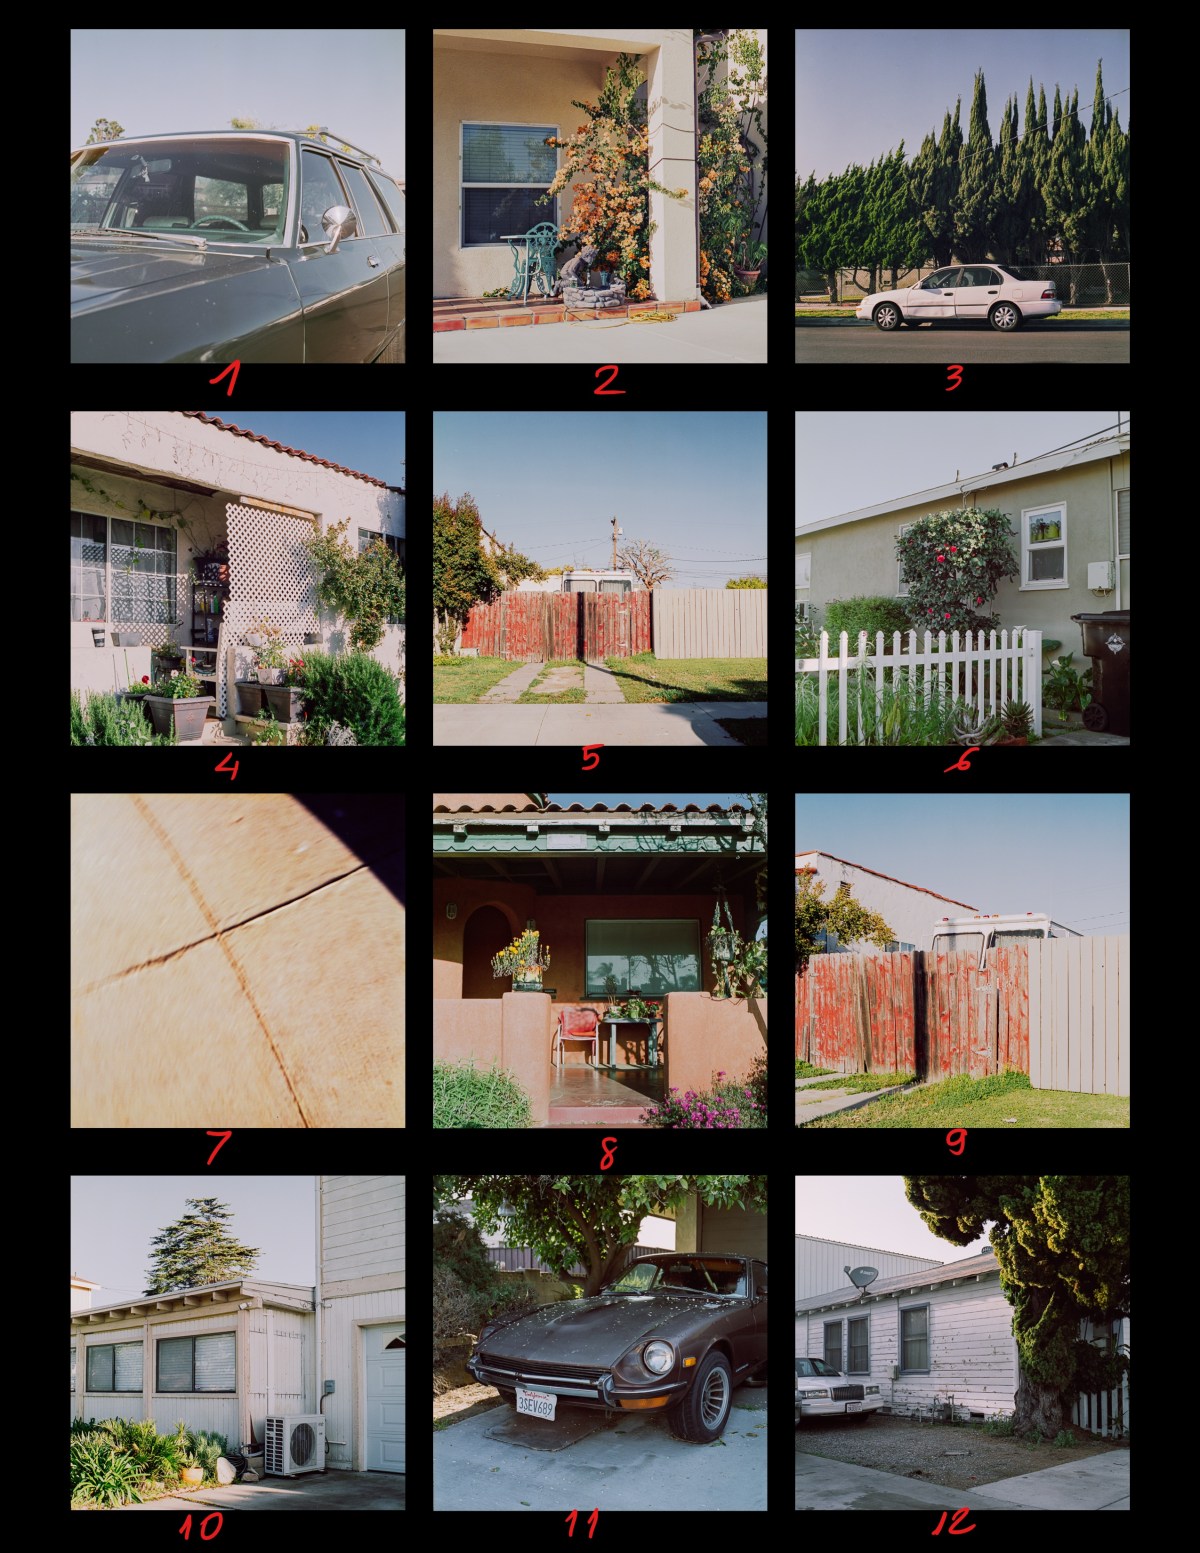
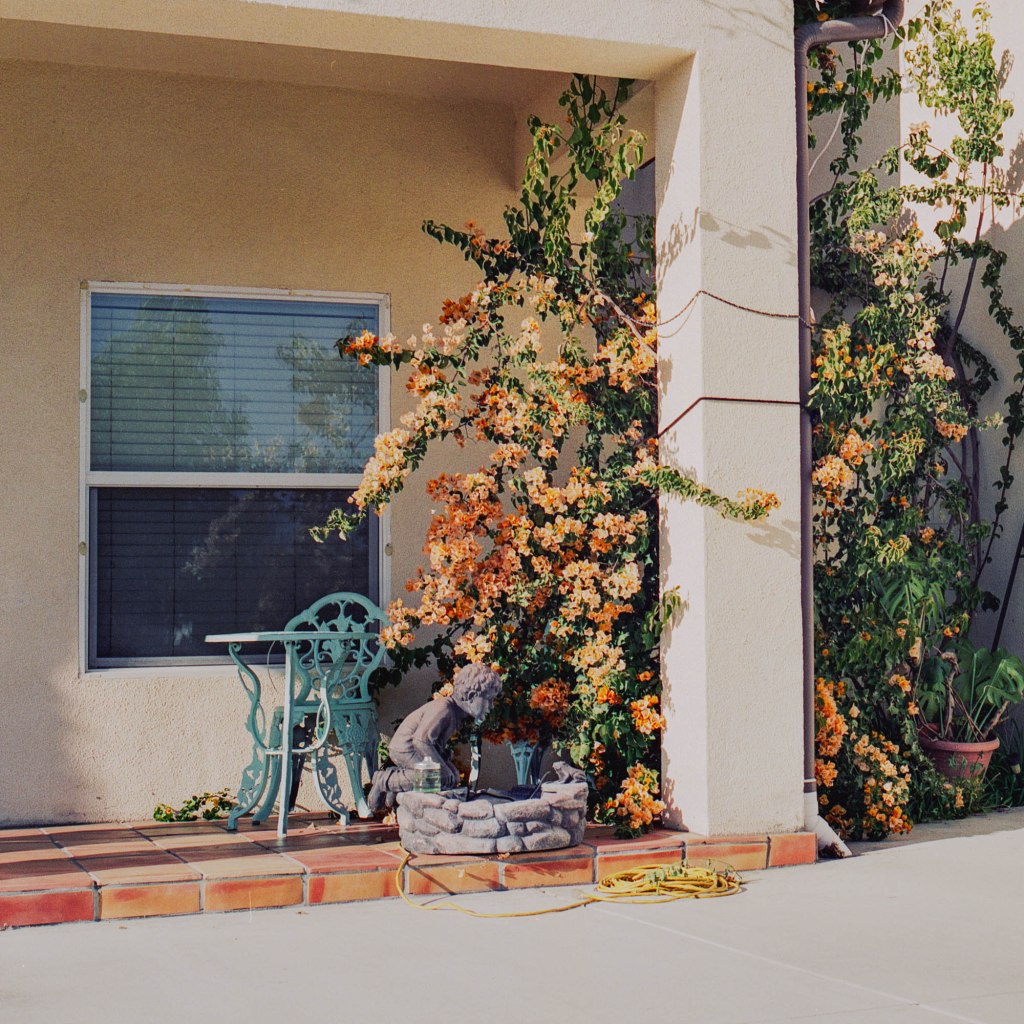
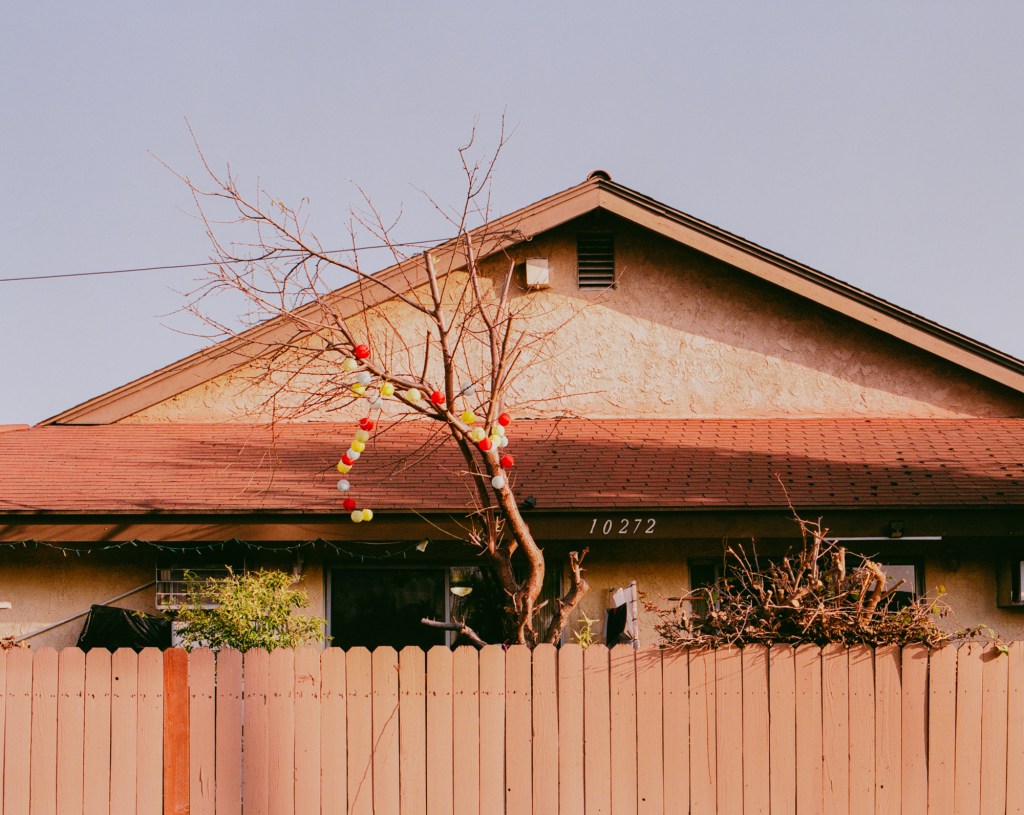
In this particular roll, I spent about 2 hours walking in a a suburbs neighborhood in the afternoon. The weather was so nice and the afternoon sunlight was gorgeous. There’re few scenes that I like because of the messiness and mundane feeling about them, something quite inadequate but humanistically poetic. I always love the image of something crooked but beautiful in their own sense. Below is the digital contact sheet of the roll.
Shot with Rolleiflex SL66E and Fuji Pro 400H
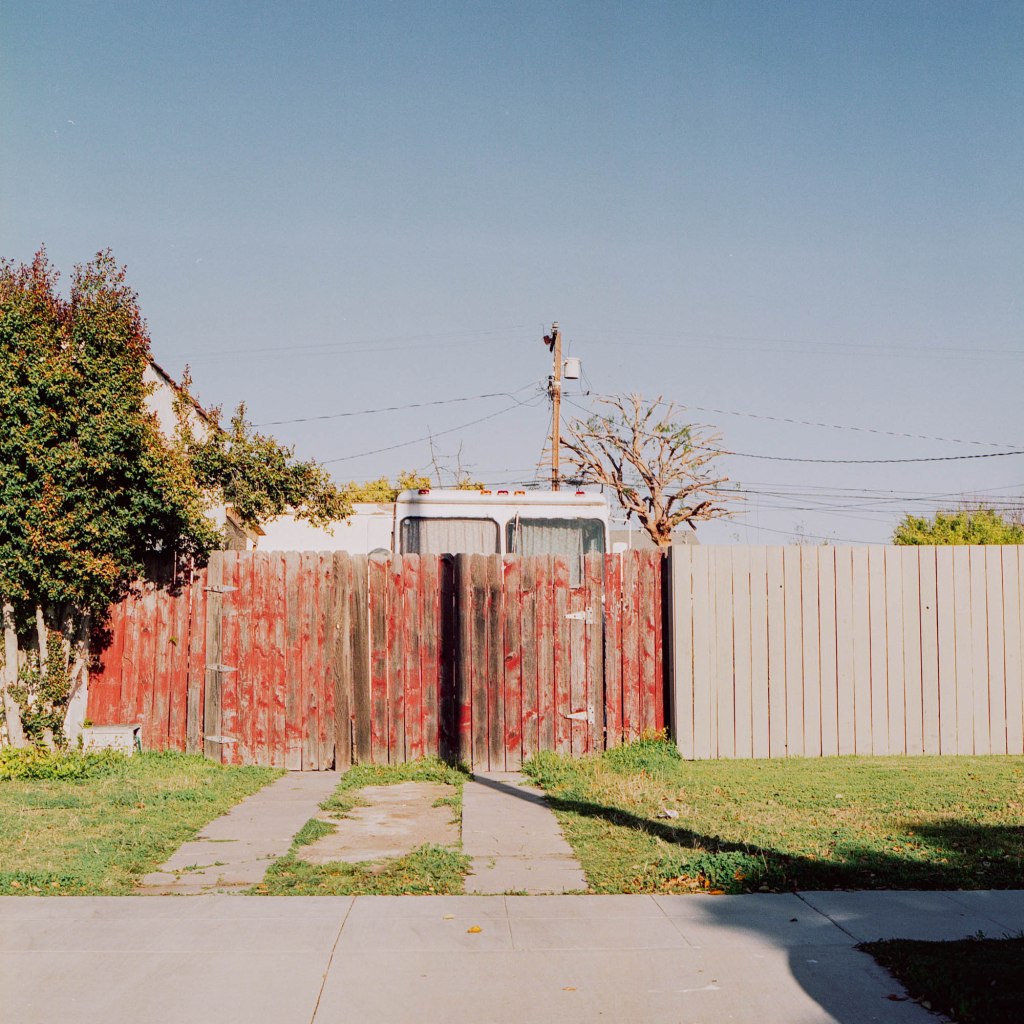
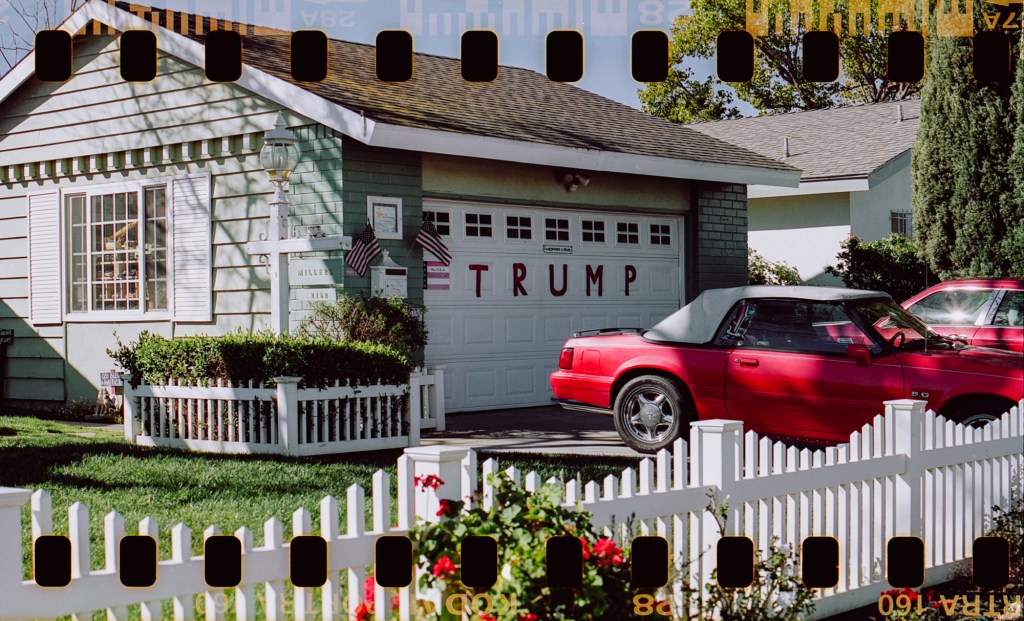
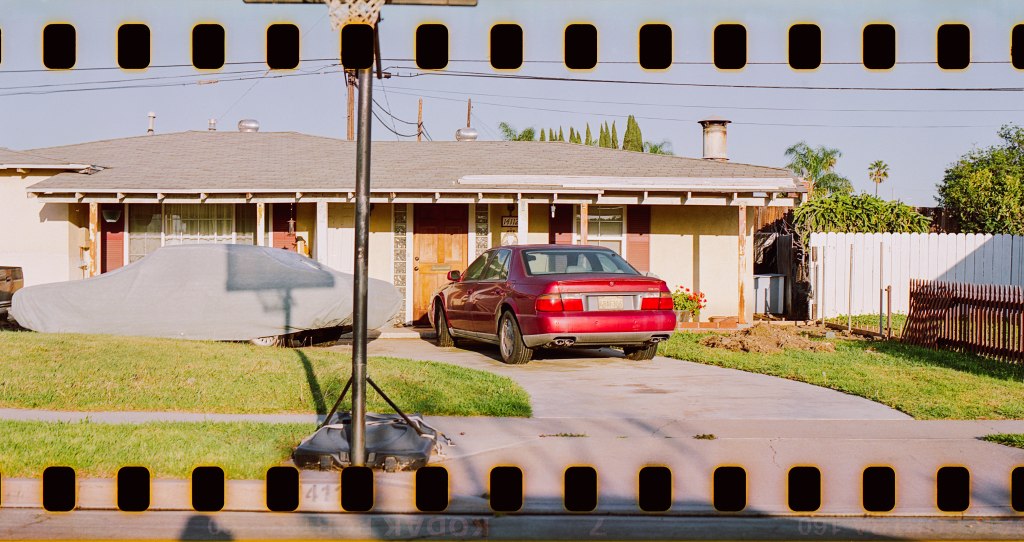
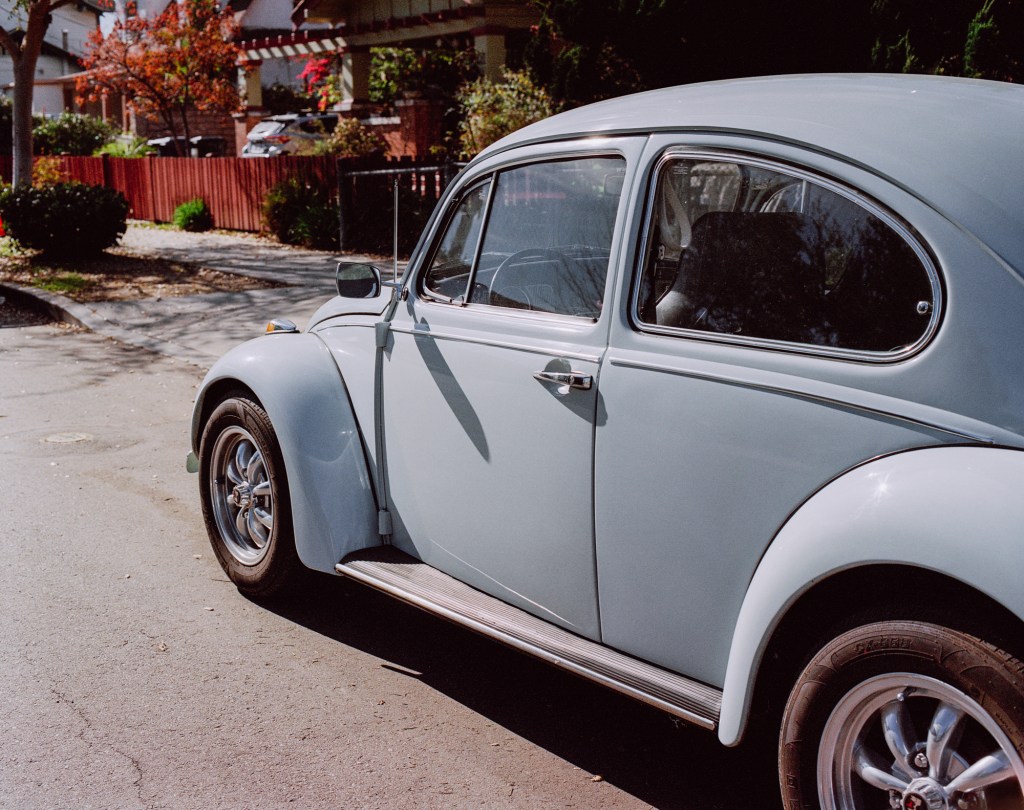
As a whole, I’m very happy with the roll. There’re 6 out of 12 that I like. The first two shots is not that good as I imagined when I took them. The car shot might be good if there weren’t any tree peak out behind it. The second one was appealing to look at in real life but I don’t think I can present a clear context in the photo. The white car shot is pretty much comes out as I imagined, I like the warm sunlight hitting it and the trees behind are kind of tilting to the right and gradually high up, the electric wire is also parallel in the movement of the trees, one bonus is the car’s door is damaged and add a bit context to the photo.
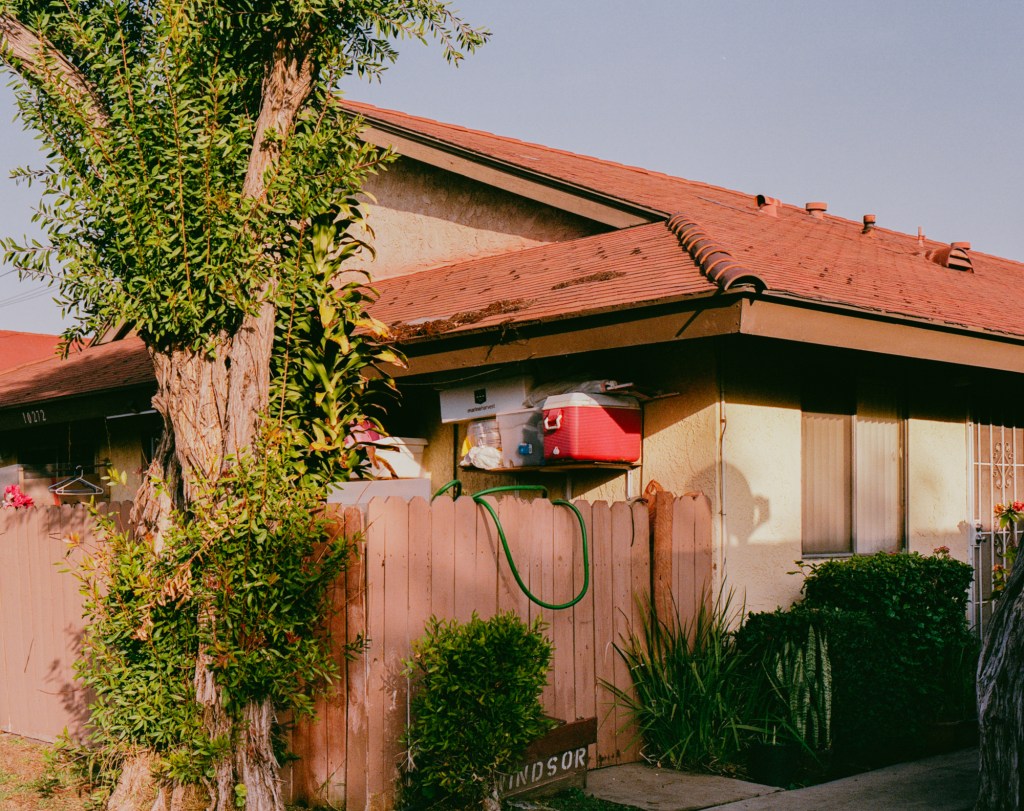
The 4th photo is my favorite scene. As you know, I like the messiness and inadequateness in a complex scene. There’s no human in the photo but you can have a sense of how’s the person’s life and characteristic.
The 6th is compositionally nice but the context is not strong.
The 5th and 9th are a nice pair. I took the 5th first and wonder if I should take another angle but them I walked around to shoot some few more shots, when I passed the camper van[?] again I decided to shoot at another angle which line up the gap in the fence with the middle front frame of the van. I think the second shot is better than the first one, but overall I like the colors and composition in both of them.
The 7th is a accident shot when my camera bump to my bag, I’m having this kind of accident more frequently.
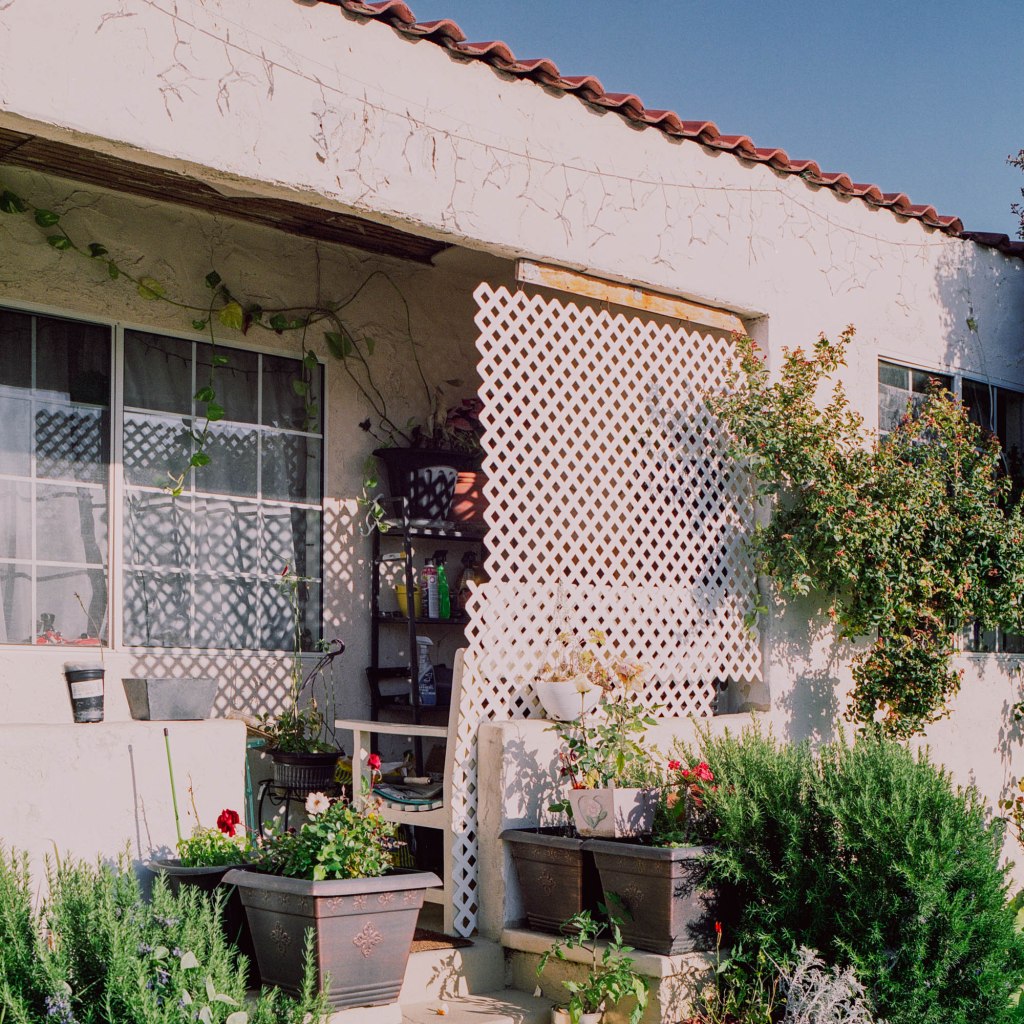
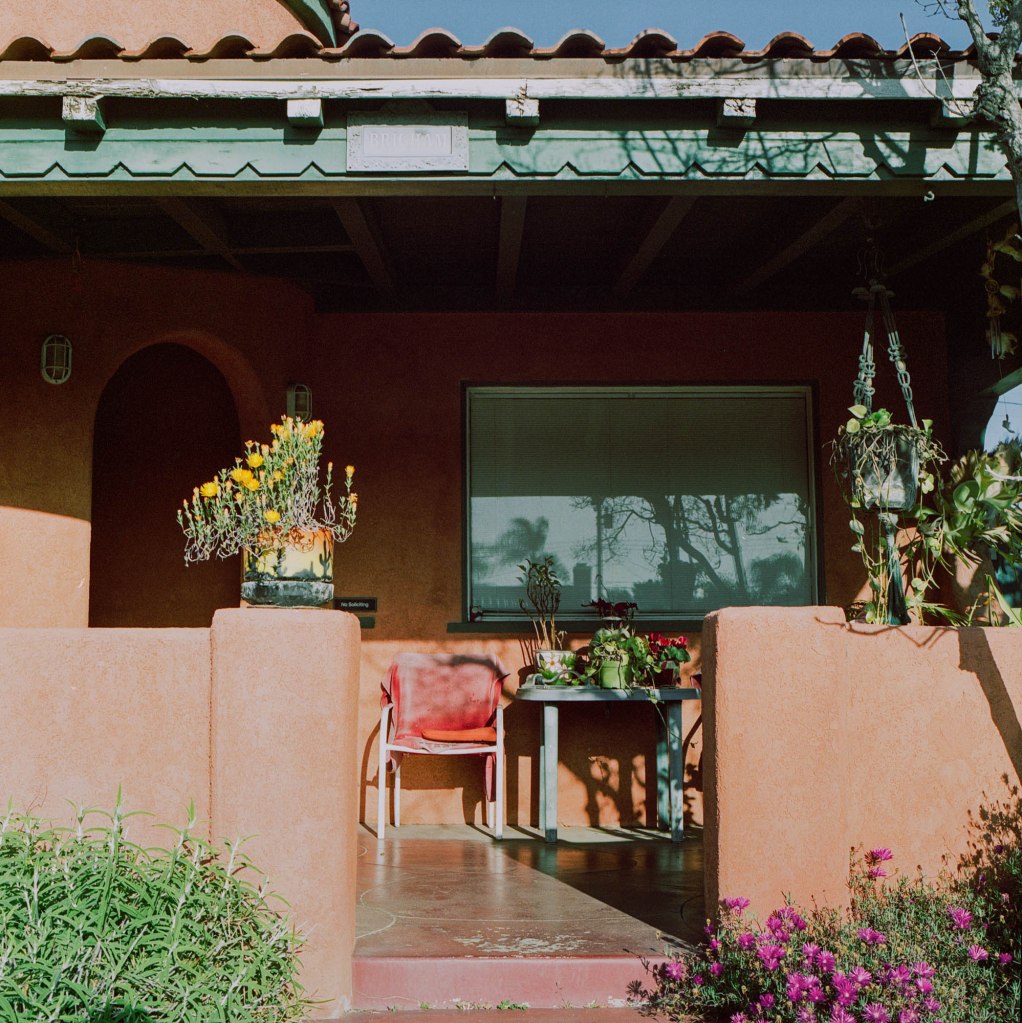
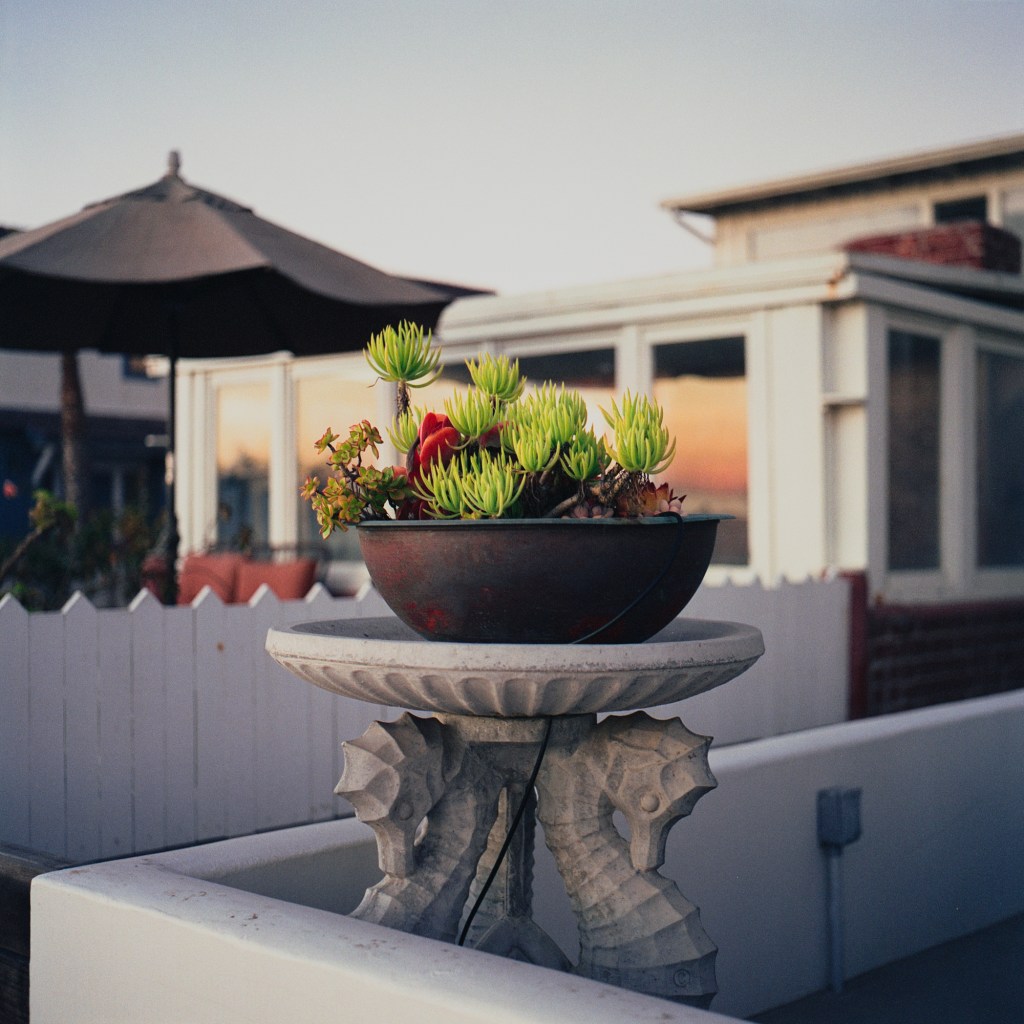
The 8th one is another favorite too. I think it’s have a similar vibe to the 4th one but in a more vivid and opened way. I like how the chair and the table is completely facing forward to the opened doorway[?] and stylobate. I think it tells a bit about the person, it’s must be an out going and straight forward kind of guy.
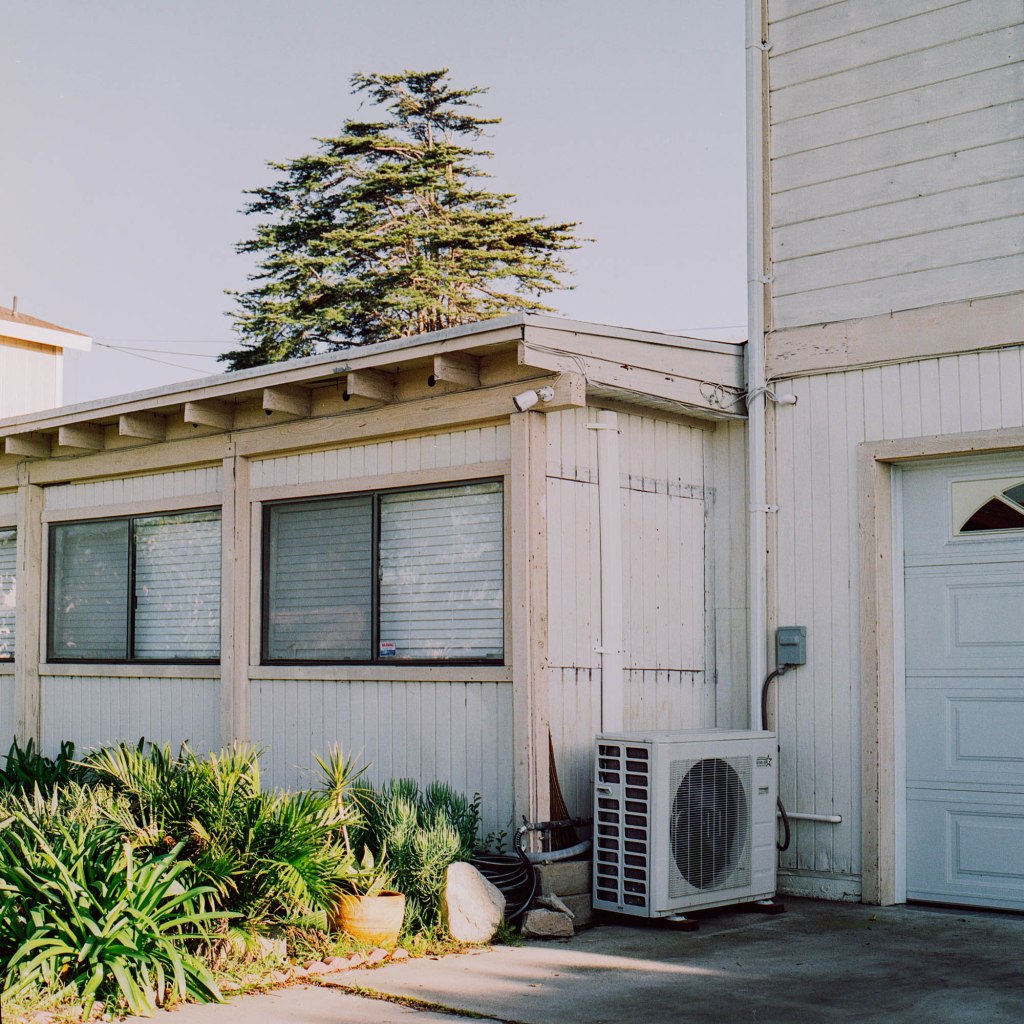
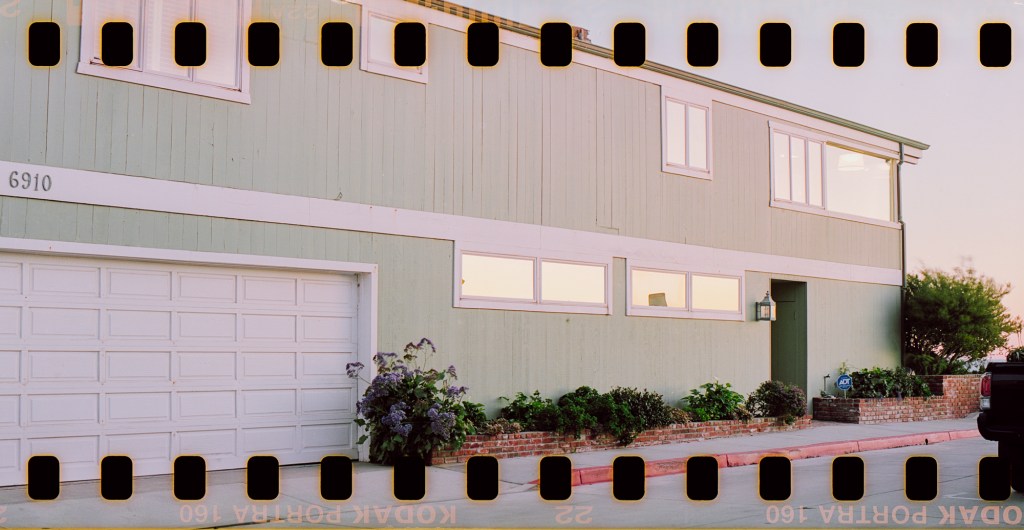
The 10th one I personally like because it reminds me of a street or a neighborhood in District 3, HCMC where I spent a lot of time hang out and buy art supply for school. I like how the air conditioner is completely put out of the building and the lower part of the building is jutting outward from the plane of the garage door, creating a nice little space that fits the air conditioner perfectly. The plants on the ground are bathing in sunlight and shine up is also a nice touch. I love this photo.
The 11th photo is not so special. The car has a nice shape but I couldn’t get a nice angle for it. However I like the fact that there’re a lot of tiny white petals fall all over the front hood of the car.
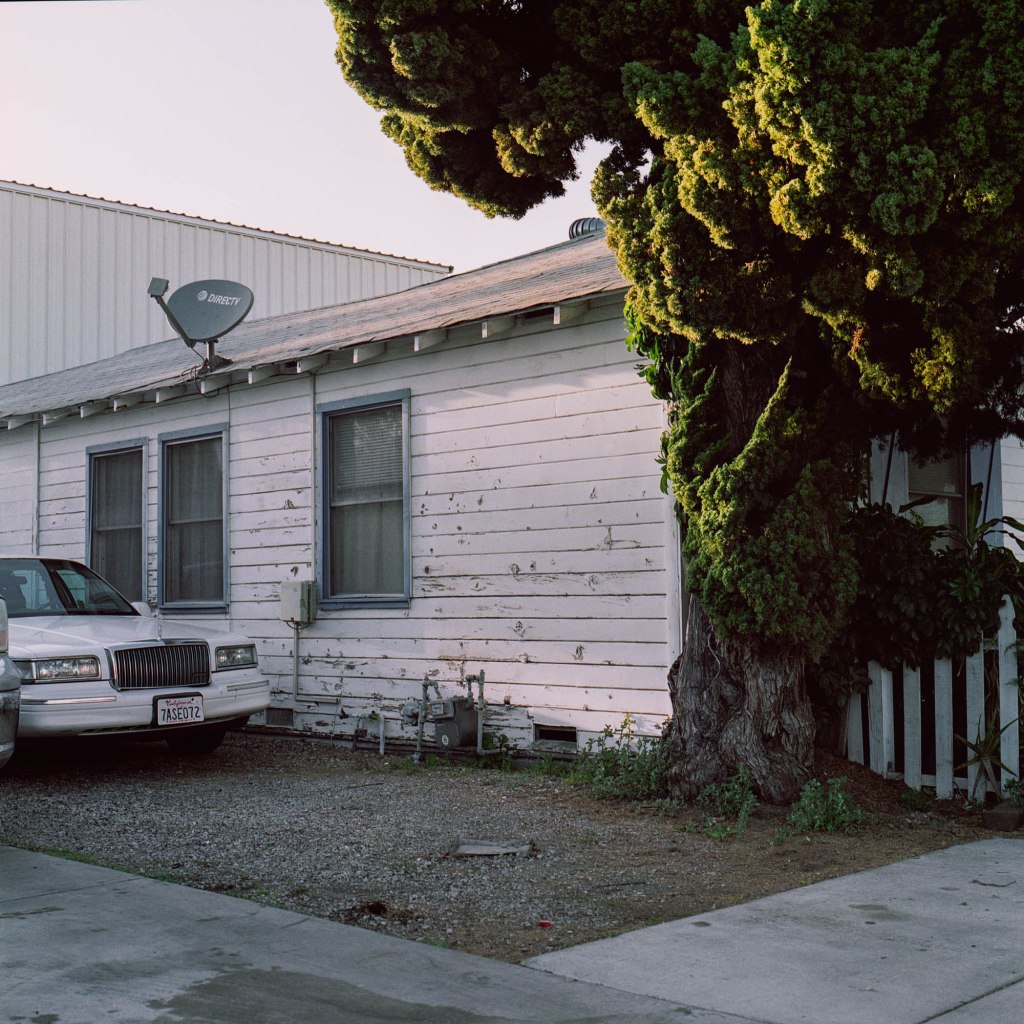
The last photo from the roll is nice but I think the context again is not strong enough. I like the shape of the tree and how the sunlight hitting it create beautiful outlines. The light hitting the wall also look gorgeous. The car on the left side is cool but I feel like it’s stuffed in the frame because of the front side of it is just barely fit completely in the frame, I don’t like that crop very much.
That’s all for my third roll of 6×6. Still want to shoot more with this aspect ratio. Hope you like it. More photos next time!
I got myself a twin lens reflect camera, the Minolta Autocord CdS, to start shooting square photos. I’ve been curious about square format since I learned about the famous Hasselblad V series and the amazing experience of shooting from the waist level. Shooting from the waist level is truly enjoyable. The feeling of seeing the photos from the ground glass is so satisfied.
One note I may add to using the waist level finder is don’t stuff your eye into the magnifier glass for “fine focus” (as you see so many Youtube photographers do), but rather put the camera down at your waist level and flip out the magnifier glass, at this distance, the circle “focusing spot” (in the middle of your ground glass) will fill up the entire magnifier glass, makes it super easy and fast to fine focus. Then, you can flip down the magnifier glass and re-compose, this way is much faster than you stuff your eye in the magnifier glass and bend your back up and down for the shots. Thanks to Rick Olesen for this focus tip.
Rick Oleson is a man who sale focusing screens for waist level camera and he’s been using waist level for about 30 years now. His tip is super helpful to me since I was stuff my eye to the magnifier glass as I saw others did.
This is my favorite shot in all the square photos I’ve taken. Test out the bokeh of the lens at f/3.5
Next is some shots from my newest camera, the Rolleiflex SL66E, my dream camera and the most expensive one I have. So far I really enjoy using the camera. I’m planning to test out the tilt feature soon.
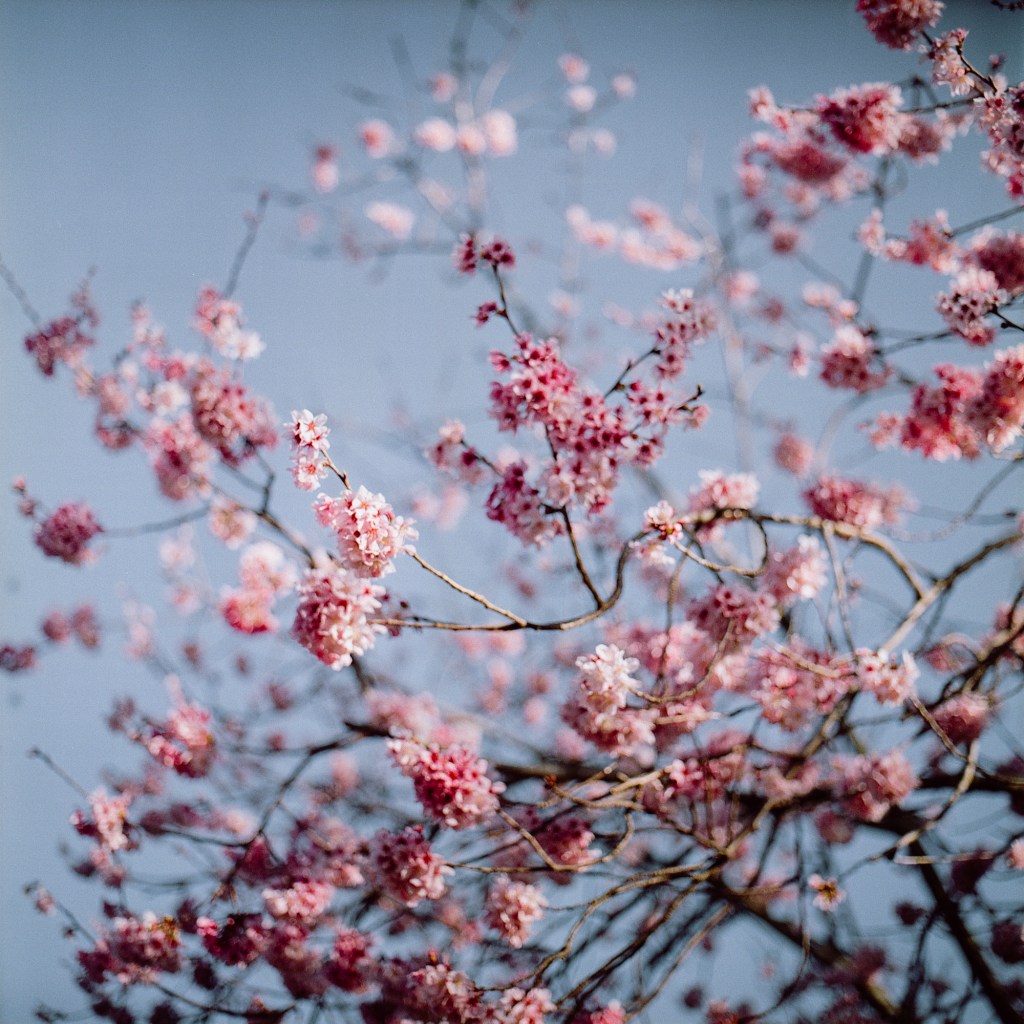
The last photo is my favorite from the roll. I like how similar the 2 trunks divide into 2 branches and their “gesture” creates a nice composition. The thing I wish I could do better is make sure the trunk behind is in focus entirely, I should shoot at f/5.6 or something like that to achieve that desire depth of field. But it’s hard to know exactly how much depth of field in these cases. Hope I will learn more about controlling depth of field for the next time.
Thank you for reading to the end. More photos next time!
My second 35mm film roll shooting with the Pentax 6×7 is Portra 160. Since I have the intention to keep the sprocket holes, I tried my best to keep my camera straight and look carefully at the frame lines to make sure everything is line up nicely, this really helps me save a lots of time in post processing. I got 15 shots out of 1 roll and open the back while I didn’t wind all the film into the canister so I caused light leak on my 2 last frames.
I’m not sure keeping the sprocket holes is a nice touch or just a “cheesy film photographer” aesthetic but it looks cool. Let me know what you think.
That’s all I’m happy with in this roll. Thank you for going to the end. More photos next time.
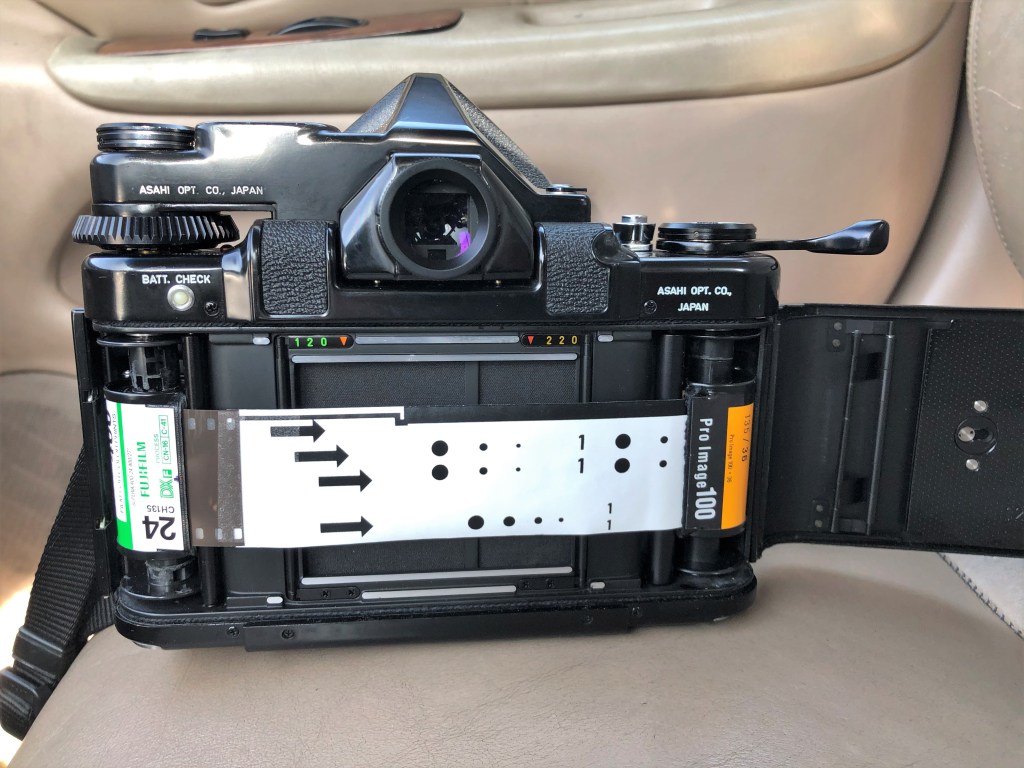
Panoramic photos weren’t interesting to me from the beginning but since Nick Carver shows how wonderful panoramic photos can be, and other Youtubers’ talked about the Xpan and panoramic photos, I slowly get curious of this format. After awhile, I think I enjoy looking at panoramic photos because of the wide scenes and so much elements we can include in one frame. The feeling of looking at a photo from left to right slowly to appreciate the details and how the elements interact with each other in the shot is very enjoyable to me. So I tried panoramic photos for the first time, with my Pentax 6×7.
In other methods I saw on Youtube, most people use the adapter for the 35mm film canister and load the film into the camera with an extension paper at the beginning of the film roll so they don’t waste the film while winding the camera for the first shot. The down side of this method is you have to unload the film in the dark when you finish the roll, because you cannot rewind the film back into the canister when you finish so you have to go into a dark room or put your camera in a dark bag to take the film out of the film back and rewind it into the canister. This will limit your shooting experience in the field, if you can’t have a access to a dark room or dark bag, you cannot take the film out and load the new roll in. So I came up with this method, including 2 film canisters/cassettes, one is your brand new canister and one to take the film in, this one acts like the pick up spoon in normal scenario, but it can protect your film from the light.
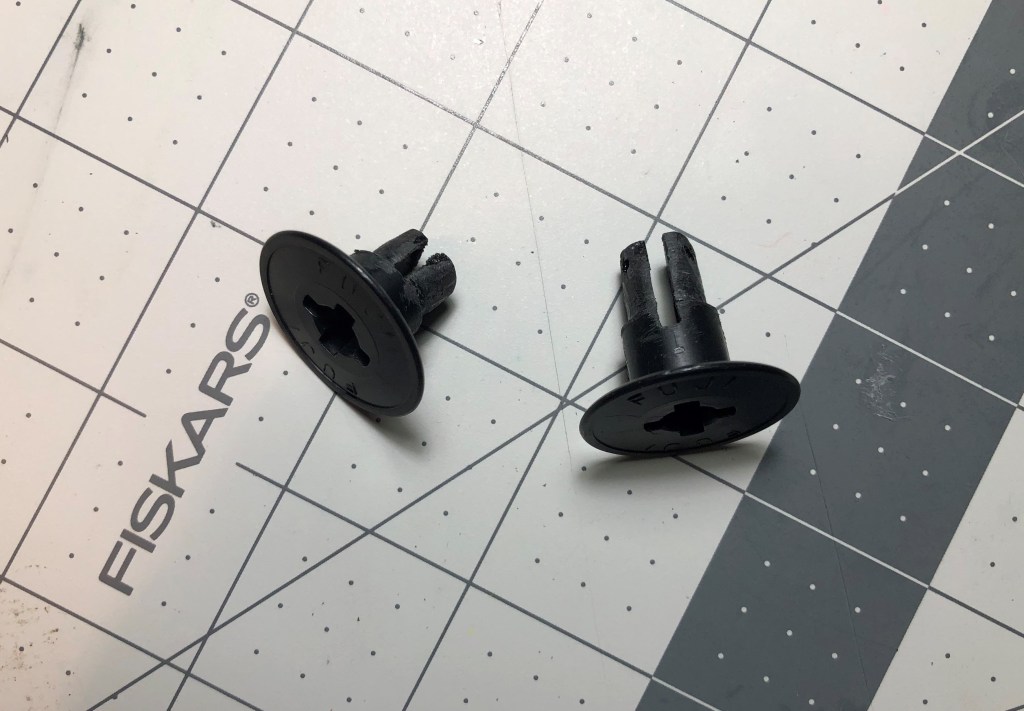
First, I made 2 pairs of 35mm film cannister adapters from old empty 120 film spoons. You can buy them dirt cheap online but on the day I wasn’t be patient enough to wait for the delivery so I made my own. It’s not beautiful at all but it works well. If you do it yourself like I did, one thing you should make sure is checking the length of the adapters carefully, so when you put it on the 35mm film canister, it will have the same height as a regular 120 film spoon. If it’s too high, it won’t fit in your film back, if it’s too short, it won’t stay straight and neat in your film back, this may cause damage to your film back.
One pair of adapter
Left to right: regular 120 film spoon, 35mm empty cannister and 35mm new film cannister. Make sure they have the same height.
So, how to prepare your pick up canister? We’re going to step 2.
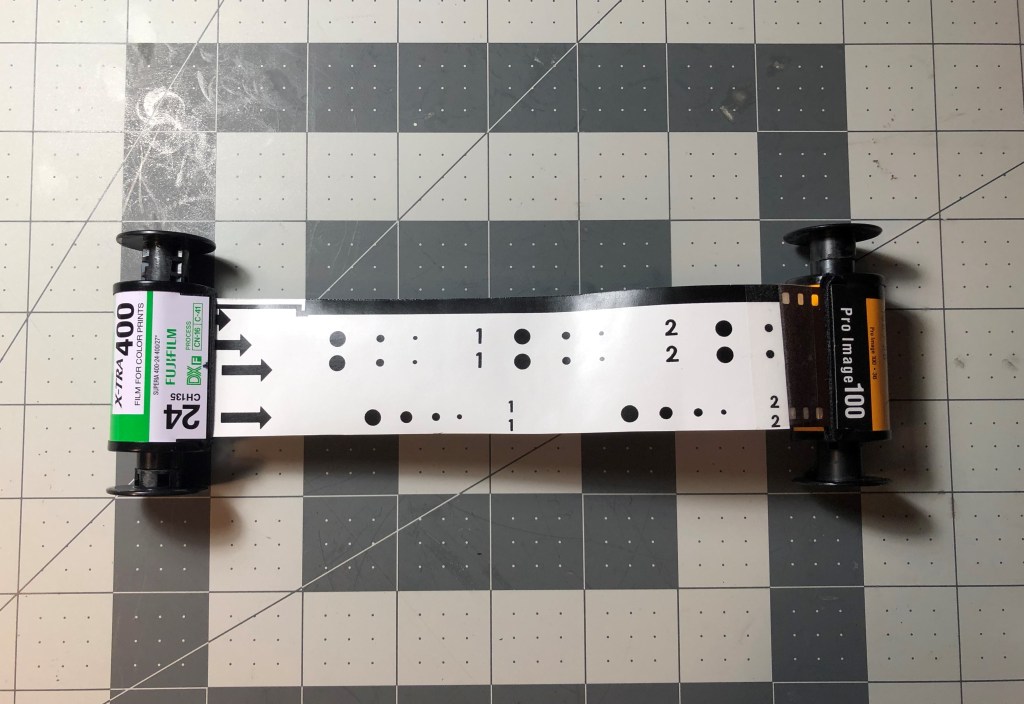
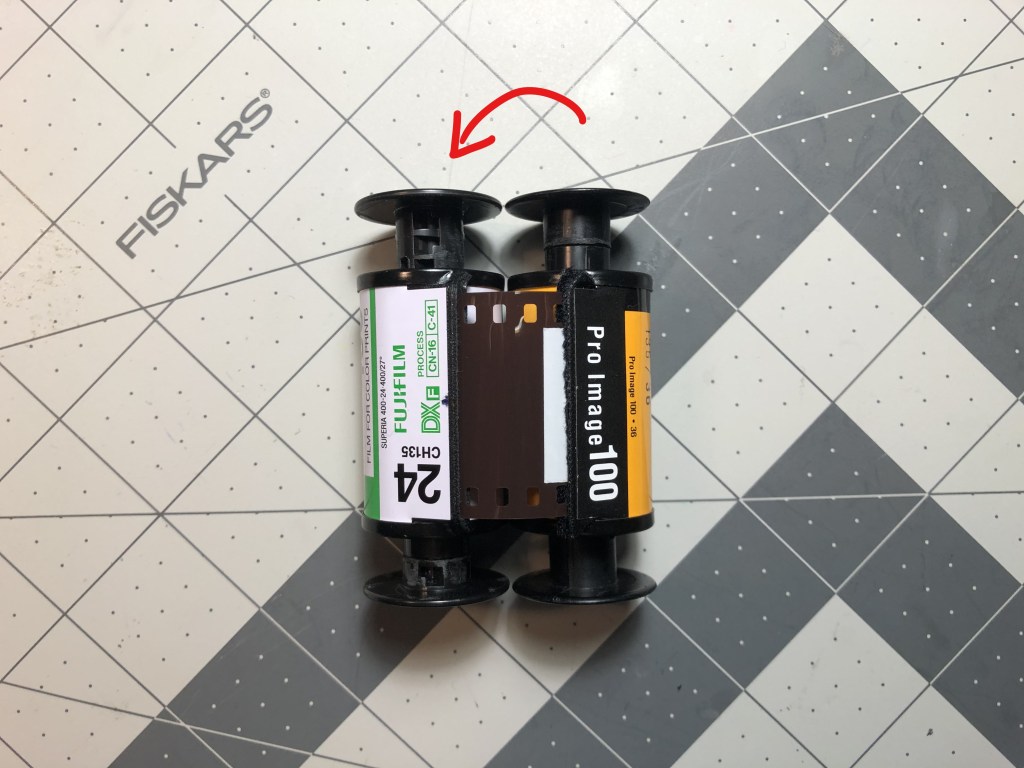
Step 2: Made the pick up canister/cassette from a old empty film canister/cassette, which still has a short amount of film left so you can tape a piece of paper on the actual film left. This piece of paper I cut from a backing paper of a 120 film roll, measured the wide is 35mm (same as the wide of the actual 35mm film) and the length is 18 cm. I taped one end of the paper strip to the film left on the old cannister and then taped the film lead from the new film roll to the other side of the paper strip, as photos below (step 2b).
Step 2a: Tape the paper strip to the piece of film left inside the empty cassette
Step 2b: Then tape the other side of the paper to the film lead from the new film roll
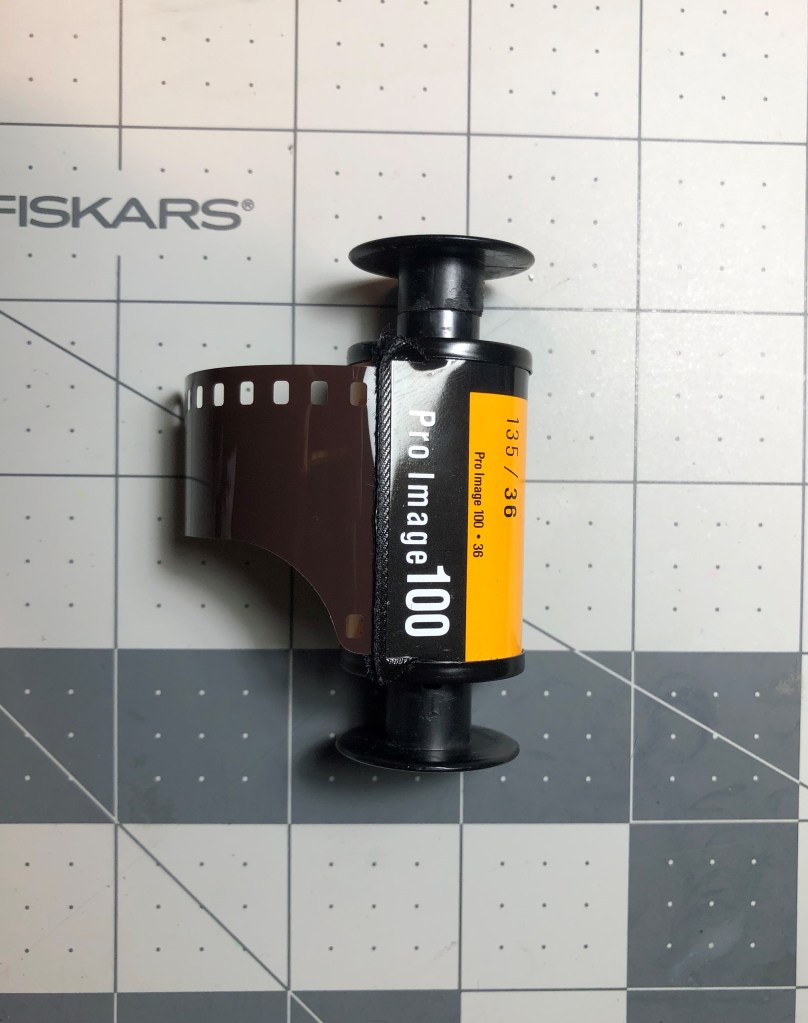
Step 3: Transfer the film from the original cassette into the empty cassette in the dark bag. So now you have 2 cassettes connected, and the film will be transferred from the new cassette into the empty cassette. Of course the transfer process is done in the dark bag. Why you must transfer the film from new cassette to the empty one? Because the point of this method is to let you unload the film in day light. So when you finish the roll and wind all the film to its original cassette, you open the camera back to take the film out, the backing paper strip that you taped earlier will be there at the end of the roll, and you don’t loose any last photo.
All the film was winded to the empty cassette, as you can see the white tape at the very end of the film roll is on the original cassette’s side.
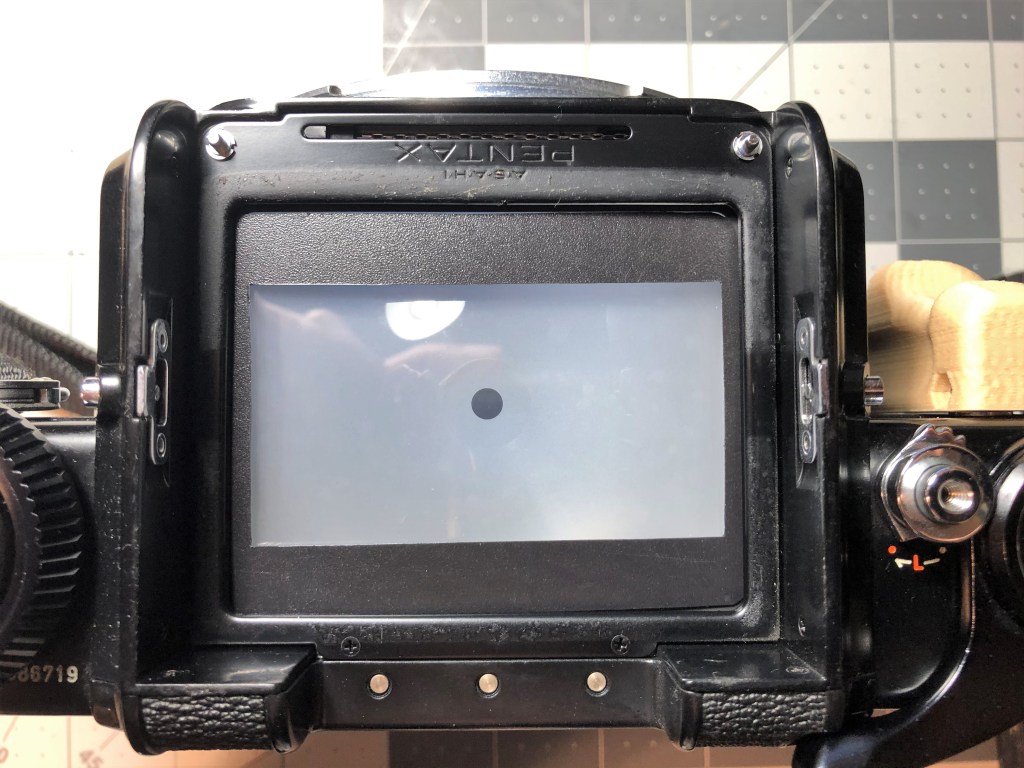
Step 4: Cut out a rectangle in a piece of black paper, the dimension of the rectangle is 35x70mm. (This includes the area of the sprocket holes, if you don’t want to include the sprocket holes, cut out the rectangle 25x70mm). Then put this piece of paper on top of your ground glass. This is a guideline for your composition.
A cut out 35x70mm paper for composing in the viewfinder
How you will see the aspect ratio looking through the viewfinder
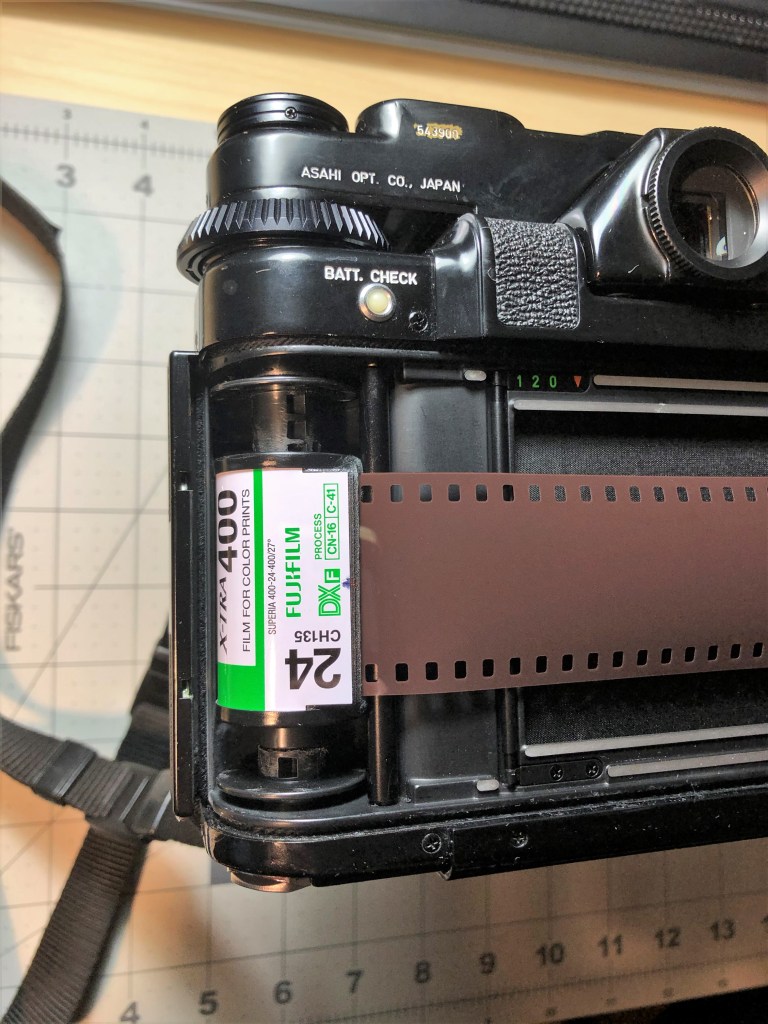
Step 5: Load the film into the camera. Remember to put the old film cassette (which now contains the film inside) on the left side and the pick up cassette (which is the original cassette) on the right side. So now when you take the photos and advance the film, you are actually wind the film back to its original cassette.
Film contained cassette on left side
Pick up cassette on the right side
Film will be transferred from the old cassette to the original one
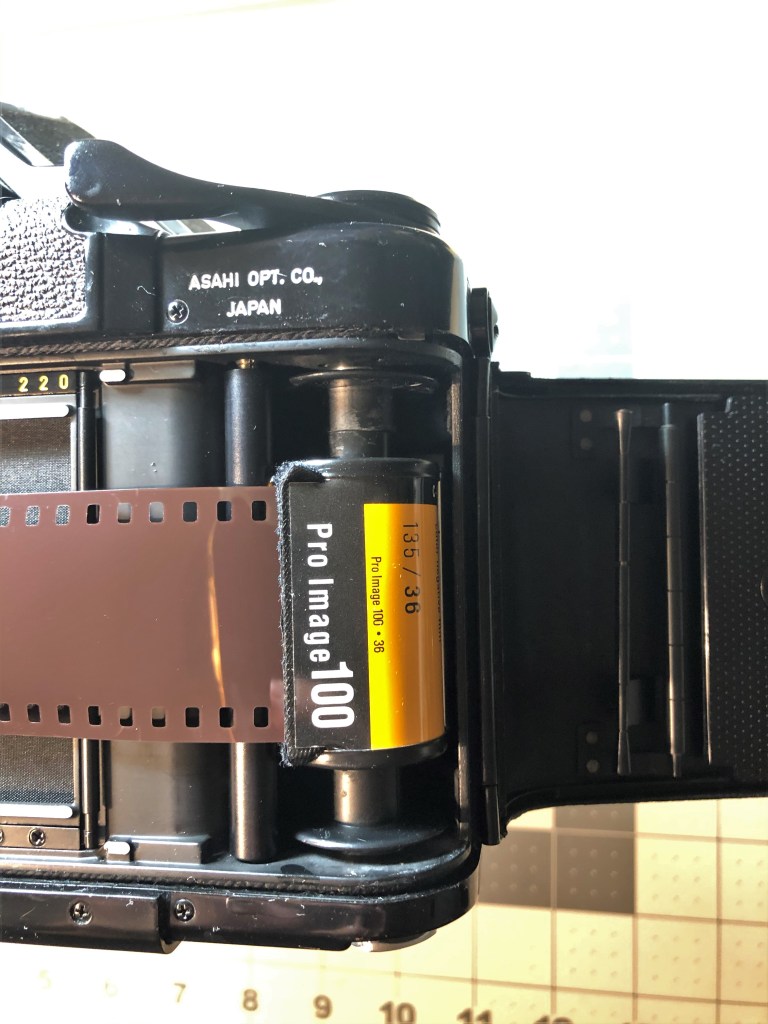
Step 6: Finish the roll and unload the film. After you finish the roll, you can open the back and remove the cassettes out of the camera safely. You will see that the film in winded into the original cassette and the part exposes to the light when you open up the camera is the paper strip you taped in. You can just remove the film lead from the paper strip and reuse the old film cassette and the paper strip again.
Open the back to unload film when you finish the roll
So now you have it, a method to take panoramic shots on your Pentax 6×7 without requiring going to dark room to unload your film. All you need to do is preparing your film upfront as a set of film cassette and pick up cassette, and you can have more freedom shooting in the field. I was able to get 15 shot out of the 36 exposes roll but I was messing with the loading part, I think if you can load the film more careful than me, you can get 18 out of the roll. I will update the exact number of the shots you can get when I finish the second roll.
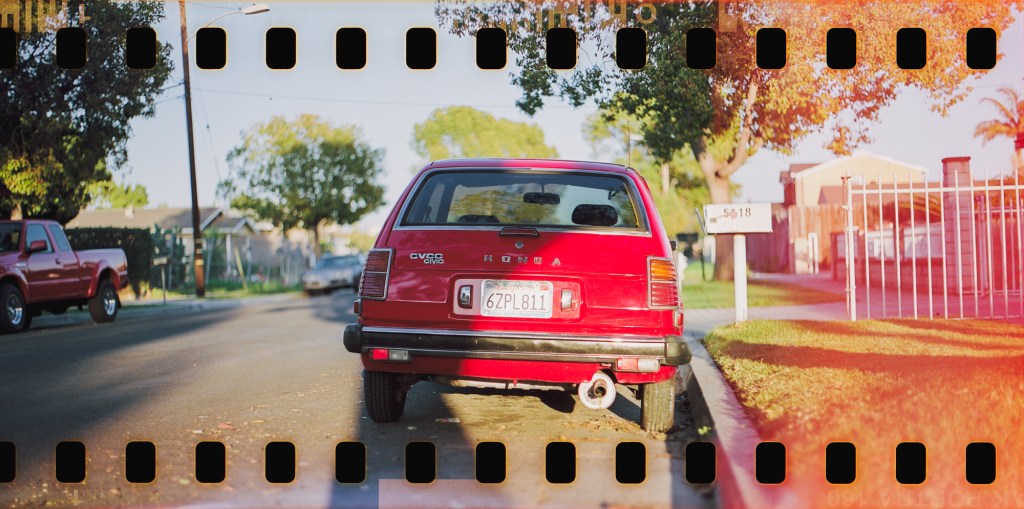
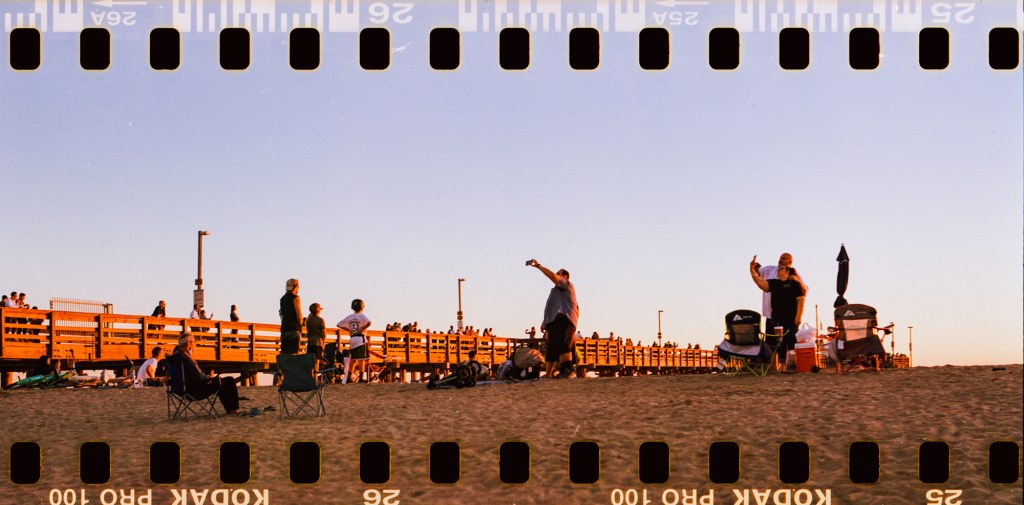
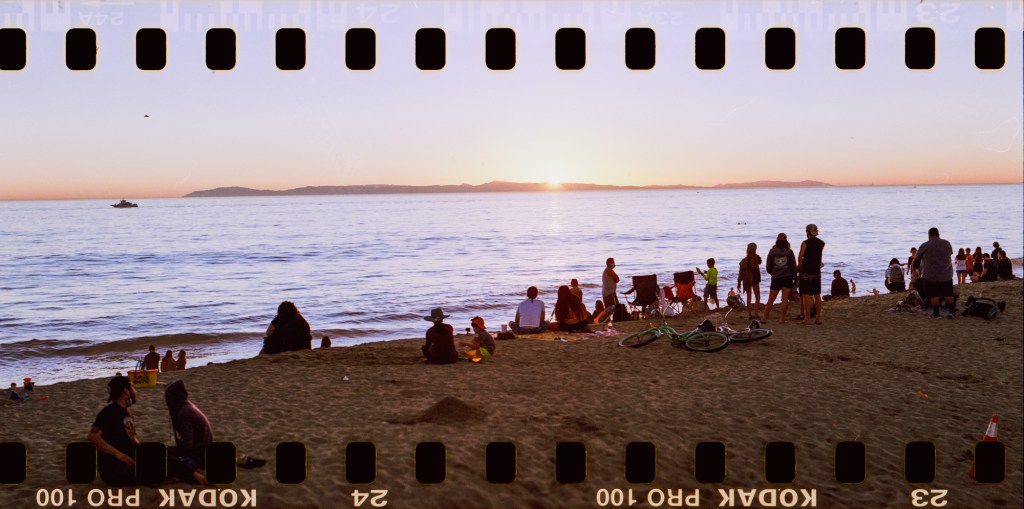
Here’re some photos I made with this first try. Taken with Kodak ProImage 100.
I love the photo of the man on the bike, it’s too bad that it’s underexposed but when I took the shot I knew this would work well on panoramic aspect ratio. You can also see that the ones with no sprocket holes are the ones I couldn’t get the horizon line straight 🙂
My favorites from the roll is this pair of photos, taking of the car in front of the house. I took the photo on the right side first and walked couple steps more to realize that the tail of the car and the scene was quite interesting and could make a good photo, so I took the second one. I think these 2 look very nice together because the continuation of the object, which is the car make the photos stand well next to each other. And I also like the idea of “the beginning is the end” cycle in the left photo, it’s not that literally but the photo starts with the head of the black car and ends with the tail of the silver car, like the end and the beginning come after each other. Or maybe I like series “Dark” a little too much 🙂
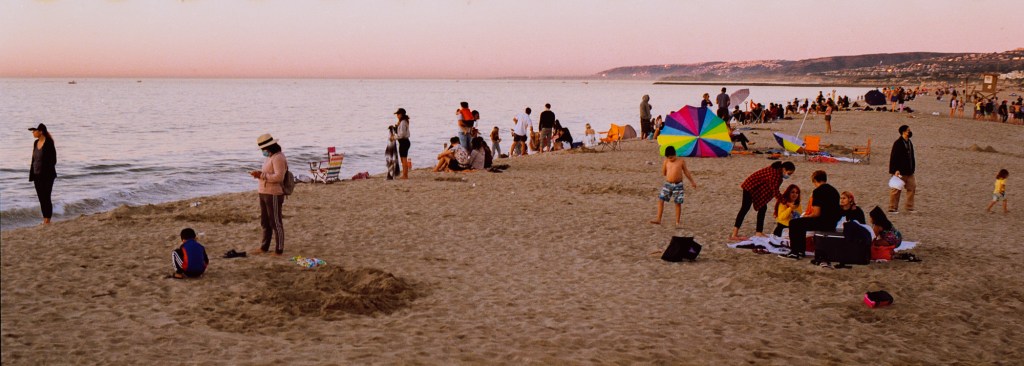
I love the last photo also. The frame feels a bit too much and messy but I like the overall feelings and colors of it.
Thank you for making it to the end. Hope you like these experimental photo ideas. Cheers!
This post does not have a specific theme but just shots from the Pentax 6×7, and some personal thoughts in life.
I got myself a Pentax 6×7 MLU body from Japan last September, along with a 90mm Leaf Shutter lens. I chose the LS lens in regard of the ability to shoot with flash, I don’t feel very comfortable with the flash sync 1/30s of the Pentax focal plane body. Since I got the system, I’ve shot with it through 4 rolls of film. Of course this is not a big amount of photos I’ve made with the camera but it’s very precious to me. The Pentax is my first 6×7 camera, I wanted a 6×7 camera for roughly a year back then, since the hype of 6×7 overrules Youtube and film community on Facebook groups. I never like the design of a replicate 35mm camera for a 6×7 system from Pentax, to me it’s just ugly and unergonomic. But after doing research, I end up getting the Pentax 6×7, because (1) the Bronica GS-1 is not as good as the Pentax or Mamiya, (2) the Mamiya RB is super heavy (not all people find it too much to handle but I’m a small Asian girl, it’s of course too big and heavy for me), and (3) the Mamiya RZ is so out of my budget. So the Pentax seems like a best option. When I received the camera, it’s not as bad as I thought, I actually did like to hold it. Gradually I find the Pentax 6×7 is not ugly anymore but kinda cool, because it’s black and huge and the sound is freaking amazing[?]. I set it up with a right hand 3D printed grip for more ergonomic to handle and of course a strap as an insurance for an expensive camera.
Since it’s 6×7 negative, means that I get 10 shots from a 120 roll, I choose my subjects and compose more carefully. Still I got some ugly and illegitimate shots, but I think my first 4 rolls are not disappointed. Not just because I got myself some favorite shots but also because the experience of shooting a “professional format” with a “professional camera”. Don’t get me wrong, I don’t mean those professional things make me a better photographer, but it gives me the spirit of intention and fidelity in my photography work. To this point, I haven’t done any paid photography job so the purpose of purchasing a Pentax 6×7 medium format camera has nothing to do with my professional or career but simply a dedicated inquisitive nature. My enthusiasm for photography is naive, I don’t know if I can become a photographer or have people admire my work, I am doing this because I want to create something that matters to someone, anyone. I’m always in the struggle of defining the purpose of my life and if I matter to anything or anyone. The only thing I can do to keep me from beating up myself with this query is keeping creating work and hope for one day, my work will give me an answer.
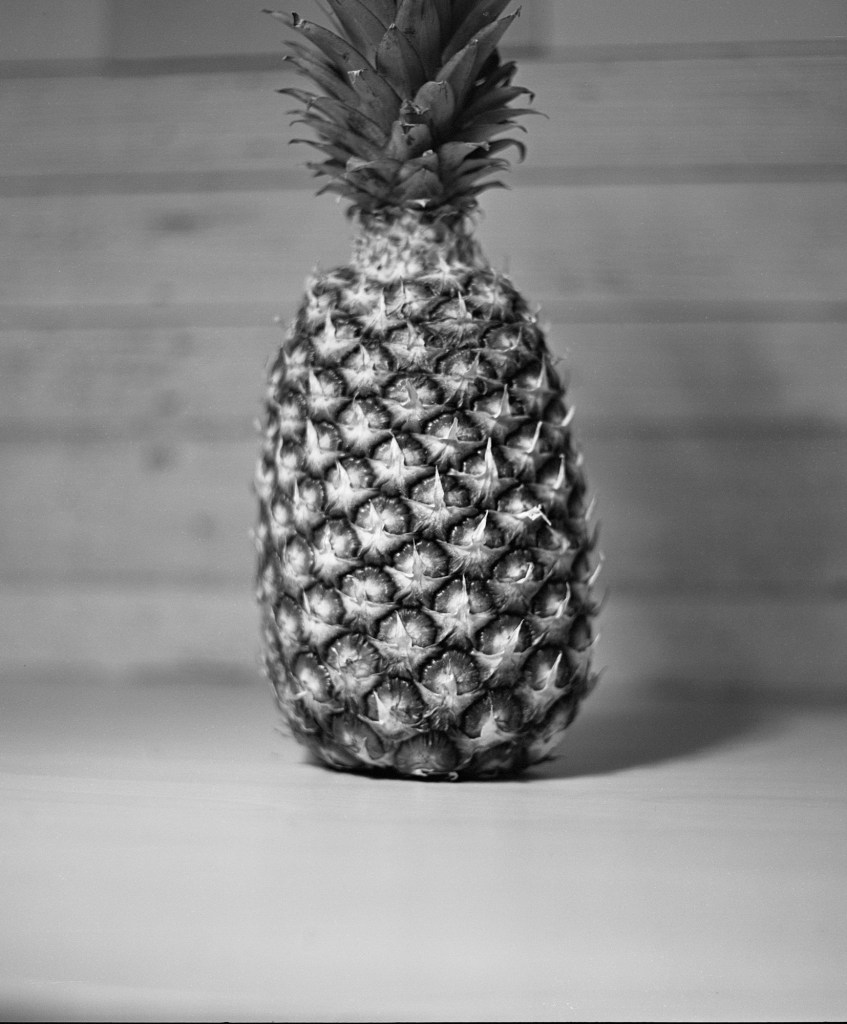
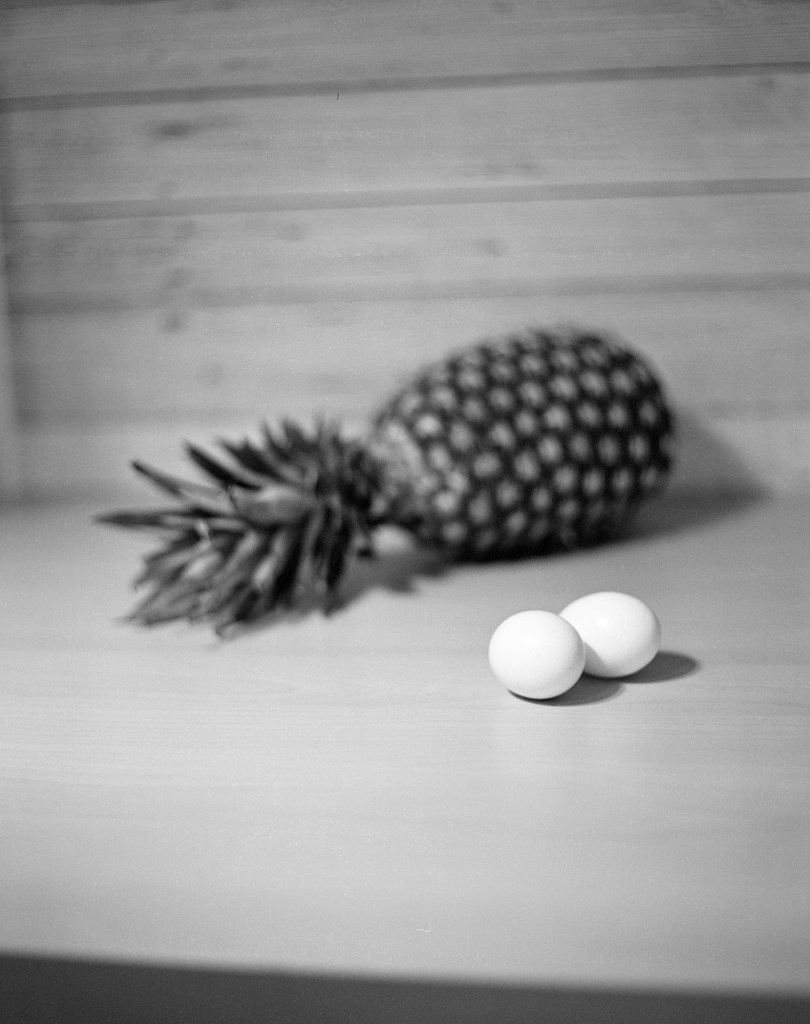
First shots I made with the Pentax 6×7 is still lives in my living room, shot with Ilford XP2. The main purpose of this is just testing out the camera to see if it works properly. The object I chose was a pineapple, because I like tropical fruits and the shape and texture of the pineapple is interesting to me. After a few shots with the pineapple, I decided to put more things in the frame, and I chose 2 eggs, because (1) 2 eggs and a pineapple makes it 3 objects in the frame, odd number of subjects is more pleasing to look at in general, (2) a pointy big pineapple is contrast with the round shape, smooth texture and small size of the eggs and (3) colorful contrast neutral (but you don’t see this in black and white photos, silly me). I like the contrast in life because things contrast each other doesn’t mean they are right and wrong, or against each other, they’re just simply different. It teaches me that everything may has its own way and we don’t necessary justify everything in order to accept it, we can just be opened and accept things or people for how they are.
The next 2 rolls I shot when riding a bicycle around my neighborhood. It’s fun to ride a bicycle just wander around and go to streets that you never go before. It reminds me of the time when I was 11~12, back then I was trying to ride bicycle and my friend was helping me and keep me company every afternoon that I went out and ride for an hour or so. Gradually, I didn’t ride bicycle every afternoon for practice anymore but because of it’s a pleasure time for me to hang out with my friend and passing by streets and scenes that elicited my curiosity and a strange urge to know/understand the stories behind visual things.
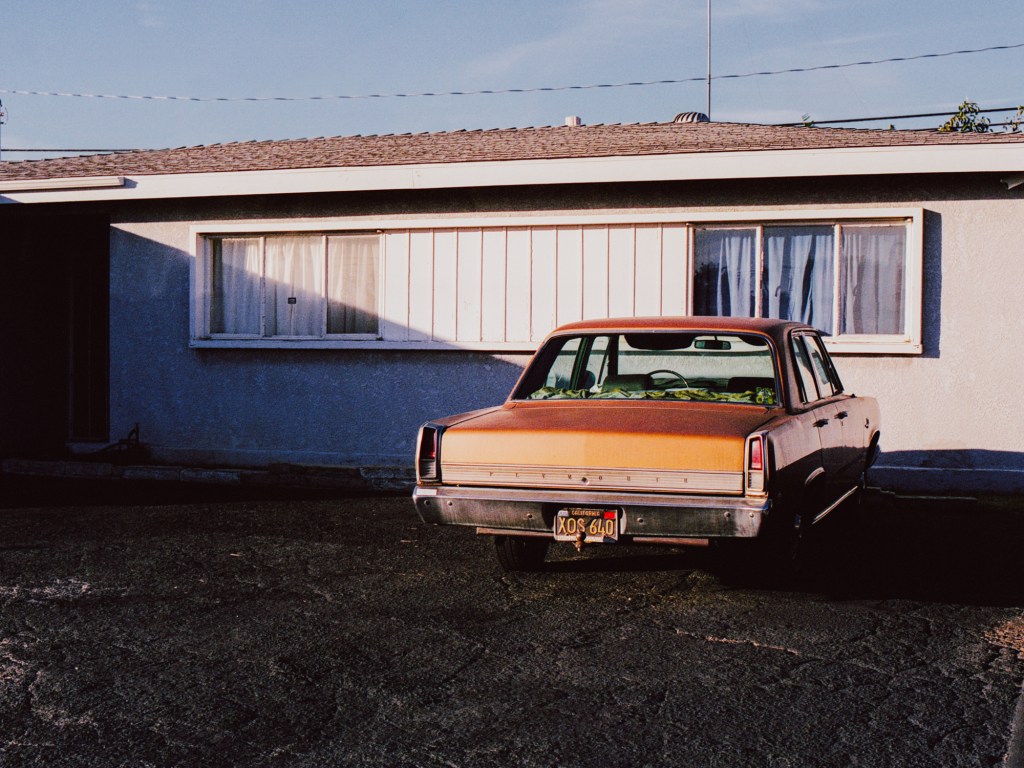
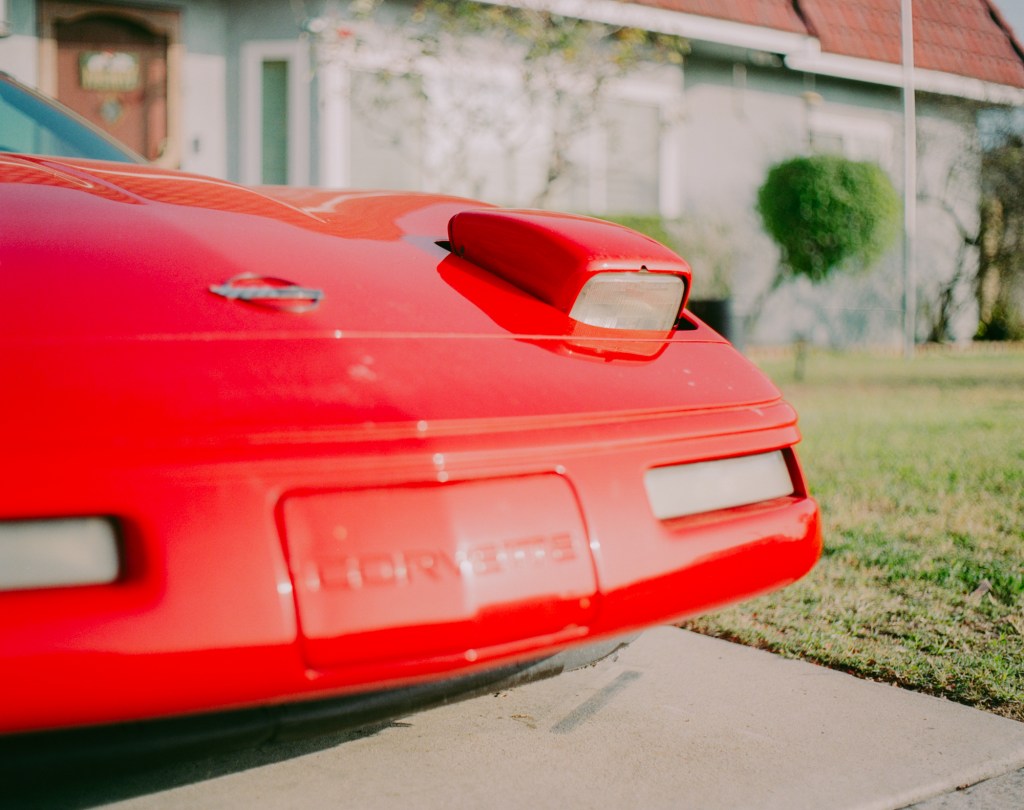
The first 2 photos I took to check out the shallow depth of field of the 90mm lens. I’m not sure why I shot a lots of cars with my Pentax but can’t denied they look quite cool on 6×7. My favorite photos are the one of the golden orange car packed in front of the windows with afternoon sunlight creating a clean line of light and shadow on the wall. I like the scene and the atmosphere here a lot. However the contrast between highlight and shadow is very high, it makes the shadows are too dark for my taste. The red car below is interesting to me because 1 of the head lights is half way up, makes the car has a sense of imperfection and uniqueness – something I’m always draw to.
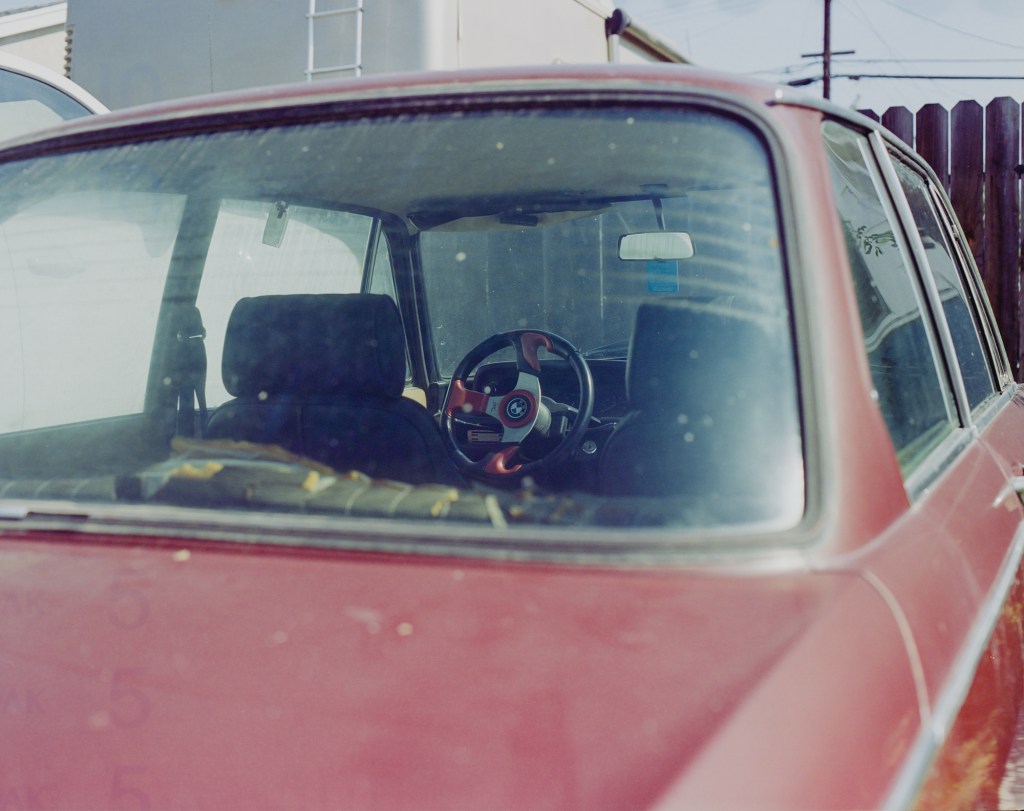
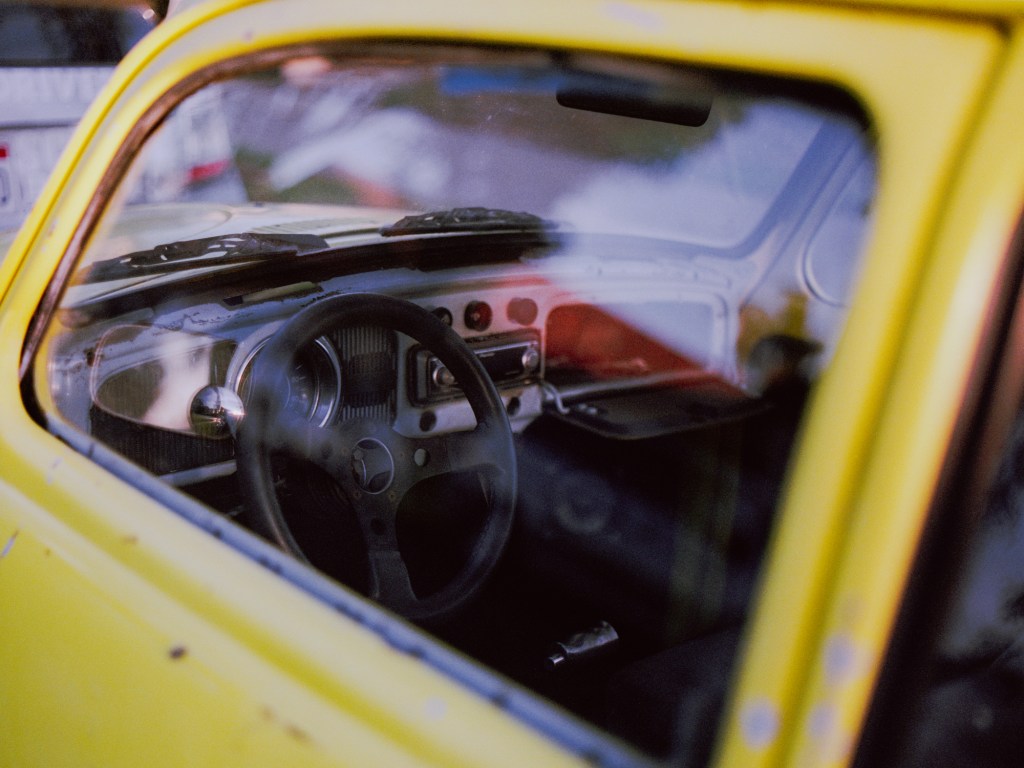
The baby blue car below is cute and classic to my eyes. I like the shot of the wheel from outside of the window the most. The red color from the steering wheel lock gives a attraction to the frame, also the subframe is quite nice.
Next are some shots that feel very special to me. I’m from Vietnam, and I spent couple years in Saigon for my university study. There’s a area in Saigon that I usually went to with my friend for after school hang outs, called Thanh Đa. The places I went to with my friend back then were typical old, tight, a bit messy and mundane. Aside from all those adjectives, I still cannot find a proper word to define how was Thanh Đa exactly from my mind, but it feels very Vietnamese. And when I came across this street near my apartment here, I knew for sure it’s a Vietnamese community. The old houses and the tightness feeling and the way people hanging their stuff out on the walls, that all represent an old Vietnamese’s life style that I’m so familiar with. I don’t think these scenes are beautiful in other people’s eyes but to me they feel like a sad old poetic memory.
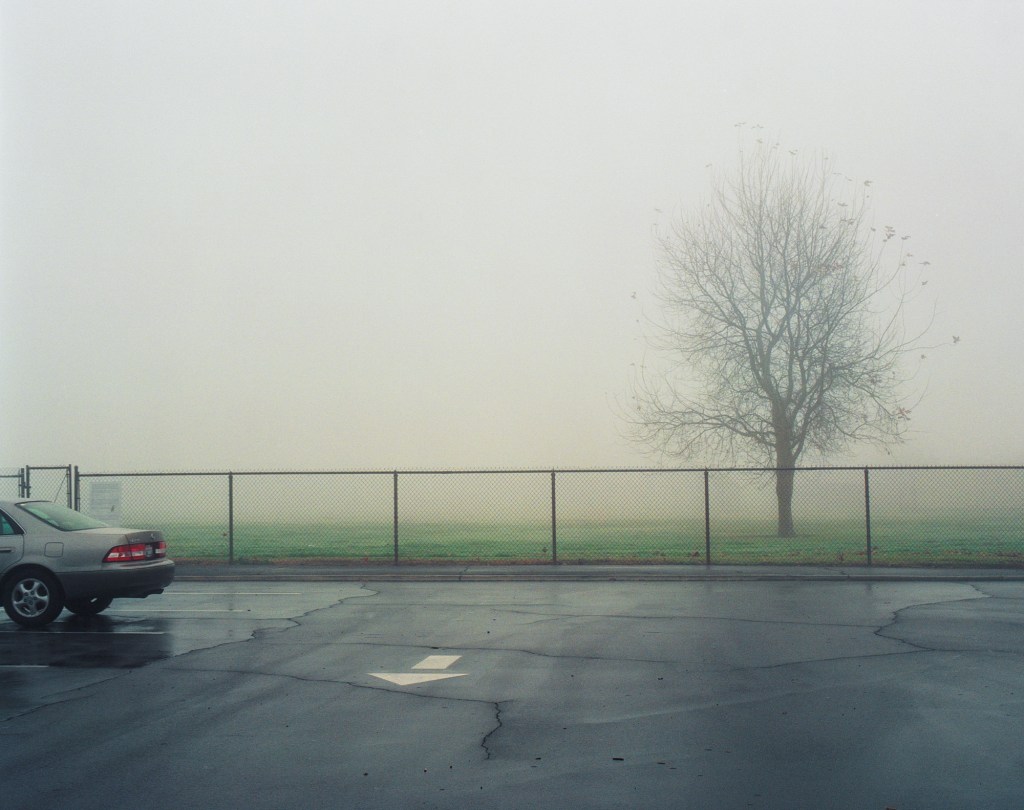
Final is some shots taken with Portra 800 in a rare foggy morning in my town. The tree standing there alone in the field feels very photogenic. I know that converting the photos to black and white will look more pleasing for these type of minimal shots but I personally don’t like minimalism style and “minimal shots + black and white” is too cliché for me. However, with these shots I was receiving a lots of helpful advices from fellows on Discord so I’m grateful for it.
Thank you for stopping by, hope my biography didn’t bore you to death. As always, leave a comment if you want to. Cheers!
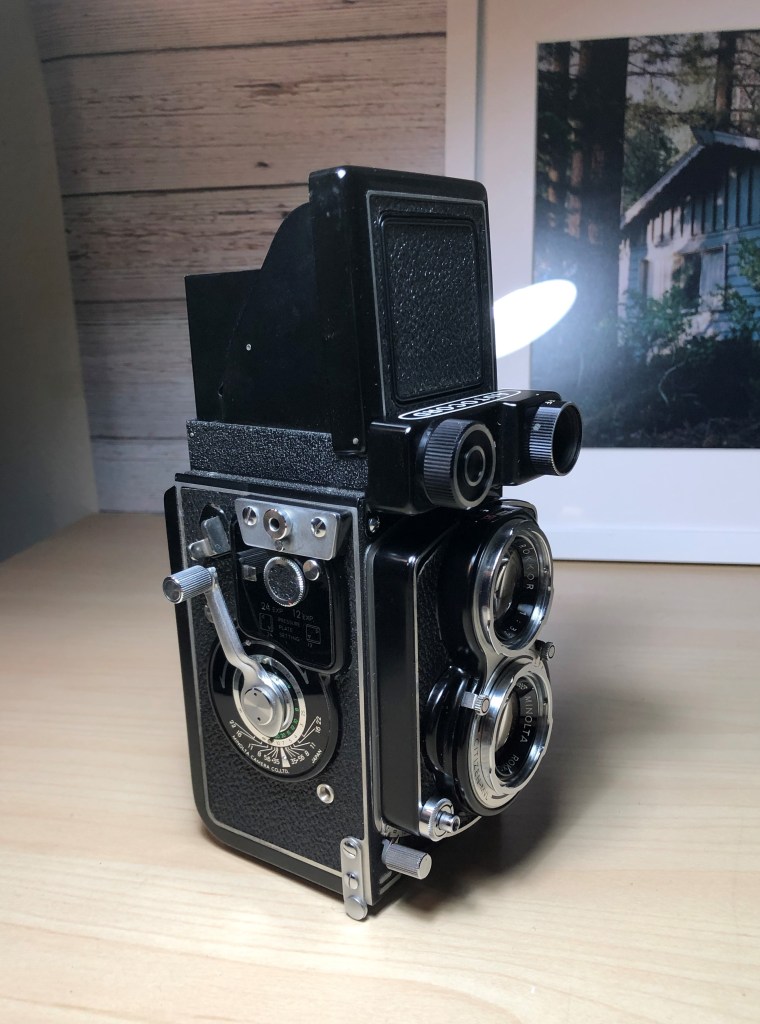
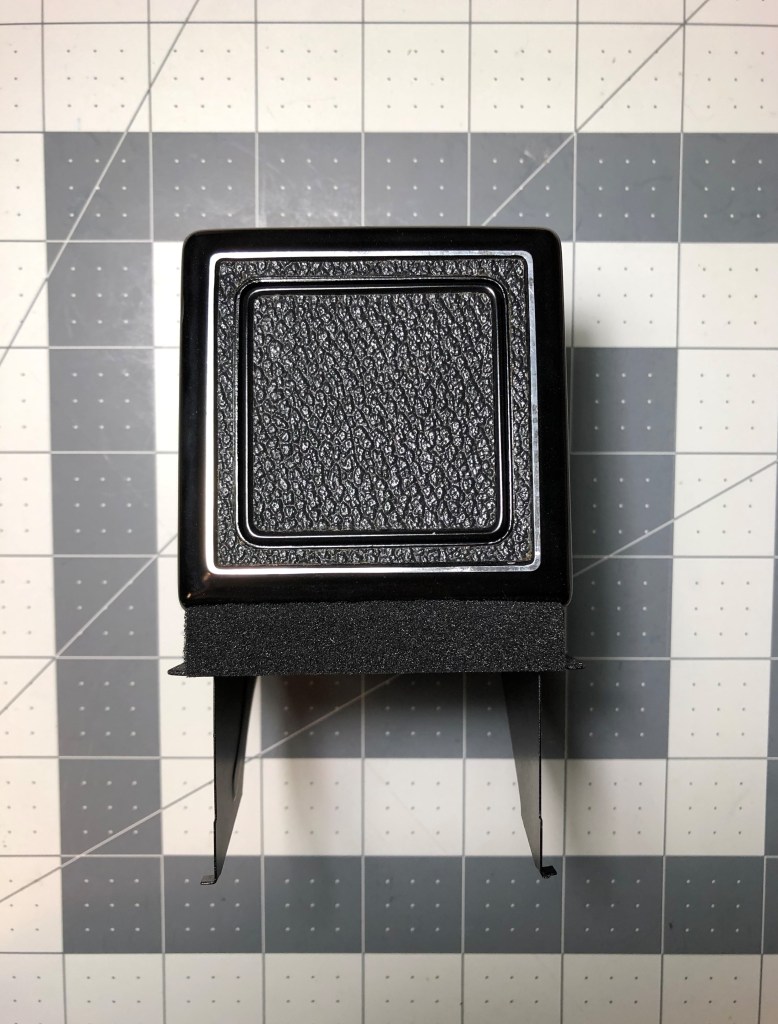
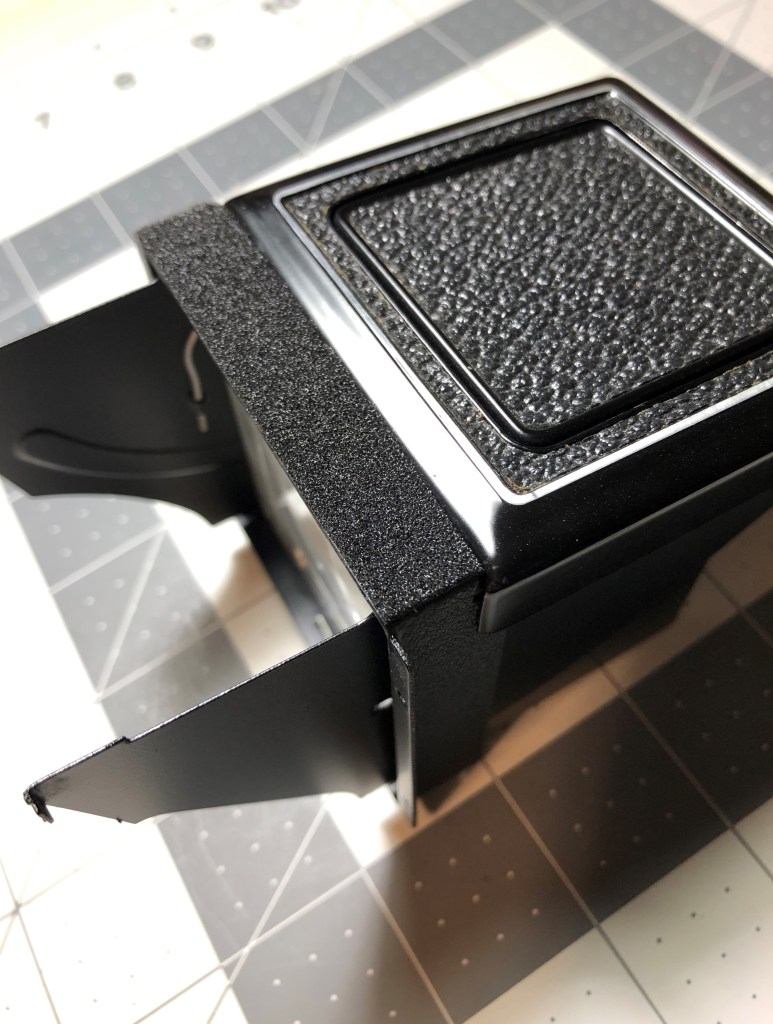
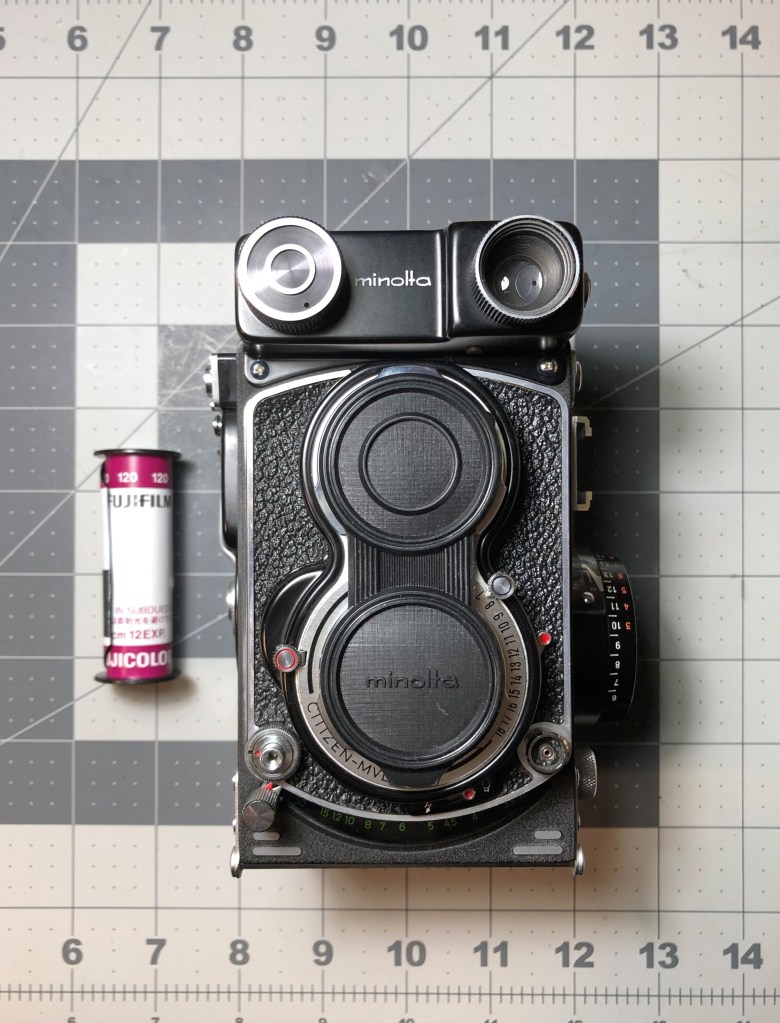
I came across this camera in a thrift store and couldn’t help myself but buy it. I’ve been wanting a TLR for a while now but decent TLRs are not cheap. Although I never touch a TLR before but I know enough about cameras in general to check the basic functions and this camera seems to work fine. So after purchased it, the first thing I did is cleaning it up. I always clean things up after I buy them, and also because of the Covid situation. I used rubbing alcohol and damp tissue to wipe the outside of the camera, I also used Q-tips and toothpick to get into places that I can’t with my fingers. For the lens, I used lens wipe and microfiber cloth to wipe them gently. Here’re some photos of the camera after I clean it. How beautiful it is!
1
2
3
4
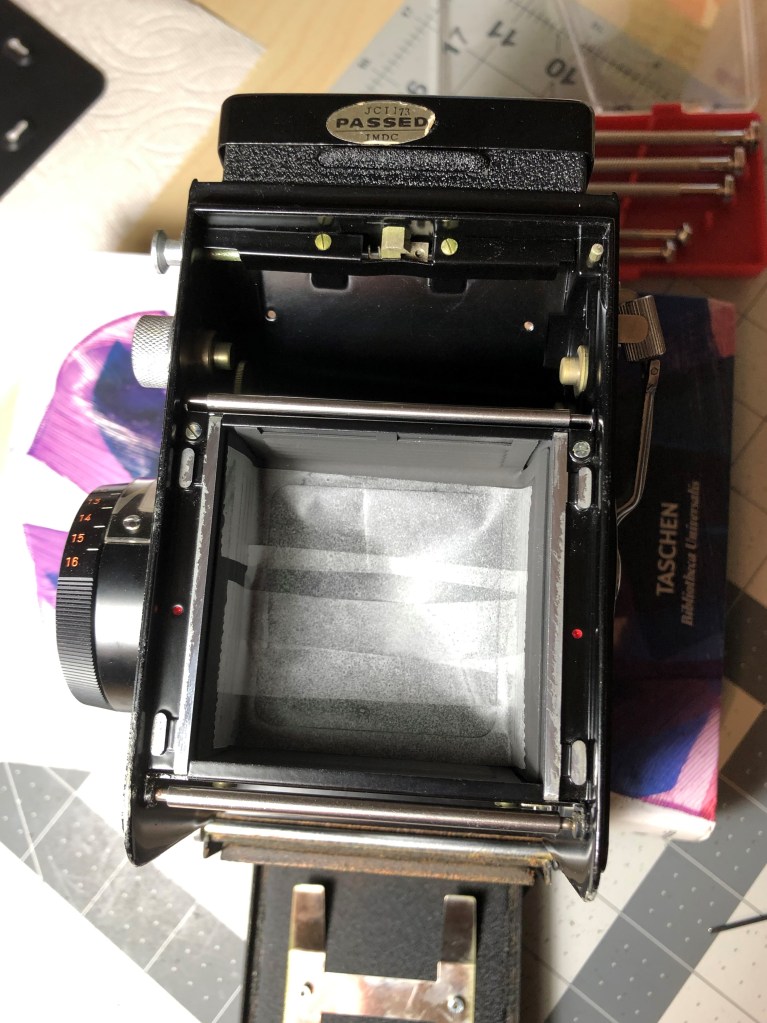
After the basic cleaning, I opened up the viewfinder to clean the ground glass and also to remove the old light seal and apply the new one. Here’s what you need for the process: a set of small screwdrivers, light seal foam ( I used the 1mm thickness), rubbing alcohol, and some additional stuffs such as baking soda, aceton, sewing machine oil.
5
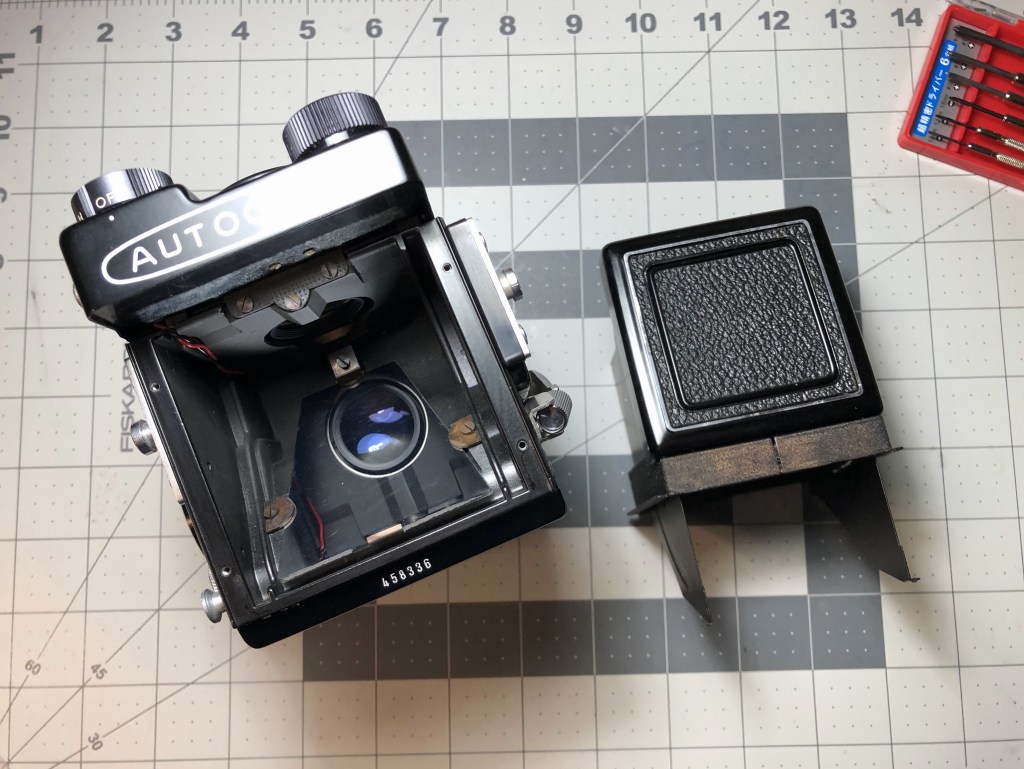
To remove the focusing hood off the camera, you need to unscrew the 4 screws on top of the camera, using a flat 1.6mm screwdriver.
6. The position of 4 screws
7
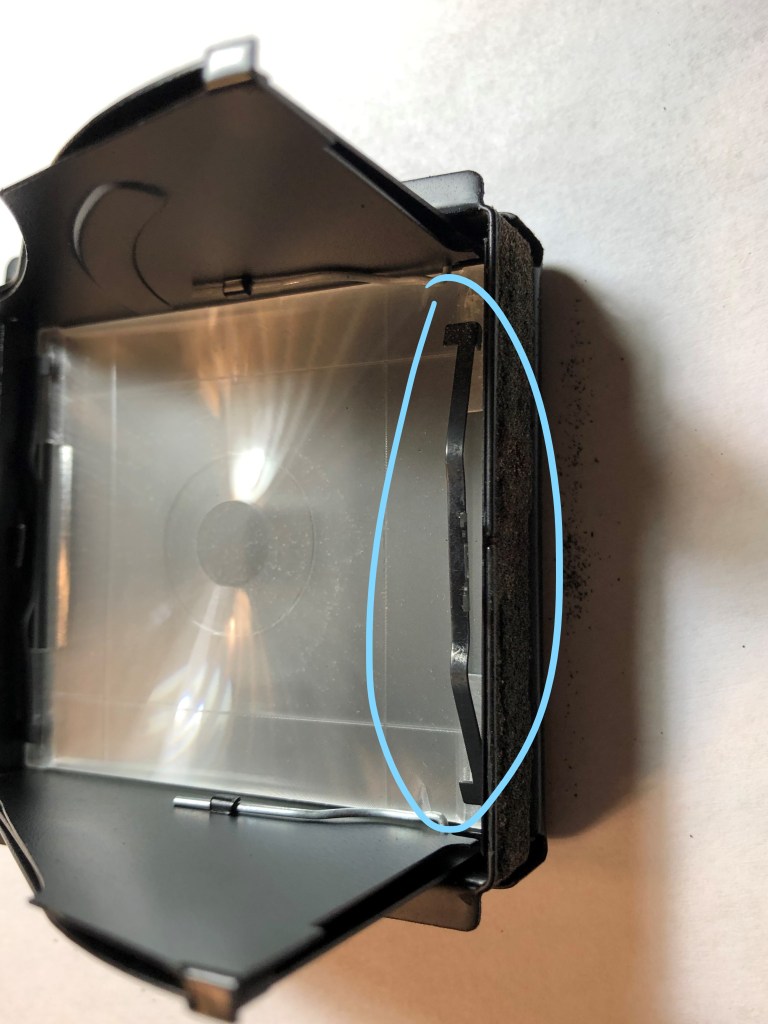
This is the focusing hood after I take it out (photo #8), you can see the dust on the glass surface and in between the ground glass and the focusing mat. I also need to remove the metal thin bars (there’re 2 of them) as in the photo on the right in order to remove the ground glass out of the hood.
8. Bottom of the viewfinder hood
9. The thin metal bars that keep the glass in place
Big advice: DON’T USE RUBBING ALCOHOL OR LENS WIPE TO CLEAN UP THE FOCUSING SCREEN!!! Because they will make the screen foggy and white and will destroy your screen. So what I read on the Internet told me that I can wash the focusing screen and ground glass with water and gentle soap and use my fingers to gently scrub them, so I did. And it worked fine. One tip is you can use the hair dryer to dry the screen and glass so they don’t have water drop marks on them. I also cleaned the magnifying glass with lens wipe and Q-tips.
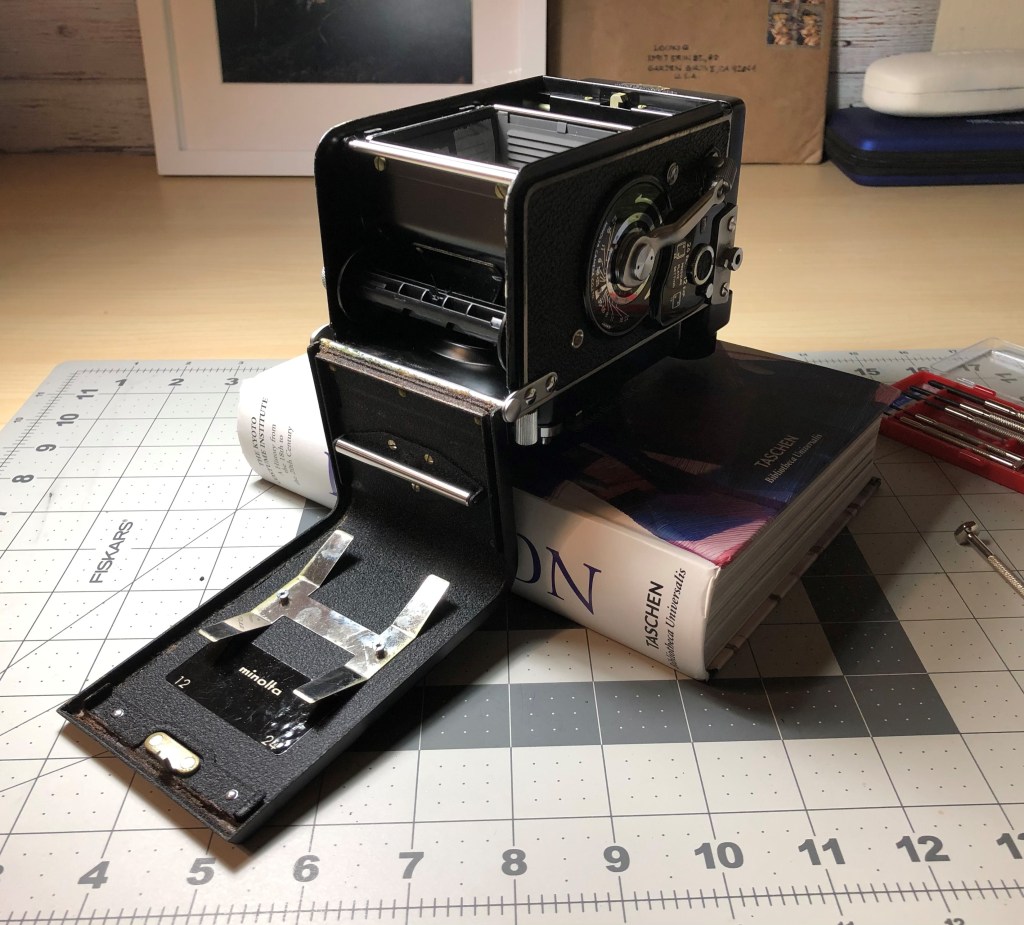
So when I finish the focusing screen and ground glass. I put them back into the viewfinder hood. Now it’s time for replacing the light seal. So, the first thing I do (and recommend you too) is using tape to cover the film chamber so the dust and old light seal crumb cannot fall on the taking lens.
10. I used tape to seal the film chamber from the dust and crumb
Also, remember to remove the pressure plate out of the camera door, just so the film back would be easier to clean.
11. Remove the pressure plate from the back
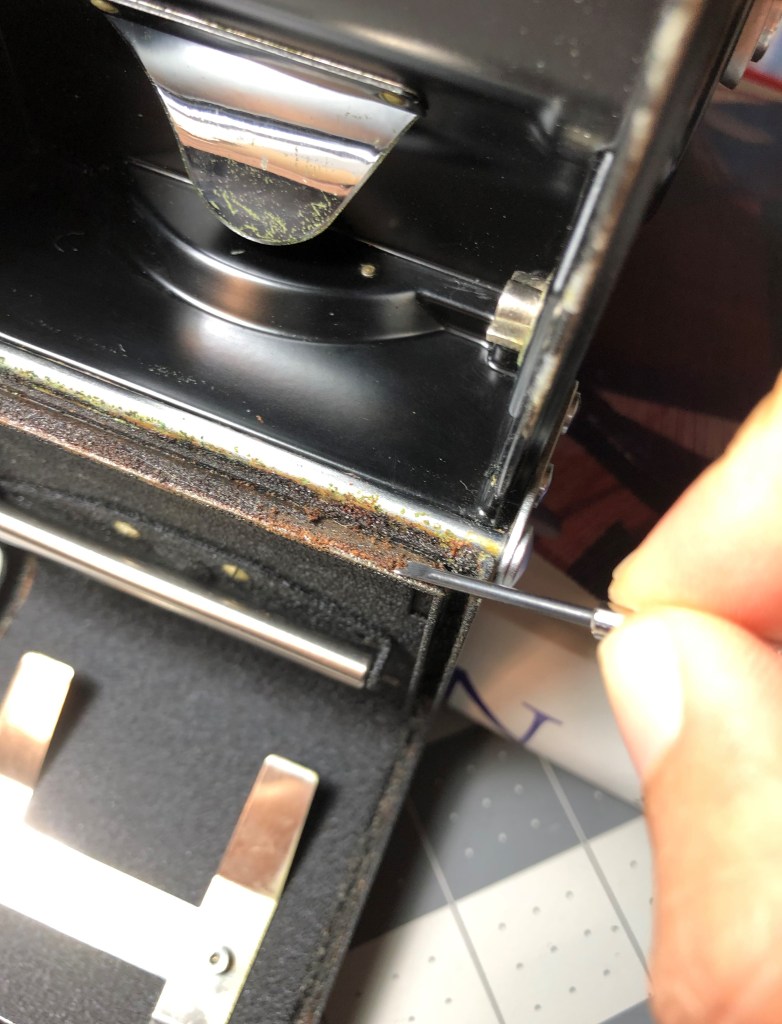
Next, I used toothpicks and the small flathead screwdriver to remove the old light seal and dust on the camera door. I put the camera on a thick book for more convenient. Then, I used Q-tips, toothpicks and rubbing alcohol to remove the crumb and rusted waste from the camera body, right at the hinge of the film door (as photo #13). As you can see, my flathead screwdriver is very affective at removing the old light seal in the small gaps along the film door.
12
13
14
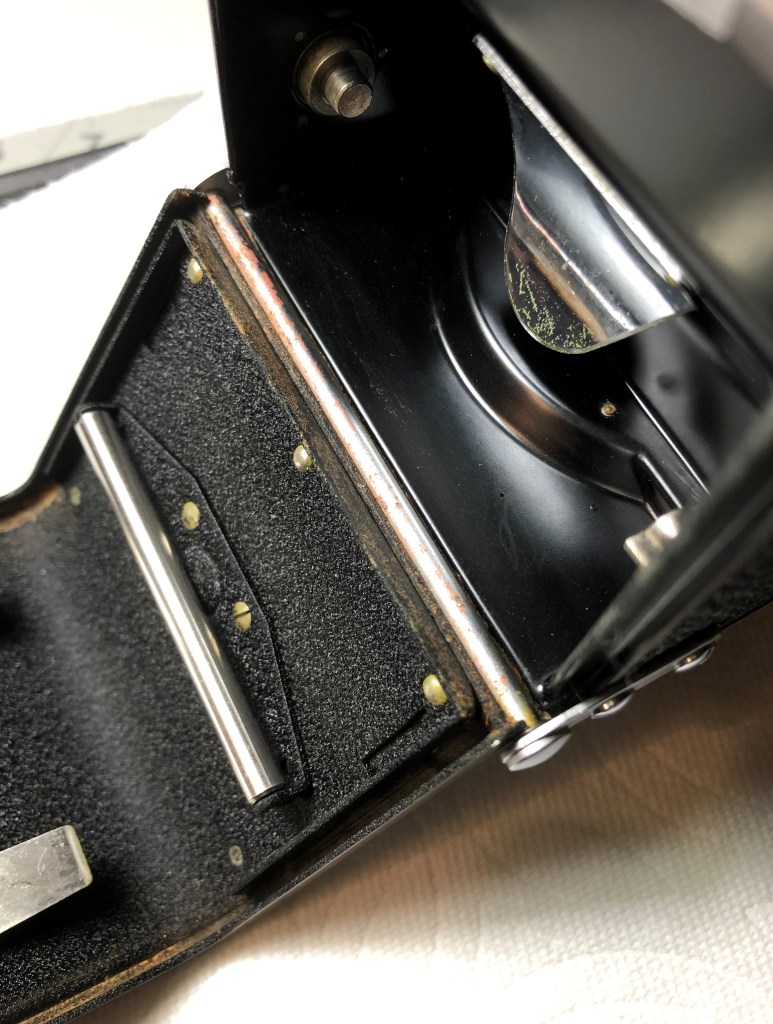
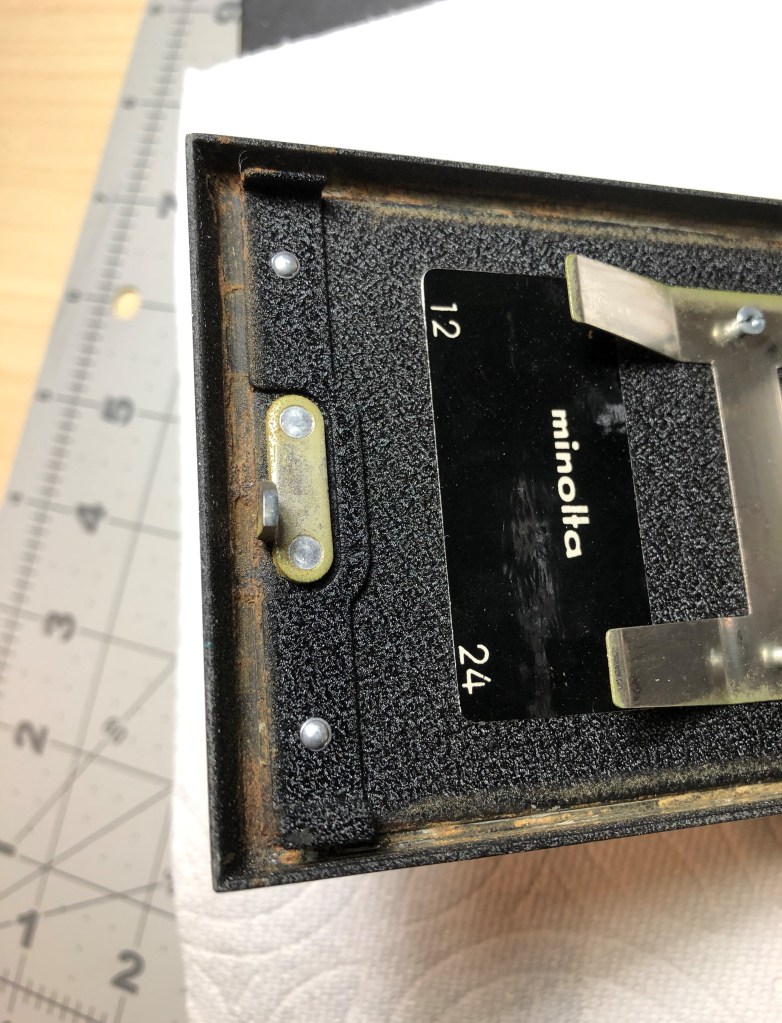
After clean the hinge area, I continued to clean the rest of the light seal, along the film door edges. The photos below show you the before and after I remove the old light seal.
15. Old light seal and crumb on the back door
Before
16. Old light seal removed
17. Crumb and dust removed on the hinge
18. Close up of the back door after remove old light seal
After
And I also used baking soda and water to wipe the metal parts that’s rusted along the way, such as screws or back door locking mechanism.
Next step is cutting the new light seal foam into the stripes to apply on the camera’s door. I asked Mr. Karl Bryan, who is a famous Minolta Autocord repair man, for the instruction of the replacement light seal since I couldn’t find the light seal pattern on the Internet, he did kindly reply me with the instructions. The light seal for the door should be 2-2.25mm wide and 1-1.5mm thickness, the light seal for the bottom of the door, right at the hinge should be wider. So in the end, I cut 2 stripes of foam 2mm wide, 250mm long (250mm is the length of the whole form, I didn’t measure for the length because I can always trim it later); 1 piece 5mm wide and 65mm long for the edge at the hinge. To cut it, I used regular paper cutter and a long ruler to guide the straight lines and put pressure on the ruler to stable the foam when I cutting.
19
20
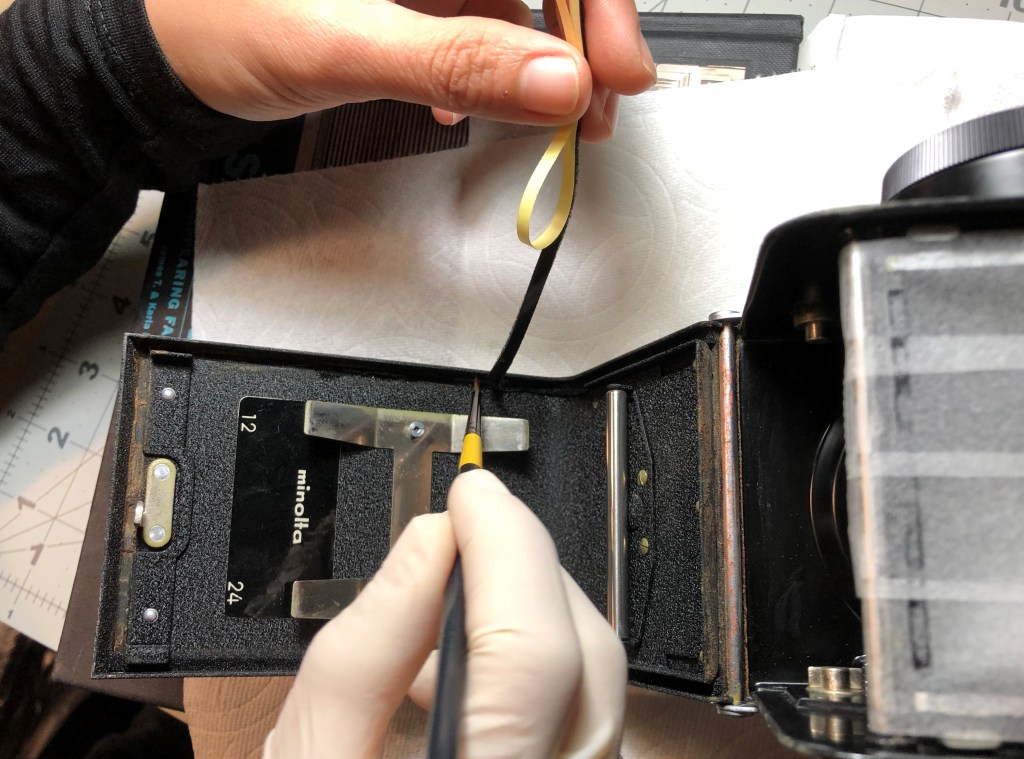
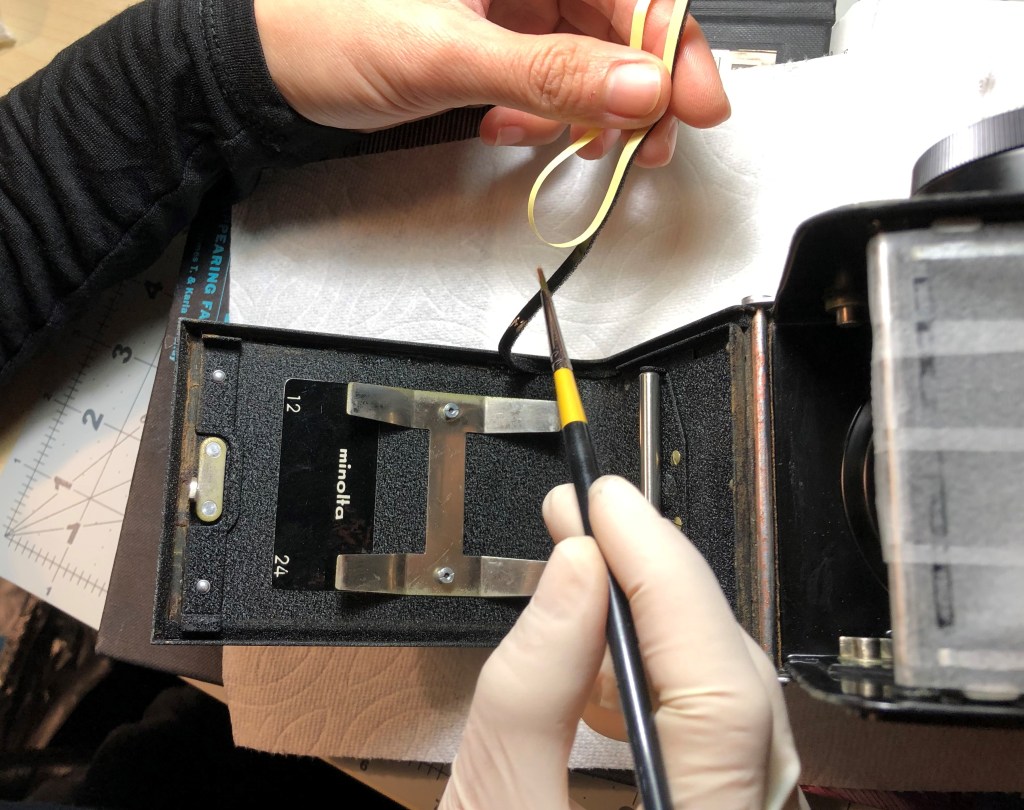
Mr. Karl Bryan also gave me a tip that applying rubbing alcohol onto the back of the light seal and on the surface of the area where we need to put the light seal on, and then lay the light seal down, slide it into place and let the alcohol evaporate. The nice thing here is the alcohol makes the adhesive backed foam and the camera door don’t stick together when they contact, so you can move or slide the foam into places easier. I used to replace the light seal in my Nikon F2 and didn’t know the trick, so when the light seal was put in the camera, it’s sticky and you may tear the foam stripe when you try to peal it out. As you can see from the photos below, I used a small paint brush to apply the rubbing alcohol on the gaps of the camera’s door and on the stripes (photos #21-22).
21. Applying rubbing alcohol on the area of the camera’s door
22. Applying rubbing alcohol on the back of the foam stripe
23. Using small screwdriver to put the foam into place
24. Applying rubbing alcohol for the door’s edge at the hinge
25. New light seal installed at the hinge
26. New light seal installed completely
After replace the light seal for the back door, I also noticed that the viewfinder hood also need a foam right at the front side where it touch the name plate. So I clean up the surface, measured the area and cut the proper light seal foam for it (photo #28). I guess the foam was put here to avoid the two parts bump and scratch each other.
27
28
29. New foam applied
30. New foam applied
31. Putting back the viewfinder hood
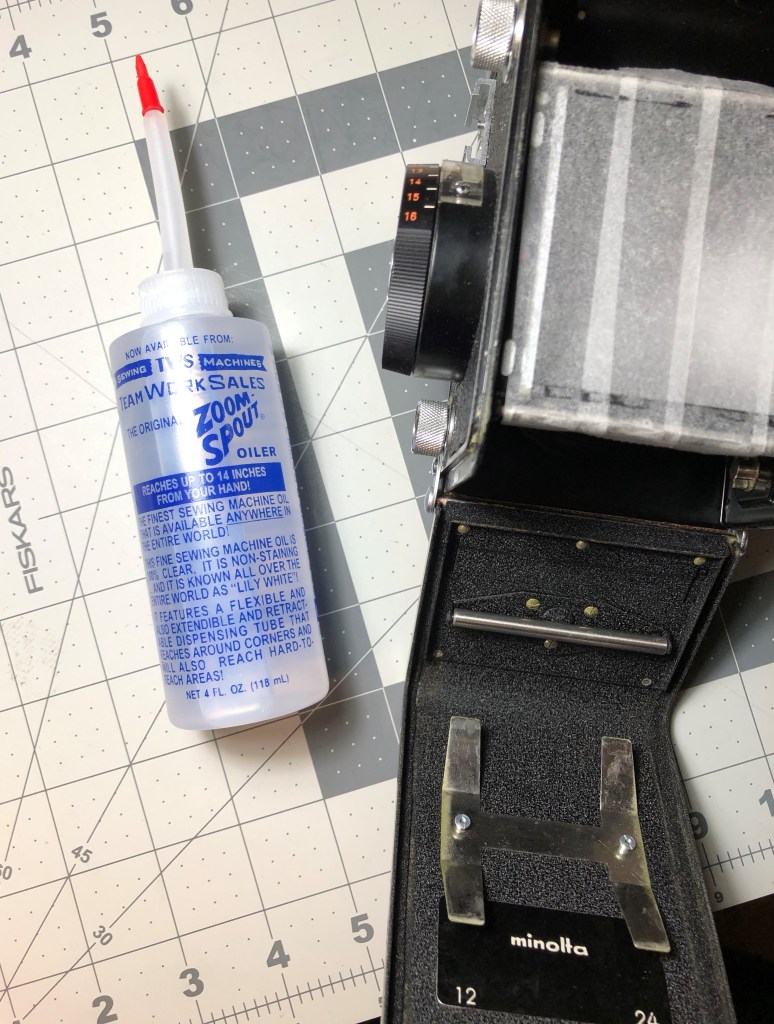
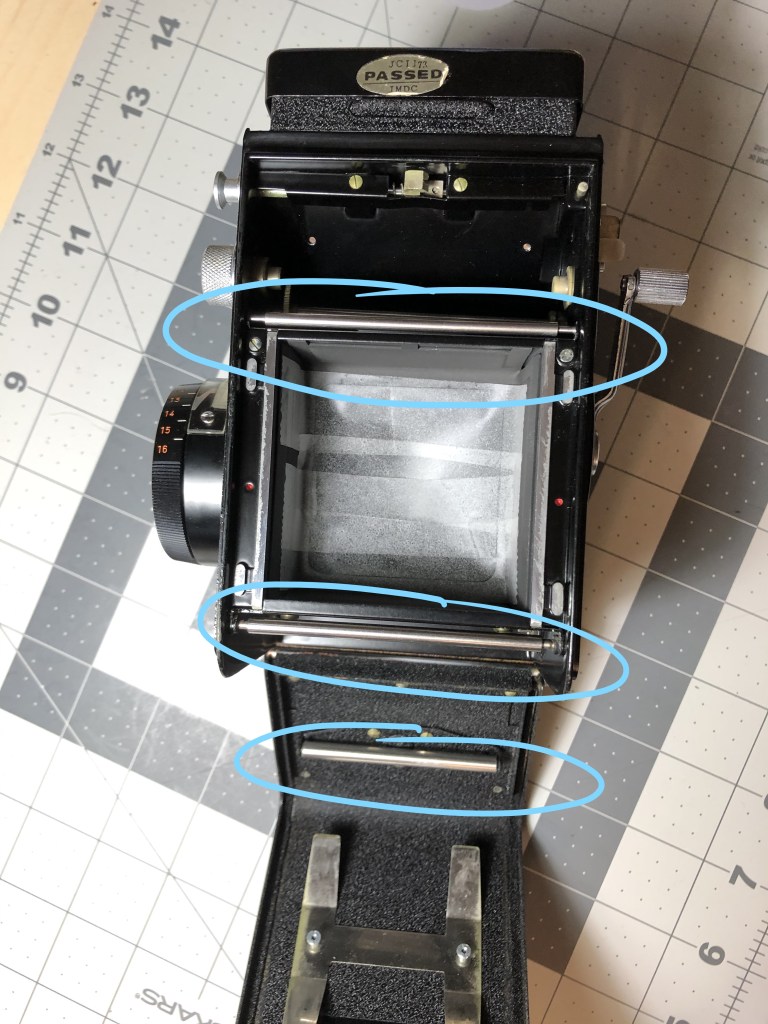
So the process almost finish here, but there’s still one last thing. As Mr. Karl Bryan advices, I applied sewing machine oil on each end of 3 film rollers (photo #33), on the upper film chamber gear (photo #34) and on the take up spoon gear (photo #35). Just put one drop of oil, spin the rollers or rotate the gear and wipe the excess oil. This will minimize scratching your film when winding.
32. Sewing machine oil for the lubrication, comes with a long tube, nice!
33. 3 film rollers
34. Upper chamber gear
35. Take up spoon gear (in lower film chamber)
In addition, I also put the oil on the hinge of the viewfinder hood since it’s a bit stiff to open and close. After applying sewing machine oil into the hinge, the viewfinder’s smooth like butter! Of course, always remember to wipe the excess oil because you don’t want the oil gather dust around in your camera.
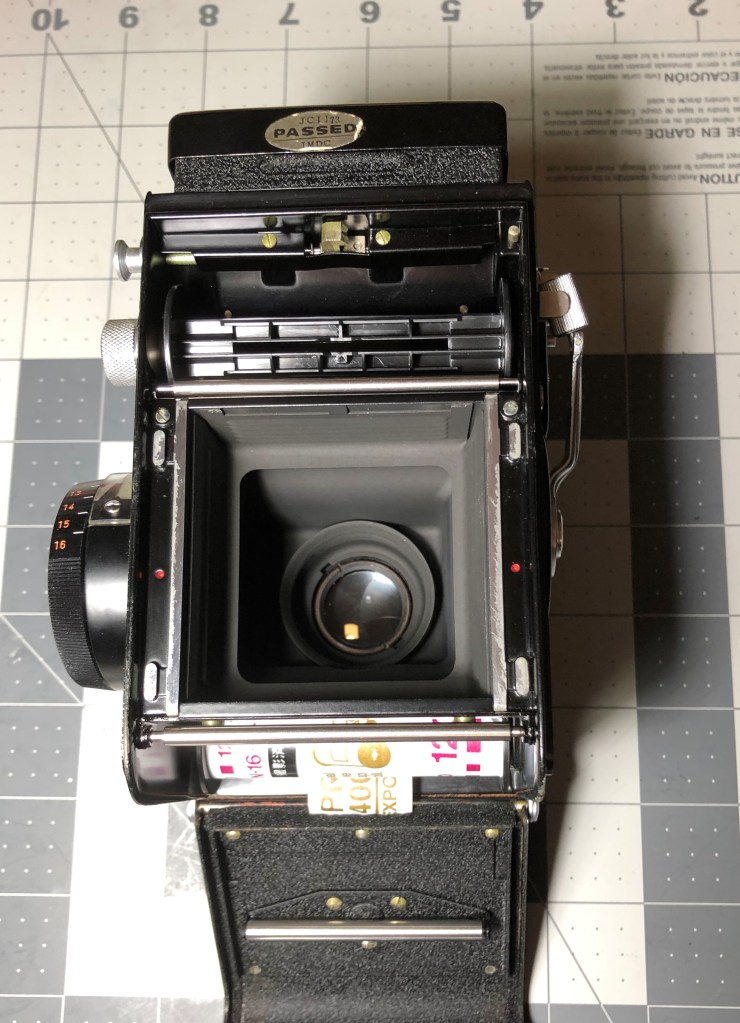
Finally, time for the test roll. I used an empty roll that just has the paper back to test out the rollers and winding crank. Everything worked beautifully. After 12 dummy shots and winding, the roll’s transferred to the pick up spoon nicely, I open the paper back to check if there’s any scratches on the back but no, yay! This camera is now ready to shoot!
36. Time for a test roll
37. Loading the test roll
38. The roll’s transferred to the pick up spoon
Thank you Mr. Karl Bryan for the instructions and advices. I didn’t know anything about the Autocord series or this CDS model particularly but when I read about it, I’m in love. Just because the design is so special and the quality is one of the top. So I wanted to give it a nice treat by having a CLA by Mr. Karl Bryan but since my camera doesn’t seem to have any functional problem, he suggested I should use the camera until something goes wrong. I definitely recommend Mr. Karl Bryan to anyone who’s looking for a repairman for the Minolta Autocord, he’s the best, and also a super nice man! You can reach him at karl.kathy@frontier.com
Thank you for making it here. Hope to share with you guys some photos taken with this camera soon. Cheers!
Here we are for the continue part of my Mammoth Lakes road trip.
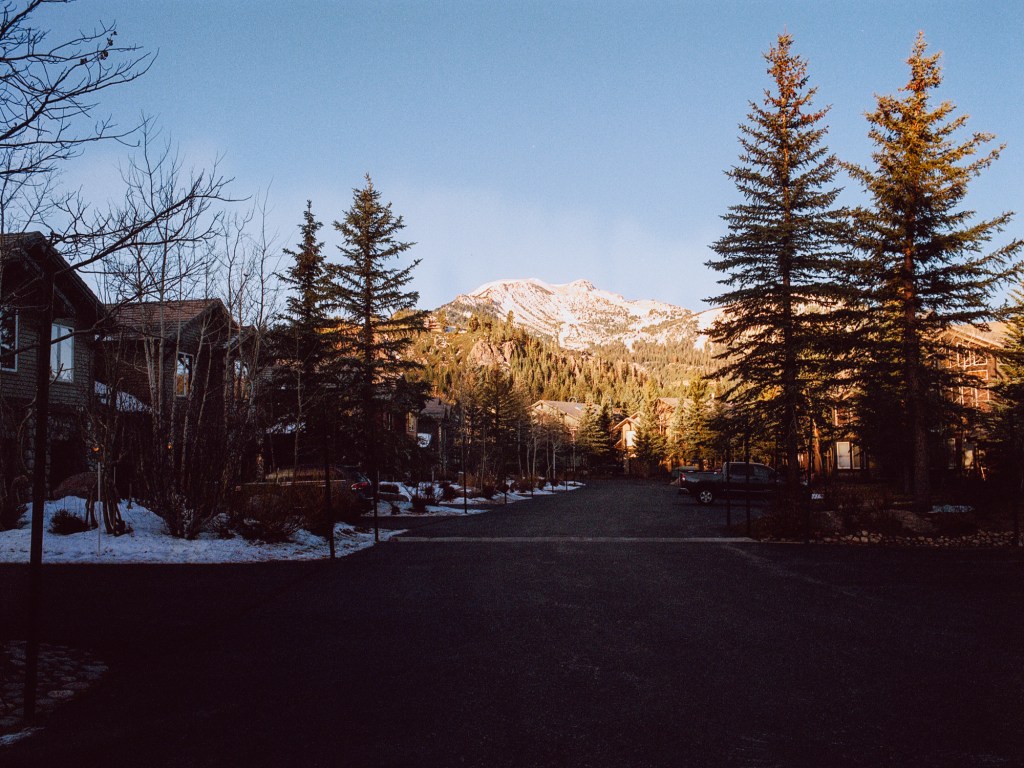
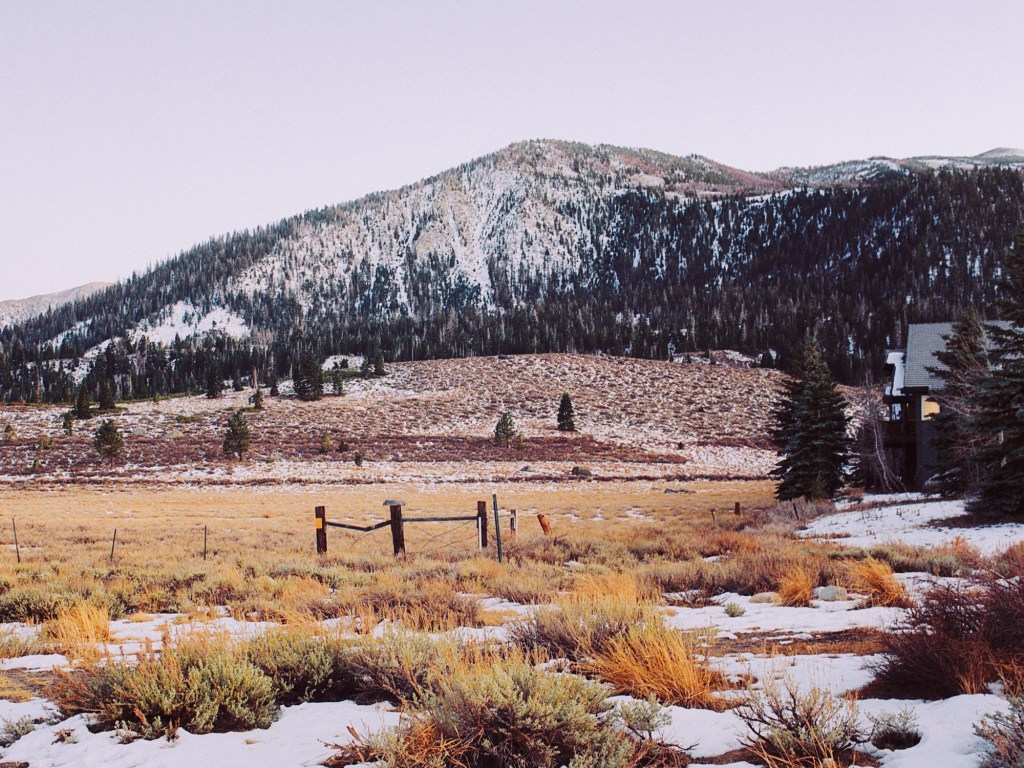
After the first day of going to Gull lake (which is I took a roll there but no photo came out that I want to post here 🙂 ) and another frozen lake that I forgot the name, we came back to the lodge because we weren’t sure to be out when the sun went down. So after getting back to the lodge, I walked out to take some sunset (or blue hour, for more precise) photos at the Meadow and stopped frequently on my way to take some nice house scenes. Here’re the photos that I like the most from the trip.
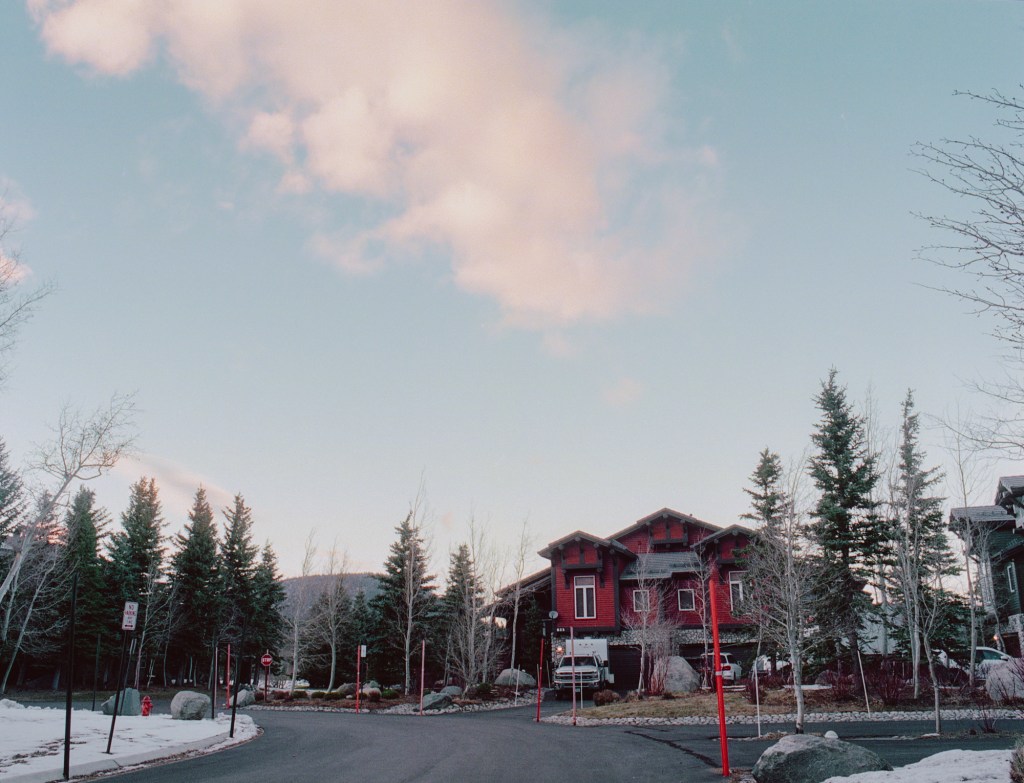
The first one is photo of one street in the lodging area, I captured it because it gives the general feel and architecture of the area, along with the massy mountain behind. The second one I took because the nice red house is quite interesting and the cloud above has a very nice shape and color. It’s a bit hard to take everything into the frame but I quite happy with the result, the only thing I don’t like is the bright red pole in the foreground that overlaps the house.
The photo on the right is when I went back the the lodge and the sky was dark. I saw the light from the light bulbs from the house was quite interesting and the tree in the front also had a nice shape and texture so I set up the shot for a long expose photo. I like how it came out but still think the composition is a bit off. I think if I had stepped back a bit and moved to the right couple inches, the composition would be much better, because the roof of the house wouldn’t ended right at the frame lines. Another lesson for watching your composition carefully before taking the shot.
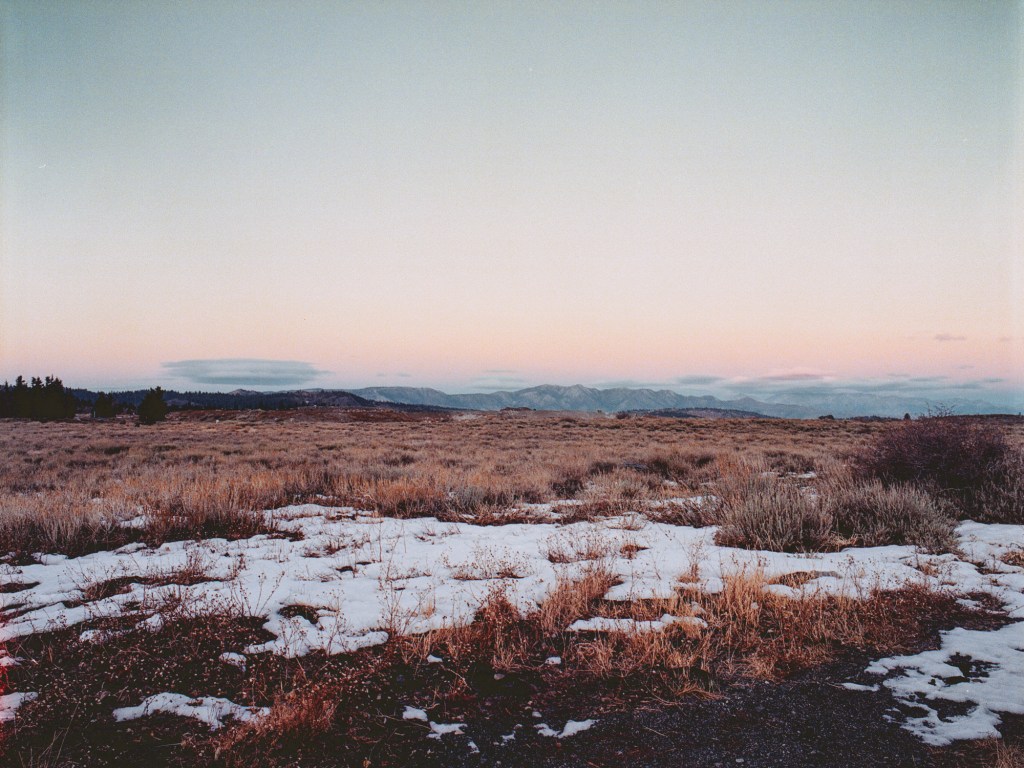
I like this very much. This is the first photo I took when I walked out for the sunset. The sun pretty much hided behind those mountain already but there’s still a bit orange glow at the horizon. I think the colors here work together very nice, the red is pop but not taking away the cold calm vibe in the photo. The reflection in the glass window also looks so dreamy and poetic. I also like the composition and the complex of the scene. To me, everything works together very well in this photo.
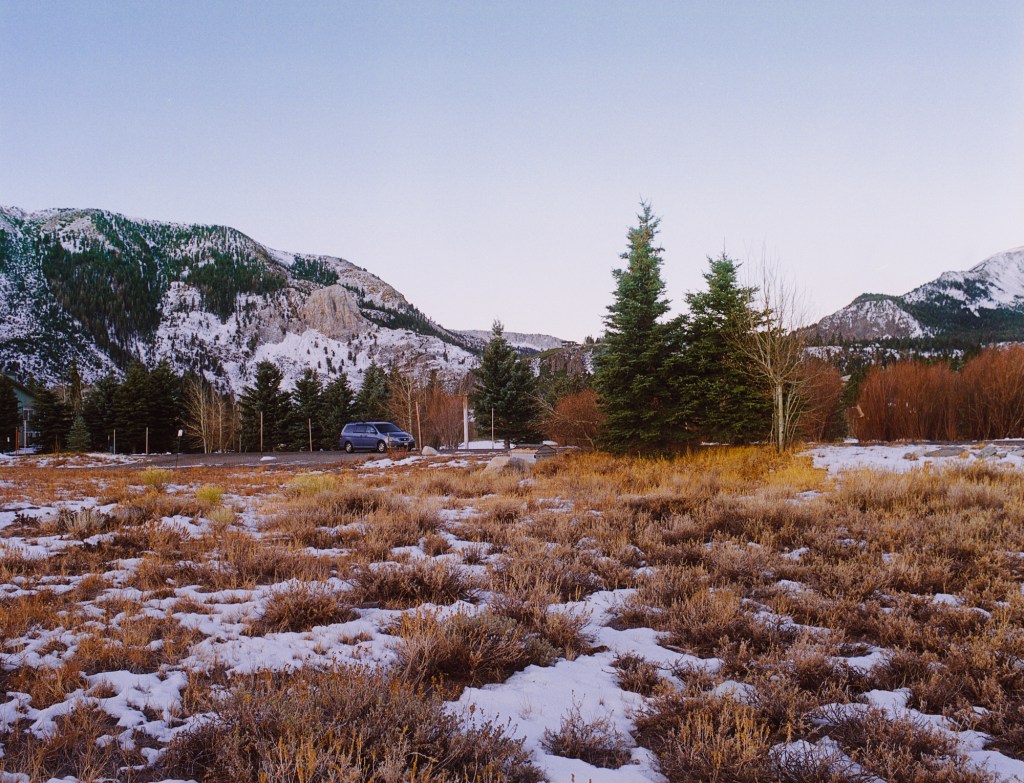
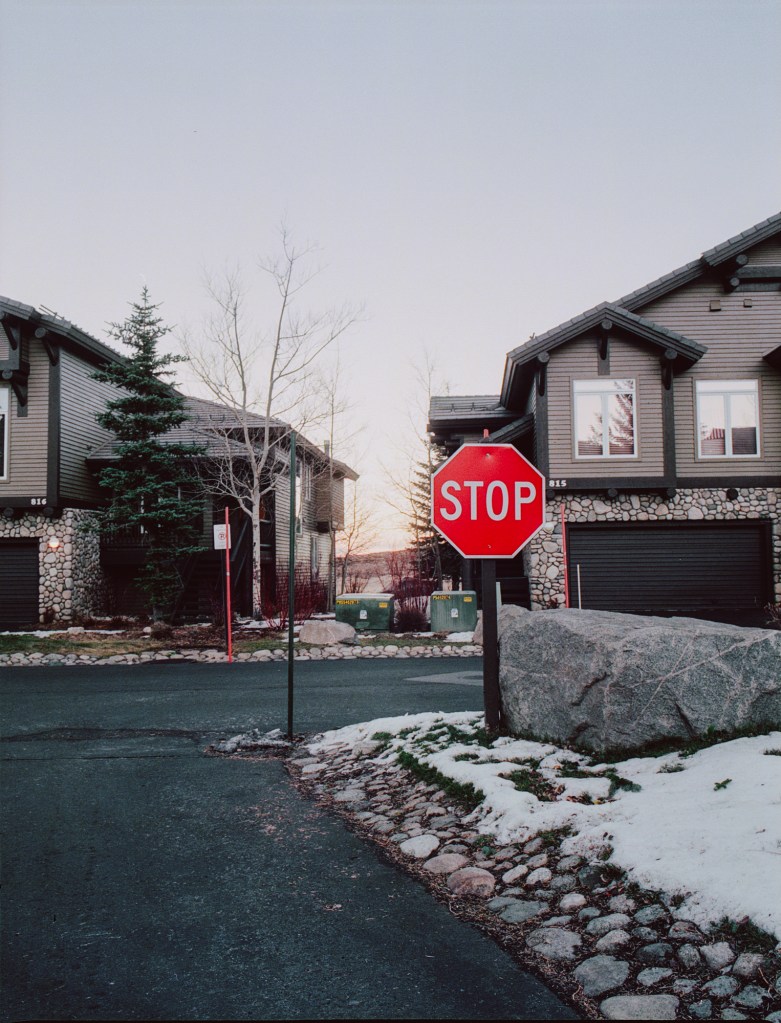
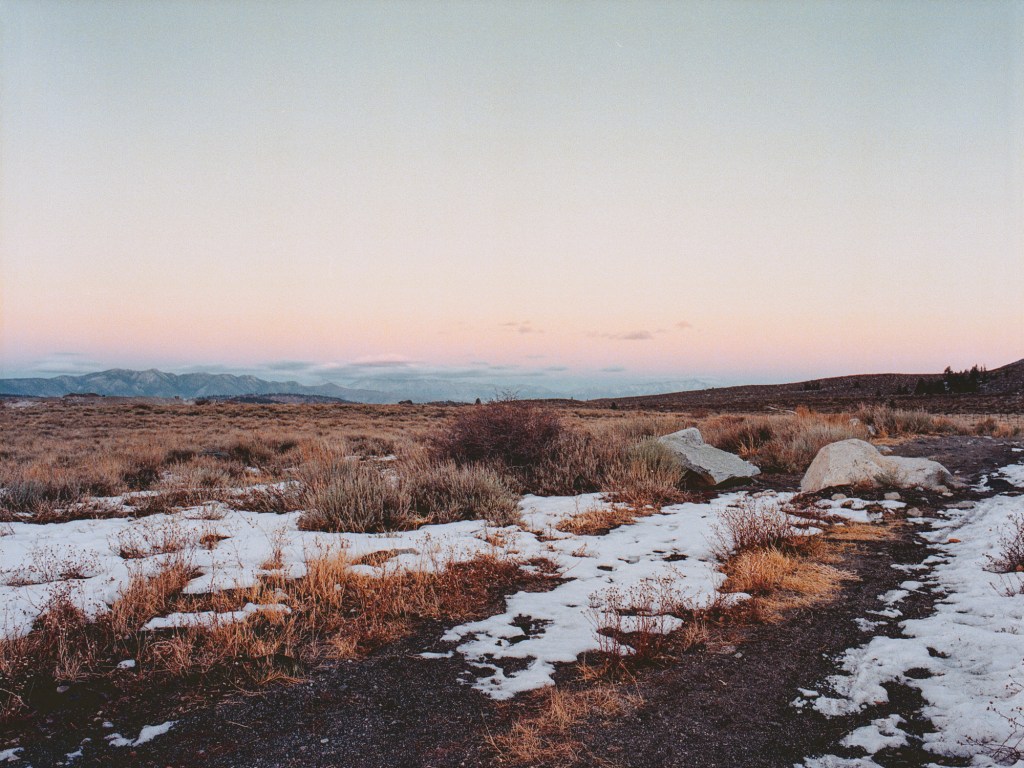
This photo of the “Private Property” sign I took on the way back to the lodge. It belongs to the Snowcreek Golf Course. I think the photo represents very well the calmness and coldness of a winter sunset in a meadow surrounded by mountains.
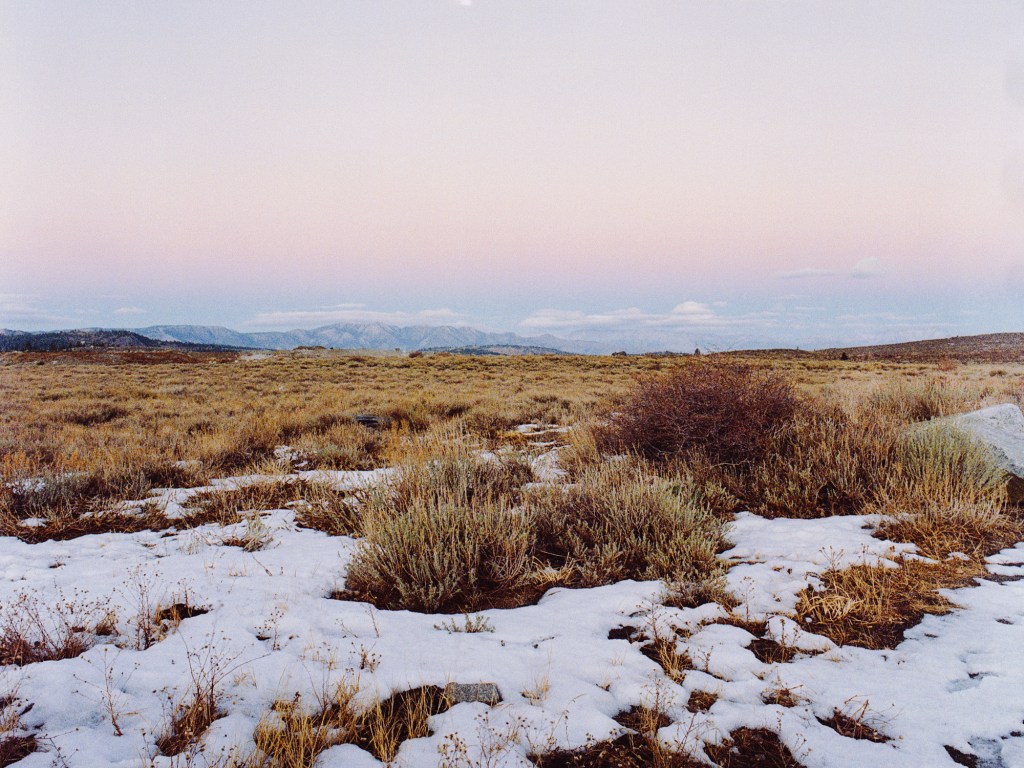
The photo above here is the first one I took on the Meadow. Took with Portra 800. The sun was behind a peak of mountain but the field still have plenty of light and the glow at the horizon was so beautiful. After took this shot, I managed to take the photo on the left, of a part of the house and the mountain behind it. I think the photo is not bad but still something is off about it. The reason I didn’t include the whole house because I wanted the photo to be suggestive, not just show the objects straight out. I also like the little fence[?] in the middle of the frame, it adds a very nice touch to the field. One thing I think I could do better for this photo is exposing for the house to get more details out of that, and hopefully don’t blow out the highlights. In general I still like it but it’s not good enough to be showed as my best work.
On the right side are photos I took when the sky is almost dark and there’s not much light on the grass field to expose. I took these in the much longer shutter speed than the previous photo above. You can see how much the difference is compared to the earlier photo taken 10-15 minutes apart. This merged photo describes the vast scene of the meadow in blue hour. I really enjoy this photo.
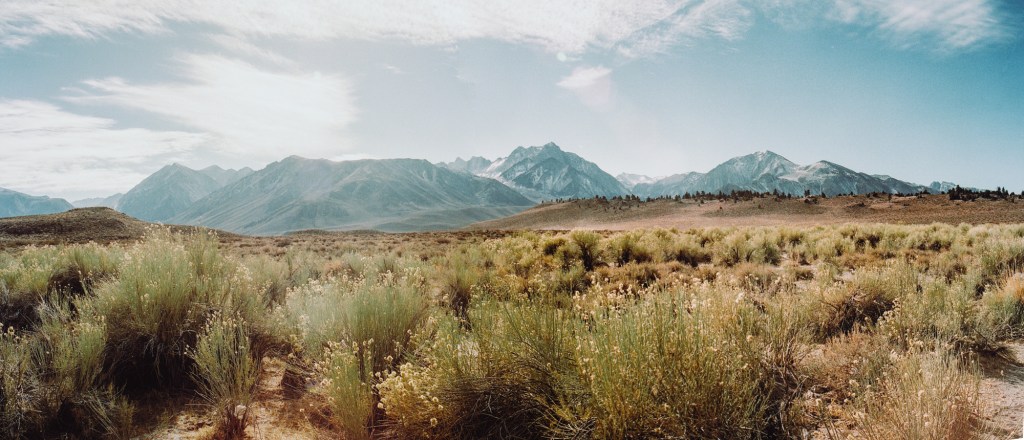
The photo below is another panorama merge from 2 photos. This is the scene at Rock Tub Hot Springs. The tub itself is quite small and funny in the middle of the vast land. When I got there, the sun was high up and the sunlight was extremely harsh. I took a couple photos but nothing come out as I like, so here just a photo for you to have an idea how the landscape looks like. All the daytime photos were taken with Fuji Pro400H.
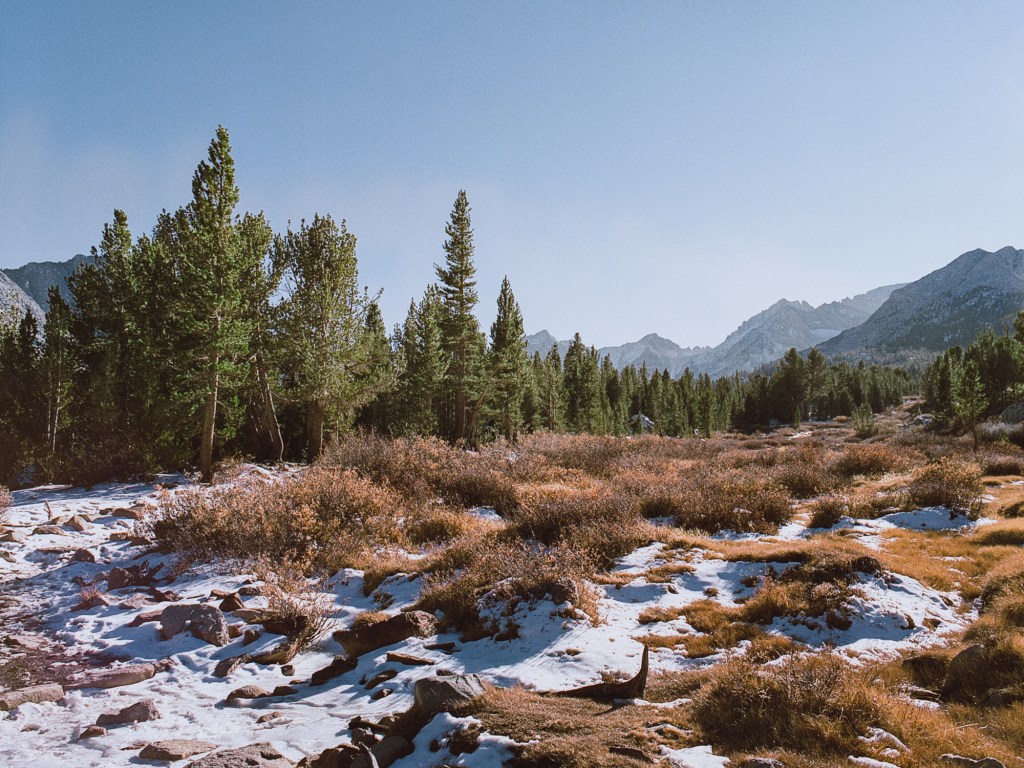
Final photos from the trip are some I took on my last hike to the place I forgot the name again, but that’s a long hike that passes couple lakes on the way. We could just have enough time to hike to the first lake and then had to come back but it’s quite a nice hike with beautiful view. The light was softer and warmer as it’s afternoon and we really enjoyed the hike.
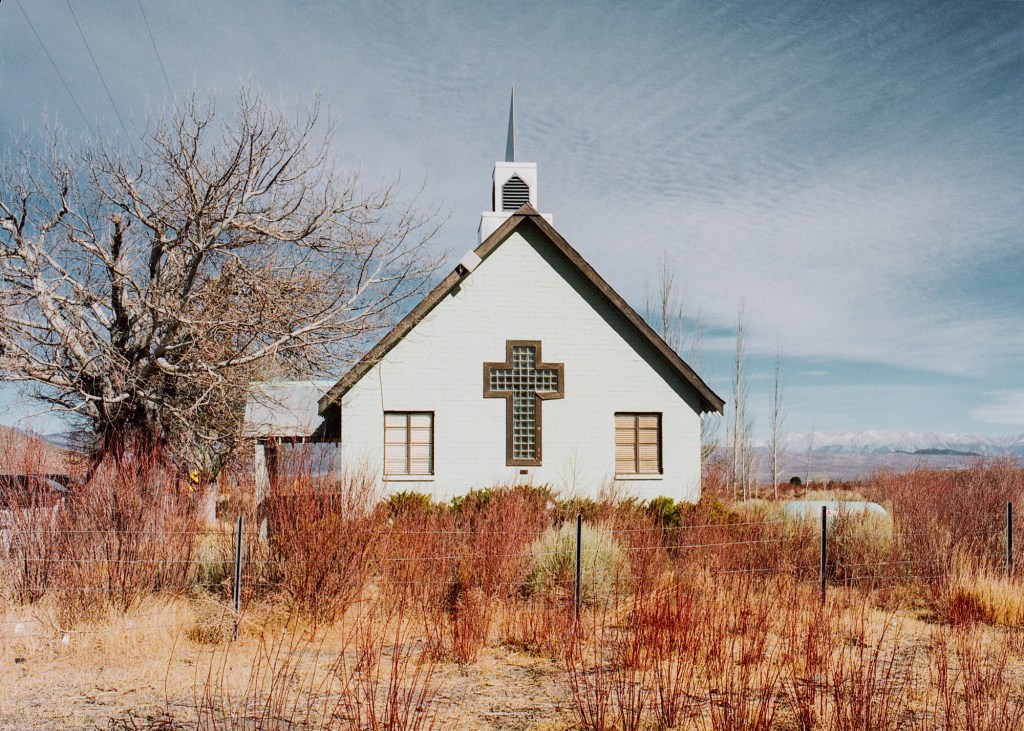
The photos above are of the Green Church near the hot springs. When I first saw it on the way to the hot springs, I was fascinated by it. A small green church in the middle of no where, who can resist that? So on the way back from the hot springs, I stopped by and took these photos. Of course with the harsh light condition, I could get the photos as good as I want. I really hope I can come back and take photos of this church in a better light. The last one is the composition that I like the most. I don’t really know why but I like the fact that a part of the building is included with the backdoor stairs and the white fence with the gate. You can also see the grass in the field behind and the mountain at the horizon. There’s many elements in this photo to look at.
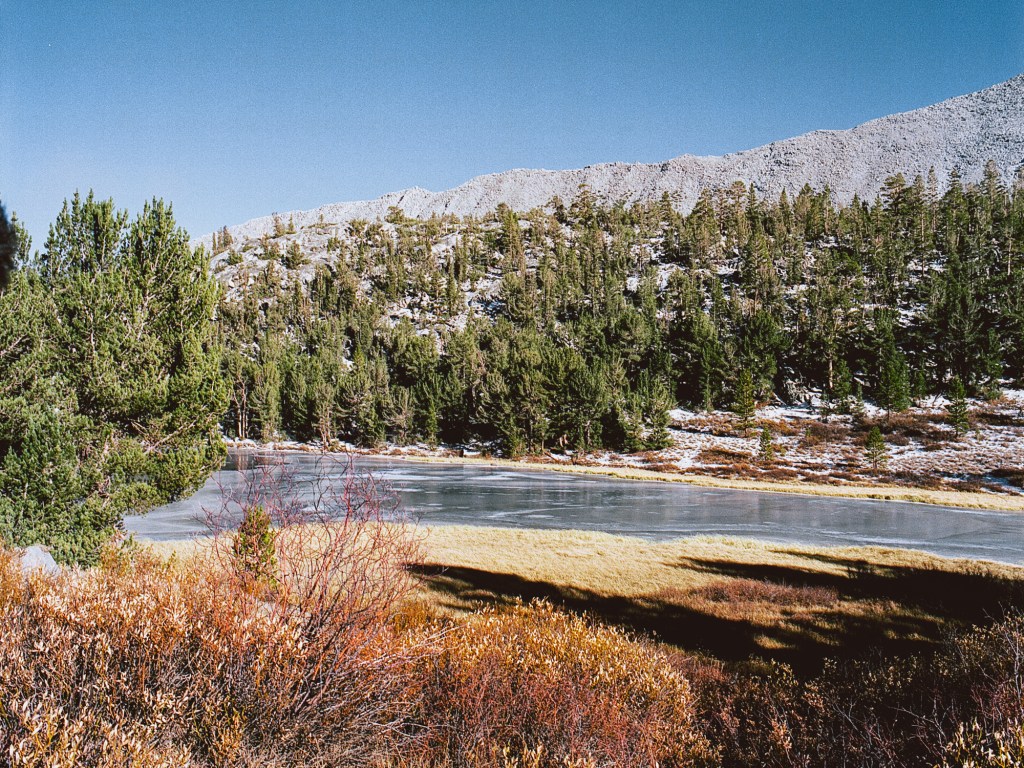
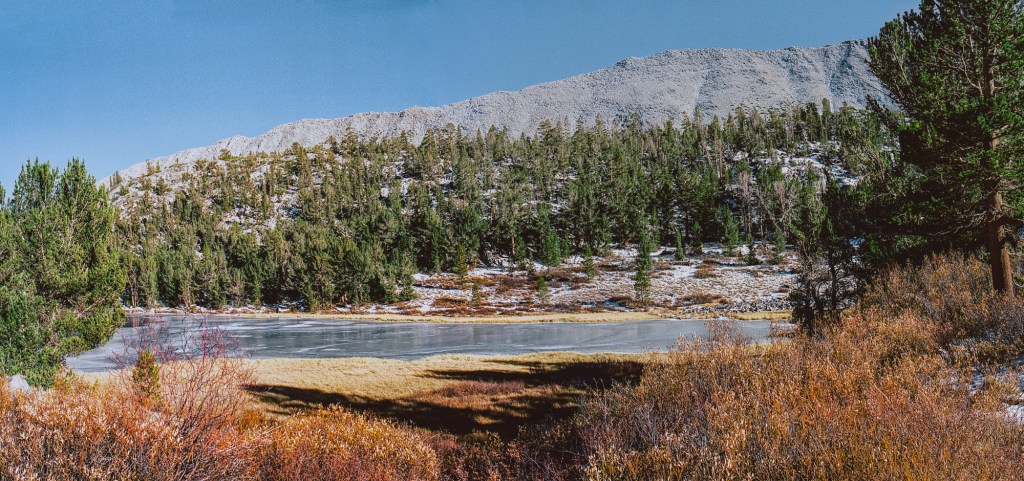
As you can see, the 2 photos on the left were merge to make the panorama below. Just so you know the view of the frozen lake that I got to see after the hike. I wish I could come down closer to the lake to have more close up photos but we’re really low on time so this is all I could get. I don’t think the composition is that good but it’s nice to see the whole view. I like the yellow grass field by the lake and the color of the sky reflect on the frozen surface.
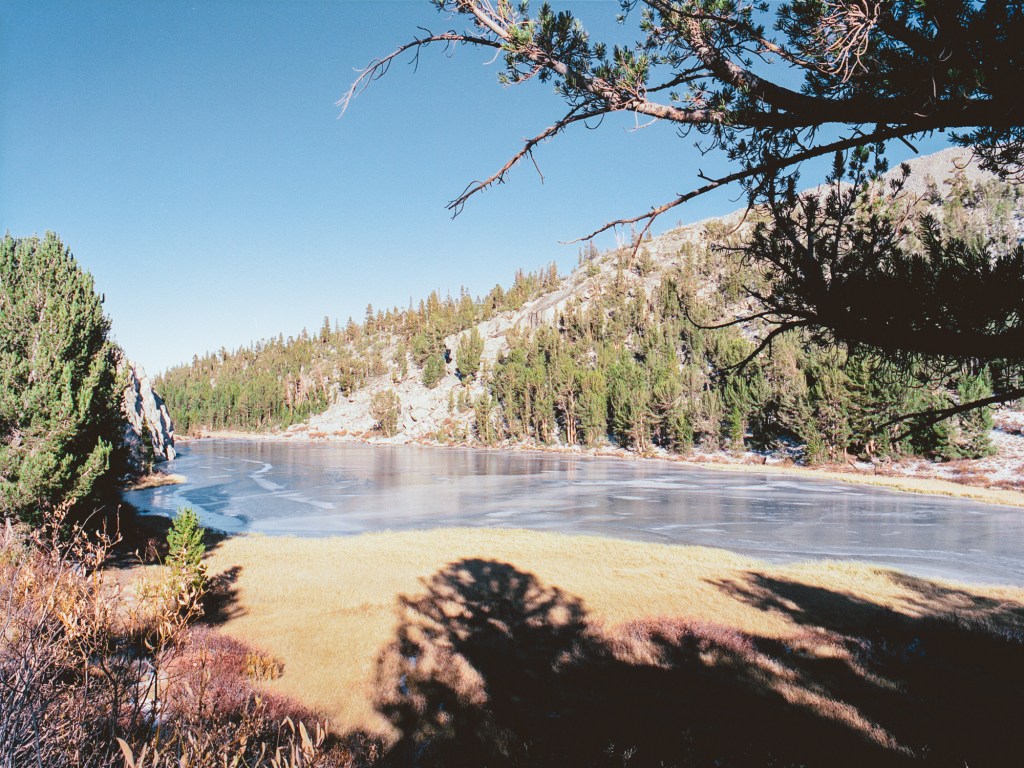
The last 2 photos are other composition that I took of the lake from a closer spot. I like the final one because the branches at top right foreground and the shadow at the bottom combines to give a direction to the eyes to look at the lake surface. I definitely blow out the highlight in this photo but I like that you can see the cliff behind the left side tree that you cannot see in previous photos.
That’s a wrap for this Mammoth Lakes trip. Thank you for making it all the way here. Hope you like the photos. Cheers!
It’s 2 months late after the trip to publish this post but I worked quite hard on the photos so I hope you enjoy it. I went to Mammoth Lakes in the middle of last November. The trip was nice and lovely, the weather was beautiful. This trip gave me some favorite shots that I’m quite happy with. In this trip, I tried something new with my photography: first, I practice merge 2 photos together to make a panorama scene; secondly, I used my new wide angle lens for the Bronica, the PE 50mm/2.8, for the first time. Having a wide angle lens gives you much more ability to shoot landscape or just more scenes in general, in the end, I shot all the photos here with the 50mm lens. Since I have a good amount of photos to share here so I make it 2 parts because I don’t want to overload my page or make you wait forever for the photos to load.
Since it’s 2 months already so I apologize for forgetting the names of some locations that I took photos of. When I went to Mammoth Lakes, the weather was very nice, not very cold, there’s thin layer of snow on the ground but I did not see any snowfall. The fall leaves were long gone and the snow was just appeared. The sky was very clear and bright in the morning and afternoon, at noon, the sky was so blue and the sunlight was very harsh, made it so hard to take photos at this time.
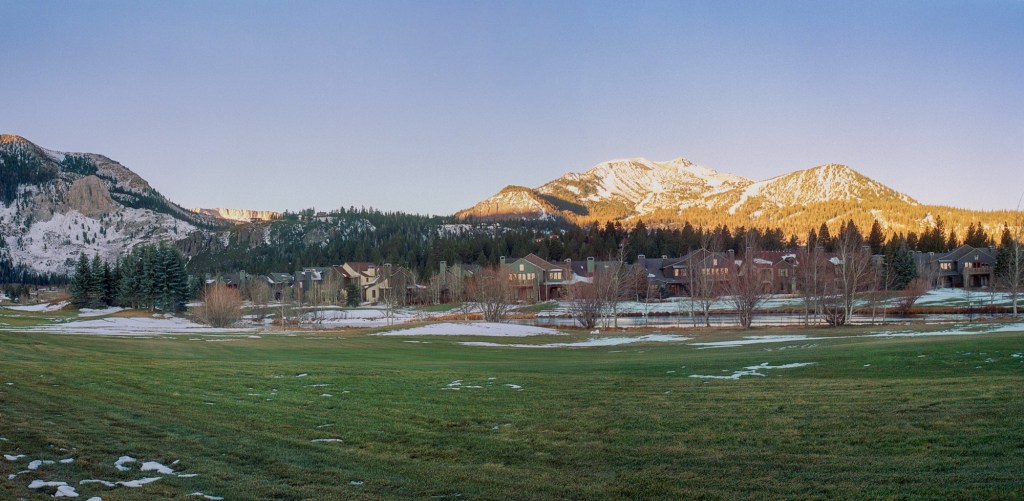
First off, let take a look at the area my friends and I stayed during our trip. It’s a lodging [compound?] called Snowcreek, it’s located by the Kerry’s Meadow and next to the Snowcreek Golf Course. These photos here I took with Bronica 645 system and Portra 800.
The first photo is the road at sunrise. This is a very high contrast scene where the peak of the mountain is lit up but the road and houses down here was very dark.
Next is some houses in the sunrise light. I took these with the promist filter 1/4 to have the glowing affect on the trees and windows.
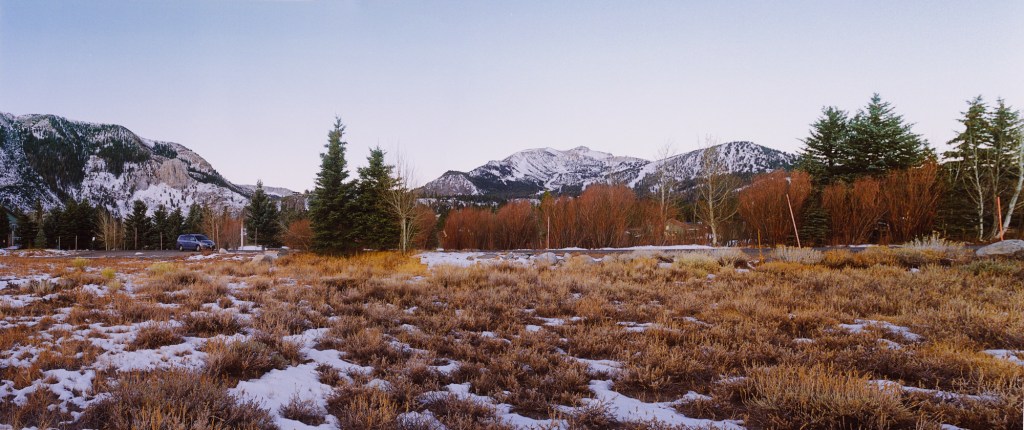
Next, the photos of the sunrise view that I took from the edge of the Kerry’s Meadow looking at the Mammoth Mountain. My specific spot here is just off the road between the Golf Course and the Meadow, I didn’t walk into the Meadow although it could be great if I did. Here I combined 2 photos together to make a panorama of the scene. When I went to the Meadow for the sunrise, I noticed the blue van was silently parked there, they must went there to watch the sunrise just like me. Even though I didn’t know them and we never talked to each other but since we came there for the same reason, I feel a connection to them, like ‘we were a same place at a same time waiting for the same thing’ vibe. Besides, the van is a nice addition to the photo in term of showing the scale of the scene. At this moment, the sun haven’t come out yet, as you can see the scene is flat and dim.
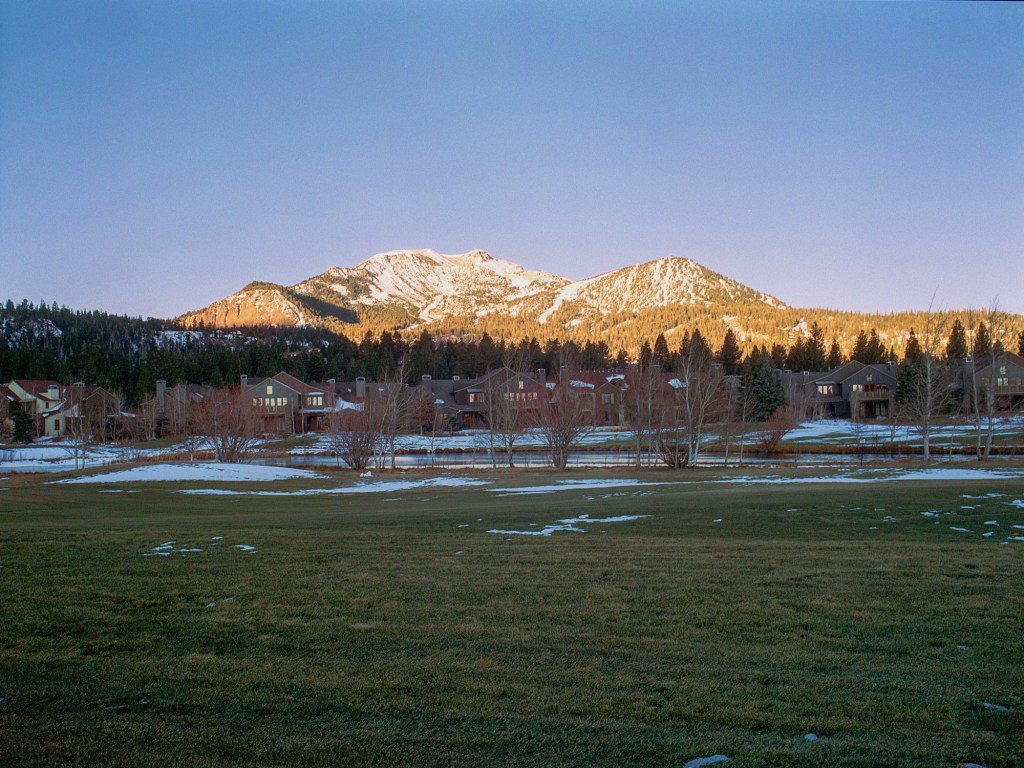
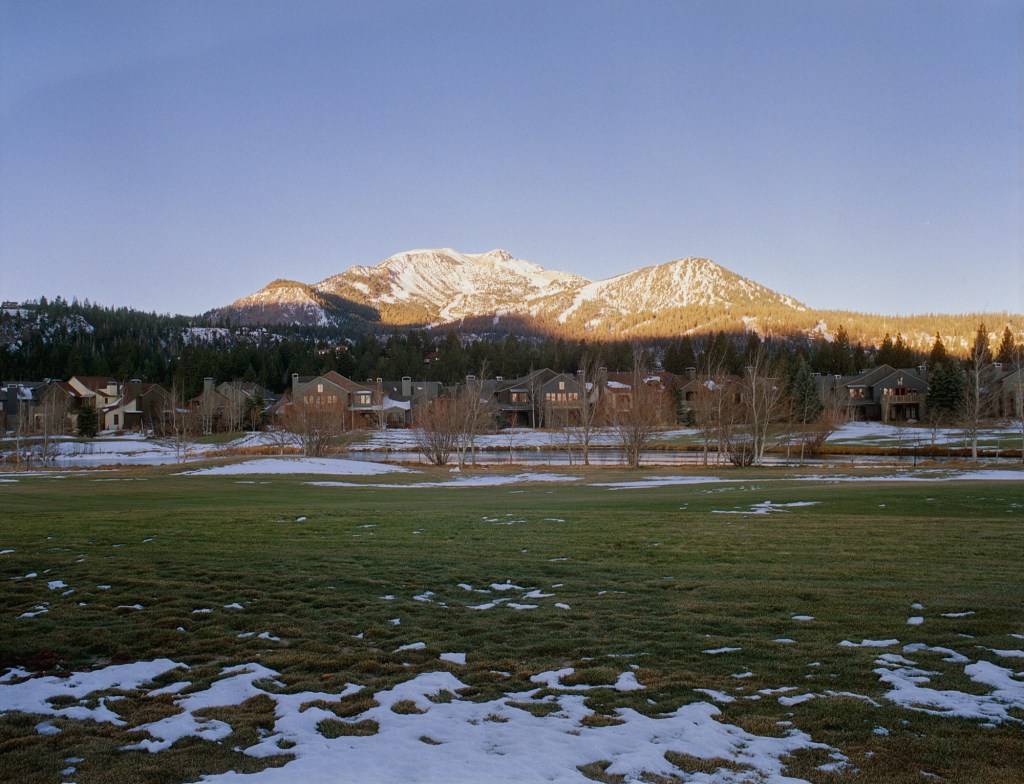
This one here is the view from the edge of the Golf Course looking at the peak of the Mammoth Mountain when the sun rises up.
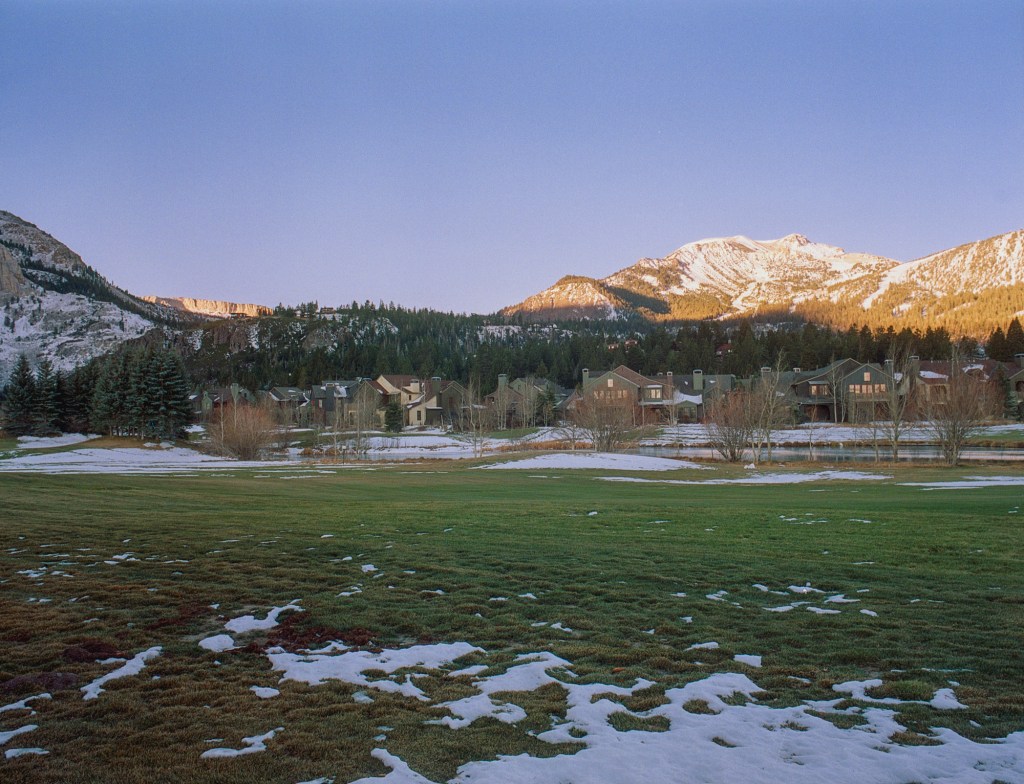
Another panorama photo. I think I watch a lots of Nick Carver’s videos to make my photos into panorama ratio. But I don’t think my composition is that good, the first reason is I didn’t actually see the composition as panorama when I compose the shots, just the estimate and imagine from myself, so when I merged the photos together, the composition is always off. But it’s nice to make these photos and see the scene as wide as I can.
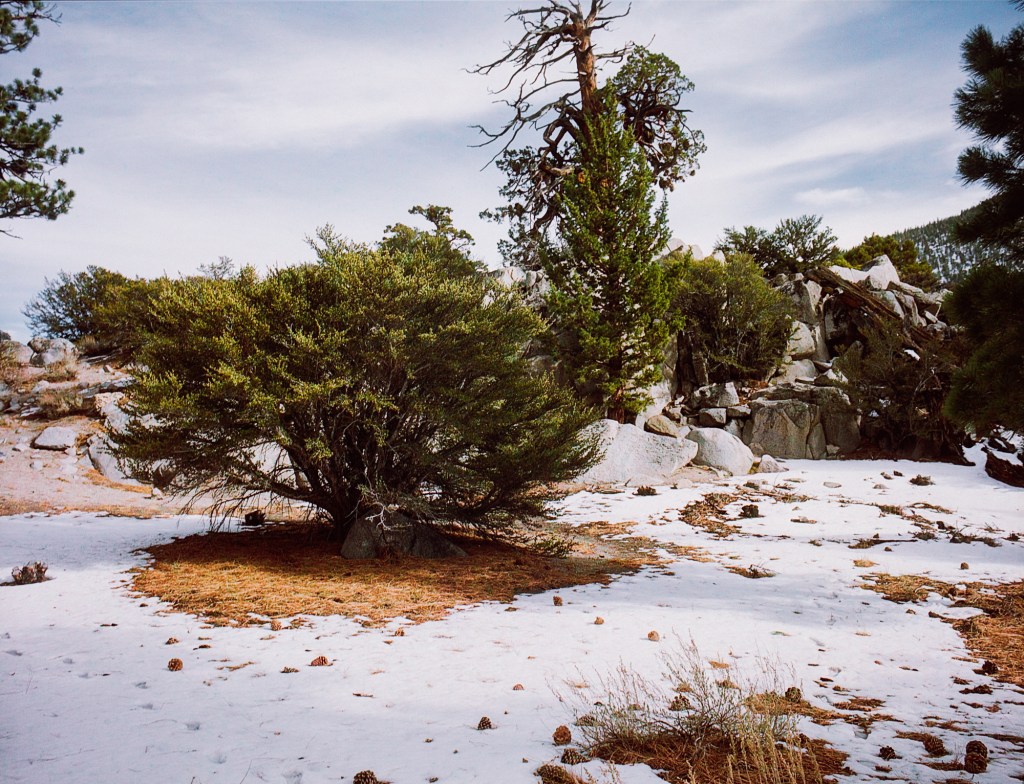
The following photos are some scene on the hike on the first day. Taking photos in the snow scenes was definitely hard because the snow is so bright and if you don’t know how to expose the shadow, your shadow will be pit black, just like my right side photo here. These were taken with Portra 160 expired.
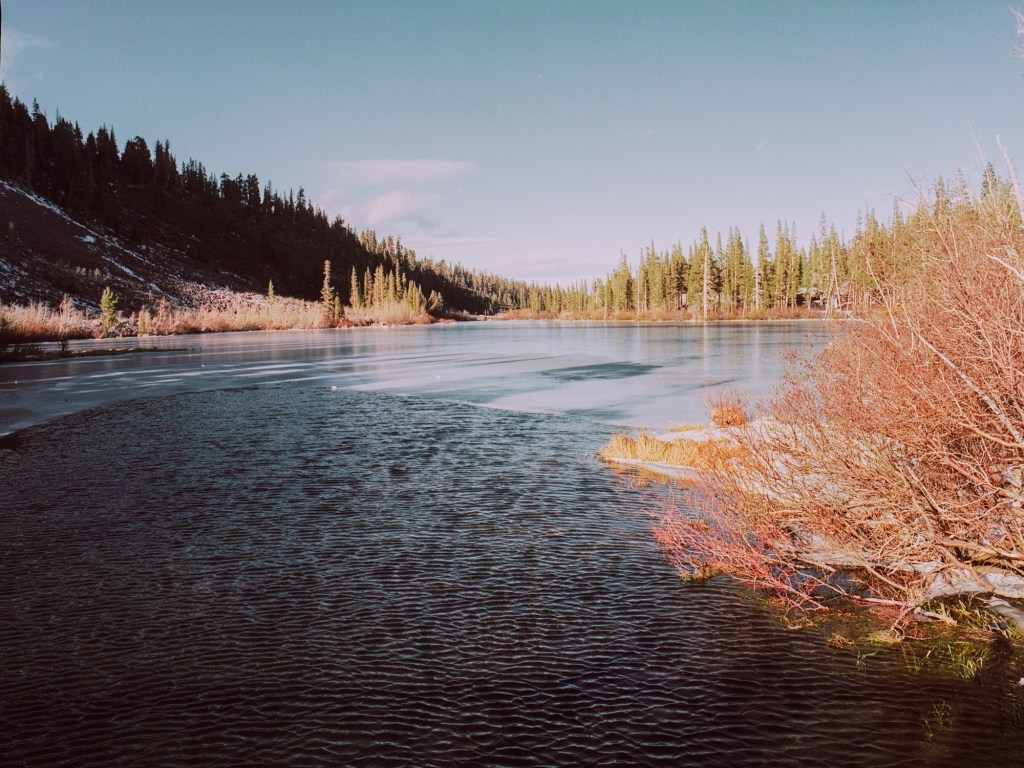
Finally, these are photos of a lake that I forgot the name. I took these in harsh sunlight so the shadow was crushed to black. The film I used here was Fuji Pro 400H. I did heavily edit these photos because the “straight out of the scanner” were so terrible to look at [or just me being terrible at scanning]. The first two are not that great but still give you the nice view of the frozen lake. The last one is my favorite, I like the color palette and the way I can capture my shadow, just something about it makes me keep looking at it.
This is end of part 1. Thank you for making it here. Let’s check out the part 2! Cheers!


![mammoth lakes road trip [part 2]](https://filmsequence.com/wp-content/uploads/2021/01/mammoth-lake-28-1.jpg?w=1200)


![mammoth lakes road trip [part 1]](https://filmsequence.com/wp-content/uploads/2021/01/mammoth-lake-20.jpg?w=1200)